はじめに
この記事は機械学習のエッセンスのPythonによる数値計算の章の NumPyと PyPlotのコードをNxとVega Liteで書き換えてみた内容になります。
ライブラリインストール
以下LivebookのExportにちょこちょこコメントを追加した内容になります
最初にnxとkino_veta_liteをインストールします
Mix.install([
  {:nx, "~> 0.2"},
  {:kino_vega_lite, "~> 0.1.1"}
])
:ok
alias VegaLite, as: Vl
VegaLite
04-02 NumPyの基本
# np.exp(2)
Nx.exp(2)
#Nx.Tensor<
  f32
  7.389056205749512
>
# np.log(np.e)
Nx.exp(1) |> Nx.log()
#Nx.Tensor<
  f32
  0.9999999403953552
>
ここが問題です
Elixirの浮動小数点の問題なのかNx.sinが通常のsinと違うのかはわかりません
erlangの:mathモジュールを使えば正常な値になります
# np.sin(np.pi)

:math.pi() |> Nx.sin() |> IO.inspect()
:math.pi() |> :math.sin() |> Nx.tensor()
#Nx.Tensor<
  f32
  -8.742277657347586e-8
>
#Nx.Tensor<
  f32
  1.2246468525851679e-16
>
# np.sqrt(3)
Nx.sqrt(3)
#Nx.Tensor<
  f32
  1.7320507764816284
>
NumPyの配列
Elixirだと特定のインデックスの値を取り出すにはEnum.at等を使用しないといけないのですが、
Nxですと添字で値が取得できます
# a = np.array([2,3,5,7,8])
a = Nx.tensor([2, 3, 5, 7, 8]) |> IO.inspect()
a[0]
#Nx.Tensor<
  s64[5]
  [2, 3, 5, 7, 8]
>

#Nx.Tensor<
  s64
  2
>
Rangeでも取得できます
# a[1:3]
IO.inspect(a)
a[1..2]
#Nx.Tensor<
  s64[5]
  [2, 3, 5, 7, 8]
>

#Nx.Tensor<
  s64[2]
  [3, 5]
>
配列の最後を表すのはちょっと特殊で -1//1でアクセスします
以下は後ろから2番めです
# a[2:-1]
IO.inspect(a)
a[2..-2//1]
#Nx.Tensor<
  s64[5]
  [2, 3, 5, 7, 8]
>

#Nx.Tensor<
  s64[2]
  [5, 7]
>
Nx.iotaで指定した数の0からの行列を作成します
# b = np.arange(5)
b = Nx.iota({5})
#Nx.Tensor<
  s64[5]
  [0, 1, 2, 3, 4]
>
ここでまた問題です
Nxはnp.arangeの引数1から引数2まで第3引数刻みで配列を作成するに該当する関数がありません
ですが安心してください、iotaと他の関数を組み合わせてnp.arrangeと同等の値が得ることができます
# np.arange(1,3,0.2)
c = Nx.iota({10}) |> Nx.multiply(0.2) |> Nx.add(1) |> IO.inspect()
#Nx.Tensor<
  f32[10]
  [1.0, 1.2000000476837158, 1.399999976158142, 1.600000023841858, 1.7999999523162842, 2.0, 2.200000047683716, 2.4000000953674316, 2.5999999046325684, 2.8000001907348633]
>
関数化するとこんな感じになります
arange = fn s, e, step ->
  Kernel.-(e, s)
  |> Kernel./(step)
  |> Kernel.trunc()
  |> then(&Nx.iota({&1}))
  |> Nx.multiply(step)
  |> Nx.add(s)
end

arange.(1, 3, 0.2)
#Nx.Tensor<
  f32[10]
  [1.0, 1.2000000476837158, 1.399999976158142, 1.600000023841858, 1.7999999523162842, 2.0, 2.200000047683716, 2.4000000953674316, 2.5999999046325684, 2.8000001907348633]
>
type関数はテンソルのデータ型を表します
この場合は signed float 64になります
Nx.type(a)
{:s, 64}
データタイプは作成時に指定することもできます
Nx.tensor([1, 2, 4], type: :s64)
#Nx.Tensor<
  s64[3]
  [1, 2, 4]
>
2次元配列
作成方法はnumpyとかわりありません
# a = np.array([[2, 3, 4], [5 ,6, 7]], dtype=np.float64)
a = Nx.tensor([[2, 3, 4], [5, 6, 7]])
#Nx.Tensor<
  s64[2][3]
  [
    [2, 3, 4],
    [5, 6, 7]
  ]
>
数値に対するアクセスは、他言語(Ruby,JS)でよくある多重配列へのアクセスと同じです
# a[0, 1]
IO.inspect(a)
a[0][1]
#Nx.Tensor<
  s64[2][3]
  [
    [2, 3, 4],
    [5, 6, 7]
  ]
>
#Nx.Tensor<
  s64
  3
>
縦方向で値を取得するときは、numpyに近い書き方になります
# a[:, 1]
IO.inspect(a)
a[[0..-1//1, 1]]
#Nx.Tensor<
  s64[2][3]
  [
    [2, 3, 4],
    [5, 6, 7]
  ]
>
#Nx.Tensor<
  s64[2]
  [3, 6]
>
横方向を取得するのはシンプルにできます
# a[1, :]
IO.inspect(a)
a[1]
#Nx.Tensor<
  s64[2][3]
  [
    [2, 3, 4],
    [5, 6, 7]
  ]
>
#Nx.Tensor<
  s64[3]
  [5, 6, 7]
>
横方向のn番目の2~最後こんな感じ
# a[0, 2:]
IO.inspect(a)
a[0][2..-1//1]
#Nx.Tensor<
  s64[2][3]
  [
    [2, 3, 4],
    [5, 6, 7]
  ]
>
#Nx.Tensor<
  s64[1]
  [4]
>
# a[0, :2]
IO.inspect(a)
a[0][0..1]
#Nx.Tensor<
  s64[2][3]
  [
    [2, 3, 4],
    [5, 6, 7]
  ]
>
#Nx.Tensor<
  s64[2]
  [2, 3]
>
配列のデータ属性
iotaで生成したテンソルにreshapeを実行して変形します
# a = np.arange(15.).reshape(3, 5)
a = Nx.iota({15}) |> Nx.reshape({3, 5})
#Nx.Tensor<
  s64[3][5]
  [
    [0, 1, 2, 3, 4],
    [5, 6, 7, 8, 9],
    [10, 11, 12, 13, 14]
  ]
>
shapeは行列の形を返します
# a.shape
Nx.shape(a)
{3, 5}
rankは行列の深さを返します
# a.ndim
Nx.rank(a)
2
sizeは要素数を返します
# a.size
Nx.size(a)
15
reshapeメソッドと形状の変更
# a = np.arange(16.)
# c = a.reshape(4, -1)
a = Nx.iota({16}) |> IO.inspect()
c = Nx.reshape(a, {4, 4})
#Nx.Tensor<
  s64[16]
  [0, 1, 2, 3, 4, 5, 6, 7, 8, 9, 10, 11, 12, 13, 14, 15]
>
#Nx.Tensor<
  s64[4][4]
  [
    [0, 1, 2, 3],
    [4, 5, 6, 7],
    [8, 9, 10, 11],
    [12, 13, 14, 15]
  ]
>
# c.ravel()
IO.inspect(c)
Nx.flatten(c)
#Nx.Tensor<
  s64[4][4]
  [
    [0, 1, 2, 3],
    [4, 5, 6, 7],
    [8, 9, 10, 11],
    [12, 13, 14, 15]
  ]
>
#Nx.Tensor<
  s64[16]
  [0, 1, 2, 3, 4, 5, 6, 7, 8, 9, 10, 11, 12, 13, 14, 15]
>
縦方向に変換
# b = np.arange(4.)
b = Nx.iota({4}) |> IO.inspect()
Nx.reshape(b, {4, 1}) |> IO.inspect()
#Nx.Tensor<
  s64[4]
  [0, 1, 2, 3]
>
#Nx.Tensor<
  s64[4][1]
  [
    [0],
    [1],
    [2],
    [3]
  ]
>
その他の配列操作
Nxにはnp.zerosに該当する関数がないので
random_normalで形状と初期値と偏差を 0.0にして作成しています
# a = np.zeros((3,4))
Nx.random_normal({3, 4}, 0.0, 0.0)
#Nx.Tensor<
  f32[3][4]
  [
    [0.0, 0.0, 0.0, 0.0],
    [0.0, 0.0, 0.0, 0.0],
    [0.0, 0.0, 0.0, 0.0]
  ]
>
np.onesも同様
# b = np.ones((2,2))
Nx.random_normal({2, 2}, 1.0, 0.0)
#Nx.Tensor<
  f32[2][2]
  [
    [1.0, 1.0],
    [1.0, 1.0]
  ]
>
行列の連結
a = Nx.iota({2, 3}) |> IO.inspect
b = Nx.iota({2, 3})|> Nx.add(6)
#Nx.Tensor<
  s64[2][3]
  [
    [0, 1, 2],
    [3, 4, 5]
  ]
>

#Nx.Tensor<
  s64[2][3]
  [
    [6, 7, 8],
    [9, 10, 11]
  ]
>
# 縦方向に連結
# np.r_[a, b]
IO.inspect(a)
IO.inspect(b)
Nx.concatenate([a, b])
#Nx.Tensor<
  s64[2][3]
  [
    [0, 1, 2],
    [3, 4, 5]
  ]
>
#Nx.Tensor<
  s64[2][3]
  [
    [6, 7, 8],
    [9, 10, 11]
  ]
>
#Nx.Tensor<
  s64[4][3]
  [
    [0, 1, 2],
    [3, 4, 5],
    [6, 7, 8],
    [9, 10, 11]
  ]
>
# 横方向に連結
# np._c(a,b)
IO.inspect(a)
IO.inspect(b)
Nx.concatenate([a, b], axis: 1)
#Nx.Tensor<
  s64[2][3]
  [
    [0, 1, 2],
    [3, 4, 5]
  ]
>
#Nx.Tensor<
  s64[2][3]
  [
    [6, 7, 8],
    [9, 10, 11]
  ]
>
#Nx.Tensor<
  s64[2][6]
  [
    [0, 1, 2, 6, 7, 8],
    [3, 4, 5, 9, 10, 11]
  ]
>
c = Nx.iota({3}) |> IO.inspect()
d = Nx.iota({3}) |> Nx.add(3)
#Nx.Tensor<
  s64[3]
  [0, 1, 2]
>
#Nx.Tensor<
  s64[3]
  [3, 4, 5]
>
IO.inspect(c)
IO.inspect(d)
# np.r_[c,d]
Nx.concatenate([c, d]) |> IO.inspect()

# np.c_[c,d]
Nx.concatenate(
  [
    Nx.reshape(c, {4,1}),
    Nx.reshape(d,{4,1})
  ],
  axis: 1
)
#Nx.Tensor<
  s64[3]
  [0, 1, 2]
>
#Nx.Tensor<
  s64[3]
  [3, 4, 5]
>
#Nx.Tensor<
  s64[6]
  [0, 1, 2, 3, 4, 5]
>
#Nx.Tensor<
  s64[3][2]
  [
    [0, 3],
    [1, 4],
    [2, 5]
  ]
>
# 形状が違うものを連結
# numpyではエラー
IO.inspect(a)
IO.inspect(c)
Nx.concatenate([a, c])
#Nx.Tensor<
  s64[2][3]
  [
    [0, 1, 2],
    [3, 4, 5]
  ]
>
#Nx.Tensor<
  s64[3]
  [0, 1, 2]
>
#Nx.Tensor<
  s64[5]
  [0, 1, 2, 3, 4]
>
new_axisで軸を足すか reshape(c, {1,3})を実行して合わせれば正常に連結できます
c = Nx.new_axis(c, 0) |> IO.inspect()
Nx.concatenate([a, c])
#Nx.Tensor<
  s64[1][3]
  [
    [0, 1, 2]
  ]
>
#Nx.Tensor<
  s64[3][3]
  [
    [0, 1, 2],
    [3, 4, 5],
    [0, 1, 2]
  ]
>
04-03 配列操作の基本
a = Nx.iota({5})
#Nx.Tensor<
  s64[5]
  [0, 1, 2, 3, 4]
>
合計
Nx.sum(a)
#Nx.Tensor<
  s64
  10
>
平均
Nx.mean(a)
#Nx.Tensor<
  f32
  2.0
>
最大値
Nx.reduce_max(a)
#Nx.Tensor<
  s64
  4
>
最小値
Nx.reduce_min(a)
#Nx.Tensor<
  s64
  0
>
2次元配列の合計
b = Nx.iota({3, 3})
#Nx.Tensor<
  s64[3][3]
  [
    [0, 1, 2],
    [3, 4, 5],
    [6, 7, 8]
  ]
>
Nx.sum(b)
#Nx.Tensor<
  s64
  36
>
縦軸で合計
IO.inspect(b)
Nx.sum(b, axes: [0])
#Nx.Tensor<
  s64[3][3]
  [
    [0, 1, 2],
    [3, 4, 5],
    [6, 7, 8]
  ]
>
#Nx.Tensor<
  s64[3]
  [9, 12, 15]
>
横軸で合計
IO.inspect(b)
Nx.sum(b, axes: [1])
#Nx.Tensor<
  s64[3][3]
  [
    [0, 1, 2],
    [3, 4, 5],
    [6, 7, 8]
  ]
>
#Nx.Tensor<
  s64[3]
  [3, 12, 21]
>
ブロードキャスト
a = Nx.iota({5}) |> Nx.add(3)
#Nx.Tensor<
  s64[5]
  [3, 4, 5, 6, 7]
>
Nx.exp(a)
#Nx.Tensor<
  f32[5]
  [20.08553695678711, 54.598148345947266, 148.4131622314453, 403.4288024902344, 1096.6331787109375]
>
Nx.log(a)
#Nx.Tensor<
  f32[5]
  [1.0986123085021973, 1.3862943649291992, 1.6094379425048828, 1.7917594909667969, 1.945910096168518]
>
Nx.sqrt(a)
#Nx.Tensor<
  f32[5]
  [1.7320507764816284, 2.0, 2.2360680103302, 2.4494898319244385, 2.6457512378692627]
>
b = Nx.iota({3, 3})
#Nx.Tensor<
  s64[3][3]
  [
    [0, 1, 2],
    [3, 4, 5],
    [6, 7, 8]
  ]
>
Nx.exp(b)
#Nx.Tensor<
  f32[3][3]
  [
    [1.0, 2.7182817459106445, 7.389056205749512],
    [20.08553695678711, 54.598148345947266, 148.4131622314453],
    [403.4288024902344, 1096.6331787109375, 2980.9580078125]
  ]
>
配列とスカラの演算
a = Nx.iota({5})
#Nx.Tensor<
  s64[5]
  [0, 1, 2, 3, 4]
>
Nx.add(a, 3)
#Nx.Tensor<
  s64[5]
  [3, 4, 5, 6, 7]
>
Nx.multiply(a, 3)
#Nx.Tensor<
  s64[5]
  [0, 3, 6, 9, 12]
>
Nx.power(a, 2)
#Nx.Tensor<
  s64[5]
  [0, 1, 4, 9, 16]
>
# 2以上の値を1 未満を0
IO.inspect(a)
Nx.greater_equal(a, 2)
#Nx.Tensor<
  s64[5]
  [0, 1, 2, 3, 4]
>
#Nx.Tensor<
  u8[5]
  [0, 0, 1, 1, 1]
>
# 一致するもののみ1
IO.inspect(a)
Nx.not_equal(a, 3)
#Nx.Tensor<
  s64[5]
  [0, 1, 2, 3, 4]
>
#Nx.Tensor<
  u8[5]
  [1, 1, 1, 0, 1]
>
b = Nx.iota({3, 3})
IO.inspect(b)
Nx.greater(b, 3)
#Nx.Tensor<
  s64[3][3]
  [
    [0, 1, 2],
    [3, 4, 5],
    [6, 7, 8]
  ]
>
#Nx.Tensor<
  u8[3][3]
  [
    [0, 0, 0],
    [0, 1, 1],
    [1, 1, 1]
  ]
>
ブール値を要素として持つ配列の演算はNxにないというかT/Fがないので一度リストにして無理やりやるしかなさそうだった
ブール値を要素として持つ配列の演算
# a = np.array([10, 20, 30, 40])
# b = np.array([False, True, True, False])
# a[b]
# array([20, 30])
a = Nx.tensor([10, 20, 30, 40])
b = Nx.tensor([0, 1, 1, 0])
Nx.multiply(a, b) |> Nx.to_flat_list() |> Enum.reject(&(&1 == 0)) |> Nx.tensor()
#Nx.Tensor<
  s64[2]
  [20, 30]
>
配列の演算
u = Nx.iota({4})
#Nx.Tensor<
  s64[4]
  [0, 1, 2, 3]
>
v = Nx.iota({4}) |> Nx.add(3)
#Nx.Tensor<
  s64[4]
  [3, 4, 5, 6]
>
IO.inspect(u)
IO.inspect(v)
Nx.add(u, v)
#Nx.Tensor<
  s64[4]
  [0, 1, 2, 3]
>
#Nx.Tensor<
  s64[4]
  [3, 4, 5, 6]
>
#Nx.Tensor<
  s64[4]
  [3, 5, 7, 9]
>
IO.inspect(u)
IO.inspect(v)

Nx.subtract(u, v)
#Nx.Tensor<
  s64[4]
  [0, 1, 2, 3]
>
#Nx.Tensor<
  s64[4]
  [3, 4, 5, 6]
>
#Nx.Tensor<
  s64[4]
  [-3, -3, -3, -3]
>
IO.inspect(u)
IO.inspect(v)

Nx.multiply(u, v)
#Nx.Tensor<
  s64[4]
  [0, 1, 2, 3]
>
#Nx.Tensor<
  s64[4]
  [3, 4, 5, 6]
>
#Nx.Tensor<
  s64[4]
  [0, 4, 10, 18]
>
# ベクトルの内積
IO.inspect(u)
IO.inspect(v)

Nx.dot(u, v)
#Nx.Tensor<
  s64[4]
  [0, 1, 2, 3]
>
#Nx.Tensor<
  s64[4]
  [3, 4, 5, 6]
>
#Nx.Tensor<
  s64
  32
>
2次元配列の演算
a = Nx.iota({3, 3})
b = Nx.iota({3, 3}) |> Nx.add(4)
足し算
IO.inspect(a)
IO.inspect(b)
Nx.add(a, b)
#Nx.Tensor<
  s64[3][3]
  [
    [0, 1, 2],
    [3, 4, 5],
    [6, 7, 8]
  ]
>
#Nx.Tensor<
  s64[3][3]
  [
    [4, 5, 6],
    [7, 8, 9],
    [10, 11, 12]
  ]
>
#Nx.Tensor<
  s64[3][3]
  [
    [4, 6, 8],
    [10, 12, 14],
    [16, 18, 20]
  ]
>
引き算
IO.inspect(a)
IO.inspect(b)

Nx.subtract(a, b)
#Nx.Tensor<
  s64[3][3]
  [
    [0, 1, 2],
    [3, 4, 5],
    [6, 7, 8]
  ]
>
#Nx.Tensor<
  s64[3][3]
  [
    [4, 5, 6],
    [7, 8, 9],
    [10, 11, 12]
  ]
>
#Nx.Tensor<
  s64[3][3]
  [
    [-4, -4, -4],
    [-4, -4, -4],
    [-4, -4, -4]
  ]
>
掛け算
IO.inspect(a)
IO.inspect(b)

Nx.multiply(a, b)
#Nx.Tensor<
  s64[3][3]
  [
    [0, 1, 2],
    [3, 4, 5],
    [6, 7, 8]
  ]
>
#Nx.Tensor<
  s64[3][3]
  [
    [4, 5, 6],
    [7, 8, 9],
    [10, 11, 12]
  ]
>
#Nx.Tensor<
  s64[3][3]
  [
    [0, 5, 12],
    [21, 32, 45],
    [60, 77, 96]
  ]
>
割り算
IO.inspect(a)
IO.inspect(b)

Nx.divide(a, b)
#Nx.Tensor<
  s64[3][3]
  [
    [0, 1, 2],
    [3, 4, 5],
    [6, 7, 8]
  ]
>
#Nx.Tensor<
  s64[3][3]
  [
    [4, 5, 6],
    [7, 8, 9],
    [10, 11, 12]
  ]
>
#Nx.Tensor<
  f32[3][3]
  [
    [0.0, 0.20000000298023224, 0.3333333432674408],
    [0.4285714328289032, 0.5, 0.5555555820465088],
    [0.6000000238418579, 0.6363636255264282, 0.6666666865348816]
  ]
>
内積
IO.inspect(a)
IO.inspect(b)

Nx.dot(a, b)
#Nx.Tensor<
  s64[3][3]
  [
    [0, 1, 2],
    [3, 4, 5],
    [6, 7, 8]
  ]
>
#Nx.Tensor<
  s64[3][3]
  [
    [4, 5, 6],
    [7, 8, 9],
    [10, 11, 12]
  ]
>
#Nx.Tensor<
  s64[3][3]
  [
    [27, 30, 33],
    [90, 102, 114],
    [153, 174, 195]
  ]
>
形状の違う行列の積
a = Nx.iota({3, 3})
v = Nx.iota({3}) |> Nx.add(1)
IO.inspect(a)
IO.inspect(v)

Nx.dot(a, v)
#Nx.Tensor<
  s64[3][3]
  [
    [0, 1, 2],
    [3, 4, 5],
    [6, 7, 8]
  ]
>
#Nx.Tensor<
  s64[3]
  [1, 2, 3]
>
#Nx.Tensor<
  s64[3]
  [8, 26, 44]
>
IO.inspect(v)
IO.inspect(a)

Nx.dot(v, a)
#Nx.Tensor<
  s64[3]
  [1, 2, 3]
>

#Nx.Tensor<
  s64[3][3]
  [
    [0, 1, 2],
    [3, 4, 5],
    [6, 7, 8]
  ]
>
#Nx.Tensor<
  s64[3]
  [24, 30, 36]
>
u = Nx.new_axis(v, 0) |> Nx.transpose()
IO.inspect(a)
IO.inspect(u)
Nx.dot(a, u)
#Nx.Tensor<
  s64[3][3]
  [
    [0, 1, 2],
    [3, 4, 5],
    [6, 7, 8]
  ]
>
#Nx.Tensor<
  s64[3][1]
  [
    [1],
    [2],
    [3]
  ]
>
#Nx.Tensor<
  s64[3][1]
  [
    [8],
    [26],
    [44]
  ]
>
# error
Nx.dot(u, a)
w = Nx.new_axis(v, 0)
#Nx.Tensor<
  s64[1][3]
  [
    [1, 2, 3]
  ]
>
IO.inspect(w)
IO.inspect(a)

Nx.dot(w, a)
#Nx.Tensor<
  s64[1][3]
  [
    [1, 2, 3]
  ]
>
#Nx.Tensor<
  s64[3][3]
  [
    [0, 1, 2],
    [3, 4, 5],
    [6, 7, 8]
  ]
>
#Nx.Tensor<
  s64[1][3]
  [
    [24, 30, 36]
  ]
>
04-04疎行列
該当する関数なし
04-05 Numpy/SciPyによる線形代数
Nxには線形代数関連のLinAlgモジュールがあるので興味がある方はhexdocを覗いてみてください
逆行列を求める
a = Nx.tensor([[3, 1, 1], [1, 2, 1], [0, -1, 1]])
Nx.LinAlg.invert(a)
#Nx.Tensor<
  f32[3][3]
  [
    [0.4285714328289032, -0.2857142686843872, -0.1428571343421936],
    [-0.1428571343421936, 0.4285714328289032, -0.2857142686843872],
    [-0.1428571343421936, 0.4285714030265808, 0.714285671710968]
  ]
>
slove関数を使う
a = Nx.tensor([[3, 1, 1], [1, 2, 1], [0, -1, 1]])
b = Nx.tensor([1, 2, 3])
Nx.LinAlg.solve(a, b)
#Nx.Tensor<
  f32[3]
  [-0.5714285373687744, -0.14285710453987122, 2.857142686843872]
>
LU分解により連立方程式を解く
a = Nx.tensor([[3, 1, 1], [1, 2, 1], [0, -1, 1]])
b = Nx.tensor([1, 2, 3])
{_p, l, u} = Nx.LinAlg.lu(a)
Nx.dot(l, u) |> Nx.LinAlg.solve(b)
#Nx.Tensor<
  f32[3]
  [-0.5714285969734192, -0.1428571492433548, 2.857142925262451]
>
04-06 乱数
numpy.randomモジュールを使う
Nxにrandom_normalとは別に randorm_uniformがあります
こちらは第2引数から第3引数までの間の値をランダムに返します
マイナスの範囲にしたい場合は第2引数をマイナス値にすれば大丈夫です
Nx.random_uniform({1}, 0.0, 1.0)
#Nx.Tensor<
  f32[1]
  [0.20401528477668762]
>
Nx.random_uniform({3, 2}, 0.0, 1.0)
#Nx.Tensor<
  f32[3][2]
  [
    [0.20480242371559143, 0.5718821287155151],
    [0.7167996168136597, 0.3234789967536926],
    [0.8850403428077698, 0.806730329990387]
  ]
>
整数のランダム値が欲しい場合は上限値を整数にすればいけます
Nx.random_uniform({1}, 0, 4)
#Nx.Tensor<
  s64[1]
  [3]
>
Nx.random_uniform({3, 3}, 0, 5)
#Nx.Tensor<
  s64[3][3]
  [
    [0, 2, 1],
    [3, 0, 2],
    [2, 4, 3]
  ]
>
乱数の種を指定する
Nxにはseedを指定する関数はなさそうでした
04-07 データの可視化
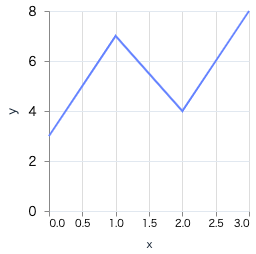
折れ線グラフ
Vega Liteの値はNxは対応していないのでリストで渡す必要があります
x = [0, 1, 2, 3]
y = [3, 7, 4, 8]

Vl.new(width: 200, height: 200)
|> Vl.data_from_values(x: x, y: y)
|> Vl.mark(:line)
|> Vl.encode_field(:x, "x", type: :quantitative)
|> Vl.encode_field(:y, "y", type: :quantitative)
散布図
線ではなく点で描画したい場合はmarkを':point'にしてください
x = [0, 1, 2, 3]
y = [3, 7, 4, 8]

Vl.new(width: 200, height: 200)
|> Vl.data_from_values(x: x, y: y)
|> Vl.mark(:point)
|> Vl.encode_field(:x, "x", type: :quantitative)
|> Vl.encode_field(:y, "y", type: :quantitative)
曲線のグラフ
階差数列(linspace)がないので値から逆算してiotaで作ります
べき乗はpowerになります
# np.linspace(-5, 5, 300)
x = Nx.iota({1, 300}) |> Nx.multiply(10 / 300) |> Nx.subtract(5) |> IO.inspect()
y = Nx.power(x, 2) |> IO.inspect()

Vl.new(width: 200, height: 200)
|> Vl.data_from_values(x: Nx.to_flat_list(x), y: Nx.to_flat_list(y))
|> Vl.mark(:line)
|> Vl.encode_field(:x, "x", type: :quantitative)
|> Vl.encode_field(:y, "y", type: :quantitative)
#Nx.Tensor<
  f32[1][300]
  [
    [-5.0, -4.9666666984558105, -4.933333396911621, -4.900000095367432, -4.866666793823242, -4.833333492279053, -4.800000190734863, -4.766666412353516, -4.733333110809326, -4.699999809265137, -4.666666507720947, -4.633333206176758, -4.599999904632568, -4.566666603088379, -4.5333333015441895, -4.5, -4.4666666984558105, -4.433333396911621, -4.400000095367432, -4.366666793823242, -4.333333492279053, -4.300000190734863, -4.266666412353516, -4.233333110809326, -4.199999809265137, -4.166666507720947, -4.133333206176758, -4.099999904632568, -4.066666603088379, -4.0333333015441895, -4.0, -3.9666666984558105, -3.933333396911621, -3.9000000953674316, -3.866666555404663, -3.8333332538604736, -3.799999952316284, -3.7666666507720947, -3.733333110809326, -3.6999998092651367, -3.6666665077209473, -3.633333206176758, -3.5999999046325684, -3.566666603088379, -3.5333333015441895, -3.5, -3.4666666984558105, -3.433333396911621, -3.3999998569488525, -3.366666555404663, ...]
  ]
>
#Nx.Tensor<
  f32[1][300]
  [
    [25.0, 24.66777801513672, 24.337778091430664, 24.010000228881836, 23.684446334838867, 23.361112594604492, 23.040000915527344, 22.72110939025879, 22.404441833496094, 22.089998245239258, 21.77777671813965, 21.467777252197266, 21.15999984741211, 20.85444450378418, 20.551111221313477, 20.25, 19.95111083984375, 19.65444564819336, 19.360000610351562, 19.067779541015625, 18.77777862548828, 18.490001678466797, 18.204442977905273, 17.921110153198242, 17.639997482299805, 17.36111068725586, 17.084444046020508, 16.809999465942383, 16.537776947021484, 16.267778396606445, 16.0, 15.734444618225098, 15.471111297607422, 15.210000991821289, 14.951109886169434, 14.694443702697754, 14.4399995803833, 14.187777519226074, 13.937776565551758, 13.689998626708984, 13.444443702697754, 13.201109886169434, 12.959999084472656, 12.721110343933105, 12.484444618225098, 12.25, 12.017778396606445, 11.7877779006958, 11.559999465942383, 11.334444046020508, ...]
  ]
>
複数の線を表示する
複数の線を1つのグラフに描画する場合は layersを使用してください
線の色や形状を変えたい場合も markにオプションを追加していってください
# np.linspace(-5, 5, 300)
x = Nx.iota({1, 300}) |> Nx.multiply(10 / 300) |> Nx.subtract(5)
y1 = Nx.power(x, 2) |> Nx.to_flat_list()
y2 = Nx.subtract(x, 2) |> Nx.power(2) |> Nx.to_flat_list()

Vl.new(width: 200, height: 200)
|> Vl.data_from_values(x: Nx.to_flat_list(x), y1: y1, y2: y2)
|> Vl.layers([
  Vl.new()
  |> Vl.mark(:line, color: :red)
  |> Vl.encode_field(:x, "x", type: :quantitative)
  |> Vl.encode_field(:y, "y1", type: :quantitative),
  Vl.new()
  |> Vl.mark(:line, color: :black, stroke_dash: [6, 4])
  |> Vl.encode_field(:x, "x", type: :quantitative)
  |> Vl.encode_field(:y, "y2", type: :quantitative)
])
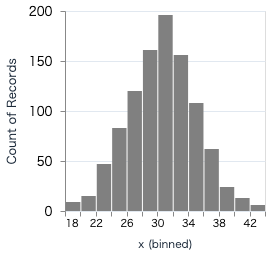
ヒストグラム
binsでx軸の上限を20にして
encode_fieldのaggregateで集計しています
# サイコロを10回振って目の合計を計算するを1000回行う
x =
  Nx.iota({1000})
  |> Nx.map(fn _i -> Nx.random_uniform({10}, 1, 6) |> Nx.sum() end)
  |> Nx.to_flat_list()

y = Nx.iota({1000}) |> Nx.to_flat_list()

Vl.new(width: 200, height: 200)
|> Vl.data_from_values(x: x, y: y)
|> Vl.mark(:bar, color: :gray)
|> Vl.encode_field(:x, "x", type: :quantitative, bin: %{maxbins: 20})
|> Vl.encode_field(:y, "y", type: :quantitative, aggregate: :count)
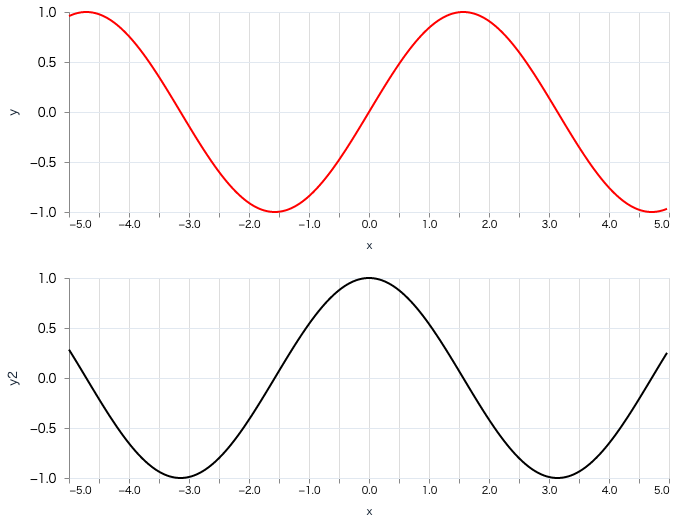
複数のグラフを並べて表示する
複数のグラフを並べて表示する場合はconcatになります
デフォルトは横方向で、:verticalを指定すると縦方向になります
# np.linspace(-5, 5, 300)
x = Nx.iota({1, 300}) |> Nx.multiply(10 / 300) |> Nx.subtract(5)
sin_x = Nx.sin(x) |> Nx.to_flat_list()
cos_x = Nx.cos(x) |> Nx.to_flat_list()

# 縦方向
Vl.new(width: 400, height: 200)
|> Vl.data_from_values(x: Nx.to_flat_list(x), y: sin_x, y2: cos_x)
|> Vl.transform(filter: %{field: "y", range: [-1.5, 1.5]})
|> Vl.transform(filter: %{field: "y2", range: [-1.5, 1.5]})
|> Vl.concat(
  [
    Vl.new(width: 600)
    |> Vl.mark(:line, color: :red)
    |> Vl.encode_field(:x, "x", type: :quantitative)
    |> Vl.encode_field(:y, "y", type: :quantitative),
    Vl.new(width: 600)
    |> Vl.mark(:line, color: :black)
    |> Vl.encode_field(:x, "x", type: :quantitative)
    |> Vl.encode_field(:y, "y2", type: :quantitative)
  ],
  :vertical
)
# np.linspace(-5, 5, 300)
x = Nx.iota({1, 300}) |> Nx.multiply(10 / 300) |> Nx.subtract(5)
sin_x = Nx.sin(x) |> Nx.to_flat_list()
cos_x = Nx.cos(x) |> Nx.to_flat_list()

# 横方向
Vl.new(width: 400, height: 200)
|> Vl.data_from_values(x: Nx.to_flat_list(x), y: sin_x, y2: cos_x)
|> Vl.transform(filter: %{field: "y", range: [-1.5, 1.5]})
|> Vl.transform(filter: %{field: "y2", range: [-1.5, 1.5]})
|> Vl.concat([
  Vl.new(width: 600)
  |> Vl.mark(:line, color: :red)
  |> Vl.encode_field(:x, "x", type: :quantitative)
  |> Vl.encode_field(:y, "y", type: :quantitative),
  Vl.new(width: 600)
  |> Vl.mark(:line, color: :black)
  |> Vl.encode_field(:x, "x", type: :quantitative)
  |> Vl.encode_field(:y, "y2", type: :quantitative)
])
最後に
書籍ではこのあとは実際に数値最適化や実際にモデルを実装しますが、一旦ここまでになります
ありがとうございました
参考サイト
https://www.sbcr.jp/product/4797393965/
https://hexdocs.pm/nx/Nx.html
https://hexdocs.pm/elixir/1.12/Kernel.html
https://hexdocs.pm/vega_lite/VegaLite.html
https://vega.github.io/vega-lite/examples/
https://vega.github.io/vega-lite/docs/
github


