はじめに
本記事はPhoenix LiveViewからHTMLではなく、
SwiftUIのレンダリングするLiveViewNativeFluterの解説と
実際にPhoenixプロジェクトを作成してiOSアプリでHello Worldを表示するところまでを解説します
LiveViewNativeについて
LiveViewNativeについては以下の記事に記載してあるので省略します
LiveViewNativeFlutterとは?
LiveViewNative SwiftUI,Jetpackとは違いDockyardではなくAlexさんという方が個人で開発しているLiveViewからFlutterのフロント側の処理を記述するライブラリになります

環境構築
Elixir,Phoenixの他にFlutterSDKのインストールが必要となります
大体以下のサイトで問題なくできるかと思います
Mac
本家
Zenn Book日本語
Windows Android
本家
Zenn Book
Linux Android
デモを動かす
以下に沿って行っていく
Phoenix Serverの構築
git clone git@github.com:alex-min/live_view_flutter_demo.git
mix setupを実行するとliveview_native_flutterのパスが間違ってるとなるのでgithubを参照するようにします
リポジトリを指定しても最新版が来なかったので最新のコミットハッシュで指定します
  defp deps do
    [
      {:phoenix, "~> 1.7.18"},
      ...
      {:live_view_native, "~> 0.4.0-rc.0"},
      {:live_view_native_stylesheet, "~> 0.3.2"},
      {:live_view_native_swiftui, "~> 0.4.0-rc.0"},
      {:live_view_native_live_form, "~> 0.4.0-rc.0"},
-     {:live_view_native_flutter, path: "../plugin"}
+     {:live_view_native_flutter,
+      github: "alex-min/live_view_native_flutter",
+      ref: "2328cb7566da5e35e01333e86c615f770ce3ddcc"}
    ]
  end
再度mix setupを実行するとliveview周りでエラーになるのでliveviewのバージョンを1.0.1で固定します
** (CaseClauseError) no case clause matching: :text
    (phoenix_live_view 1.0.4) lib/phoenix_live_view/tokenizer.ex:117: Phoenix.LiveView.Tokenizer.tokenize/5
    lib/live_view_native/tag_engine.ex:33: LiveViewNative.TagEngine.handle_text/3
    (eex 1.17.2) lib/eex/compiler.ex:317: EEx.Compiler.generate_buffer/4
    expanding macro: LiveViewNative.Component.sigil_LVN/2
    lib/live_view_native/component.ex:315: LiveViewNative.Component.csrf_token/1
could not compile dependency :live_view_native, "mix compile" failed. Errors may have been logged above. You can recompile this dependency with "mix deps.compile live_view_native --force", update it with "mix deps.update live_view_native" or clean it with "mix deps.clean live_view_native"
mix setupが完了したなら以下のコマンドでサーバーを起動します
mix phx.server
Flutterアプリの起動
以下のコマンドでサンプルを取得します
git clone git@github.com:alex-min/live_view_native_flutter_client.git
完了したらexampleまで移動して
cd live_view_native_flutter_client/example
以下のコマンドでアプリが立ち上がります
flutter run
レイアウトが壊れているので横に倒します
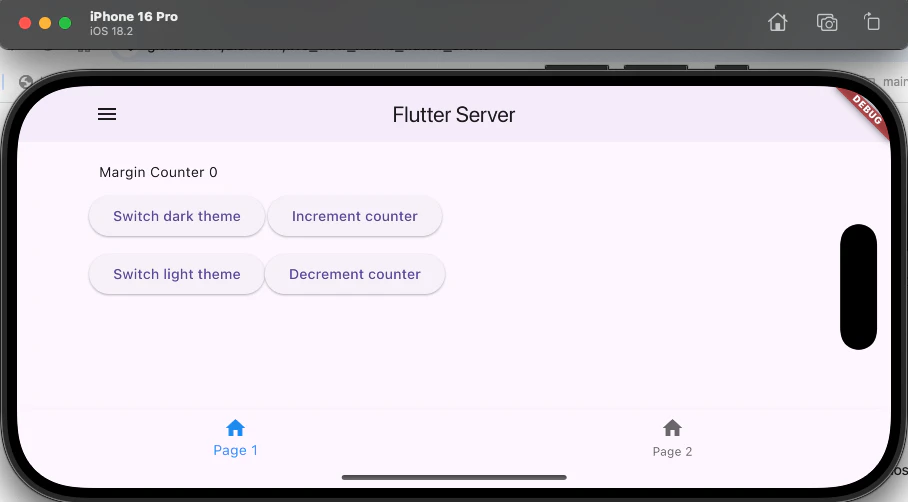
無事デモが動きました
自分で作ってみる
Phoenix Server
プロジェクト作成
mix phx.new my_flutter --no-ecto
ライブラリの追加
必要なライブラリとバージョンの固定を行います
  defp deps do
    [
      {:phoenix, "~> 1.7.18"},
      {:phoenix_html, "~> 4.1"},
      {:phoenix_live_reload, "~> 1.2", only: :dev},
-     {:phoenix_live_view, "~> 1.0.0"},
+     {:phoenix_live_view, "1.0.1"},
      {:floki, ">= 0.30.0", only: :test},
      {:phoenix_live_dashboard, "~> 0.8.3"},
      {:esbuild, "~> 0.8", runtime: Mix.env() == :dev},
      {:tailwind, "~> 0.2", runtime: Mix.env() == :dev},
      {:heroicons,
       github: "tailwindlabs/heroicons",
       tag: "v2.1.1",
       sparse: "optimized",
       app: false,
       compile: false,
       depth: 1},
      {:swoosh, "~> 1.5"},
      {:finch, "~> 0.13"},
      {:telemetry_metrics, "~> 1.0"},
      {:telemetry_poller, "~> 1.0"},
      {:gettext, "~> 0.26"},
      {:jason, "~> 1.2"},
      {:dns_cluster, "~> 0.1.1"},
-     {:bandit, "~> 1.5"}
+     {:bandit, "~> 1.5"},
+     {:live_view_native, "~> 0.4.0-rc.0"},
+     {:live_view_native_stylesheet, "~> 0.3.2"},
+     {:live_view_native_swiftui, "~> 0.4.0-rc.0"},
+     {:live_view_native_live_form, "~> 0.4.0-rc.0"},
+     {:live_view_native_flutter,
+      github: "alex-min/live_view_native_flutter",
+      ref: "2328cb7566da5e35e01333e86c615f770ce3ddcc"}
    ]
  end
mix deps.get
セットアップ
mix lvn.setup.config
mix lvn.setup.gen
rm -rf native
LiveViewページの作成
実際に表示するliveviewのページを作っていきます
通常のLiveViewとLiveViewNativeFlutterを切り替える起点のhome_live.exを作成します
ついでに render関数を追加して通常のブラウザでも表示できるようにします
defmodule MyFlutterWeb.HomeLive do
use MyFlutterWeb, :live_view
use MyFlutterNative, :live_view
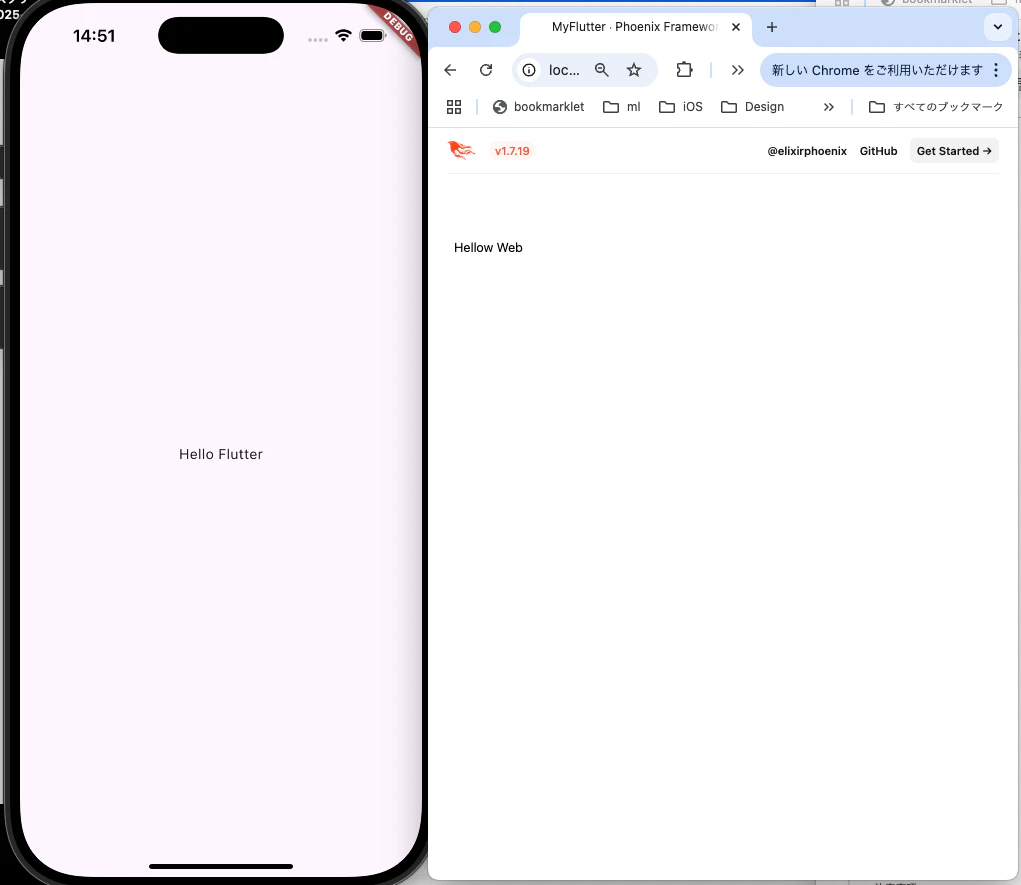
def render(assigns) do
~H"""
<h1>Hellow Web</h1>
"""
end
end
LiveViewNativeページの作成
flutterでのアクセスの場合はこちらが表示されます
実装済みコンポーネントの一覧はこちら
Expandedが本家のContainerのオプション的な扱いから独立コンポーネントとして使うみたいなのでちょっとハマった
defmodule MyFlutterWeb.HomeLive.Flutter do
  use MyFlutterNative, [:render_component, format: :flutter]

  def render(assigns) do
    ~LVN"""
    <Expanded>
      <Center>
        <Text>Hello Flutter</Text>
      </Center>
    </Expanded>
    """
  end
end
routerへの追加
routerへは、home_liveだけを表示するだけでアーキテクチャごとに表示するliveviewを切り替えてくれます
  scope "/", MyFlutterWeb do
    pipe_through :browser

-   get "/", PageController, :home
+   live "/", HomeLive
  end
Flutter
Flutterのでもアプリはライブラリ読み込んでlocalhostを表示する処理のみなのでデモと同じく以下のコマンドで実行します
flutter run
作ってみる
flutter create my_flutter_app
ライブラリの追加
dependencies:
  flutter:
    sdk: flutter

  # The following adds the Cupertino Icons font to your application.
  # Use with the CupertinoIcons class for iOS style icons.
  cupertino_icons: ^1.0.8
+ liveview_flutter:
+   git:
+     url: git@github.com:alex-min/live_view_native_flutter_client.git
+     ref: master
以下のコマンドで取得します
flutter pub get
main.dartを次のように書き換えます
import 'dart:io';

import 'package:flutter/foundation.dart';
import 'package:flutter/material.dart';
import 'package:liveview_flutter/liveview_flutter.dart';

void main() {
  WidgetsFlutterBinding.ensureInitialized();
  runApp(const MyApp());
}

class MyApp extends StatefulWidget {
  const MyApp({super.key});

  @override
  State<MyApp> createState() => _MyAppState();
}

class _MyAppState extends State<MyApp> {
  final LiveView view = LiveView();

  @override
  initState() {
    Future.microtask(boot);
    super.initState();
  }

  void boot() async {
    if (kIsWeb) {
      view.connectToDocs();
      return;
    }

    await view.connect(
      Platform.isAndroid
          ?
          // android emulator
          'http://10.0.2.2:4000'
          // computer
          : 'http://localhost:4000/',
    );
  }

  // This widget is the root of your application.
  @override
  Widget build(BuildContext context) {
    return view.rootView;
  }
}
保存したら以下を実行します
flutter run
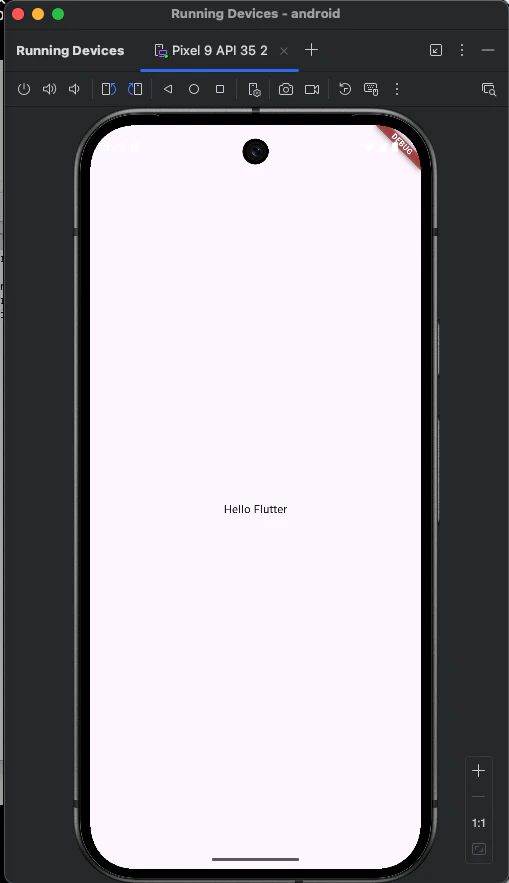
Androidで起動
iOS Simulatorを起動していると自動でそちらが起動しますが
Android Emulatorを同時に起動しているとどちらで起動しますかと聞かれるので
該当する番号を入力しましょう
sdk gphone64 arm64 (mobile)     • emulator-5554                        • android-arm64  • Android 15 (API 35) (emulator)
iPhone 16 Pro (mobile)          • 1C65BA1D-E1D5-4B98-8D57-0BEFFBF0C2C3 • ios            • com.apple.CoreSimulator.SimRuntime.iOS-18-2 (simulator)
起動時にエラーになった場合はgradleのバージョン違いであることが多いので以下のように変更することで起動できます
FAILURE: Build failed with an exception.

* Where:
Build file '/Users/shou/phoenix/elixir_mobile/my_flutter_app/android/app/build.gradle' line: 2

* What went wrong:
An exception occurred applying plugin request [id: 'com.android.application']
> Failed to apply plugin 'com.android.internal.version-check'.
   > Minimum supported Gradle version is 8.6. Current version is 8.4. If using the gradle wrapper, try editing the distributionUrl in /Users/shou/phoenix/elixir_mobile/my_flutter_app/android/gradle/wrapper/gradle-wrapper.properties to gradle-8.6-all.zip
distributionBase=GRADLE_USER_HOME
distributionPath=wrapper/dists
zipStoreBase=GRADLE_USER_HOME
zipStorePath=wrapper/dists
- distributionUrl=https\://services.gradle.org/distributions/gradle-8.3-all.zip
+ distributionUrl=https\://services.gradle.org/distributions/gradle-8.4-all.zip
plugins {
    id "dev.flutter.flutter-plugin-loader" version "1.0.0"
-   id "com.android.application" version "8.1.0" apply false
+   id "com.android.application" version "8.3.0" apply false
    id "org.jetbrains.kotlin.android" version "1.8.22" apply false
}
再度 flutter runを実行して無事起動できました
完成度
API等のカバー具合ですが基本的なコンポーネント、ナビゲーション、ホットリロード等は完成していて
phx-hookを使ったliveviewのようなJS(この場合はDart)Hook、アニメーション、ドキュメント、セッション周りはまだのようです
- Some basic components are partially supported (Container, TextButton, Icon, AppBar, BottomNavigationBar ...)
- Modern Flutter Navigation with router 2.0 (switch pages, transitions go back). Although transitions aren't customizable yet.
- Basic styling (padding, margin and background)
- Basic forms (validation & submit)
- Dynamic attributes & replacement
- Conditional component rendering
- Material Icons
- Server-side themes with JSON, also you can switch & save theme on the server side
- Live reloading
- Responsive navigation
- Basic Images support
- Live Components
- Confirm modals
- Plugins to add your own custom components
- Documentation
- A full API support of all the components
- Hooks similar as web hooks
- Animations
- Local storage
- Better Image support & Video
- Responsive navigation & desktop support (like windows title)
- Sessions & Session storage events
最後に
今回はLiveViewNativeFlutterのデモを動かし、実際に自分で作ってみるところまでやってみました
気になる方は以下もぜひ触ってみてください
LiveViewnative SwiftUI
LiveViewnative Jetpack
LiveViewnative Iced
本記事は以上になりますありがとうございました