はじめに
本記事はマルチプラットフォームアプリ開発を行うライブラリElixirDesktopで、
DBにSqlite3を使用してスタンドアローンで動作するスマホアプリを作る手順を紹介します
環境
M1 Mac 13.3
iOS 16.4
Phoenix 1.7
Elixirのインストール
基本的に上記のREADMEに沿って行います
brew install carthage git openssl@1.1 npm
export DED_LDFLAGS_CONFTEST="-bundle"
export KERL_CONFIGURE_OPTIONS="--without-javac --with-ssl=$(brew --prefix openssl@1.1)"
asdf install erlang 25.0.4
asdf install elixir 1.14.4-otp-25
インストール後はPhoenixをインストールします
mix archive.install hex phx_new
プロジェクトの作成
本棚アプリEbookWormerを作りますが、今回は単純なCRUDのみ行います
DBはsqlite3を使うので --database sqliteのオプションをつけます
また、PhoenixのプロジェクトとXcodeのプロジェクトの2つが必要なので、両方のプロジェクトをいれるディレクトリを作成します
mkdir ebookworm_project
cd ebookworm_project
mix phx.new ebookworm --database sqlite3
cd ebookworm
ライブラリの追加
以下の3つのライブラリを追加します
  defp deps do
    [
      ...
      {:exqlite, github: "elixir-desktop/exqlite", override: true},
      {:desktop, "~> 1.5"},
      {:wx, "~> 1.1", hex: :bridge, targets: [:android, :ios]}
    ]
  end
追加したらmix deps.getを実行しましょう
config修正
configファイルをElixirDesktopに合わせて変更します
※portの設定はバックグラウンドモードからの復帰時に必要
config :ebookworm, EbookwormWeb.Endpoint,
  # because of the iOS rebind - this is now a fixed port, but randomly selected
  http: [ip: {127, 0, 0, 1}, port: 10_000 + :rand.uniform(45_000)],
  render_errors: [
    formats: [html: EbookwormWeb.ErrorHTML, json: EbookwormWeb.ErrorJSON],
    layout: false
  ],
  pubsub_server: Ebookworm.PubSub,
  live_view: [signing_salt: "XYeoBJB0"],
  secret_key_base: :crypto.strong_rand_bytes(32),
  server: true
ebookworm/config/runtime.exsがあるとエラーになるのでruntime_disable.exsにリネームします
Endpoint設定
EndpointのモジュールをPhoenixからDesktopに変更します
ブラウザではないのでセッション管理をcookieから etsに変更します
defmodule EbookwormWeb.Endpoint do
  use Desktop.Endpoint, otp_app: :ebookworm

  @session_options [
    store: :ets,
    key: "_ebookworm_key",
    table: :session
  ]
アプリケーション起動時の設定
起動時のsuperviserの設定を行います
defmodule Ebookworm do
  use Application

  def config_dir() do
    Path.join([Desktop.OS.home(), ".config", "ebookworm"])
  end

  @app Mix.Project.config()[:app]
  def start(:normal, []) do
    # configフォルダを掘る
    File.mkdir_p!(config_dir())

    # DBの場所を指定
    Application.put_env(:ebookworm, Ebookworm.Repo,
      database: Path.join(config_dir(), "/database.sq3")
    )

    # session用のETSを起動
    :session = :ets.new(:session, [:named_table, :public, read_concurrency: true])

    children = [
      Ebookworm.Repo,
      {Phoenix.PubSub, name: Ebookworm.PubSub},
      EbookwormWeb.Endpoint
    ]

    opts = [strategy: :one_for_one, name: Ebookworm.Supervisor]
    # メインのsuperviser起動
    {:ok, sup} = Supervisor.start_link(children, opts)

    # DBのマイグレーション実行
    Ebookworm.Repo.initialize()

    # phoenixサーバーが起動中のポート番号を取得
    port = :ranch.get_port(EbookwormWeb.Endpoint.HTTP)
    # メインのsuperviserの配下にElixirDesktopのsuperviserを追加
    {:ok, _} =
      Supervisor.start_child(sup, {
        Desktop.Window,
        [
          app: @app,
          id: EbookwormWindow,
          title: "Ebookworm",
          size: {400, 800},
          url: "http://localhost:#{port}"
        ]
      })
  end

  def config_change(changed, _new, removed) do
    EbookwormWeb.Endpoint.config_change(changed, removed)
    :ok
  end
end
マイグレーション関連はまだなにもないですが関数だけ追加しておきます
defmodule Ebookworm.Repo do
  ...
  def initialize() do
  end
end
アプリケーション設定ファイルを差し替えます
  def application do
    [
-      mod: {Ebookworm.Application, []},
+      mod: {Ebookworm, []},
      extra_applications: [:logger, :runtime_tools]
    ]
  end
iOSでの起動
設定が完了しましたので一度ここで
phoenixのフォルダからプロジェクトのフォルダに移動し、iOSのサンプルアプリをcloneします
cd ..
git clone git@github.com:elixir-desktop/ios-example-app.git
cloneしたらswfiftのライブラリを追加します
cd ios-example-app && carthage update --use-xcframeworks
次にphoenixのビルドファイルを編集します
#!/bin/bash
set -e

# Setting up the PATH environment
[ -s /opt/homebrew/bin/brew ] && eval $(/opt/homebrew/bin/brew shellenv)
[ -s /usr/local/bin/brew ] && eval $(/usr/local/bin/brew shellenv)

# This loads nvm
export NVM_DIR="$HOME/.nvm"
[ -s "$NVM_DIR/nvm.sh" ] && \. "$NVM_DIR/nvm.sh"

# This loads asdf
if [ -s "$HOMEBREW_PREFIX/opt/asdf/libexec/asdf.sh" ]; then
  \. "$HOMEBREW_PREFIX/opt/asdf/libexec/asdf.sh"
elif [ -s "$HOME/.asdf/asdf.sh" ]; then
  \. "$HOME/.asdf/asdf.sh"
fi

BASE=`pwd`
export MIX_ENV=prod
export MIX_TARGET=ios

mix local.hex --force --if-missing
mix local.rebar --force --if-missing

- if [ ! -d "elixir-app" ]; then
-  git clone https://github.com/elixir-desktop/desktop-- example-app.git elixir-app
- fi

- # using the right runtime versions
- if [ ! -f "elixir/.tool-versions" ]; then
-   cp .tool-versions elixir-app/
- fi

- cd elixir-app
+ cd ../ebookworm

if [ ! -d "deps/desktop" ]; then
  mix deps.get
fi

- if [ ! -d "assets/node_modules" ]; then
-   cd assets && npm i && cd ..
- fi

if [ -f "$BASE/todoapp/app.zip" ]; then
  rm "$BASE/todoapp/app.zip"
fi

mix assets.deploy && \
  mix release --overwrite && \
-  cd _build/ios_prod/rel/todo_app && \
+  cd _build/ios_prod/rel/ebookworm && \
  zip -9r "$BASE/todoapp/app.zip" lib/ releases/ --exclude "*.so"
書き換えが終わったらxcodeを開きます
open todoapp.xcodeproj
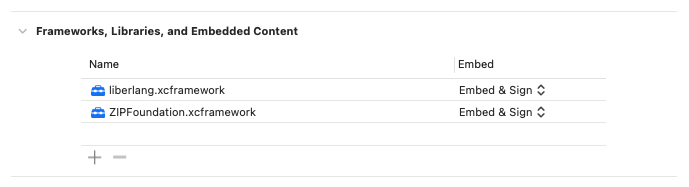
プロジェクト設定からライブラリのliberlangをEmbed & Signに変更します
完了したらxcodeのstartボタンを押します
ビルドが失敗した場合は ./run_mix でビルドスクリプト単体で実行してエラーメッセージを見ましょう
CRUD作成
いつものコマンドでCRUD画面を作ります
mix phx.gen.live Shelves Shelf shelves name:string
特に認証はしないのでそのまま貼り付けます
  scope "/", EbookwormWeb do
    pipe_through :browser

    get "/", PageController, :home
    # 以下追加
    live "/shelves", ShelfLive.Index, :index
    live "/shelves/new", ShelfLive.Index, :new
    live "/shelves/:id/edit", ShelfLive.Index, :edit

    live "/shelves/:id", ShelfLive.Show, :show
    live "/shelves/:id/show/edit", ShelfLive.Show, :edit
  end
Migration周り
ここからが本記事の本番です
ElixirDesktopでは端末ごとにmix ecto.migrateなんてことはできないので起動時にmigrationをするようにします
ebookworm/priv/repo/migrationsフォルダを
ebookworm/lib/ebookwormにコピーします
コピー後は xxxx_create_shelves.exsをxxxx_create_shelves.exにリネームします
名前衝突を防ぐためにモジュール名をリネームします
- defmodule Ebookworm.Repo.Migrations.CreateShelves do
+ defmodule Ebookworm.Migrations.CreateShelves do
  ...
end
repo.exのinitialize関数に実行するマイグレーションのモジュール名を追加します
Ecto.Migrator.upはマイグレーションを実行する関数で
第1引数はRepoモジュール
第2引数はマイグレーション番号、今回はファイル名のタイムスタンプ
第3引数は先ほどコピーしたマイグレーションファイルのモジュール名
をそれぞれ指定します
defmodule Ebookworm.Repo do
  ...
  def initialize() do
    Ecto.Migrator.up(Ebookworm.Repo, 20_230_510_040_608, Ebookworm.Migrations.CreateShelves)
  end
end
起動時に開くページを指定
現在だと起動時にトップページが開かれるので棚一覧が開くようにします
defmodule Ebookworm do
  ...

  @app Mix.Project.config()[:app]
  def start(:normal, []) do
    ...
    {:ok, _} =
      Supervisor.start_child(sup, {
        Desktop.Window,
        [
          app: @app,
          id: EbookwormWindow,
          title: "Ebookworm",
          size: {400, 800},
          # shelvesを末尾に追加
          url: "http://localhost:#{port}/shelves"
        ]
      })
  end
end
confirm modalを追加
WebViewだと削除時に出てくる confirmやalertのダイアログは出ないので独自に実装が必要です
index.html.heexの末尾にconfirm modalを表示するようにします
...
<.table
  id="shelves"
  rows={@streams.shelves}
  row_click={fn {_id, shelves} -> JS.navigate(~p"/shelves/#{shelf}") end}
>
  <:col :let={{_id, shelf}} label="Name"><%= shelf.name %></:col>
  <:action :let={{_id, shelf}}>
    <div class="sr-only">
      <.link navigate={~p"/shelves/#{task}"}>Show</.link>
    </div>
    <.link patch={~p"/shelves/#{shelf}/edit"}>Edit</.link>
  </:action>
-  <:action :let={{id, shelf}}>
+  <:action :let={{_id, shelf}}>
    <.link
-      phx-click={JS.push("delete", value: %{id: shelf.id}) |> hide("##{id}")}
-      data-confirm="Are you sure?"
+      patch={~p"/shelves/#{shelf}/delete"}
    >
      Delete
    </.link>
  </:action>
</.table>

...
<.modal
  :if={@live_action in [:delete]}
  id="shelf-delete-modal"
  show
  on_cancel={JS.navigate(~p"/shelves")}
>
  <p class="m-8">Are you sure?</p>
  <.button phx-click={JS.push("delete", value: %{id: @shelf.id})}>Delete</.button>
</.modal>
defmodule EbookwormWeb.ShelfLive.Index do
  use EbookwormWeb, :live_view

  alias Ebookworm.Shelves
  alias Ebookworm.Shelves.Shelf

  ...
  defp apply_action(socket, :index, _params) do
    socket
    |> assign(:page_title, "Listing Shelves")
    |> assign(:shelf, nil)
  end
  # 追加
  defp apply_action(socket, :delete, %{"id" => id}) do
    socket
    |> assign(:page_title, "Delete Shelf")
    |> assign(:shelf, Shelves.get_shelf!(id))
  end

  @impl true
  def handle_info({EbookwormWeb.ShelfLive.FormComponent, {:saved, shelf}}, socket) do
    {:noreply, stream_insert(socket, :shelves, shelf)}
  end

  @impl true
  def handle_event("delete", %{"id" => id}, socket) do
    shelf = Shelves.get_shelf!(id)
    {:ok, _} = Shelves.delete_shelf(shelf)

    {
      :noreply,
      socket
      # flashを追加
      |> put_flash(:info, "Shelf deleted successfully")
      # モーダルを閉じるように変更
      |> push_navigate(to: ~p"/shelves")
      |> stream_delete(:shelves, shelf)
    }
  end
end
routeにdelete actionを追加します
  scope "/", EbookwormWeb do
    pipe_through(:browser)

    get("/", PageController, :home)
    live("/shelves", ShelfLive.Index, :index)
    live("/shelves/new", ShelfLive.Index, :new)
    live("/shelves/:id/edit", ShelfLive.Index, :edit)
    live("/shelves/:id/delete", ShelfLive.Index, :delete) # 追加

    live("/shelves/:id", ShelfLive.Show, :show)
    live("/shelves/:id/show/edit", ShelfLive.Show, :edit)
  end
core_component カスタム
.table コンポーネントが横に広くてスクロールが必要になるのが嫌なので、変更する場合は
core_components.exに全てあるので、対象のコンポーネントを検索してclassを値を変更することで調整ができます
  def table(assigns) do
    assigns =
      with %{rows: %Phoenix.LiveView.LiveStream{}} <- assigns do
        assign(assigns, row_id: assigns.row_id || fn {id, _item} -> id end)
      end

    ~H"""
    <div class="overflow-y-auto px-4 sm:overflow-visible sm:px-0">
-      <table class="mt-11 w-[40rem] sm:w-full">
+      <table class="mt-11 w-full">
    # 以下省略
    """
  end
開発時の小技
iOSシミュレーターで起動するとprod環境のためコードの変更は再度ビルドする必要があるため非常に効率が悪いです
なのでiex -S mixでWxWidgetで起動して、そのPhoenixサーバーにアクセスするようにします
defmodule Ebookworm do
  ...
  @app Mix.Project.config()[:app]
  def start(:normal, []) do
    {:ok, _} =
      Supervisor.start_child(sup, {
        Desktop.Window,
        [
          app: @app,
          id: EbookwormWindow,
          title: "Ebookworm",
          size: {400, 800},
          # portから4000に変更
          url: "http://localhost:#{4000}/shelves"
        ]
      })
  end
end
このときDBはiOSシミュレーターのsqliteではなく、ebookworm直下にあるsqliteを参照するので注意が必要です
DEMO

追記:iPhoneSE の実機での動作も確認できました
最後に
いかがでしたでしょうか
ElixirDesktopと最新版のPhoenix+Sqlite3で外部と通信を行わないスタンドアローンなアプリを簡単に作ることができました。API等を使用して外部と通信の行わない場合はオフラインで問題なく動きます
クラウドサービスを使用することなく簡単に作ることができるのでぜひなにか作ってみて実際に審査に出してみてください
本記事は以上になりますありがとうございました