この記事は、fukuoka.ex Elixir/Phoenix Advent Calendar 2020 8日目です。
前日は、自分(@thehaigo) のPhoenix LiveViewで作る web/mobile チャットアプリ 下準備編 でした
Phoenix LiveViewで web、スマートフォンアプリ両方で動く認証機能付きチャットアプリケーションを作成します
Phoenix LiveViewで作る web/mobile チャットアプリ 下準備編
Phoenix LiveViewで作る web/mobile チャットアプリ リアルタイム処理編 <- 本記事
前回はLiveView CRUDを作成したので今回はリアルタイム処理を実装していきます
全体の構成は
・LiveViewでroom CRUDとmessageの作成 <-前回で実装済
・メッセージの更新時にルーム内のユーザー全体のメッセージが更新される
・ルーム内のユーザーログイン状況の表示
スマートフォンアプリでは
アプリ側でsignup/signin後WebView経由でLiveViewページをログインした状態で開けるようにします
では始めていきましょう
メッセージ一覧リアルタイム更新
この機能の実装にはPhoenix.PubSubを使用します
実装ですがpubsubの設定はアプリ作成時ですでに完了しているので、
subscribeとbroadcastを書くだけで終了です
  def start(_type, _args) do
    children = [
      # Start the Ecto repository
      Chat.Repo,
      # Start the Telemetry supervisor
      ChatWeb.Telemetry,
      # Start the PubSub system
      {Phoenix.PubSub, name: Chat.PubSub}, # <- ここで読み込んでChat.PubSubプロセス起動
      # Start the Endpoint (http/https)
      ChatWeb.Endpoint
      # Start a worker by calling: Chat.Worker.start_link(arg)
      # {Chat.Worker, arg}
    ]

    # See https://hexdocs.pm/elixir/Supervisor.html
    # for other strategies and supported options
    opts = [strategy: :one_for_one, name: Chat.Supervisor]
    Supervisor.start_link(children, opts)
  end
config :chat, ChatWeb.Endpoint,
  url: [host: "localhost"],
  secret_key_base: "*",
  render_errors: [view: ChatWeb.ErrorView, accepts: ~w(html json), layout: false],
  pubsub_server: Chat.PubSub, # <- ChatWeb.Endpointで使用するpubsubプロセスを設定
  live_view: [signing_salt: "*]
リアルタイム更新実装
変更内容は
・ mount時にroom:room_idをキーとしてsubscriptionを開始する
・ save eventでput_flash,put_redirectを削除して broadcastを実行
・ broadcastで指定したイベントbroadcast_messageで渡されたpayloadの値をassignする
defmodule ChatWeb.RoomLive.Show do

  @impl true
  def mount(%{"id" => id}, session, socket) do
    ...
    ChatWeb.Endpoint.subscribe("room:#{id}")
    ...
  end

  @impl true
  def handle_event("save", %{"message" => message_params}, socket) do
    case Rooms.create_message(message_params) do
      {:ok, _message} ->
        room = Rooms.get_room_with_messages!(socket.assigns.room.id)
        # 以下書き換え
        ChatWeb.Endpoint.broadcast!(
          "room:#{room.id}",
          "broadcast_message",
          %{ messages: room.messages }
        )
      {:error, %Ecto.Changeset{} = changeset } ->
        {:noreply, assign(socket, changeset: changeset)}
    end
  end
  # ここ追加
  def handle_info(%{event: "broadcast_message", payload: state}, socket) do
    {:noreply, assign(socket, state)}
  end

  defp page_title(:show), do: "Show Room"
end
これでリアルタイム更新が実装できたので動作を確認してみましょう
リアルタイム更新動作確認
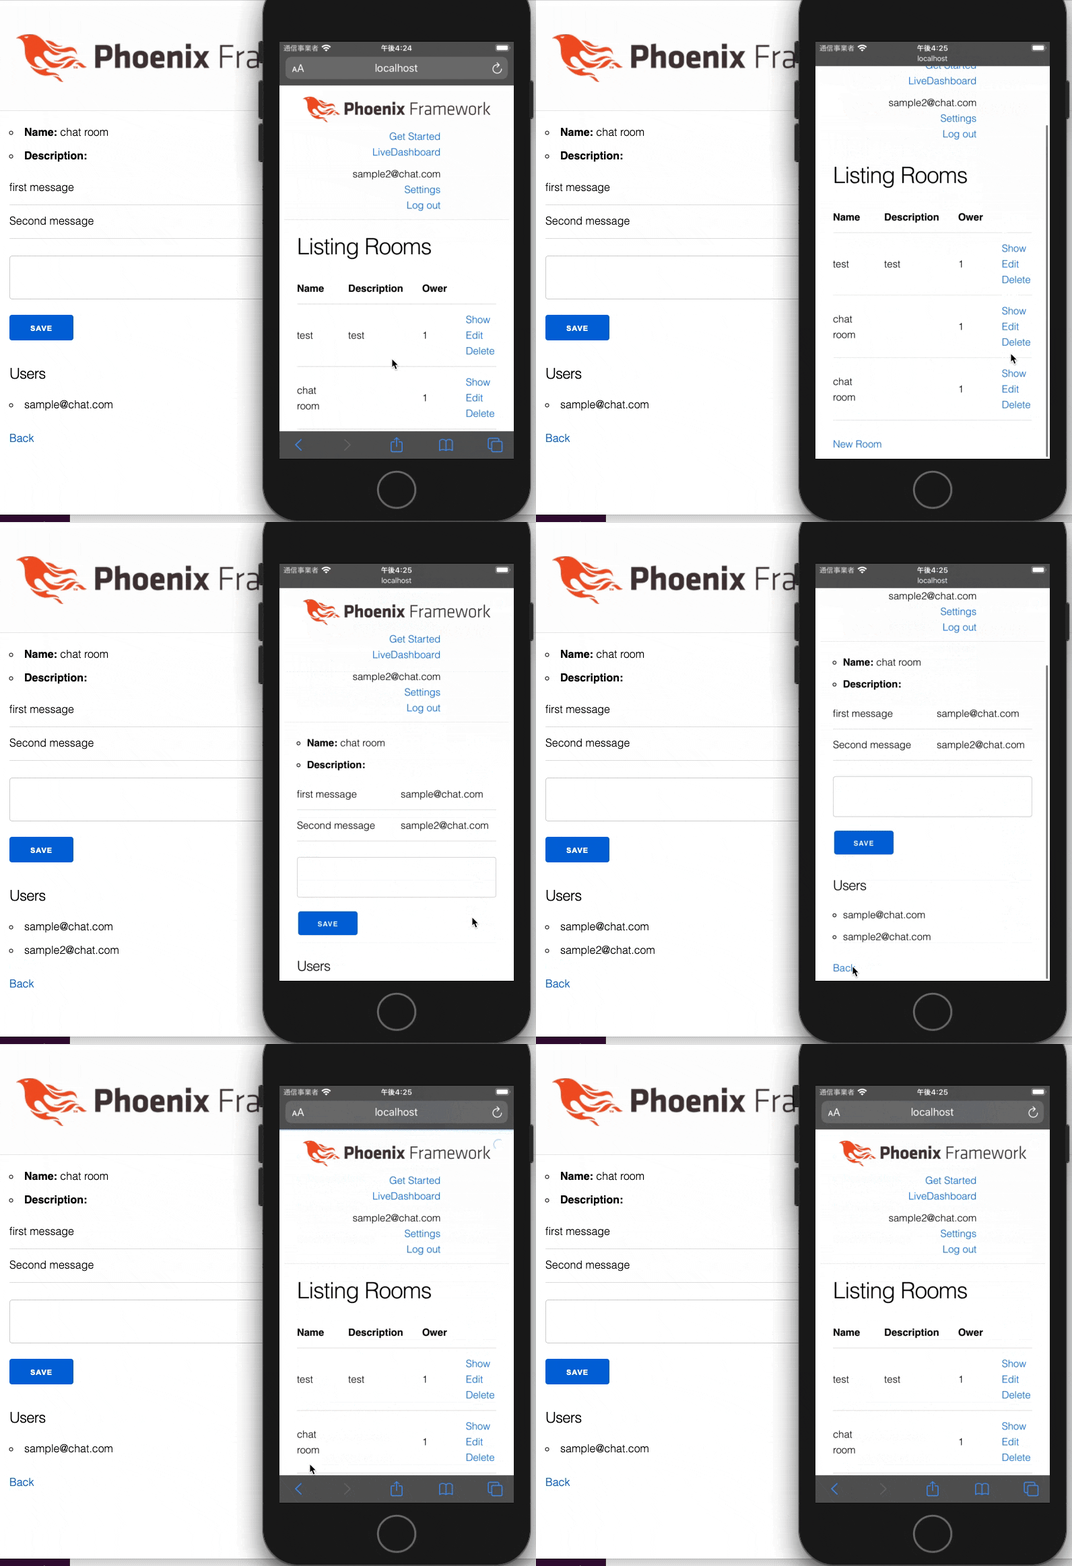
webはChrome,iOS Simulatorはサファリでlocalhostを開いています

別々のユーザーがメッセージを送信して、その内容がリアルタイムに更新されているのが確認できました
ルームのログイン状態
同一ルームに居るユーザーの一覧を表示します
実装にPhoenix.Presenceを使用します
Phoenix.Presenceについて
https://hexdocs.pm/phoenix/presence.html
Phoenix Presenceは、トピックのプロセス情報を登録し、クラスタ間で透過的に複製することができる機能です。
サーバーサイドとクライアントサイドの両方のライブラリを組み合わせたもので、実装が簡単です。
簡単な使用例としては、アプリケーションで現在オンラインになっているユーザーを表示することが挙げられます。

Phoenix Presenceが特別なのにはいくつかの理由があります。
単一の障害点がなく、単一の真実のソースがなく、完全に標準ライブラリに依存しており、運用上の依存関係がなく、自己修復が可能です。
これらはすべて、コンフリクトフリーのレプリケートデータ型(CRDT)プロトコルで処理されます。
まずpresenceを作成します
mix phx.gen.presence
superviserにpresenceを追加します
defmodule Chat.Application do
  # See https://hexdocs.pm/elixir/Application.html
  # for more information on OTP Applications
  @moduledoc false

  use Application

  def start(_type, _args) do
    children = [
      # Start the Ecto repository
      Chat.Repo,
      # Start the Telemetry supervisor
      ChatWeb.Telemetry,
      # Start the PubSub system
      {Phoenix.PubSub, name: Chat.PubSub},
      # Start the Endpoint (http/https)
      ChatWeb.Endpoint,
      # Start a worker by calling: Chat.Worker.start_link(arg)
      # {Chat.Worker, arg}
      ChatWeb.Presence # <- ここ追加
    ]

    # See https://hexdocs.pm/elixir/Supervisor.html
    # for other strategies and supported options
    opts = [strategy: :one_for_one, name: Chat.Supervisor]
    Supervisor.start_link(children, opts)
  end
....
end
そのままだとデータが扱いにくいので、メソッドxx_presenceでラップしてデータを加工します
関数名がtrack,update,listとかだとargument errorがでるので関数名は xx_presenceである必要があります
defmodule ChatWeb.Presence do
  @moduledoc """
  Provides presence tracking to channels and processes.

  See the [`Phoenix.Presence`](http://hexdocs.pm/phoenix/Phoenix.Presence.html)
  docs for more details.
  """
  use Phoenix.Presence, otp_app: :chat,
                        pubsub_server: Chat.PubSub
  # 以下追加
  alias ChatWeb.Presence

  def track_presence(pid, topic, key, payload) do
    Presence.track(pid, topic, key, payload)
  end

  def list_presence(topic) do
    topic
    |> Presence.list
    |> Enum.map(fn { _user_id, data} -> data |> extract_metadata end)
  end

  def update_presence(pid, topic, key, payload) do
    metas =
      Presence.get_by_key(topic, key)
      |> extract_metadata
      |> Map.merge(payload)

    Presence.update(pid, topic, key, metas)
  end

  def extract_metadata(data) do
    data |> Map.get(:metas) |> List.first
  end
end
mount時にpresenceにroomログインした情報を追加しtrackを開始し、assignsに現在のpresenceのデータを追加します
またpresenceの変更を検知した際にpresenceの最新データをassignします
defmodule ChatWeb.RoomLive.Show do
  use ChatWeb, :live_view
  alias Chat.Rooms
  alias Chat.Rooms.Message
  alias ChatWeb.Presence # <- 追加

  @impl true
  def mount(%{"id" => id}, session, socket) do
    ...
    Presence.track_presence(
      self(),
      "room:#{room.id}",
      user.id,
      %{ email: user.email, id: user.id}
    ) # <-追加

    {:ok,
      socket
      |> assign(:page_title, page_title(socket.assigns.live_action))
      |> assign(:room, room)
      |> assign(:messages, room.messages)
      |> assign(:return_to, return_to)
      |> assign(:changeset, changeset)
      |> assign(:user, user)
      |> assign(:users, Presence.list_presence("room:#{room.id}")) # <- 追加
    }
  end

  def handle_info(%{event: "presence_diff"}, socket = %{assigns: %{room: room}}) do
    {:noreply, assign(socket, users: Presence.list_presence("room:#{room.id}"))}
  end
  ...
end
最後にviewにユーザーログイン状況を表示して終了になります
# [edit]lib/chat_web/live/show.html.leex
<ul>
....
</ul>
<h3>Users</h3>
<ul id="user-container">
  <%= for user <- @users do %>
    <li id="<%= user.phx_ref %>"><%= user.email %></li>
  <% end %>
</ul>
<span><%= live_redirect "Back", to: Routes.room_index_path(@socket, :index) %></span>
ログイン状況動作確認
実装が完了しましたので動作確認をしていきましょう
sampleがいるチャットルームのページに飛ぶとUsersにsample2が増え、backで別のページに移動するとsample2が消えるのを確認できました
スマートフォンログイン
上記2つの機能でもスマートフォンのブラウザで動いてはいますが、
セッションがすぐ切れたりログインし直すのが面倒なので、
api経由でログインし、取得したJWTをアプリに保存して、保存したJWTを使用してsessionを貼ります
何が嬉しいの?
レスポンシブになっているならそのままブラウザやWebViewで表示すればいいのでは?
phoenixのLiveView単体で完結させる場合や、スマートフォンでも見れないことはないで十分な場合はそれで構いませんが、ネイティブアプリにリアルタイムチャットを実装するのが面倒なので、LiveViewだけwebviewで表示して残りはネイティブで実装といった場合に役に立ちます。
またiOSアプリとして申請する場合にwebview onlyだと、それはアプリにする必要があるのか?とレジェクト要因の1つになります
https://developer.apple.com/forums/thread/103427
https://teratail.com/questions/90576
http://techno-monkey.com/apple-reject-ukenai-tsukuruna/
下準備
フレームワークはExpo(ReactNative)を使用します
expoでJWTでユーザー認証については
Phoenix とExpoで作るスマホアプリ ⑤ expo セットアップ編
Phoenix とExpoで作るスマホアプリ ⑥認証機能編
かこちらをcloneしてください
phoenix側でやること
jwtからユーザーを取得して、そのユーザーでログインしてsessionに情報を入れるコントローラーを作成
expo側でやること
react-native-webviewのインストール
アプリログイン後、webviewで上記のコントローラーにheaderのBearerにjwtを付けてアクセスする
では始めていきましょう
Phoenix JWT to Session
Guardian.current_resousceでconnからuser_idを取得します
次に取得したユーザーでログインし、ブラウザからログインしたのと同じ状態にします
defmodule ChatWeb.RoomController do
  use ChatWeb, :controller

  def index(conn, _params) do
    user = Chat.Users.get_user!(current_resource(conn).id)
    ChatWeb.UserAuth.log_in_user(conn, user)
  end
end
jwt関連のGuardianの設定をしたモジュールを読み込み
jwt認証でしかアクセスできない/sp scope内にさっきのログイン処理のルートを追加します
defmodule ChatWeb.Router do
  use ChatWeb, :router
  alias ChatWeb.ApiAuthPipeline # <- ここ追加

  ...
  scope "/api/v1", ChatWeb do # <- expoのコードに合わせるため /v1 を追加
    pipe_through :api

    post "/sign_up", Api.UserController, :sign_up
    post "/sign_in", Api.UserController, :sign_in
  end

  scope "/sp", ChatWeb do
    pipe_through [:browser, :jwt_authenticated]
    get "/", RoomController, :index
  end
  ...
end
最後にroot(/)にはroomsの導線を入れてないので、
ログイン後のリダイレクト先を /から /roomsに変更します
defmodule ChatWeb.UserAuth do
  import Plug.Conn
  import Phoenix.Controller
...

  defp signed_in_path(_conn), do: "/" # <- ここ削除
  defp signed_in_path(_conn), do: "/rooms" # <- ここ追加
end
phoenix側は以上になります
次にexpo側を実装していきましょう
Expo JWT to Session
expo install react-native-webview
webviewでアクセスする時にjwtをつけるだけです
import React, { useContext } from "react";
import { StyleSheet } from "react-native";
import { WebView } from "react-native-webview";
import { Context as AuthContext } from "../context/AuthContext";
const HomeScreen = () => {
  const {
    state: { token },
  } = useContext(AuthContext);
  return (
    <WebView
      source={{
        uri: "http://localhost:4000/sp/",
        headers: {
          Authorization: `Bearer ${token}`,
        },
      }}
      style={{ marginTop: 20 }}
    />
  );
};

const styles = StyleSheet.create({
  container: {
    justifyContent: "center",
    alignSelf: "center",
    flex: 1,
  },
});
export default HomeScreen;
実装は以上になります
次に動作確認をしていきましょう
JWT -> Sessionの動作確認
expoからログインしてLiveViewのページにアクセスし、正常に動いているのを確認できました
いかがでしたでしょうか?
Phoenix.LiveViewとPresenceを使うことでリアルタイム処理の実装がとても楽になりました!
LiveViewは去年できた機能でスクロールなどのDOM操作はJS hookを使用してJSを書く必要があり、
全てをElixirで書けるわけではありませんが、複雑になりがちなデータ加工やリアルタイム処理をとてもシンプルに書くことができます。
アップデートの頻度も高くファイルアップロードの機能が実装されたりしています
また以下のようにベストプラクティスやライブラリも開発されており、今後が楽しみです
PhoenixのLiveComponentでReact + ReduxのようなFlux patternの書き方
https://www.youtube.com/watch?v=bhdeHhwDFQo&feature=youtu.be
LiveViewでReactを使えるようにするライブラリ
https://hexdocs.pm/phoenix_live_react/readme.html
vue + bootstrapのようなライブラリ
http://surface-demo.msaraiva.io/
2日続けてと長い記事になりましたが、ありがとうございました
fukuoka.ex Elixir/Phoenix Advent Calendar 2020 の9日目は @koga1020 さんの記事です お楽しみに!
差分
リアルタイム更新
ログイン状況
jwt to session
jwt to session expo
参考ページ
https://www.870labo.com/posts/create-chat-app-with-liveview-part5
https://qiita.com/pojiro/items/dc8c9d97be82f91560bf
https://hexdocs.pm/phoenix_pubsub/Phoenix.PubSub.html
https://hexdocs.pm/phoenix/Phoenix.Presence.html

