はじめに
30代未経験からエンジニアを目指して勉強中のYNと申します。
インフラ初学者の私ですが、Kubernetes the hard wayを進めるにあたって、インフラに関する基本的な知識を体系的に学ぶことができました。
そこで、初学者目線での学びなどを本記事にまとめておきたいと思います。
目次
etcdサーバーの設定
ここから先は、master-1/master-2を同時に設定するためにtmuxを使うと便利です。
インストール
バイナリファイルをダウンロードして展開します。
wget -q --show-progress --https-only --timestamping \
  "https://github.com/coreos/etcd/releases/download/v3.3.9/etcd-v3.3.9-linux-amd64.tar.gz"
{
  tar -xvf etcd-v3.3.9-linux-amd64.tar.gz
  sudo mv etcd-v3.3.9-linux-amd64/etcd* /usr/local/bin/
}
etcdサーバーの設定
前準備
適切なディレクトリを準備します↓
{
  sudo mkdir -p /etc/etcd /var/lib/etcd
  sudo cp ca.crt etcd-server.key etcd-server.crt /etc/etcd/
}
masterノードのinternal IPを取得(してshell変数に格納)しておきます↓
INTERNAL_IP=$(ip addr show enp0s8 | grep "inet " | awk '{print $2}' | cut -d / -f 1)
一応、上記パイプの解説すると、↓
echo $(ip addr show enp0s8)
3: enp0s8: mtu 1500 qdisc fq_codel state UP group default qlen 1000 link/ether 08:00:27:55:29:fd brd ff:ff:ff:ff:ff:ff inet 192.168.5.12/24 brd 192.168.5.255 scope global enp0s8 valid_lft forever preferred_lft forever inet6 fe80::a00:27ff:fe55:29fd/64 scope link valid_lft forever preferred_lft forever
echo $(ip addr show enp0s8 | grep "inet ")
inet 192.168.5.12/24 brd 192.168.5.255 scope global enp0s8
echo $(ip addr show enp0s8 | grep "inet " | awk '{print $2}')
192.168.5.12/24
echo $(ip addr show enp0s8 | grep "inet " | awk '{print $2}' | cut -d / -f 1)
192.168.5.12
etcdに名前をつけてホスト(ノード)名と一致させておきます↓

```master-1.node/master-2.node
ETCD_NAME=$(hostname -s)
systemdで起動するetcd serviceについて、etcd.serviceファイルを設定する
etcdはLinuxのsystemdのserviceとしてデプロイするため、systemdについて分からない場合はあらかじめ調べておくことをお勧めします。
systemdでは、.serviceファイルにLinuxにより起動されるプロセスを記述し、unitとして定義します。ここでは、etcdサーバープログラムをunitとして定義し、「システム起動と共に常に起動されるもの」と関連づけることで、OSが起動したときにetcdサーバーを起動させる設定を行います。これにより、
.serviceファイルについてはこちらの記事の説明が分かりやすかったですが、大まかには下記のようになります。
参照1・参照2
-
ExecStart=>etcd --name=*** --cert=*** --key=***...を実行するのと同義。公式の手順に則る。 -
RestartおよびRestartSec=> 起動失敗したら5秒のインターバル後に再起動 -
WantedBy=multi-user.target=> 依存関係をmulti-user-targetに紐づける。つまり、ここで記述されているService(つまりetcd)を常時起動することを示している。
cat <<EOF | sudo tee /etc/systemd/system/etcd.service
[Unit]
Description=etcd
Documentation=https://github.com/coreos

[Service]
ExecStart=/usr/local/bin/etcd \\
  --name ${ETCD_NAME} \\
  --cert-file=/etc/etcd/etcd-server.crt \\
  --key-file=/etc/etcd/etcd-server.key \\
  --peer-cert-file=/etc/etcd/etcd-server.crt \\
  --peer-key-file=/etc/etcd/etcd-server.key \\
  --trusted-ca-file=/etc/etcd/ca.crt \\
  --peer-trusted-ca-file=/etc/etcd/ca.crt \\
  --peer-client-cert-auth \\
  --client-cert-auth \\
  --initial-advertise-peer-urls https://${INTERNAL_IP}:2380 \\
  --listen-peer-urls https://${INTERNAL_IP}:2380 \\
  --listen-client-urls https://${INTERNAL_IP}:2379,https://127.0.0.1:2379 \\
  --advertise-client-urls https://${INTERNAL_IP}:2379 \\
  --initial-cluster-token etcd-cluster-0 \\
  --initial-cluster master-1=https://192.168.5.11:2380,master-2=https://192.168.5.12:2380 \\
  --initial-cluster-state new \\
  --data-dir=/var/lib/etcd
Restart=on-failure
RestartSec=5

[Install]
WantedBy=multi-user.target
EOF
ExecStartの中身に記載されていetcdの設定については、下の全体図からetcdが関わるコンポーネントを意識すると分かりやすいです。
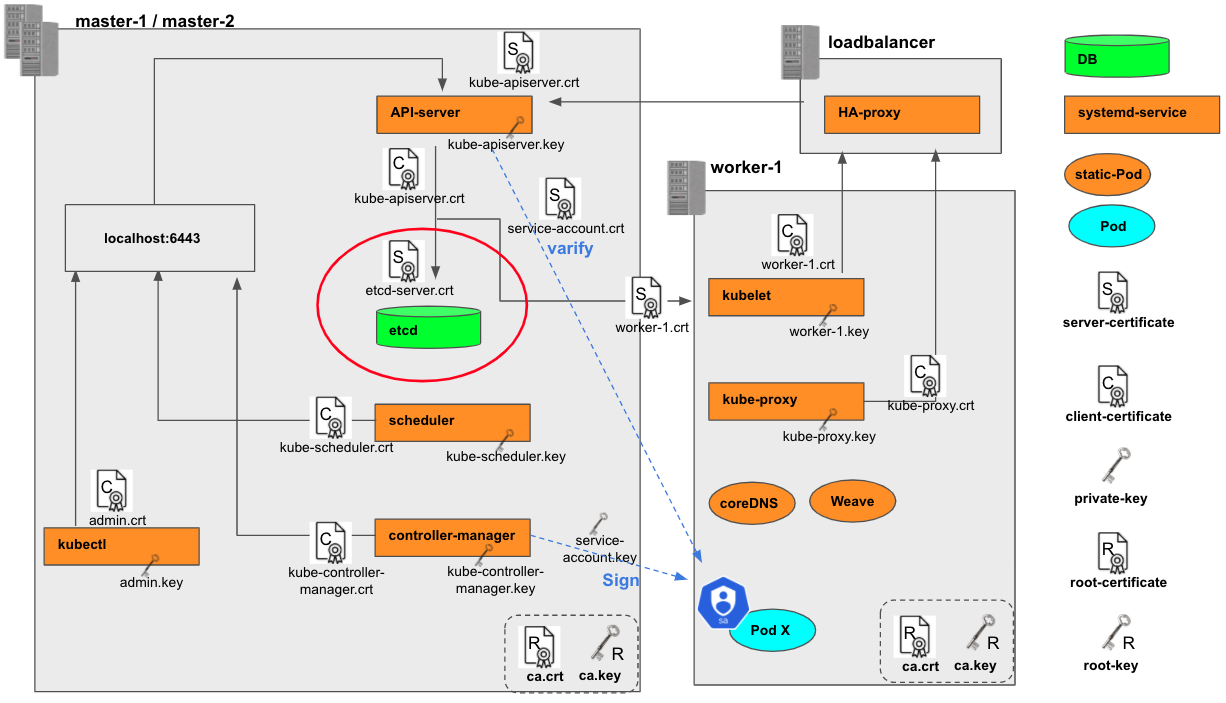
最も注目すべきは、etcdはmasterノード間でデータを同期するために、下記の設定によりetcdクラスターを構成しているという点です。
As we know the cluster members, their addresses and the size of the cluster before starting, we can use an offline bootstrap configuration by setting the initial-cluster flag. Each machine will get either the following environment variables or command line:
--initial-cluster master-1=https://192.168.5.11:2380,master-2=https://192.168.5.12:2380
--initial-cluster-state new
Note that the URLs specified in `initial-cluster` are the advertised peer URLs, i.e. they should match the value of `initial-advertise-peer-urls` on the respective nodes.

>If spinning up multiple clusters (or creating and destroying a single cluster) with same configuration for testing purpose, it is highly recommended that each cluster is given a unique `initial-cluster-token`. By doing this, etcd can generate unique cluster IDs and member IDs for the clusters even if they otherwise have the exact same configuration. This can protect etcd from cross-cluster-interaction, which might corrupt the clusters.

>etcd listens on `listen-client-urls` to accept client traffic. etcd member advertises the URLs specified in advertise-client-urls to other members, proxies, clients. Please make sure the `advertise-client-urls` are reachable from intended clients. A common mistake is setting `advertise-client-urls` to localhost or leave it as default if the remote clients should reach etcd.
[参照](https://github.com/etcd-io/etcd/blob/master/Documentation/op-guide/clustering.md)


## etcdサーバーを起動する
`systemctl`でetcdサーバーを起動します。
`systemd`と`systemctl`の対応関係については[こちら](https://qiita.com/a_yasui/items/f2d8b57aa616e523ede4#%E5%9F%BA%E6%9C%AC%E6%93%8D%E4%BD%9C)が参考になりました。

```master-1.node/master-2.node
{
  sudo systemctl daemon-reload
  sudo systemctl enable etcd
  sudo systemctl start etcd
}
動作確認
下記コマンドで動作確認できます。
sudo ETCDCTL_API=3 etcdctl member list \
  --endpoints=https://127.0.0.1:2379 \
  --cacert=/etc/etcd/ca.crt \
  --cert=/etc/etcd/etcd-server.crt \
  --key=/etc/etcd/etcd-server.key