はじめに
30代未経験からエンジニアを目指して勉強中のYNと申します。
TypeScriptを勉強しているなか、NestJSというフレームワークにたどり着きました。これから長い付き合いになりそうです。
学んだことをメモとして書きます。
やったこと
Usersというテーブルを定義して下記二つのAPIを実装します。
- Get: テーブルに登録された全てのUserを返す
- Post: テーブルにUserを登録する

全体像
可視化しようとしたら逆に分かりづらくなってしまいましたが、全体図はこんな感じです。順に手順を書いていきます。

プロジェクトをはじめる
npm i -g @nestjs/cli  #グローバルインストール
nest new <project-name> #プロジェクト作成
yarn add typeorm @nestjs/typeorm pg class-transformer class-validator #必要なライブラリをインストール
この時点で全体像は下図の通りです。

データベースに接続する
app moduleとPostgresSQLコンテナを接続します。

コンテナを起動
dockerを使わずPostgreSQLアプリを使う場合はこのステップは飛ばして結構です。dockerを使う場合は、ポート番号が被るのでPostgreSQLアプリは落としておきましょう。
ルートディレクトリにdocker-composeファイルを作ります。
version: '3'
services:
  postgres:
    image: 'postgres:9.6.1'
    ports:
      - '5432:5432'
    environment:
      POSTGRES_USER: 'test'
      POSTGRES_PASSWORD: 'test'
      POSTGRES_DB: 'test'
そして実行します。
docker-compose up -d #コンテナ起動
docker-compose exec postgres psql -U test #コンテナ上でpsqlコマンドをtestユーザーとして実行
app moduleとデータベースを接続
公式ドキュメント参照。
typeormの設定
まずはtypeormの設定を記述します。
{
  "type": "postgres",
  "host": "localhost",
  "port": 5432,
  "username": "test",
  "password": "test",
  "database": "test",
  "synchronize": false,
  "logging": false,
  "entities": ["dist/**/*.entity.js"],
  "migrations": ["dist/migration/**/*.js"],
  "cli": {
    "entitiesDir": "src/entity",
    "migrationsDir": "src/migration",
    "subscribersDir": "src/subscriber"
  }
}
"synchronize": false
trueにするとデータベース接続時に自動マイグレーションを実行します。
"entities": ["dist/**/*.entity.js"]
テーブルスキーマを定義するentityファイルの場所を記述します。typeormおよびNestJSでは、コマンド実行時にコンパイル済のJSファイルを読み込む設定となっているので、entity関連のファイルはdistフォルダを指定します。(TSファイルを読み込もうとするとimport関連のエラーが出ると思います。)つまり、データベースに接続する前に必ずentityファイルのコンパイルが必要です。
"migrations": ["dist/migration/**/*.js"]
テーブルを作成したり、データを埋め込むmigrationファイルの場所を記述します。上記同様、migration関連のファイルの場所はdistフォルダを指定します。migration実行前にコンパイルが必要です。
app moduleの設定
次にapp moduleのimport部分の設定をします。
import { Module } from '@nestjs/common';
import { TypeOrmModule } from '@nestjs/typeorm/dist/typeorm.module';
import { UsersModule } from './users/users.module';

@Module({
  imports: [TypeOrmModule.forRoot(), UsersModule], //UserModuleは後ほど説明
})
export class AppModule {}
imports: [TypeOrmModule.forRoot()]でデータベースに接続できます。
テーブルをつくる

テーブルのスキーマを定義する
entityファイルを定義します。
import { Entity, Column, PrimaryGeneratedColumn } from 'typeorm';

@Entity()
export class User {
  @PrimaryGeneratedColumn()
  id: number;

  @Column()
  firstName: string;

  @Column()
  lastName: string;

  @Column({ default: true })
  isActive: boolean;
}
migrationを実行する
migrationファイルを生成する
まずはtypeormのCLIを使って、entityファイルを参照してmigrationファイルを生成します。
npx typeorm migration:generate -n Test
ここで、typeormのCLIが参照するentityファイルと、生成されたmigrationファイルの保存場所は下記に指定してある通りです。
 "cli": {
    "entitiesDir": "src/entity",
    "migrationsDir": "src/migration",
  }
migrationファイルを実行する
migrationを実行する時、コンパイル済のJSファイルを実行することになるので、先にコンパイルします。
yarn build #コンパイル
npx typeorm migration:run #テーブル作成
npx typeorm migration:revert #ロールバック
テーブルが作成できたか確認する
下記コマンドでテーブルが作成されたかどうか確認できます。
docker-compose up -d
docker-compose exec postgres psql -U test
\dt
users moduleをテーブルに接続する
nestのCLIをつかってmoduleを作ります。
nest g module users
そしてテーブルに接続します。
import { Module } from '@nestjs/common';
import { TypeOrmModule } from '@nestjs/typeorm/dist';
import { User } from '../entity/user.entity';

@Module({
  imports: [TypeOrmModule.forFeature([User])], //ここでUserエンティティを引数にとり、テーブルに接続する
})
export class UsersModule {}

users contoroller/service の実装
controllerとserviceをつくる
nestのCLIをつかって作ります。
nest g controller users
nest g service users
users moduleも自動的に修正されているのが分かります。
import { Module } from '@nestjs/common';
import { TypeOrmModule } from '@nestjs/typeorm/dist';
import { User } from '../entity/user.entity';
import { UsersService } from './users.service';
import { UsersController } from './users.controller';

@Module({
  imports: [TypeOrmModule.forFeature([User])],
  providers: [UsersService], //自動で追記
  controllers: [UsersController], //自動で追記
})
export class UsersModule {}
controllerの実装
controllerには前回同様にvalidationを実装します。
まずは、validationのためのDTOを定義します。
import { IsString } from 'class-validator';

export class CreateUserDto {
  @IsString()
  firstName: string;

  @IsString()
  lastName: string;
}
そして、@UserPipes()と@Body()デコレータをつかってvalidationを実装します。
import {
  Body,
  Controller,
  Get,
  Post,
  UsePipes,
  ValidationPipe,
} from '@nestjs/common';
import { CreateUserDto } from './dto/create-user.dto';
import { UsersService } from './users.service';

@Controller('users')
@UsePipes(new ValidationPipe({ transform: true }))
export class UsersController {
  constructor(private readonly service: UsersService) {}

  @Get()
  getUsers() {
    return this.service.findAll();
  }

  @Post()
  addUser(@Body() createUserDto: CreateUserDto) {
    const { firstName, lastName } = createUserDto;
    return this.service.createUser(firstName, lastName);
  }
}
ここまでの全体像はこんな感じです。

serviceの実装
最後にserviceを実装します。
@InjectRepositoryデコレータを使って、UserエンティティをtypeormのRepositoryとして使うことができ、Repositoryメソッドを使ってSQLを実行することができます。
import { Injectable } from '@nestjs/common';
import { InjectRepository } from '@nestjs/typeorm';
import { Repository } from 'typeorm';
import { User } from '../entity/user.entity';

@Injectable()
export class UsersService {
  constructor(
    @InjectRepository(User)
    private usersRepository: Repository<User>,
  ) {}

  findAll(): Promise<User[]> {
    return this.usersRepository.find();
  }

  createUser(firstName: string, lastName: string) {
    const newUser = new User();
    newUser.firstName = firstName;
    newUser.lastName = lastName;
    newUser.isActive = true;
    this.usersRepository.insert(newUser);
    return newUser.id;
  }

  findOne(id: string): Promise<User> { //今回は使ってない
    return this.usersRepository.findOne(id);
  }

  async remove(id: string): Promise<void> { //今回は使ってない
    await this.usersRepository.delete(id);
  }
}
これで完成です。

動作確認
yarn start:dev #サーバー起動
postしてから
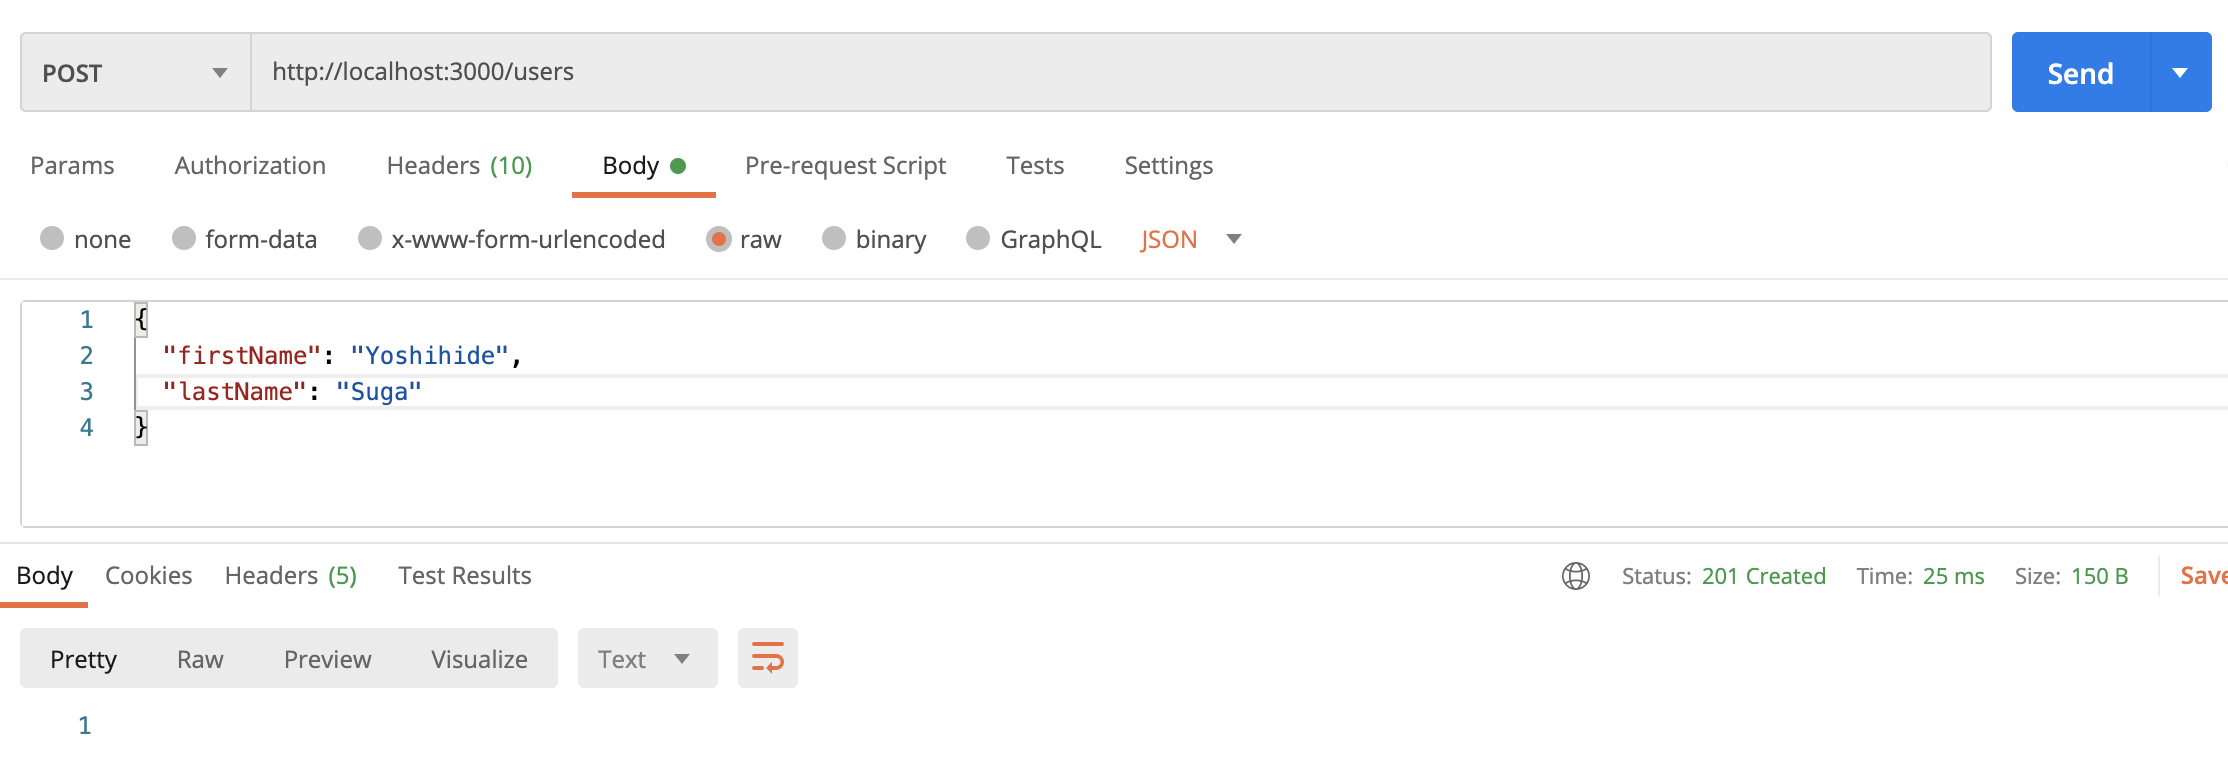
getすると、期待どおり動いていることが分かります。

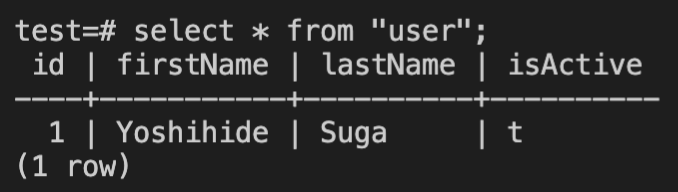
validationも機能しています。

最後に
NestJSを使うと、APIをマイクロアーキテクチャに分解でき、とても設計しやすいと感じました。
これからも使っていきたいです。