概要
nginxのaccess.logを、fluentdでPostgreSQLに保存し、metabaseで簡単に可視化した。
その時の自分用のメモを少しまとめてみました。
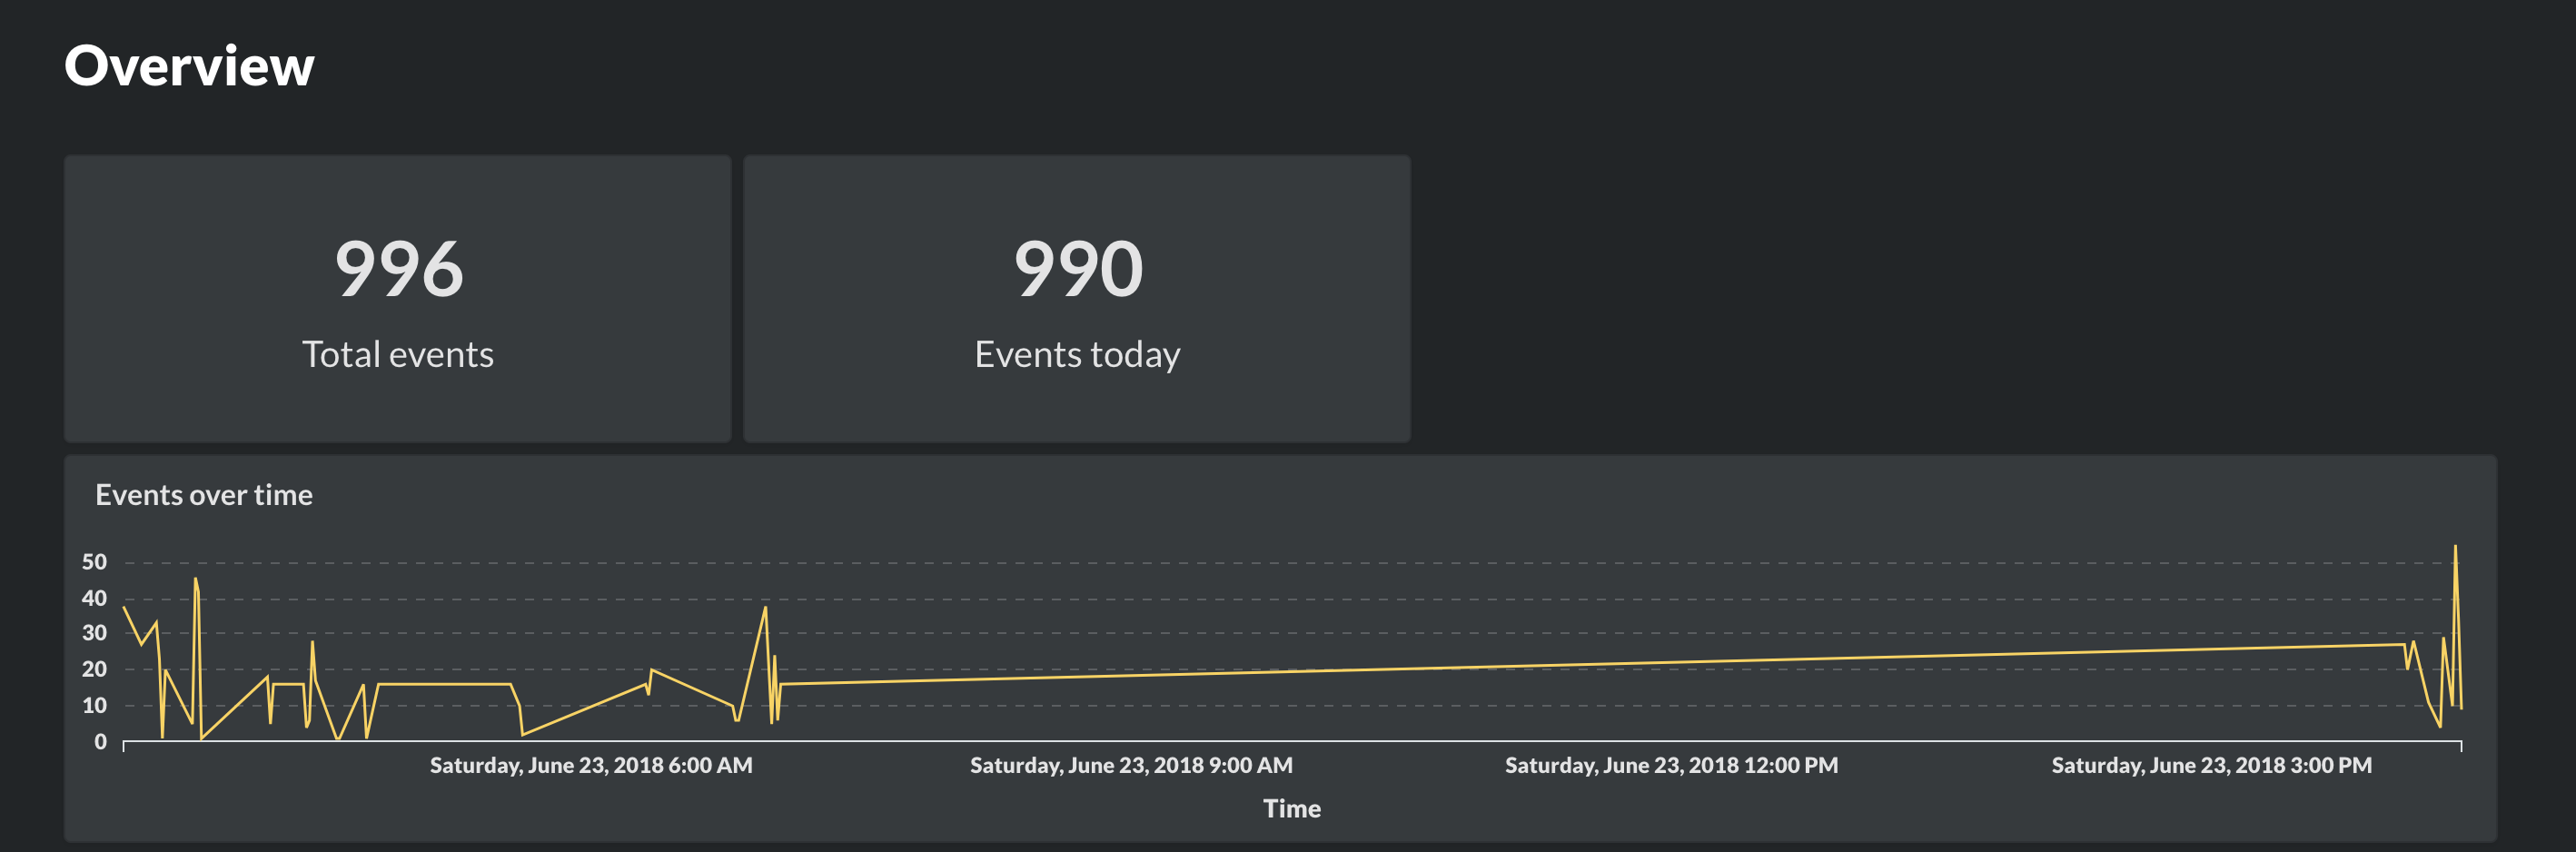
overviewだったり。
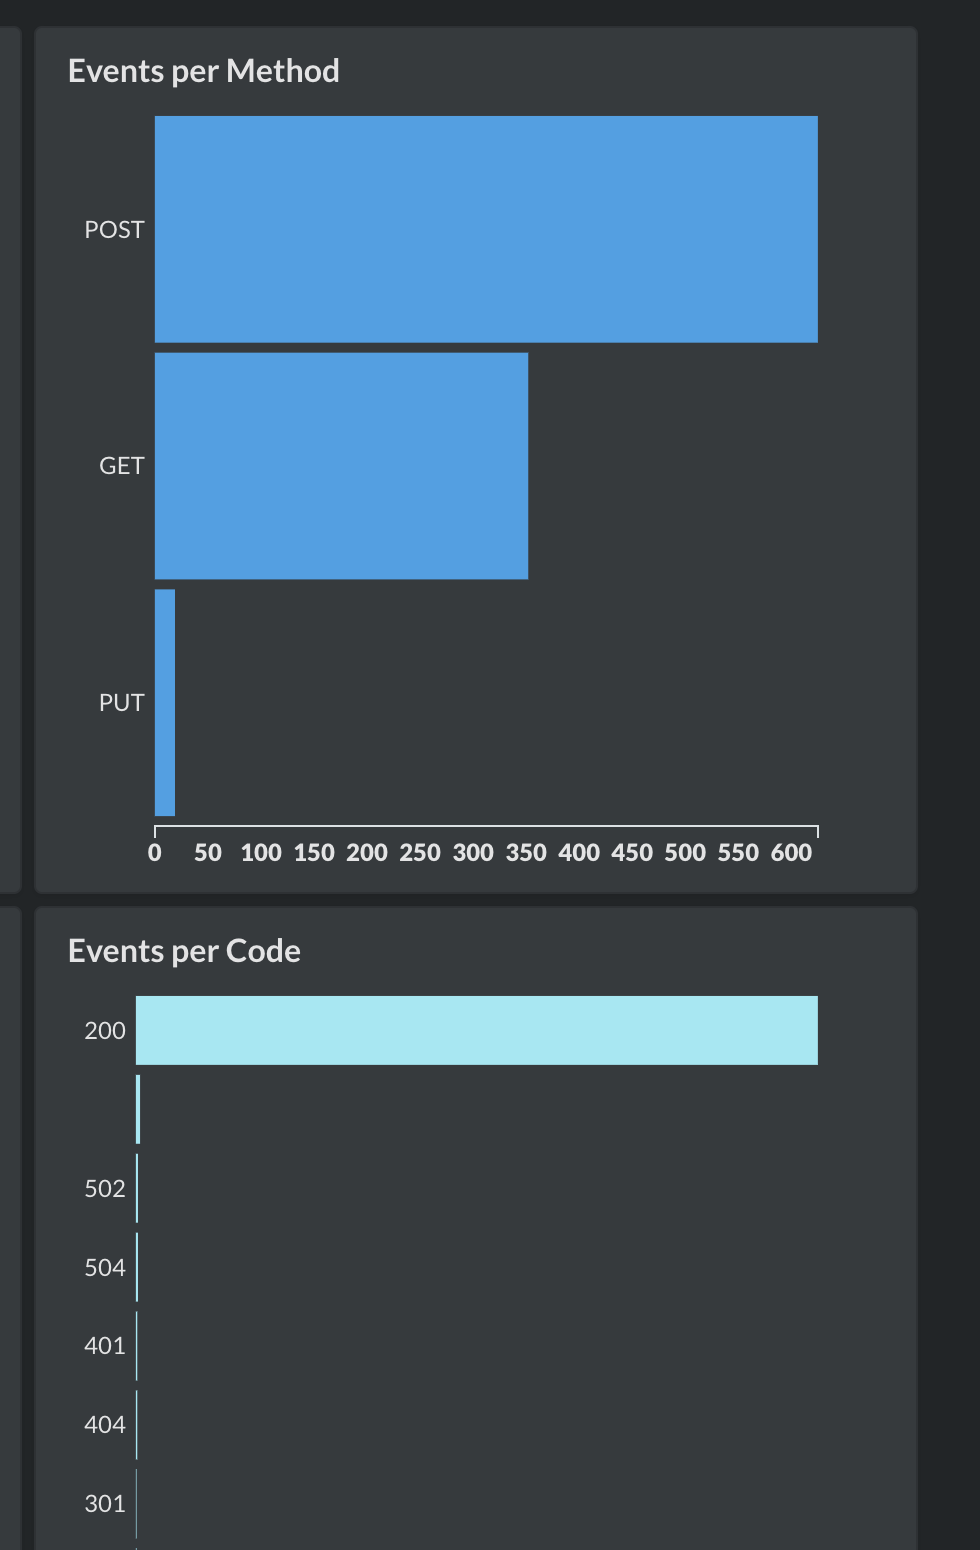
method別アクセス数だったり。
metabse
下記URL参照
https://www.metabase.com/
環境
GCP上でインスタンスを2つ構築。
instance1は無料インスタンスで、gunicornとDjongoで開発したWebAppを動かしている。
metabaseを別インスタンスに立てた理由は、gunicornがメモリを食ってしまい、無料インスタンス上ではまともに動かなかったからです。
| instance | os | middleware | memo |
|---|---|---|---|
| 1 | ubuntu16.04 | nginx/1.14.0 PostgreSQL/9.5.13 fluentd/ 0.12.40 |
無料インスタンス |
| 2 | ubuntu16.04 | metabase |
手順
nginx
リバプロとして利用。
logはデフォルトのものを利用する。
metabaseへのリバも設定しておく。
インストール・SSL(Let's Encrypt)の設定などは割愛。
server {
    listen       443;
    server_name  [server name];

    #charset koi8-r;
    #access_log  /var/log/nginx/host.access.log  main;
    ssl on;
    ssl_certificate /etc/letsencrypt/live/[server name]/fullchain.pem;
    ssl_certificate_key /etc/letsencrypt/live/[server name]/privkey.pem;

    client_max_body_size 2g;

    proxy_set_header    Host    $host;
    proxy_set_header    X-Real-IP    $remote_addr;
    proxy_set_header    X-Forwarded-Host       $host;
    proxy_set_header    X-Forwarded-Server    $host;
    proxy_set_header    X-Forwarded-For    $proxy_add_x_forwarded_for;
    proxy_set_header    X-Forwarded-Proto  $scheme;

    # metabase
    location /metabase/ {
      proxy_pass http://metabase:3000/;
    }

    # Django
    location /document/ {
      root   [Django path];
      access_log off;
    }

    location /static/  {
      root [Django path];
      access_log off;
    }

    location / {
      proxy_pass http://127.0.0.1:8081;
    }


    #error_page  404              /404.html;

    # redirect server error pages to the static page /50x.html
    #
    error_page   500 502 503 504  /50x.html;
    location = /50x.html {
        root   /usr/share/nginx/html;
    }

    # proxy the PHP scripts to Apache listening on 127.0.0.1:80
    #
    #location ~ \.php$ {
    #    proxy_pass   http://127.0.0.1;
    #}

    # pass the PHP scripts to FastCGI server listening on 127.0.0.1:9000
    #
    #location ~ \.php$ {
    #    root           html;
    #    fastcgi_pass   127.0.0.1:9000;
    #    fastcgi_index  index.php;
    #    fastcgi_param  SCRIPT_FILENAME  /scripts$fastcgi_script_name;
    #    include        fastcgi_params;
    #}

    # deny access to .htaccess files, if Apache's document root
    # concurs with nginx's one
    #
    #location ~ /\.ht {
    #    deny  all;
    #}
}
備考
metabaseへのアクセスログが不要であれば、location /metabase/にaccess_log off;を設定すればよいかと。
PostgreSQL
インストール
インストールは割愛。
設定項目は、instance2からアクセスできるように、/etc/postgresql/9.5/main/pg_hba.conf を設定しておきます(割愛)
データベース・テーブル作成
fluentdの出力先データベースとテーブルを作成しておきます。
名前は各自で、好きなものを設定ください。
CREATE DATABASE [database-name];

CREATE TABLE [table-name] VALUES (
  host text
  ,time timestamp without time zone
  ,method text
  ,path text
  ,version text
  ,code integer
  ,size integer
  ,referer text
);
fluentd
導入
# install
curl -L https://toolbelt.treasuredata.com/sh/install-ubuntu-xenial-td-agent3.sh | sh

# postgresqlのpluginをinstall
sudo /usr/sbin/td-agent-gem install fluent-plugin-postgres
設定
設定ファイル/etc/td-agent/td-agent.confの設定を行う。
まずは、sourceの設定から。
<source>
  @type tail
  path /var/log/nginx/access.log
  tag nginx.access
  pos_file /var/log/td-agent/nginx.access.pos
  format /^(?<host>[^ ]*) [^ ]* (?<user>[^ ]*) \[(?<time>[^\]]*)\] "(?<method>\S+)(?: +(?<path>\S+) +(?<version>\S+))?" (?<code>[^ ]*) (?<size>[^ ]*) "(?<referer>[^\"]*)" "(?<agent>[^\"]*)" "(?<xforwarded>[^\"]*)"$/
  time_key time_local
</source>
続いて、postgresqlをログ出力先として、下記を設定する。
key_names の項目が上のhostやtimeに対応しており、key_namesに書いた順番で、$1, $2,...となる。
<match **>
  @type postgres
  host localhost
  port 5432
  database [database-name]
  username [username]
  password [password]
  key_names host,time,method,path,version,code,size,referer
  sql INSERT INTO [table-name] (host,time,method,path,version,code,size,referer) VALUES ($1,$2,$3,$4,$5,$6,$7,$8)
</match>
fluentdが/var/log/nginx/access.logにアクセスできるように、実行ユーザtd-agentをユーザグループadmに追加する
sudo usermod -aG adm td-agent
metabase
導入
javaが導入されているか確認。されていなければインストールしましょう。
java -version
metabseをダウンロード
wget http://downloads.metabase.com/v0.29.3/metabase.jar
service化するため、/etc/systemd/system/metabase.serviceを作ります
[Unit]
Description=Metabase server
After=syslog.target network.target nginx.service

[Service]
User=root
Type=simple
WorkingDirectory=/opt/metabase
ExecStart=/usr/bin/java -Dlog4j.configuration=file:/opt/metabase/log4j.properties -jar /opt/metabase/metabase.jar
ExecStop=/bin/kill -SIGTERM $MAINPID

[Install]
WantedBy=multi-user.target
serviceとして実行します。metabaseはデフォルトでport3000をlistenします。
sudo systemctl enable metabase
sudo service metabase start
PostgreSQLへ接続
ここまでの設定がうまく行けば、https://~~~/metabase へアクセスできるはず。
そうすると設定画面に行くので、先ほど作成したpostgreのデータベース・テーブルとの接続を設定します。
あとは、Data Reference>Explore our data>[データベース名]>[テーブル名]>X-ray this table とアクセスしていけば、すでにDashboardが出来上がっています!
カスタマイズしたいときは、SQL文さえ書ければ、欲しいデータの抽出・可視化・作図ができます。色々試してみてください〜。