1.はじめに
1.1.構築の背景
個人開発している静的サイトを会社メンバだけに公開させようと思い、Cognito と Lambda@Edgeを利用した 認証機能を実装しようと思いましてハンズオンをしてみました。
今回は後半の「Lambda@Edgeを利用した認証機能」部分を実装していきたいと思います。
1.2.前提知識
本記事は以下前回のブログをベースにしてリソースを追加していきます:
本記事は以下の知識をお持ちの方を対象としています:
- AWS基本サービス(S3、CloudFront、Lambda)の基本的な理解
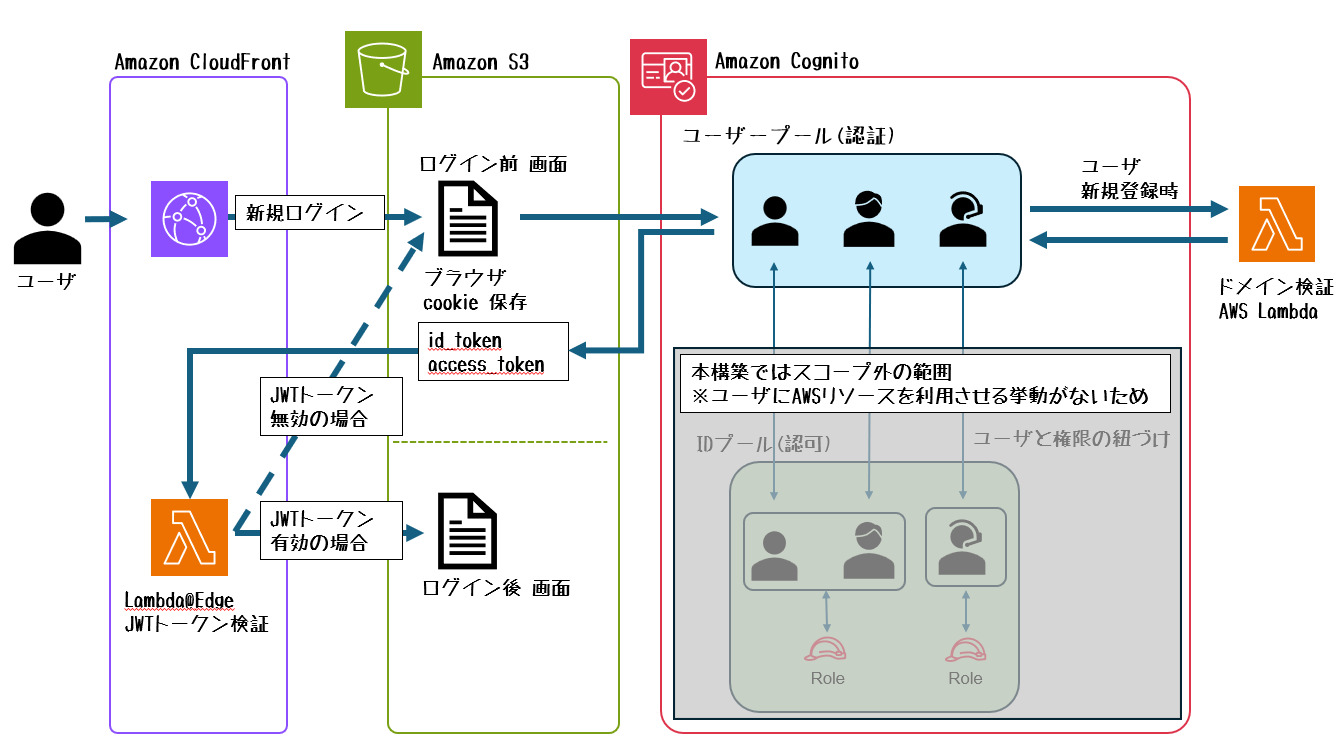
1.3.アーキテクチャ方針
- 前半部分:CloudFront + S3 + Cognito を用いた認証基盤の構築
- User Poolのみ使用(Identity Poolは使用しない)
- Lambda@Edge による認証が通れば CloudFront から S3へアクセスが可能なため。
- User Poolのみ使用(Identity Poolは使用しない)
- 後半部分:Lambda@Edgeから、JWT検証ロジックを持つLambda関数を呼び出す構成
- Node.js の場合、以下ライブラリがあり導入は容易(ブログも多い)ですが、学習目的のためPythonを利用
- 参考URL:cognito-at-edge
- Node.js の場合、以下ライブラリがあり導入は容易(ブログも多い)ですが、学習目的のためPythonを利用
1.4.アーキテクチャ図
2.ハンズオン
2.0.構築方法
2.0.1.構築環境
- 以下環境より、CLIを利用して構築
- 後半構築の Lambda@Edgeは
us-east-1で作成する必要があり、リージョンを合わせるため選択
| 環境 | 設定 |
|---|---|
| 環境 | AWS CloudShell |
| リージョン | バージニア北部(us-east-1) |
2.0.2.ファイル構成
lambda-edge-cognito-auth/
├── lambda/
│   ├── pre-signup/         # 新規ログイン時のドメインチェック(※前半作成)
│   └── edge/               # Lambda@Edge関数
├── frontend/
│   └── index.html          ※前半作成
│   └── login.html          ※前半作成(今回修正あり)
└── policy/
    └── bucket-policy.json  ※前半作成
2.1.前回構築環境の変数復旧
# 前回作成したリソースの情報を取得
BUCKET_NAME=$(aws s3 ls | grep lambda-edge-auth | awk '{print $3}')
DISTRIBUTION_ID=$(aws cloudfront list-distributions --query 'DistributionList.Items[?Comment==`Lambda@Edge Auth Demo Distribution`].Id' --output text)
CLOUDFRONT_DOMAIN=$(aws cloudfront list-distributions --query 'DistributionList.Items[?Comment==`Lambda@Edge Auth Demo Distribution`].DomainName' --output text)
USER_POOL_ID=$(aws cognito-idp list-user-pools --max-results 20 --query 'UserPools[?Name==`lambda-edge-auth-pool`].Id' --output text)
CLIENT_ID=$(aws cognito-idp list-user-pool-clients --user-pool-id $USER_POOL_ID --query 'UserPoolClients[?ClientName==`lambda-edge-auth-client`].ClientId' --output text)
COGNITO_DOMAIN=$(aws cognito-idp describe-user-pool --user-pool-id $USER_POOL_ID --query 'UserPool.Domain' --output text)

# 変数確認
echo "S3バケット: $BUCKET_NAME"
echo "CloudFront Domain: $CLOUDFRONT_DOMAIN"
echo "Distribution ID: $DISTRIBUTION_ID"
echo "User Pool ID: $USER_POOL_ID"
echo "Client ID: $CLIENT_ID"
echo "Cognito Domain: $COGNITO_DOMAIN"
2.2.Cognito 修正
- 前半ではリダイレクト先を
index.htmlにしていましたが、login.htmlに修正。
# callback URLをlogin.htmlに変更
aws cognito-idp update-user-pool-client \
  --user-pool-id $USER_POOL_ID \
  --client-id $CLIENT_ID \
  --client-name "lambda-edge-auth-client" \
  --supported-identity-providers COGNITO \
  --callback-urls "https://$CLOUDFRONT_DOMAIN/login.html" \
  --logout-urls "https://$CLOUDFRONT_DOMAIN/" \
  --allowed-o-auth-flows implicit \
  --allowed-o-auth-scopes openid email profile \
  --allowed-o-auth-flows-user-pool-client \
  --explicit-auth-flows ALLOW_USER_SRP_AUTH ALLOW_REFRESH_TOKEN_AUTH
2.3.HTMLファイルの修正
# 1. login.htmlを新しいcallback URLで再生成
cat > login.html << EOF
<!DOCTYPE html>
<html lang="ja">
<head>
    <meta charset="UTF-8">
    <meta name="viewport" content="width=device-width, initial-scale=1.0">
    <title>ログイン</title>
    <style>
        body { font-family: Arial, sans-serif; max-width: 600px; margin: 100px auto; padding: 20px; text-align: center; background-color: #f5f5f5; }
        .container { background-color: white; padding: 40px; border-radius: 10px; box-shadow: 0 2px 10px rgba(0,0,0,0.1); }
        h1 { color: #2c3e50; }
        .login-btn { display: inline-block; background-color: #3498db; color: white; padding: 15px 30px; text-decoration: none; border-radius: 5px; margin-top: 20px; }
        .login-btn:hover { background-color: #2980b9; }
    </style>
</head>
<body>
    <div class="container" id="login-container">
        <h1>ようこそ</h1>
        <p>コンテンツを閲覧するにはログインが必要です。</p>
        <a href="https://$COGNITO_DOMAIN.auth.us-east-1.amazoncognito.com/login?client_id=$CLIENT_ID&response_type=token&scope=openid+email+profile&redirect_uri=https://$CLOUDFRONT_DOMAIN/login.html" class="login-btn">ログイン</a>
    </div>
    <script>
        (function() {
            const hash = window.location.hash.substring(1);
            const params = new URLSearchParams(hash);
            const id_token = params.get('id_token');
            const access_token = params.get('access_token');

            if (id_token && access_token) {
                document.getElementById('login-container').innerHTML = "<p>ログイン処理中...</p>";

                // 特殊文字をエスケープ
                const options = "path=/; max-age=86400; SameSite=Lax; Secure";
                document.cookie = \`id_token=\${id_token}; \${options}\`;
                document.cookie = \`access_token=\${access_token}; \${options}\`;

                window.location.href = '/index.html';
            }
        })();
    </script>
</body>
</html>
EOF

# 3. index.htmlにログアウトボタン追加
cat > index.html << EOF
<!DOCTYPE html>
<html lang="ja">
<head>
    <meta charset="UTF-8">
    <meta name="viewport" content="width=device-width, initial-scale=1.0">
    <title>認証済みページ</title>
    <style>
        body {
            font-family: Arial, sans-serif;
            max-width: 800px;
            margin: 50px auto;
            padding: 20px;
            background-color: #f5f5f5;
        }
        .container {
            background-color: white;
            padding: 30px;
            border-radius: 10px;
            box-shadow: 0 2px 10px rgba(0,0,0,0.1);
        }
        h1 { color: #2c3e50; text-align: center; }
        .info {
            background-color: #e8f5e8;
            padding: 15px;
            border-radius: 5px;
            margin: 20px 0;
        }
        .logout-btn {
            background-color: #e74c3c;
            color: white;
            padding: 10px 20px;
            text-decoration: none;
            border-radius: 5px;
            display: inline-block;
            margin-top: 20px;
        }
        .logout-btn:hover { background-color: #c0392b; }
    </style>
</head>
<body>
    <div class="container">
        <h1>ようこそ!認証済みユーザー様</h1>
        <div class="info">
            <p><strong>認証成功</strong></p>
            <p>このページは認証済みユーザーのみアクセス可能です。</p>
        </div>
        <p>アクセス時刻: <span id="time"></span></p>
        <a href="https://$COGNITO_DOMAIN.auth.us-east-1.amazoncognito.com/logout?client_id=$CLIENT_ID&logout_uri=https://$CLOUDFRONT_DOMAIN/" class="logout-btn">ログアウト</a>
    </div>
    <script>
        document.getElementById('time').textContent = new Date().toLocaleString('ja-JP');
    </script>
</body>
</html>
EOF

# 4. S3にアップロード
aws s3 cp login.html s3://$BUCKET_NAME/
aws s3 cp index.html s3://$BUCKET_NAME/
2.4.Lambda@Edge関数の作成
2.4.1.Lambda関数のパッケージ作成
# Lambda@Edge用ディレクトリ作成
cd ../
mkdir edge && cd edge

# requirements作成
cat > requirements.txt << EOF
python-jose[rsa]==3.3.0
EOF

# Lambda@Edge関数作成
cat > lambda_function.py << EOF
import json
import logging
import urllib.request
from jose import jwt, jwk
from jose.exceptions import JOSEError, ExpiredSignatureError

# ログ設定
logger = logging.getLogger()
logger.setLevel(logging.INFO)

# JWKS(公開鍵情報)のキャッシュ
jwks = None

def get_jwks(jwks_url):
    """Cognitoの公開鍵情報を取得(キャッシュ有効活用)"""
    global jwks
    if jwks:
        logger.info("Using cached JWKS")
        return jwks

    logger.info(f"Fetching JWKS from {jwks_url}")
    with urllib.request.urlopen(jwks_url) as response:
        jwks = json.loads(response.read().decode('utf-8'))
    return jwks

def parse_tokens_from_cookies(headers):
    """Cookieからid_tokenとaccess_tokenを抽出"""
    id_token = None
    access_token = None

    if 'cookie' not in headers:
        return None, None

    # Cookie文字列を分割してパース
    cookies = headers['cookie'][0]['value'].split(';')
    for cookie in cookies:
        if '=' in cookie:
            key, value = cookie.strip().split('=', 1)
            if key == 'id_token':
                id_token = value
            elif key == 'access_token':
                access_token = value

    return id_token, access_token

def create_redirect_response(host, location, clear_cookies=False):
    """リダイレクトレスポンスを生成(Cookie削除オプション付き)"""
    response = {
        'status': '302',
        'statusDescription': 'Found',
        'headers': {
            'location': [{'key': 'Location', 'value': f"https://{host}{location}"}],
            'cache-control': [{'key': 'Cache-Control', 'value': 'no-cache, no-store, must-revalidate'}],
        }
    }

    # 認証失敗時は両方のトークンCookieを削除
    if clear_cookies:
        response['headers']['set-cookie'] = [
            {'key': 'Set-Cookie', 'value': 'id_token=; Path=/; Expires=Thu, 01 Jan 1970 00:00:00 GMT; Secure; SameSite=Lax'},
            {'key': 'Set-Cookie', 'value': 'access_token=; Path=/; Expires=Thu, 01 Jan 1970 00:00:00 GMT; Secure; SameSite=Lax'}
        ]

    return response

def lambda_handler(event, context):
    """CloudFrontリクエスト処理のメインハンドラー"""
    request = event['Records'][0]['cf']['request']
    uri = request['uri']
    host = request['headers']['host'][0]['value']

    # 認証不要なファイルはスキップ(ログイン前ページは認証不要)
    if uri.startswith('/login.html') or uri.endswith(('.css', '.js', '.png', '.jpg', '.ico')):
        return request

    # Cookieから認証トークンを取得
    id_token, access_token = parse_tokens_from_cookies(request['headers'])

    # いずれかのトークンが欠けている場合はログインページへ
    if not id_token or not access_token:
        logger.info('ID token or Access token not found in cookies. Redirecting to login.')
        return create_redirect_response(host, '/login.html')

    try:
        # Cognito設定(デプロイ時にsedで実際の値に置換される)
        user_pool_id = "$USER_POOL_ID"
        client_id = "$CLIENT_ID"
        region = 'us-east-1'

        # Cognitoの公開鍵情報を取得
        jwks_url = f"https://cognito-idp.{region}.amazonaws.com/{user_pool_id}/.well-known/jwks.json"
        public_keys = get_jwks(jwks_url)

        # ID Tokenのヘッダーからkid(Key ID)を取得
        unverified_header = jwt.get_unverified_header(id_token)
        kid = unverified_header.get('kid')
        if not kid:
            raise JOSEError('kid not found in token header')

        # JWKSから対応する公開鍵を検索
        key_data = next((key for key in public_keys['keys'] if key['kid'] == kid), None)
        if not key_data:
            raise JOSEError('Public key not found in JWKS')

        # 公開鍵オブジェクトを構築
        public_key = jwk.construct(key_data)

        # JWT検証(署名・有効期限・at_hash検証を実行)
        # access_tokenを渡すことでat_hash(Access Token Hash)も自動検証される
        # これによりID TokenとAccess Tokenの整合性が保証される
        message = jwt.decode(
            id_token,
            public_key,
            algorithms=['RS256'],
            audience=client_id,
            access_token=access_token
        )

        logger.info(f"Token and at_hash validation successful for user: {message.get('cognito:username')}")
        return request

    except ExpiredSignatureError:
        # トークン期限切れ:Cookieクリアしてログインページへ
        logger.error('Token has expired. Redirecting to login page.')
        return create_redirect_response(host, '/login.html', clear_cookies=True)

    except JOSEError as e:
        # JWT検証エラー(署名不正、at_hash不一致など):Cookieクリアしてログインページへ
        logger.error(f'Error validating token: {str(e)}. Redirecting to login page.')
        return create_redirect_response(host, '/login.html', clear_cookies=True)

    except Exception as e:
        # その他のエラー:安全側に倒してログインページへ
        logger.error(f'An unexpected error occurred: {str(e)}. Redirecting to login page.')
        return create_redirect_response(host, '/login.html', clear_cookies=True)
EOF

# lambda_function.py内の変数を実際の値に置換
sed -i "s/\\\$USER_POOL_ID/$USER_POOL_ID/g" lambda_function.py
sed -i "s/\\\$CLIENT_ID/$CLIENT_ID/g" lambda_function.py

# 依存関係をインストール
pip install -r requirements.txt -t package

# lambda_function.pyをpackageディレクトリにコピー
cp lambda_function.py package/

# packageディレクトリ内でZIP作成
cd package
zip -r ../lambda-edge-function.zip .
cd ..

# ZIPファイルのサイズ確認
ls -lh lambda-edge-function.zip
2.4.2.IAMロール作成
# Lambda@Edge用IAMロール作成
aws iam create-role \
  --role-name lambda-edge-execution-role \
  --assume-role-policy-document '{
    "Version": "2012-10-17",
    "Statement": [
      {
        "Effect": "Allow",
        "Principal": {
          "Service": [
            "lambda.amazonaws.com",
            "edgelambda.amazonaws.com"
          ]
        },
        "Action": "sts:AssumeRole"
      }
    ]
  }'

# 基本実行ポリシーアタッチ
aws iam attach-role-policy \
  --role-name lambda-edge-execution-role \
  --policy-arn arn:aws:iam::aws:policy/service-role/AWSLambdaBasicExecutionRole
2.4.3.Lambda@Edge デプロイ
# Lambda関数名を変数として定義
FUNCTION_NAME="lambda-edge-auth-function"

# Lambda@Edge関数作成(us-east-1リージョン必須)
aws lambda create-function \
  --function-name "$FUNCTION_NAME" \
  --runtime python3.10 \
  --role arn:aws:iam::$(aws sts get-caller-identity --query Account --output text):role/lambda-edge-execution-role \
  --handler lambda_function.lambda_handler \
  --zip-file fileb://lambda-edge-function.zip \
  --timeout 5 \
  --region us-east-1

# バージョンを発行(Lambda@Edgeでは特定バージョンが必要)
VERSION_ARN=$(aws lambda publish-version \
  --function-name "$FUNCTION_NAME" \
  --region us-east-1 \
  --query 'FunctionArn' \
  --output text)

echo "Lambda@Edge Version ARN: $VERSION_ARN"

# リソースベースポリシー追加
aws lambda add-permission \
  --function-name "$FUNCTION_NAME" \
  --statement-id cloudfront-execute-function \
  --action lambda:InvokeFunction \
  --principal edgelambda.amazonaws.com \
  --region us-east-1

# リソースベースポリシーの確認
aws lambda get-policy \
  --function-name "$FUNCTION_NAME" \
  --region us-east-1
2.5.CloudFrontへのLambda@Edge設定
2.5.1.CloudFrontディストリビューションの更新
# 現在のCloudFront設定を取得
ETAG=$(aws cloudfront get-distribution-config --id $DISTRIBUTION_ID --query 'ETag' --output text)
DIST_CONFIG=$(aws cloudfront get-distribution-config --id $DISTRIBUTION_ID --query 'DistributionConfig')

# Lambda@EdgeをViewer Requestに設定
UPDATED_CONFIG=$(echo $DIST_CONFIG | jq --arg version_arn "$VERSION_ARN" '
  .DefaultCacheBehavior.LambdaFunctionAssociations = {
    "Quantity": 1,
    "Items": [
      {
        "LambdaFunctionARN": $version_arn,
        "EventType": "viewer-request",
        "IncludeBody": false
      }
    ]
  }
')

# CloudFrontを更新
aws cloudfront update-distribution \
  --id $DISTRIBUTION_ID \
  --distribution-config "$UPDATED_CONFIG" \
  --if-match $ETAG
2.5.2.デプロイ状況確認
# デプロイ状況を確認(Deployed になったらテスト実施)
aws cloudfront get-distribution --id $DISTRIBUTION_ID --query 'Distribution.Status' --output text

echo "CloudFront URL: https://$CLOUDFRONT_DOMAIN"
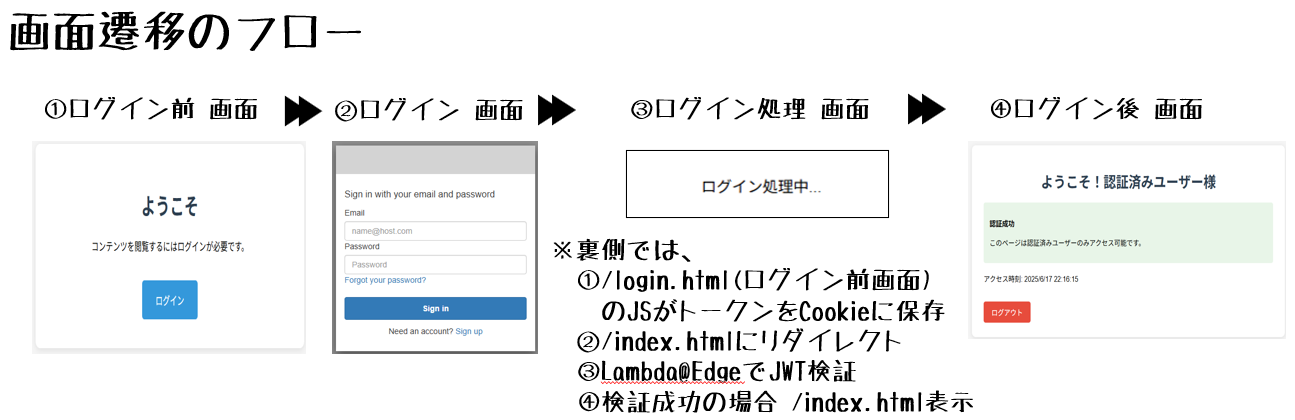
3.挙動確認
3.1.画面の移り変わり
アクセスのフローに関しては以下のようなフローとなる。
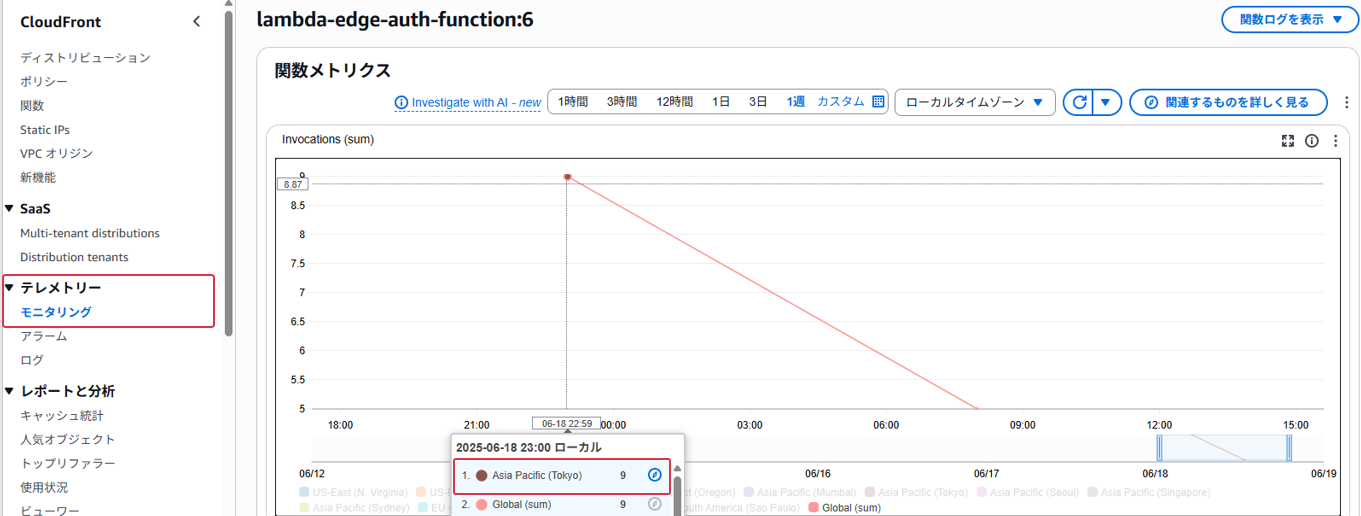
3.2.Lambda@Edgeの確認
3.2.1.CloudFrontでの確認
- CloudFront 左ペイン「テレメトリー」の「モニタリング」から Lambda@Edgeのメトリクスを確認
3.2.2.ログの確認
- Lambda@Edgeの動きに関する CloudWatch Logsの出力結果確認
- CloudFrontに表示されていたリージョンで確認
- バージニア北部に構築は必要だが、各リージョンにログは出力される
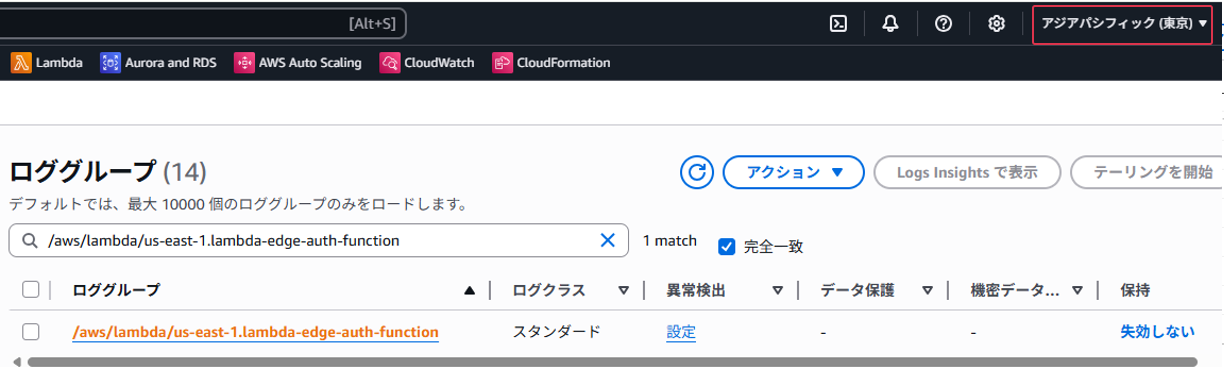
- CloudWatch Logsで出力されたログ
- JWT検証が成功してログインできていることが確認できる

4.おわりに
4.1.得られた知見
- CloudFront と Lambda@Edgeの関連付けの方法
- ログの出力先
- リソースベースポリシー
- at_hashについて(後日別ブログについて記載)
4.2.今後の課題
- Identity Poolを使ったAWS権限ベース認可