この記事はシスコの有志による Cisco Systems Japan Advent Calendar 2021 1枚目の 3日目として投稿しています。
2021年版(1枚目): https://qiita.com/advent-calendar/2021/cisco
2021年版(2枚目): https://qiita.com/advent-calendar/2021/cisco2
以下、昨年までのものです。
2020年版(1枚目): https://qiita.com/advent-calendar/2020/cisco
2020年版(2枚目): https://qiita.com/advent-calendar/2020/cisco2
2019年版: https://qiita.com/advent-calendar/2019/cisco
2018年版: https://qiita.com/advent-calendar/2018/cisco
2017年版: https://qiita.com/advent-calendar/2017/cisco
はじめに
昨年に引き続きクラウドのFaaSサービスの無料枠を活用してCisco Webex Botを作ってみます。
ちなみに、昨年はVercel Serverless Functionsを使いました。
[Qiita] Vercel Serverless FunctionsでCisco Webex Botを作る
https://qiita.com/tetsusat/items/6cd2234fecd5af9441c4
Cisco WebexでQuizを出題する仕組みを作ってみた
https://qiita.com/tetsusat/items/28363b785dc0dda7be73
Cludflare Workersとは
Cloudflare Workersは、Cloudflareのグローバルクラウドネットワーク上で実行されるサーバーレスアプリケーションプラットフォームです。
[Cludflare Workers] Home
https://workers.cloudflare.com/
2021年12月現在、クレジットカードの登録なしでフリープランでアカウントが作れて、フリープランでもBotを運用するには十分な機能とリソースが使えます。
[Cludflare Workers] Price
https://developers.cloudflare.com/workers/platform/pricing
[Cludflare Workers] Limit
https://developers.cloudflare.com/workers/platform/limits
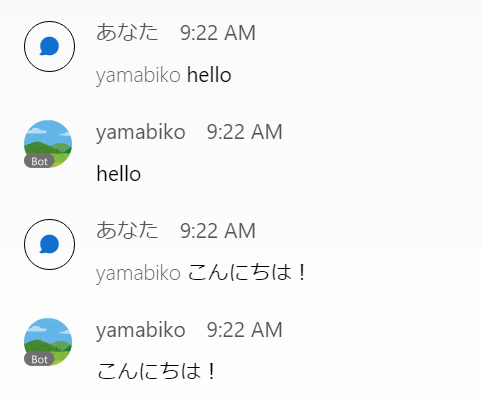
エコーBotを作る
まずは、Cludflare Workersの使い勝手を知る上でも、メンションで呼びかけられたら同じメッセージをオウム返しするシンプルなエコーBotを作ってみたいと思います。
Botアプリケーションの概要は以下のようです。
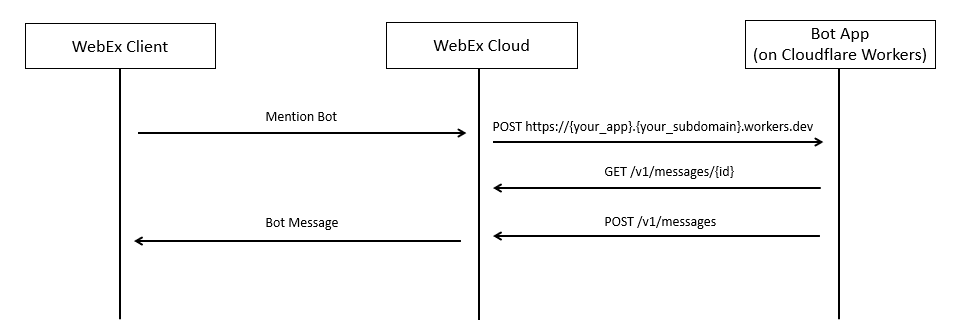
利用するAPIコールは以下の2つです。
事前準備
事前準備として、Cloudflare Workersのアカウントを作成します。
Cloudflare Workers
https://workers.cloudflare.com/
次に、Cisco Webex BotおよびWebhookを作成しておきます。やり方は以下の記事が参考になると思います。
[Qiita] Vercel Serverless FunctionsでCisco Webex Botを作る
https://qiita.com/tetsusat/items/6cd2234fecd5af9441c4
Webhook作成のパラメータは以下のとおりです。参考記事から唯一の変更点としてtargetUrlをCloudflare Workersのルートに合わせてあげます。
- name: 任意
- tergetUrl: https://<your_app>.<your_subdomain>.workers.dev
- resource: messages
- event: created
- filter: mentionedPeople=me
Botアプリケーションの作成
Cloudflare Workersのアプリケーションの作成を支援してくれるWranglerツールをインストールします。
$ npm install @cloudflare/wrangler -g
Wranglerツールを実行できることを確認します。
$ wrangler --version
wrangler 1.19.4
Cloudflare Workersアカウントでログインします。
$ wrangler login
アプリケーションの雛形を生成します。webex-echoは今回のプロジェクト名になります。
$ wrangler generate webex-echo
cd webex-echo
生成されたindex.jsを確認します。
なんとなく、HTTPリクエスト受けたときの処理としてResponseオブジェクトを返すイベントハンドラをeventのrespondWith()メソッドを通じて登録すればいいということが分かります。
addEventListener("fetch", event => {
  event.respondWith(handleRequest(event.request))
})

async function handleRequest(request) {
  return new Response("Hello worker!", {
    headers: { "Content-Type": "text/plain" }
  })
}
メンションされるとWebhookにHTTPリクエストがされるので、ボディから必要な情報を取得して、Cisco WebexのAPIを通じてメッセージを返します。
index.jsを変更します。
面倒くさいので分かりやすさを重視してエラー処理は割愛してます。
addEventListener('fetch', event => {
  event.respondWith(handleRequest(event.request))
})
/**
 * Respond with hello worker text
 * @param {Request} request
 */
async function handleRequest(request) {
  const body = await request.json();
  const resp = await fetch(`https://webexapis.com/v1/messages/${body.data.id}`, {
    headers: {
      'Content-Type': 'application/json',
      'Authorization': `Bearer ${WEBEX_TOKEN}`
    }
  })
  const data = await resp.json()
  await fetch('https://webexapis.com/v1/messages/', {
    method: 'POST',
    headers: {
      'Content-Type': 'application/json',
      'Authorization': `Bearer ${WEBEX_TOKEN}`
    },
    body: JSON.stringify({ roomId: data.roomId, text: data.text.replace(BOT_NAME, '').trim() }),
  })

  return new Response('{}', {
    headers: { 'content-type': 'application/json' },
  })
}
Bot名は環境変数として渡せるようにwrangler.tomlに以下のような記載を追加します。
...
[vars]
BOT_NAME = "yamabiko"
Cisco Webex BotのアクセストークンはSecret環境変数として登録します。
$ wrangler secret put WEBEX_TOKEN
アプリケーションを公開します。
$ wrangler publish
CRONでスケジュールしたBotを作る
次に、CRONでスケジュールしてミーティングの開催を知らせてくれるBotを作ってみます。
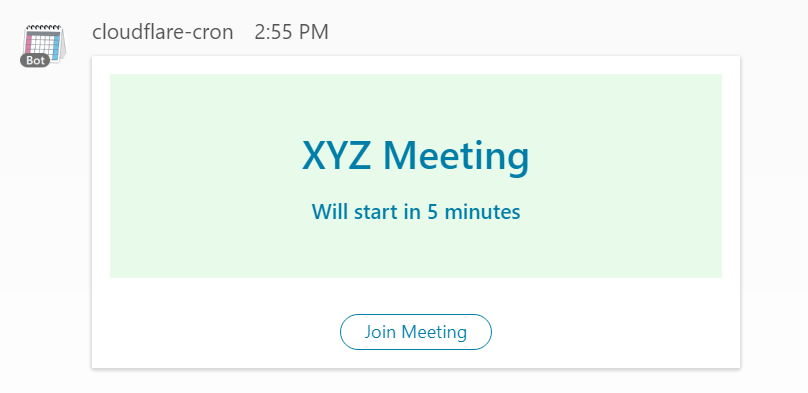
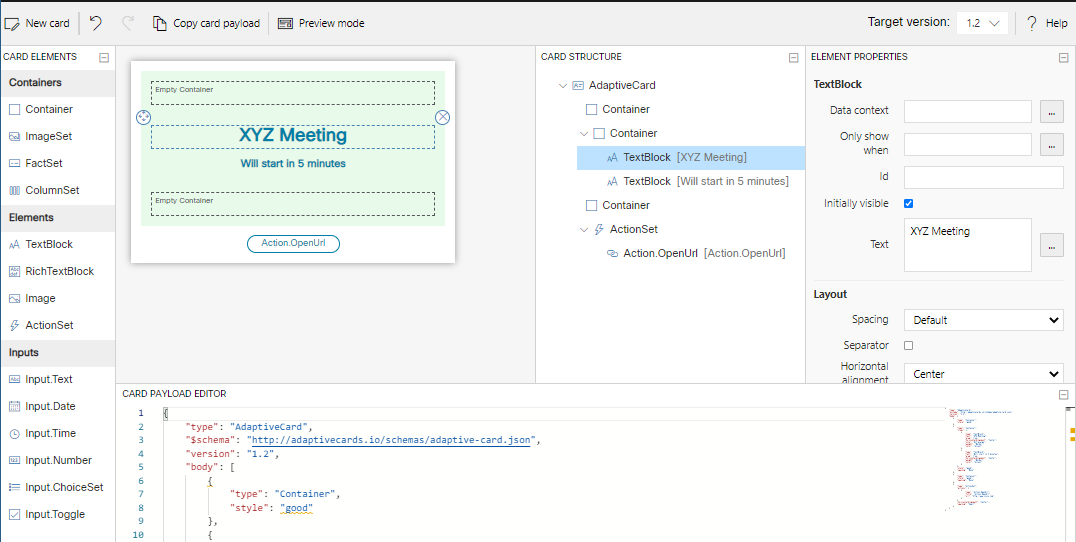
下部のボタンをクリックするとリンクされているURLに飛べるイメージです。
アプリケーションの概要は以下のようです。
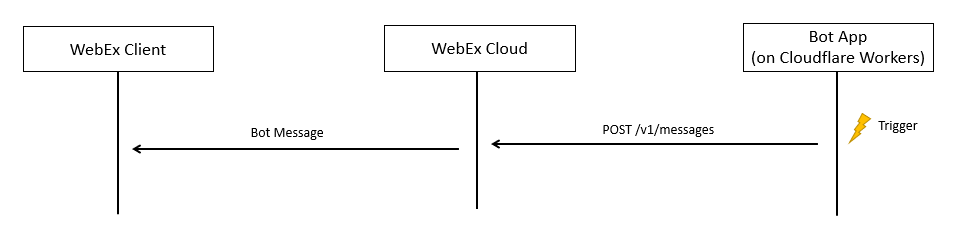
利用するAPIコールは以下の1つです。
事前準備
事前準備として、Cisco Webex Botを作成しておきます。
Botから一方的にメッセージを送るので、今回はWebhookは不要です。
Botアプリケーションの作成
アプリケーションの雛形を生成します。
$ wrangler generate webex-cron
cd webex-cron
スケジュールで呼び出されるアプリケーションは以下のような感じになります。
なんとなく、イベントがトリガーされたときに処理を実行するイベントハンドラをeventのtriggerEvent()メソッドを通じて登録すればいいということが分かります。
addEventListener('scheduled', event => {
    event.waitUntil(triggerEvent(event.scheduledTime))
})

async function triggerEvent(scheduledTime) {
    // Fetch some data
    // Update API
    console.log("cron processed")
}
[Cloudflare Workers] Cron Triggers
https://developers.cloudflare.com/workers/examples/cron-trigger
以上を踏まえて、スケジュールで呼び出された際に、ミーティングの告知をするindex.jsを作成します。
addEventListener('scheduled', event => {
  event.waitUntil(handleScheduled(event))
})

async function handleScheduled(event) {
  const headers = {
    'Content-Type': 'application/json',
    'Authorization': `Bearer ${WEBEX_TOKEN}`
  }

  const content = `
  {
    "roomId":"${ROOM_ID}",
    "text":"Meeting will start soon!",
    "attachments":[
      {
        "contentType":"application/vnd.microsoft.card.adaptive",
        "content":{
          "type":"AdaptiveCard",
          "$schema":"http://adaptivecards.io/schemas/adaptive-card.json",
          "version":"1.2",
          "body":[
            {
              "type":"Container",
              "style":"good"
            },
            {
              "type":"Container",
              "items":[
                {
                  "type":"TextBlock",
                  "text":"${MEETING_TITLE}",
                  "wrap":true,
                  "horizontalAlignment":"Center",
                  "size":"ExtraLarge",
                  "weight":"Bolder",
                  "color":"Accent"
                },
                {
                  "type":"TextBlock",
                  "text":"Will start in 5 minutes",
                  "wrap":true,
                  "horizontalAlignment":"Center",
                  "weight":"Bolder",
                  "color":"Accent"
                }
              ],
              "style":"good",
              "spacing":"None"
            },
            {
              "type":"Container",
              "style":"good",
              "spacing":"None"
            },
            {
              "type":"ActionSet",
              "actions":[
                {
                  "type":"Action.OpenUrl",
                  "title":"Join Meeting",
                  "url":"${MEETING_URL}"
                }
              ],
              "horizontalAlignment":"Center",
              "spacing":"Small"
            }
          ]
        }
      }
    ]
  }
  `

  await fetch("https://webexapis.com/v1/messages/", {
    method: 'POST',
    headers: headers,
    body: content,
  })
}
リッチなコンテンツを表現するためにAdaptive Cardsの機能を使いました。
[Cisco WebEx for Developer] Buttons and Cards
https://developer.webex.com/docs/api/guides/cards
以下のDesignerツールを使うことで比較的簡単にコンテンツを作れます。
Cisco WebEx for Developer] Buttons and CardsDesigner
https://developer.webex.com/buttons-and-cards-designer
環境変数をwrangler.tomlに追記します。
アプリケーションを実行するタイミングはCRON形式でUTC時間で記載します。
以下、金曜14時55分(15時のミーティングの5分前)にトリガーする設定例です。
[vars]
ROOM_ID = "<meeting_id>"
MEETING_TITLE = "XYZ Meeting"
MEETING_URL = "<meeting_url>"

[triggers]
crons = ["55 5 * * 6"]
Cisco Webex BotのアクセストークンはSecret環境変数として登録します。
$ wrangler secret put WEBEX_TOKEN
アプリケーションを公開します。
$ wrangler publish
おしまい