1. 概要
前回の記事でFirebaseの環境を構築が完了しましたが、今回は実際に画像をアップロードするプログラムを開発します。
2. 前提条件
作業日時
- 2020/3/20
環境
- MacBook Pro
- macOS Catalina
ソフトウェアのバージョン
| 分類 | ソフトウェア | バージョン |
|---|---|---|
| フレームワーク | React | 16.13.0 |
| フレームワーク | React-dom | 16.13.0 |
| 静的型付け | TypeScript | 3.7.5 |
| Firebase CLI | firebase-tools | 7.14.0 |
| ライブラリ | Material UI | v4.9.4 |
| @material-ui/core | 4.9.4 | |
| @material-ui/icons | 4.9.1 | |
| ライブラリ | react-dropzone | 10.2.1 |
3. 追加のライブラリのインストール
Material UIに加えて、画像をドラッグアンドで追加可能とするためreact-dropzoneをインストールする。
$ yarn add @material-ui/core @material-ui/icons
$ yarn add react-dropzone
4. Firebaseのコンフィグファイルの作成
Firebaseのアカウント情報を保持するconfigファイルを作成します。 コンフィグファイルのAPI keyなどの入力項目はFirebaseのWebコンソールから確認できます。
「プロジェクトの設定」 > 「全般」 > 「マイアプリ」 > 「ウェブアプリ」 > 「マイアプリ」 > 「Firebase SDK snippet」 > 「構成」に記載されています。
以下では直接値を記載していますが、環境変数で指定してdatabaseURL: process.env.REACT_APP_FIREBASE_DATABASE_URLといった形で値を指定する方が望ましいです。
import * as firebase from 'firebase/app';

//必要なモジュールごとにimport
// import 'firebase/auth';
// import 'firebase/firestore';
// import 'firebase/database';
import 'firebase/storage';
// import 'firebase/function';
// import 'firebase/analytics';

// インスタンスの初期化
const firebaseConfig = {
  apiKey: "hoeghogehogehoeghogehogehoeghogehoge",
  authDomain: "hoge",
  databaseURL: "https://hoge.firebaseio.com",
  projectId: "hoge",
  storageBucket: "hoge.appspot.com",
  messagingSenderId: "9999999999",
  appId: "1:1000000000000:web:hogehogehogehoge"
};

export const firebaseApp = firebase.initializeApp(config);
export default firebaseApp;
Storageのアクセス権限修正
今回はサンプルのため、未認証でもファイルの書き込みが可能なように、Storageのアクセス権限を付与します。
rules_version = '2';
service firebase.storage {
  match /b/{bucket}/o {
    match /{allPaths=**} {
//      allow read, write: if request.auth!=null;
      allow read, write;
    }
  }
}
`firebase deploy'で設定を反映します。
5. プログラムの作成
App.tsx
最初にApp.tsxにFileUploadのコンポーネントを表示するように修正します。
import React from "react";
import { MuiThemeProvider, createMuiTheme } from '@material-ui/core/styles';
import CssBaseline from "@material-ui/core/CssBaseline";
import green from '@material-ui/core/colors/green';

import FileUpload from "./FileUpload";

// 独自のテーマを作成する
const theme = createMuiTheme({
  palette: {
    //type: 'dark', // ダークテーマ
    primary: green,
  },
  typography: {
    fontFamily: [
      'Noto Sans',
      'sans-serif',
    ].join(','),
    fontSize: 12,
    h1: {
      fontSize: "1.75rem"
    },
    h2: {
      fontSize: "1.5rem"
    },
    h3: {
      fontSize: "1.25rem"
    },
    h4: {
      fontSize: "1.125rem"
    },
    h5: {
      fontSize: "1rem"
    },
    h6: {
      fontSize: "1rem"
    },
  }
});

function App() {
  return (
    <MuiThemeProvider theme={theme}>
        <CssBaseline />
        <FileUpload />
    </MuiThemeProvider >
  );
}

export default App;
FilreUpload.tsx
次に、FileUpload.tsx のコンポーネントを作成します。
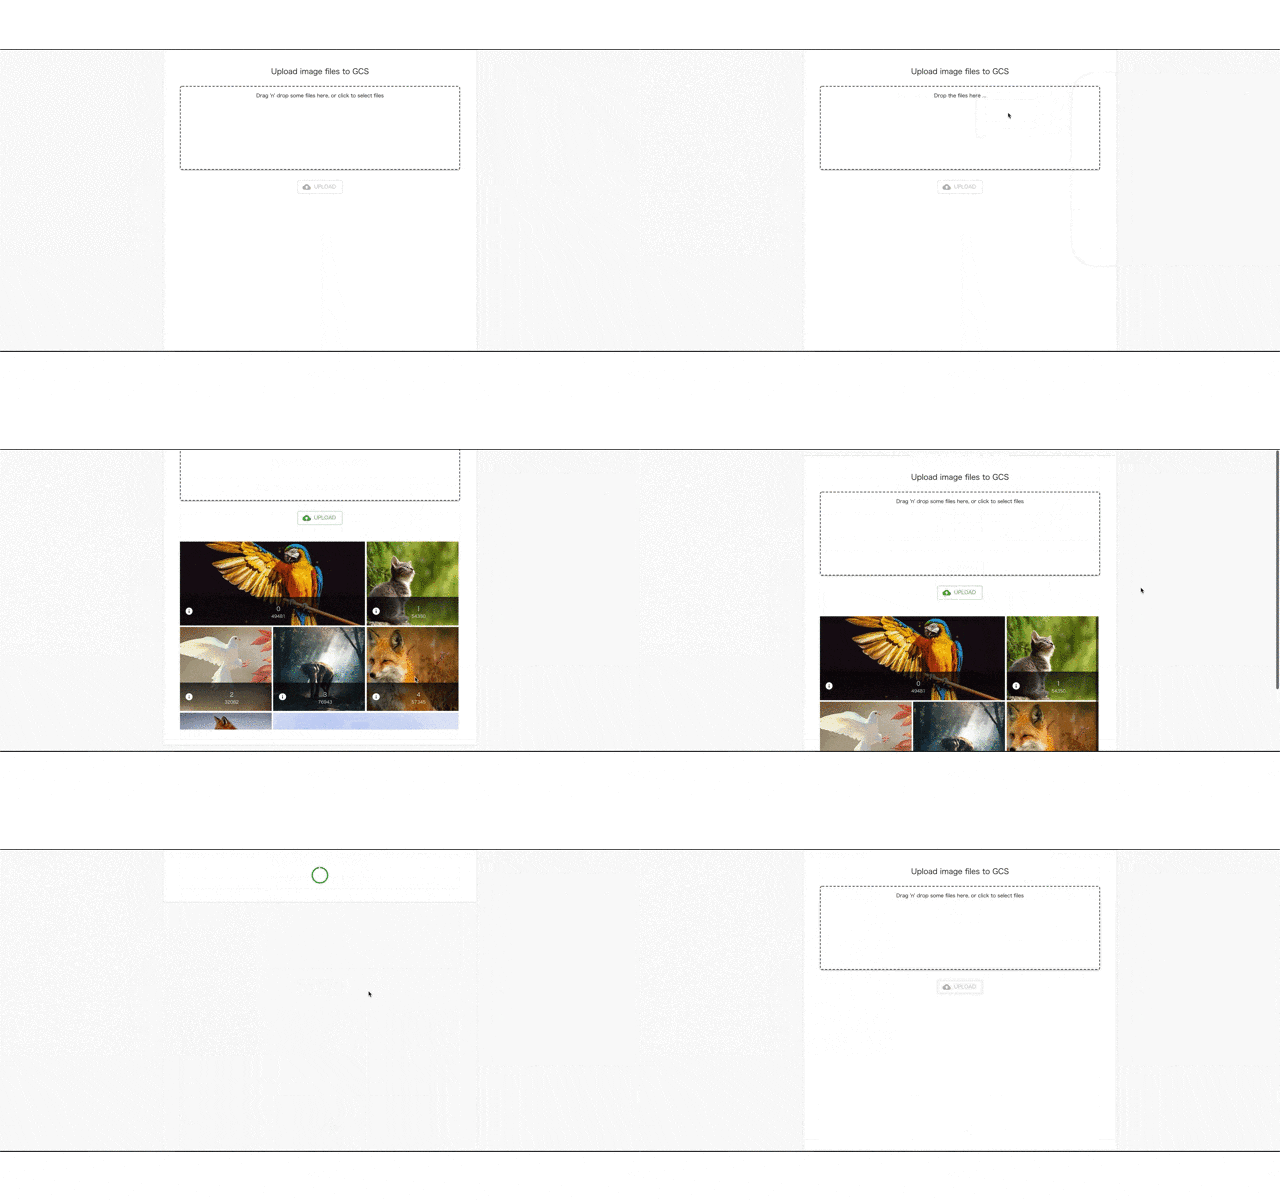
useDropzone でDropzoneの設定と、ファイルがドロップされた時に呼びされる関数 onDrop を指定します。 onDropの中ではドロップされたファイルをfilesに保存してます。
このfilesに保存された画像ファイルはサムネイルとして、下部に表示しています。Masonryっぽく全てのタイルが埋まるようにしています。ちゃんと実装するなら以下のようなライブラリを利用してください。
Firebase storageへのアップロードは、アップロードボタンが押下された時に呼び出されるonUpload関数の中で行っています。
const storageRef = firebaseApp.storage().ref().child('images/' + file_name); でアップロード先を指定し、var task = storageRef.put(file); でアップロードを行っています。 taskはアップロード処理の途中経過・完了の把握や、処理の停止をするためのものです。
Promise.all で各ファイルを並列にアップロードを行い、全てアップロードが完了したら、ローディングの中止とアラートの表示を行っています。
import React, { useState, useEffect, useCallback } from "react";

import * as firebase from 'firebase/app';
import { firebaseApp } from './firebase_config';

import { makeStyles, createStyles, Theme } from '@material-ui/core/styles';

import {
  Typography,
  Grid,
  GridList,
  GridListTile,
  GridListTileBar,
  Button,
  IconButton,
  Paper,
  CircularProgress
} from '@material-ui/core/';

import CloudUploadIcon from '@material-ui/icons/CloudUpload';
import InfoIcon from '@material-ui/icons/Info';

import { useDropzone } from 'react-dropzone'

// スタイルを適用する
const useStyles = makeStyles((theme: Theme) =>
  createStyles({
    root: {
      display: 'flex',
    },
    paper: {
      padding: theme.spacing(2),
      textAlign: 'center',
      '& > *': {
        margin: theme.spacing(3),
      },
    },
    dropzone: {
      width: "100%",
      height: 200,
      boxSizing: "border-box",
      borderWidth: 2,
      borderColor: "#666666",
      borderStyle: "dashed",
      borderRadius: 5,
      verticalAlign: "top",
      marginRight: "2%",
    },
    thumbsContainer: {
      marginTop: 16,
    },
    gridList: {
      width: "100%",
      height: 450,
      // Promote the list into his own layer on Chrome. This cost memory but helps keeping high FPS.
      transform: 'translateZ(0)',
    },
    titleBar: {
      background:
        'linear-gradient(to bottom, rgba(0,0,0,0.7) 0%, ' +
        'rgba(0,0,0,0.3) 70%, rgba(0,0,0,0) 100%)',
    },
    icon: {
      color: 'white',
    },
    upButton: {
      color: "secondary",
      margin: theme.spacing(3),
    },
    circular: {
      textAlign: 'center',
    }
  }),
);

// propsは無し
type Props = {};

// Dropzoneの設定
const acceptFile = 'image/*';
const maxFileSize = 1048576;

// previewを追加
type MyFile = File & {
  preview: string;
};

export default function FileUpload(props: Props) {
  console.log("FileUpload page start.");

  // State
  const [files, setFiles] = useState<MyFile[]>([]);
  const [uploading, setUploading] = useState(false);
  const [progress, setProgress] = useState(0);

  const classes = useStyles(props);

  /*
  ドロップした時の処理
  */
  const onDrop = useCallback((acceptedFiles: File[]) => {
    console.log('onDrop');

    // previewの追加
    setFiles(acceptedFiles.map(
      file => Object.assign(file, {
        preview: URL.createObjectURL(file)
      })));

  }, [])

  // Dropzone
  const { getRootProps, getInputProps, isDragActive }
    = useDropzone({ onDrop, accept: acceptFile, minSize: 0, maxSize: maxFileSize })

  const onUpload = async () => {
    console.log('onUpload start');

    // ローディングをOn。progressを初期化
    setUploading(true);
    setProgress(0);

    function uploadImageAsPromise(file) {
      console.log('uploadImageAsPromise start');

      // アップロード先のファイルパスの作成
      const file_name = file.name;
      const storageRef = firebaseApp.storage().ref().child('images/' + file_name);

      return new Promise(function (resolve, reject) {
        //Upload file
        var task = storageRef.put(file);

        //Update progress bar
        task.on(firebase.storage.TaskEvent.STATE_CHANGED,
          function progress(snapshot) {
            var percent = (snapshot.bytesTransferred / snapshot.totalBytes) * 100;
            console.log(percent + "% done");
          },
          function error(err) { // 失敗時
            console.log("upload error");
            reject(err);
          },
          function complete() { // 成功時
            console.log('upload complete.');
            task.then(function (snapshot: firebase.storage.UploadTaskSnapshot) {
              resolve(snapshot.ref.getDownloadURL());
            })
          }
        );

      }).then(function (downloadURL) {
        console.log("Finished uploading file: " + file_name);

        // progressを更新する
        setProgress(oldProgress => (oldProgress + 1));
        return downloadURL;
      }).catch(function () {
        console.log("Error:uploadImageAsPromise");
      });
    }

    // 複数のファイルアップロードをPromise.allで並列に実行する
    const result = await Promise.all(files.map((file) => { return uploadImageAsPromise(file); }));

    console.log("Upload result");
    console.log(result);

    // ローディングを終了し、リストを空に
    setUploading(false);
    setProgress(0);
    setFiles([]);

    alert("送信されました");

  }

  // アップロード中はCircularを表示する
  if (uploading === true) {
    const percent = Math.round((progress / files.length) * 100)
    console.log("Loadingの表示。Progreass:" + progress + " Percent:" + percent);

    return (
      <Grid container className={classes.root} spacing={3} justify="center">
        <Grid item xs={6}>
          <Paper variant="outlined" elevation={3} className={classes.paper}>
            <CircularProgress className={classes.circular} variant="determinate" value={percent} />
          </Paper>
        </Grid>
      </Grid>
    )

  } else {
    // タイルを敷き詰められるように、一部画像のサイズは大きくする
    const tile_cols = 3;
    let tile_featured = [];
    switch (files.length % tile_cols) {
      case 0:
        tile_featured = [];
        break;
      case 1:
        tile_featured = [0, files.length - 1];
        break;
      case 2:
        tile_featured = [0];
        break;
    }

    // サムネイルの作成
    const thumbs = files.map((file, index) => (

      <GridListTile key={file.preview} cols={tile_featured.indexOf(index) >= 0 ? 2 : 1} rows={1}>
        <img src={file.preview} alt={file.name} />
        <GridListTileBar
          title={file.name}
          subtitle={file.size}
          actionIcon={
            <IconButton aria-label={`star ${file.name}`} className={classes.icon}>
              <InfoIcon />
            </IconButton>
          }
          actionPosition="left"
          className={classes.titleBar}
        />
      </GridListTile>
    ));

    const diabled_button = (files.length === 0);

    return (
      <Grid container className={classes.root} spacing={3} justify="center">
        <Grid item xs={6}>
          <Paper variant="outlined" elevation={3} className={classes.paper}>

            <Typography variant="h4">Upload image files to GCS</Typography>
            <div>
              <Paper className={classes.dropzone} {...getRootProps()}>
                <input {...getInputProps()} />
                {
                  isDragActive ?
                    <p>Drop the files here ...</p> :
                    <p>Drag 'n' drop some files here, or click to select files</p>
                }
              </Paper>
              <Button onClick={onUpload} variant="outlined" color="primary" disabled={diabled_button} className={classes.upButton} startIcon={<CloudUploadIcon />} >Upload</Button>
              <aside className={classes.thumbsContainer}>
                <GridList cellHeight={200} className={classes.gridList} cols={tile_cols}>
                  {thumbs}
                </GridList>
              </aside>
            </div>
          </Paper>
        </Grid>
      </Grid>
    );
  }

}
6. 動作確認
yarn startでサーバーを起動し、ブラウザで表示します。
FirebaseのWebコンソールでファイルがアップロードされていることを確認します。

7. 最後に
次回はアップロードした画像をCloud Functionsでリサイズする方法について説明します。
8. 関連記事
Reactに関する記事です。
- 第1回 2020年版 Node.js+Reactのインストール
- 第2回 2020年版 ReactのMaterial UI V4の使い方について
- 第3回 2020年版 React+Firebaseでアプリを作成する
- 第4回 2020年版 既存のウェブサイトに React を追加する
- 第5回 2020年版 ReactのRechartsで新型コロナウイルス感染症対策サイトのデータを可視化する
- 第6回 2020年版 React+Firebaseで画像のアップロード(その1)
- 第8回 2020年版 React+Firebaseで画像のアップロード(その3)
- 第9回 2020年版 ReactにStoryshotsを導入する
