(2023/12/22)
より改善された方法をIBM Cloud: VPC Custom Routesを利用したAZまたぎのHA環境の構成例(VPC外部からのアクセス): ingress routeのadvertiseにて紹介しています。
(2020/11/27)
本稿執筆時にはうまくいっていたのですが、その後しばらく試してみるとうまく切り替わらないことがわかりました。どうやらAddress Prefixを削除してもBGP sessionが残ってしまうことがあるという既知の問題があるようです。この問題が解決するまでは、この記事の解決は有効に働かない可能性があります。 -> 修正されました!
1. はじめに
IBM Cloud: VPC Custom Routesを利用したAZまたぎのHA環境の構成例(VPC内部からのアクセス)の続編です。
VPC内部からのアクセスはこれでZone間切り替えがうまくいったが、Direct Link経由やTransit Gateway経由では192.168.10.10経由でアクセスできない。
これは、以下の理由のためである。
- Direct LinkやTransit GatewayのようなVPC外部からの経路については、Ingress Route tableを使う必要がある。(前回利用していたのはEgress Route tableで、VPC内のsubnetをsourceとする経路制御)
- 192.168.10.10というVPC内で定義されていないアドレスに対して、そのままではVPC外部からは到達できない(勝手に指定したアドレスが対向側に経路広告されることはない)。そのため、例えば192.168.10.0/28というダミーのAddress Prefixを定義しておく必要がある。IBM CloudのVPCはAddress Prefix単位で経路広告されるため、必ずしもsubnetを作っておく必要はない。
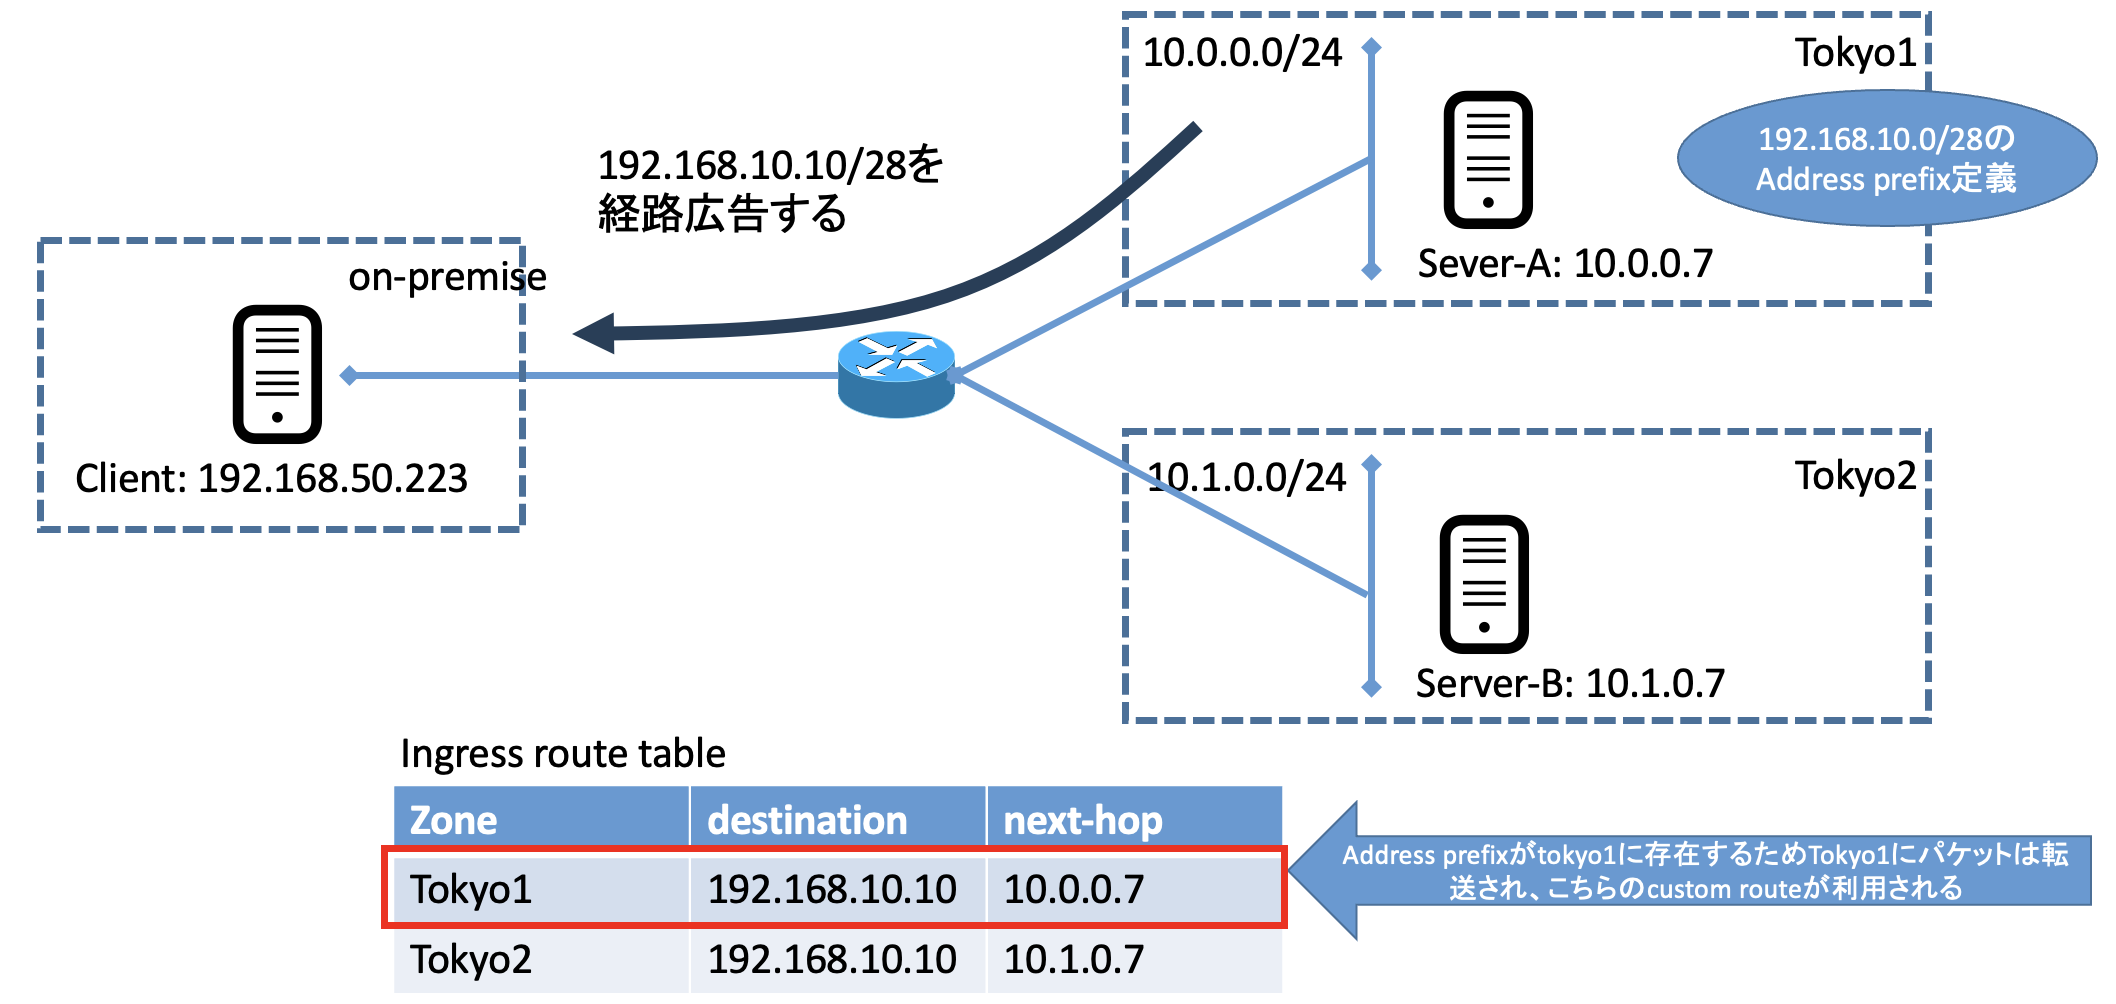
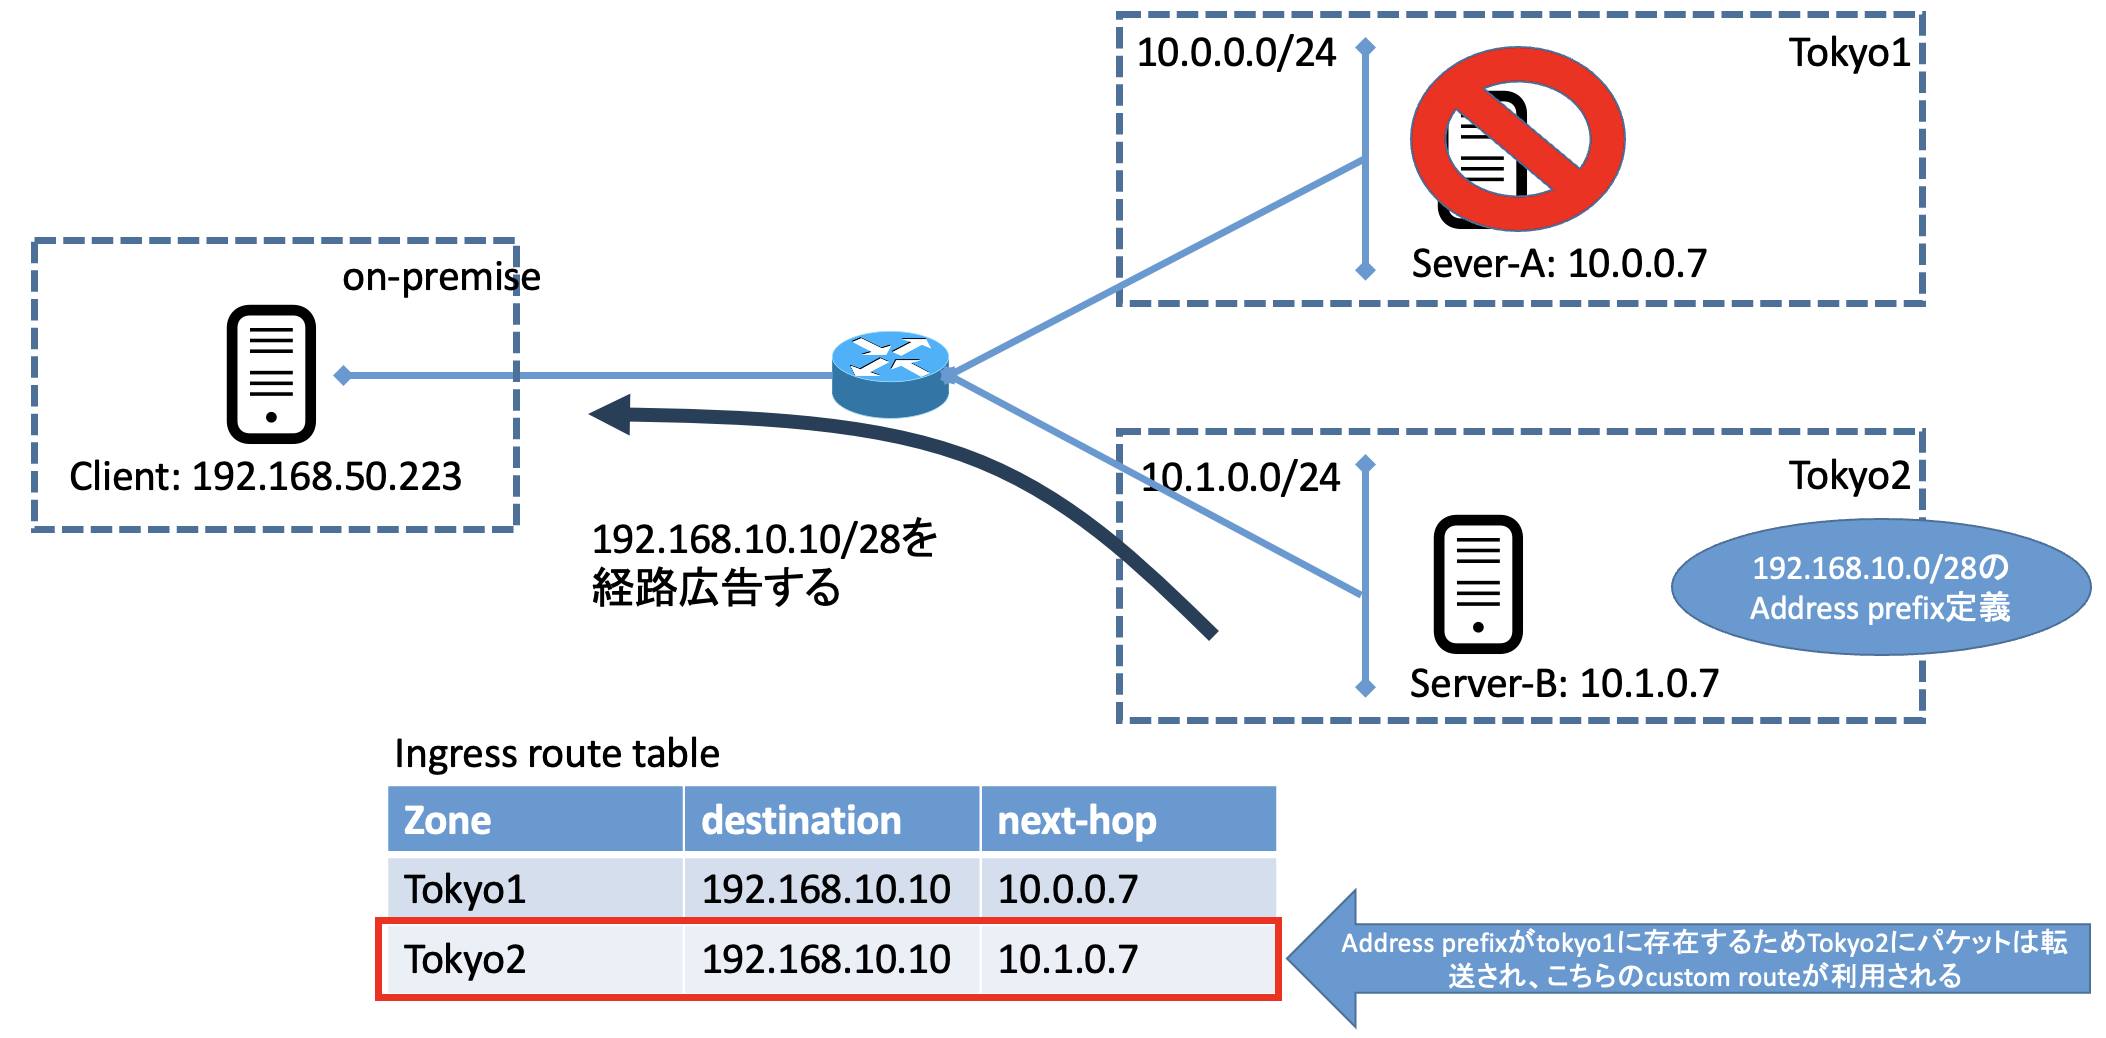
今回やりたい構成は以下である。
-
Server-A正常時(192.168.10.10宛のアクセスは10.0.0.7に転送)。192.168.10.10を含むAddress PrefixはTokyo1側にある。

-
Server-A障害時(192.168.10.10宛のアクセスは10.1.0.7に転送)。Tokyo2側にAddress Prefixを再作成。

2. 設定方法
2-1. Custom Route(Ingress)の作成
- 192.168.10.10宛のパケットがTokyo1 Zoneに到達したら10.0.0.7に
- 192.168.10.10宛のパケットがTokyo1 Zoneに到達したら10.1.0.7に
(参考)IngressのCustom Routeは同一Zoneへのnext hopしか選択できないことに注意。
https://cloud.ibm.com/docs/vpc?topic=vpc-about-custom-routes#limitations-custom-routes
For egress custom routes, when you add a destination route, you must select a zone. However, the next hop doesn't have to be in the same zone. For ingress custom routes, the next hop must be in the same zone.
2-2. Address Prefixの作成。
Address Prefix単位で広告されるので、subnetの作成は不要。
いったんTokyo1側に作成する。

2-3. Server-A/Server-Bに192.168.10.10を付与
前回実施している場合は不要。
2-4. IP spoofingの有効化
前回実施している場合は不要。
2-5. Security Group/Network ACLでDirect Link/Transit Gatewayの対向側からの通信を許可する。
(省略)
2-6. Direct Link/Transit Gatewayの対向側で192.168.10.0/28宛のstatic routeを設定する
(省略)
3. テスト
今回はDirect Link Connect 2.0経由でAIX端末からテストを行った。
3-1. Server-A正常時のアクセス
# oslevel -s
7200-04-01-1939
# ping -c 3 192.168.10.10
PING 192.168.10.10 (192.168.10.10): 56 data bytes
64 bytes from 192.168.10.10: icmp_seq=0 ttl=54 time=1 ms
64 bytes from 192.168.10.10: icmp_seq=1 ttl=54 time=1 ms
64 bytes from 192.168.10.10: icmp_seq=2 ttl=54 time=1 ms

--- 192.168.10.10 ping statistics ---
3 packets transmitted, 3 packets received, 0% packet loss
round-trip min/avg/max = 1/1/1 ms


[root@server-a ~]# tcpdump -i any icmp -nn
tcpdump: verbose output suppressed, use -v or -vv for full protocol decode
listening on any, link-type LINUX_SLL (Linux cooked), capture size 262144 bytes
09:54:10.996319 IP 192.168.50.223 > 192.168.10.10: ICMP echo request, id 416, seq 0, length 64
09:54:10.996352 IP 192.168.10.10 > 192.168.50.223: ICMP echo reply, id 416, seq 0, length 64
09:54:11.996347 IP 192.168.50.223 > 192.168.10.10: ICMP echo request, id 416, seq 1, length 64
09:54:11.996377 IP 192.168.10.10 > 192.168.50.223: ICMP echo reply, id 416, seq 1, length 64
09:54:12.996326 IP 192.168.50.223 > 192.168.10.10: ICMP echo request, id 416, seq 2, length 64
09:54:12.996361 IP 192.168.10.10 > 192.168.50.223: ICMP echo reply, id 416, seq 2, length 64


[root@server-b ~]# tcpdump -i any icmp -nn
tcpdump: verbose output suppressed, use -v or -vv for full protocol decode
listening on any, link-type LINUX_SLL (Linux cooked), capture size 262144 bytes
3-2. Server-A障害時のアクセス(Server-Bへの切り替えテスト)
Tokyo1からTokyo2に切り替えたいときは、192.168.10.0/28のAddress prefixをTokyo1から削除し、Tokyo2に作成する。
切り替えスクリプトのサンプルはこちら。

# oslevel -s
7200-04-01-1939
# ping -c 3 192.168.10.10
PING 192.168.10.10 (192.168.10.10): 56 data bytes
64 bytes from 192.168.10.10: icmp_seq=0 ttl=58 time=0 ms
64 bytes from 192.168.10.10: icmp_seq=1 ttl=58 time=0 ms
64 bytes from 192.168.10.10: icmp_seq=2 ttl=58 time=0 ms

--- 192.168.10.10 ping statistics ---
3 packets transmitted, 3 packets received, 0% packet loss
round-trip min/avg/max = 0/0/0 ms

[root@server-a ~]# tcpdump -i any icmp -nn
tcpdump: verbose output suppressed, use -v or -vv for full protocol decode
listening on any, link-type LINUX_SLL (Linux cooked), capture size 262144 bytes

[root@server-b ~]# tcpdump -i any icmp -nn
tcpdump: verbose output suppressed, use -v or -vv for full protocol decode
listening on any, link-type LINUX_SLL (Linux cooked), capture size 262144 bytes
09:56:02.887484 IP 192.168.50.223 > 192.168.10.10: ICMP echo request, id 406, seq 0, length 64
09:56:02.887521 IP 192.168.10.10 > 192.168.50.223: ICMP echo reply, id 406, seq 0, length 64
09:56:03.887461 IP 192.168.50.223 > 192.168.10.10: ICMP echo request, id 406, seq 1, length 64
09:56:03.887489 IP 192.168.10.10 > 192.168.50.223: ICMP echo reply, id 406, seq 1, length 64
09:56:04.887502 IP 192.168.50.223 > 192.168.10.10: ICMP echo request, id 406, seq 2, length 64
09:56:04.887530 IP 192.168.10.10 > 192.168.50.223: ICMP echo reply, id 406, seq 2, length 64

