1. はじめに
IBM CloudのVPCで待望のBM for VPC(物理サーバー)がGAされましたので、まずはプロビジョニングしてみたいと思います。
Announcement Blogはこちら。
https://www.ibm.com/cloud/blog/announcements/introducing-ibm-cloudr-bare-metal-servers-for-vpc
IBM Cloud docsはこちら。
https://cloud.ibm.com/docs/vpc?topic=vpc-about-bare-metal-servers&interface=ui&locale=en
https://cloud.ibm.com/docs/vpc?topic=vpc-planning-for-bare-metal-servers&interface=ui&locale=en
2. 主な特徴と制約
-
現在はDALとFRAで利用が可能2022年3月29日現在、DAL/WDC/FRAで利用可能。 -
また、OSとしてVMWare ESXi 7.x(subscription or BYOL)のみが選択可能。RHELやWindowsなどは今後追加されていく予定。2022年3月29日現在、ESXi 7.xとRHEL 8.xが選択可能。他のOSは今後追加されていく予定。 - 最大で100Gbpsのネットワークスループットを出すことが可能。SmartNICを利用することにより、最大で8つまでPCI Interfaceを増やすことができます。つまり、あたかもOSから見ると物理NICが8つまで増えせるように見えるということですね。
- 注文時にサーバー名を指定しているにも関わらず、ESXiには
localhost.localdomainで設定されてしまう。これは2022/02/02時点では仕様のようです。後から簡単に変更できるとか、User Dataでプロビジョニング時に明示的に変更すればいいじゃないかっていうのもありますが、、、どこかのタイミングで改善して欲しい気もしますね。手動で後から変更する方法は、ESXiのhostnameを変更する方法を参照してください。
その他の特徴は、今後追々利用する際に紹介していきたいと思います。
3. 注文方法
Bare metal serversというメニューがCompute配下に表示されています。
3-1. Createを押下
3-2. サーバー名やロケーションを指定
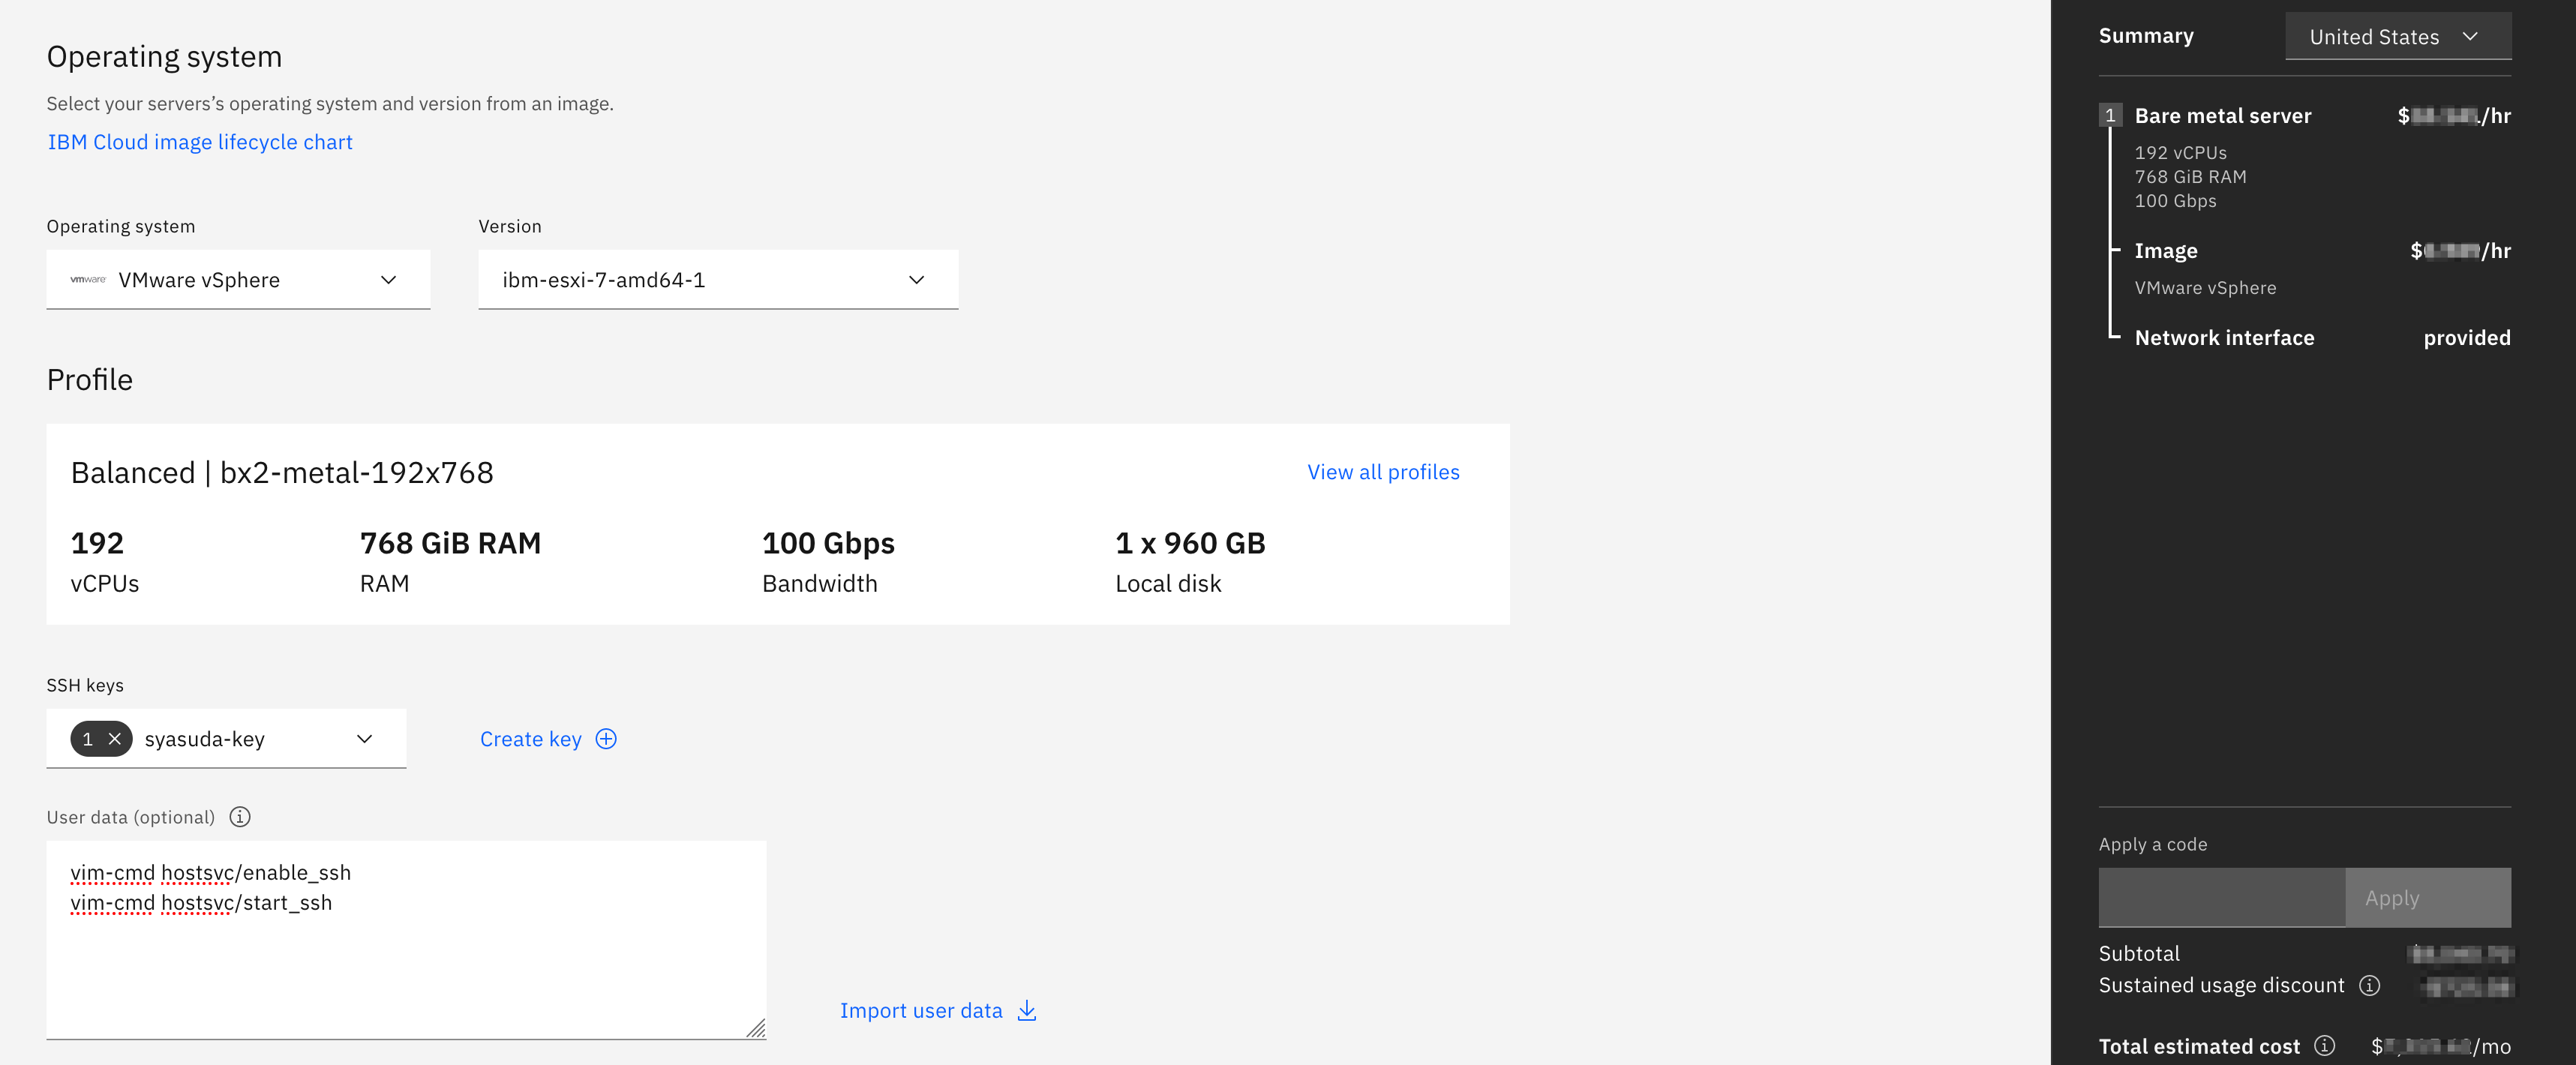
3-3. OSおよびProfileを選択
VMware ESXiではデフォルトではSSHは無効化されています。後からVNC Consoleなどを使って変更することはできますが、最初から変更しておきたい時は、IBM Cloud docsにも記載されているように User dataに以下を登録しておきます。ここでは、SSHを有効化するように構成します。
vim-cmd hostsvc/enable_ssh
vim-cmd hostsvc/start_ssh
3-4. NWの設定
subnetなどを選択します。このまま注文しても良いのですが、せっかくなのでPCI Interfaceに割り当てるIPアドレスを指定したいところです。残念ながらGUIからではsubnetは指定できてもIPアドレスは指定できませんので、必要な構成を全部完了させた後に、VSIでの操作の時と同様にGet Sample API callからスクリプトを保管・編集します。
この例ではbm.shという名前のスクリプトに保管した後、10.18.0.11を指定するために、
"primary_ipv4_address": "10.18.0.11",
という行を追加しています。参考API
(省略)
  "primary_network_interface": {
    "name": "eth0",
    "interface_type": "pci",
    "enable_infrastructure_nat": true,
    "allowed_vlans": [],
    "allow_ip_spoofing": false,
    "subnet": {
      "id": "02b7-822d182e-2a26-432e-9609-e7acba487e10"
    },
    "security_groups": [
      {
        "id": "r010-2dbd4c3f-b0ef-4e38-af80-c75813f557f9"
      }
    ]
  },
(省略)
(省略)
  "primary_network_interface": {
    "name": "eth0",
    "primary_ipv4_address": "10.18.0.11",
    "interface_type": "pci",
    "enable_infrastructure_nat": true,
    "allowed_vlans": [],
    "allow_ip_spoofing": false,
    "subnet": {
      "id": "02b7-822d182e-2a26-432e-9609-e7acba487e10"
    },
    "security_groups": [
      {
        "id": "r010-2dbd4c3f-b0ef-4e38-af80-c75813f557f9"
      }
    ]
  },
(省略)
##3-5. スクリプトの実行(プロビジョニングの実施)
上記で作成したスクリプトを以下のように実行し、サーバーをプロビジョニングします。
$ export LANG=C
$ ibmcloud login -r eu-de  (もしくはログインした後に、 ibmcloud target -r eu-de)
$ export iam_token=`ibmcloud iam oauth-tokens | awk '{printf $4}'`
$ sh bm.sh
4. プロビジョニングの確認
およそ15分程度でプロビジョニングが完了しました。先程APIで指定した、10.18.0.11が割り当てられています。
$ ibmcloud is bare-metal-servers
Listing bare metal servers in all resource groups and region eu-de under account xxx as user xxxxxxx@xx.xxx.xxx...
ID                                          Name      Status    Address      Floating IP   Profile             VPC      Zone      Resource group
02b7-b022ca45-16db-4b20-a89b-84ea2bc05647   fra-bm1   running   10.18.0.11   -             bx2-metal-192x768   bm-vpc   eu-de-1   Default
5. パスワードの取得
ESXiサーバーにはVSIのケースと違って公開鍵認証方式でアクセスできるようには構成されていません。サーバー作成時に指定したSSH鍵は、暗号化された公開鍵認証でそのため、まずパスワードを入手します。
パスワードを入手するためには、Server-IDとSSH秘密鍵を指定して以下のように実行します。
$ ibmcloud is bare-metal-server-initialization-values 02b7-b022ca45-16db-4b20-a89b-84ea2bc05647 --private-key @.ssh/id_rsa
Retrieving configuration variables used to initialize the bare metal server 02b7-b022ca45-16db-4b20-a89b-84ea2bc05647 under account xxx as user xxxxxxx@xx.xxx.xxx...

Image      ID                                          Name
           r010-85e78310-b809-4e03-9257-52c7959435ea   esxi-7

SSH keys   ID                                          Name          Fingerprint
           r010-34271868-9d8a-4ce2-ac18-7b78ff6bda26   syasuda-key   SHA256:0pUqd7pCk8KQH30tsDMx6pTKD/G/DWoVjALradjauuQ

User accounts:

Resource type        host_user_account
User name            root
Encrypted password   xxxxxxxxxxxxxxxxxxxxxxxxxxxxxxxxxxxxxxxxxxxxxxx
Encryption key       ID                                          Name          Fingerprint
                     r010-34271868-9d8a-4ce2-ac18-7b78ff6bda26   syasuda-key   SHA256:0pUqd7pCk8KQH30tsDMx6pTKD/G/DWoVjALradjauuQ

Password             <暗号化が解かれたパスワード情報>
IBM Cloud docsに記載されているパスワード取得方法はここで紹介したとおりですが、IBM Cloud CLIを使わずに、opensslを使ってEncrypted Passwordから復号する方法は以下も参考にしてください。
(小ネタ)IBM Cloud: IBM Cloud CLIを使わずにBM for VPCのための暗号化パスワードを復号する方法
6. SSHで接続してみる
VPC内部にVSIの踏み台サーバー(bastion server)を作成し、そこからsshでアクセスしてみます。
[root@syasuda-bastion-bmforvpc ~]# ssh root@10.18.0.11
Password:
The time and date of this login have been sent to the system logs.

WARNING:
   All commands run on the ESXi shell are logged and may be included in
   support bundles. Do not provide passwords directly on the command line.
   Most tools can prompt for secrets or accept them from standard input.

VMware offers supported, powerful system administration tools.  Please
see www.vmware.com/go/sysadmintools for details.

The ESXi Shell can be disabled by an administrative user. See the
vSphere Security documentation for more information.

[root@localhost:~] vmware -vl
VMware ESXi 7.0.2 build-17867351
VMware ESXi 7.0 Update 2

[root@localhost:~] vim-cmd vimsvc/license --show| head -15
[200] Sending request for installed licenses...[200] Complete, result is:
   serial: xxxxx-xxxxx-xxxxx-xxxxx-xxxxx
   vmodl key: esx.enterprisePlus.cpuPackageCoreLimited
   name: vSphere 7 Enterprise Plus
   total: 256
   used: 4
   unit: cpuPackage:32core
   Properties:
     [ProductName] = VMware ESX Server
     [ProductVersion] = 7.0
     [feature] = vsmp:0 ("Unlimited virtual SMP")
     [feature] = h264remote ("H.264 for Remote Console Connections")
     [feature] = esxHost ("vCenter agent for VMware host")
     [feature] = vimapi ("vSphere API")
     [feature] = contentlib ("Content Library")
ちなみに、パスワードを毎回入力するのが面倒なので、私は
- 踏み台サーバーの
.ssh/id_rsaに秘密鍵を配置 - ESXiサーバーの
/etc/ssh/keys-root/authorized_keysに公開鍵を配置
のように構成することで、SSH鍵指定(パスワードなし)でアクセスできるように構成しました。
Allowing SSH access to ESXi/ESX hosts with public/private key authentication (1002866)
7. VNCでDCUIに接続してみる
- IAMで自分に
Operator以上、かつBare Metal Console Administratorが付与されていることを確認。

-
ActionsからOpen VNC consoleを選択。すると、以下のようにDCUI(Direct Console User Interface )がブラウザ上に表示されるようになる。


- F2を押下 (以下、必要に応じてSoftwareキーボードも兼用してください)。するとLogin Name/Passwordを入力する画面が出てくるので入力。(Login Nameはroot、Passwordは先ほどCLIで取得したパスワードです)

- 以下の構成画面にアクセスできます。

もしサーバー作成時にSSHの設定をしておらず、SSHを有効化したい時はこの画面でTroubleshooting Optionsを選択することで有効化可能です(以下ではすでにSSHは有効化されています)

ESXi再起動時にVNCに接続していたらわかりますが、BM for VPCもSupermicroなんですね。
8. VMware Host Clientで接続してみる
この物理サーバーにfloating IP(Public IP Address)を割り当てるとか、Client VPN for VPCを利用するなど色々方法はあると思いますが、今回は手っ取り早く、踏み台サーバー経由でSSH Port forwardingを利用してアクセスしたいと思います。
以下のようにlocalhost:9443にアクセスすると10.18.0.11:443にアクセスするように指定して、踏み台サーバーにSSHアクセスします。
syasuda@MacBook-Pro ~ % ssh -L 9443:10.18.0.11:443 bmvsi
自端末でhttps://localhost:9443にブラウザでアクセスし、ブラウザの警告をスキップするとアクセスできました!


