はじめに
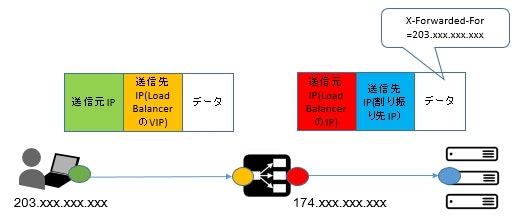
SoftLayerのLocal Load Balancer経由でWebサーバーに接続した際には、Webサーバーによってはデフォルトの構成ではクライアント側のIPアドレスがログに出力されません。
これは、Local Load Balancerをパケットが経由する際にNATされて、パケットの送信元IPがクライアント側のIPからLocal Load BalancerのIPに変更されてしまうからです。
203.xxx.xxx.xxx - - [17/Apr/2015:09:30:15 +0900] "GET / HTTP/1.1" 304 - "-" "Mozilla/5.0 (Windows NT 6.1; WOW64; rv:31.0) Gecko/20100101 Firefox/31.0"
174.xxx.xxx.xxx - - [17/Apr/2015:09:31:37 +0900] "GET / HTTP/1.1" 200 21 "-" "Mozilla/5.0 (Windows NT 6.1; WOW64; rv:31.0) Gecko/20100101 Firefox/31.0"
webサーバーにおけるアクセスログの設定
このままだと、webサーバーから見た接続元IPはLocal Load Balancerになってしまいますが、Local Load Balancerは、NAT時にX-Forwarded-ForというHTTPヘッダ情報に送信元IPを埋め込んでくれています。なので、HTTPサーバーのアクセスログでは、この情報を出力するように設定すれば良いでしょう。
以下は、Apacheのhttpd.confでの設定例です。LogFormatにて、%{X-Forwarded-For}i %hの順に並べたので、LocalLoadBalancerへの接続元IP LocalLoadBalancerのNAT元のIPの順で出力されることが分かります。
※行末の%Dは応答時間(単位はマイクロ秒)が見たかったのでおまけで付けています。その他の設定の意味は、http://httpd.apache.org/docs/current/ja/mod/mod_log_config.html を参考。
# LogFormat "%h %l %u %t \"%r\" %>s %b \"%{Referer}i\" \"%{User-Agent}i\"" combined
LogFormat "%{X-Forwarded-For}i %h %l %u %t \"%r\" %>s %b \"%{Referer}i\" \"%{User-Agent}i\" %D" combined
(途中略)
CustomLog logs/access_log combined
203.xxx.xxx.xxx 174.xxx.xxx.xxx - - [17/Apr/2015:09:43:20 +0900] "GET / HTTP/1.1" 304 - "-" "Mozilla/5.0 (Windows NT 6.1; WOW64; rv:31.0) Gecko/20100101 Firefox/31.0" 495
接続元IP毎のアクセス制御
同様に、webサーバーから見た接続元IPはLocal Load Balancerになってしまいますので、source IPを使ったFirewall保護にあまり意味をもたなくなります。よって、webサーバーの設定でX-Forwarded-Forを使ったアクセス制限をかければよいでしょう。
<VirtualHost *:80>
    SetEnvIf X-Forwarded-For "10.[1-3][0-9]" allow_ip
    #直接アクセスも、Load Balancer経由でのアクセスも禁止
    SetEnvIf Remote_Addr     "192.[1-3][0-9]" deny_ip
    SetEnvIf X-Forwarded-For "192.[1-3][0-9]" deny_ip

    <Location />
        Order Deny,Allow
        Deny from all
        Allow from env=allow_ip
    </Location>

    <Location /*/test1/>
        Order allow,deny
        Allow from all
        Deny from env=deny_ip
    </Location>

</VirtualHost>
その他
OS Firewall(iptables)や、WAF(ApacheならModSecurity?NginxならNaxsi?)と組み合わせると、さらにしっかりとした保護ができると思います。
mod_security: http://www.ipa.go.jp/security/vuln/waf.html
