メリークリスマスイブ!初めまして,テシマ(@tessy_0901)と申します.
皆さんはどんなクリスマスをお過ごしになりますか?私はバイトです.
というわけで iOS#2 AdventCalender2019,24日目の記事となります.
こちらではPageViewControllerとボタンを使ったウォークスルーの実装を書きましたが,スクロールビューを使って同じ動作をさせたいと思います.
先駆者様の最高の記事がめちゃくちゃ多いため,適宜リンクを貼って省略させていただきます.
PageViewControllerの代わりにScrollViewを使うメリットとしては,
- StoryBoard内のViewControllerの1画面で完結する
- PageControlの位置を変更しやすい(←ここがでかい)
- viewのinstanceを生成しないため,循環参照が起きる可能性がない
- swiftファイルの数を1つにできる
などがあります.(実際にこっちの方が簡単だった)
また,Xcode11からはScrollViewをXcode上でスワイプさせて確認することができるようになったため,こちらを使う方がベターだと感じました.
では本文です.
この記事でできること
- UIViewControllerでPageControlができる
- ボタンでページ移動ができる
完成品

GitHub
このようにボタンでもスワイプでもページ移動ができるような物を作っていきたいと思います.
実装
UIPageViewControllerの実装
project作成
省略します!(上にあるPageControllerの記事を参考にしたりしなかったりしてください)
UIScrollViewによるPageViewの作成(StoryBoard)
UIScrollViewとPageControlの設置や設定は,この記事参考にしてください(丸投げ)
それとXcode11からUIScrollViewの方式が変わりました.
以前(Xcode10)は,
View
┠Safe Area
┠UIScrollView
┃ ┗View
┃   ┠View1
┃   ┠View2
┃   ┠...
┗PageControl
のように,UIScrollViewの下にScrollView全体を示すViewを置き,その下に各Viewを置く階層構造でしたが,
Xcode11からは
View
┠Safe Area
┠UIScrollView
┃ ┠Content Layout Guide
┃ ┠Frame Layout Guide
┃ ┠View1
┃ ┠View2
┃ ┠...
┗PageControl
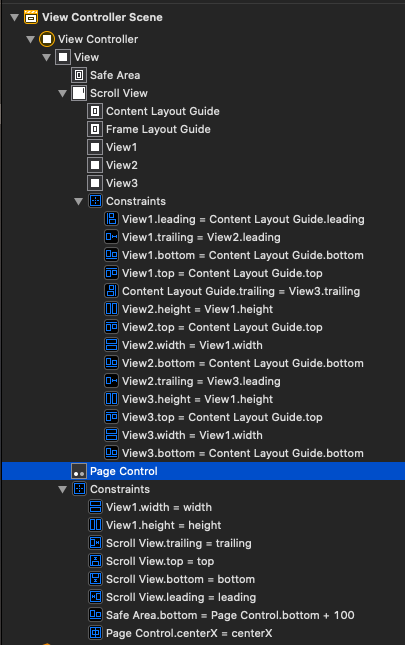
このように,Content Layout GuideとFrame Layout Guideという要素が追加され,それぞれが全てのViewのガイド,描画範囲のガイドとなりました,
詳しくはこちらやこちらをご覧ください.
ここからが大変なのですが,上記の記事にもあるように,AutoLayoutの設定が変わりました.
AutoLayoutの設定
ちゃんと一つ一つ説明していきます.
まずView1,View2,View3の制約ですが,
View1.trailing = View2.leading
View2.trailing = View3.leading
として,View1の右端にView2の左端,View2の右端にView3の左端をくっつけます.
次にView1のWidth,HeightをViewのWidth,Heightと等しくします.
次にContent Layout Guideの設定です.
View1.top = ContentLayoutGuide.top
View2.top = ContentLayoutGuide.top
View3.top = ContentLayoutGuide.top
View1.buttom = ContentLayoutGuide.button
View2.buttom = ContentLayoutGuide.buttom
View3.buttom = ContentLayoutGuide.buttom
View1.leading = ContentLayoutGuide.leading
View3.trailing = ContentLayoutGuide.trailing
全てのviewのtop,buttomをContent Layout Guideのtop,buttomと合わせて,
leading,trailingはそれぞれ端のview(leading = View1, trailing = View3)と合わせます.
最後にView1のheight, widthを大元のViewのheight, widthに合わせ,
View1.height = height
View1.width = width
View2.height = View1.height
View2.width = View1.width
View3.height = View1.height
View3.width = View1.width
View1=View2=View3と合わせることで,どの端末でも画面の大きさが変わらないようにしました.
これで画面は完成です.
UIScrollViewによるPageViewの作成(ソースコード)
追加したScrol, PageControllをBIOutletとして, ButtonをIBActionとしてそれぞれつなぎます.
そしてScrollViewのdelegateを設定するとこうなります.
import UIKit

class ViewController: UIViewController {
    @IBOutlet weak var pageScrollView: UIScrollView!
    @IBOutlet weak var pageControl: UIPageControl!
    @IBAction func onButtonTapped(_ sender: Any) {
    }

    override func viewDidLoad() {
        super.viewDidLoad()
        self.pageScrollView.delegate = self
    }
}
ここまでできたら中身を書いていきましょう
ボタンによる遷移の実装
とりあえず完成したソースコード載せます
import UIKit

class ViewController: UIViewController {
    @IBOutlet weak var pageScrollView: UIScrollView!
    @IBOutlet weak var pageControl: UIPageControl!
    @IBAction func onButtonTapped(_ sender: Any) {
        let contentSize: CGSize = self.pageScrollView.contentSize
        let currentPage: Int = pageControl.currentPage
        pageScrollView.setContentOffset(CGPoint(x: floor(contentSize.width/3 * CGFloat(currentPage + 1)), y: 0), animated: true)
    }

    override func viewDidLoad() {
        super.viewDidLoad()
        self.pageScrollView.delegate = self
    }

}

extension ViewController: UIScrollViewDelegate {
    func scrollViewDidScroll(_ scrollView:UIScrollView) {
        let pageControlNumber = pageScrollView.contentOffset.x / pageScrollView.frame.size.width
        if pageControlNumber.truncatingRemainder(dividingBy: 1) == 0 {
            pageControl.currentPage = Int(pageControlNumber)
        }

    }
}
@IBAction func onButtonTapped(_ sender: Any) {
        let contentSize: CGSize = self.pageScrollView.contentSize
        let currentPage: Int = pageControl.currentPage
        pageScrollView.setContentOffset(CGPoint(x: floor(contentSize.width/3 * CGFloat(currentPage + 1)), y: 0), animated: true)
ここではボタンを押した際に,ScrollView全体の中身のサイズを取得して,画面サイズxPageControl+1だけずらすという動作にしています.
extension ViewController: UIScrollViewDelegate {
    func scrollViewDidScroll(_ scrollView:UIScrollView) {
        let pageControlNumber = pageScrollView.contentOffset.x / pageScrollView.frame.size.width
        if pageControlNumber.truncatingRemainder(dividingBy: 1) == 0 {
            pageControl.currentPage = Int(pageControlNumber)
        }

    }
}
また,UIScrollのdelegateを指定しているためスクロールのオフセットの変化を検知するメソッドを呼び出せます.
そのためそのメソッドで,currentPageをスクロールが終わった際(→ Scrollのオフセット/画面の横幅 が整数の時)にcurrentPageが与えられるようにしています.
最後に
流石に雑すぎるので追記でもっと丁寧に解説します・・・
それと弊部のアドカレもよろしくお願いします!!!!!!!
参考文献
https://techblog.recochoku.jp/7237
https://program-life.com/538
https://developer.apple.com/documentation/uikit/uiscrollview/2865772-framelayoutguide
https://developer.apple.com/documentation/uikit/uiscrollview/2865870-contentlayoutguide
