Python mini hack a thon 夏山合宿 2014 で、 @hirokiky 氏に聞いた負荷テストツール FunkLoad についての記事です。
このツールとDjangoを組合せた詳細な内容と事例は、 PyCon JP 2014でトークセッション があるようです
ひとつ一つ機能を確認しながら、このエントリーに追記して行きたいと思います。
事前準備
以下を前もってインストールしておく。
- Python 2.7
- pip
- Gnuplot
GnuplotをMacBookAirにインストール
私は普段からMac OSを使っていて、portsを使っているので、それにしたがってインストール
$ sudo port selfupdate
$ sudo port install gunplot
Gnuplotは、インストールしなくても負荷テストは可能ですが、テスト結果をHTML等で表現する際に、グラフを出力するのに使っているようです。
Pythonの環境
virtualenv を導入したほうがいい。(Pythonの環境の作り方の作法によります)
このページ に簡単な設定方法が記載されています。
要するに、以下を行う
- Python2.7のインストール
- distribute_setup で、eaay_install コマンドを使えるようにする
- <<今でもこれでいいんだよね?
- pipのインストール
- <<これって一発で入る方法があった気がする
- virtualenvのインストール
- <<上記同上 (このあたりがいつも混沌としていて、一度環境を整えるとやらないことなので、忘れがち) @aodag氏や@shimizukawa氏に聞くと最新の情報がてに入ります。(pyhack に来るといろいろと聞けますよ)
- virtualenvを使って、クリーンで他に影響を与えないPython環境を手に入れる
- sourceコマンドで、使うPythonを指定
- <<私はfullpathでPythonを指定する癖をがあるので、これをしないことが多い。
インストール等の準備
インストール
$ cd ~/dev/misc/funkload # 上記で作った環境
$ ./python/bin/pip install funkload
fl- 関係のスクリプトが 使っているPythonのbin/以下に出来たはず
$ pwd
~/dev/misc/funkload
$ ls ./python/bin/
activate		fl-monitor-ctl		rst2latex.py
activate.csh		fl-record		rst2man.py
activate.fish		fl-run-bench		rst2odt.py
activate_this.py	fl-run-test		rst2odt_prepstyles.py
easy_install		pip			rst2pseudoxml.py
easy_install-2.7	pip-2.7			rst2s5.py
fl-build-report		python			rst2xetex.py
fl-credential-ctl	python2.7		rst2xml.py
fl-install-demo		rst2html.py		rstpep2html.py
スクリプトと設定ファイル
$ pwd
~/dev/misc/funkload
以下の様なファイルを作る。この時ファイル名が重要。
test_ で始め、別途記述する、confファイルのファイル名と合わせる必要がある。
(なお、以下のファイルは、公式ドキュメントにあるものをそのまま流用)
import unittest
from random import random
from funkload.FunkLoadTestCase import FunkLoadTestCase

class Simple(FunkLoadTestCase):
    """This test use a configuration file Simple.conf."""
    def setUp(self):
        """Setting up test."""
        self.server_url = self.conf_get('main', 'url')

    def test_simple(self):
        # The description should be set in the configuration file
        server_url = self.server_url
        # begin test ---------------------------------------------
        nb_time = self.conf_getInt('test_simple', 'nb_time')
        for i in range(nb_time):
            self.get(server_url, description='Get URL')
        # end test -----------------------------------------------

if __name__ in ('main', '__main__'):
    unittest.main()
設定ファイルを作る。スクリプトのファイル名を使うので注意が必要。
(公式チュートリアルから、ほぼそのまま流用)
テスト先のURLは変更。([main] url= の項目)
# main section for the test case
[main]
title=Simple FunkLoad tests
description=Simply testing a default static page
url=http://localhost:8080/Plone

# a section for each test
[test_simple]
description=Access the main URL %(nb_time)s times

nb_time=20

# a section to configure the test mode
[ftest]
log_to = console file
log_path = simple-test.log
result_path = simple-test.xml
sleep_time_min = 0
sleep_time_max = 0

# a section to configure the bench mode
[bench]
cycles = 50:75:100:125
duration = 10
startup_delay = 0.01
sleep_time = 0.01
cycle_time = 1
log_to =
log_path = simple-bench.log
result_path = simple-bench.xml
sleep_time_min = 0
sleep_time_max = 0.5
実行方法
簡単な実行テスト
$ ./python/bin/fl-run-test test_Simple.py --simple-fetch
--simple-fetch オプションを付けて、HTML内のリンク先を取得しない設定。
実行テスト
$ ./python/bin/fl-run-test test_Simple.py
HTML内のリンク先にNot Foundエラーがあると、途中で落ちる。
エラーなどを解消して実際にテスト
実際にテストをしてみる
$ ./python/bin/fl-run-bench -c 1:10:20 test_Simple.py Simple.test_simple
結果の表示
結果がXMLで出力されるので、HTML化をする。
$ ./python/bin/fl-build-report simple-bench.xml --html
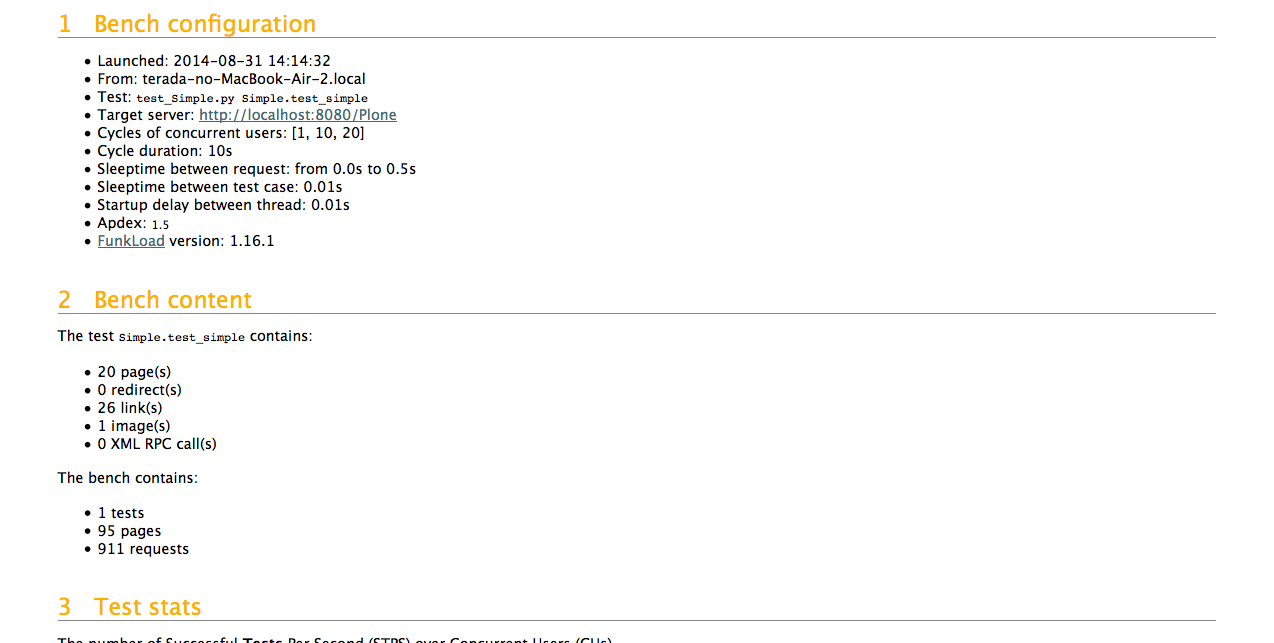
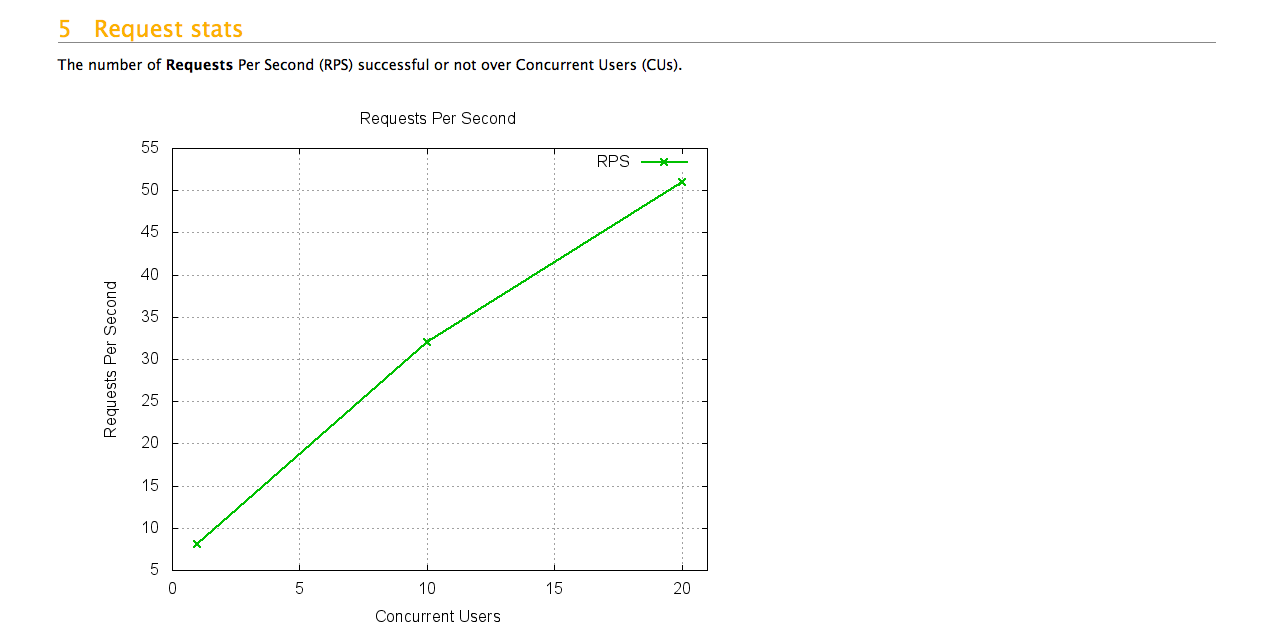
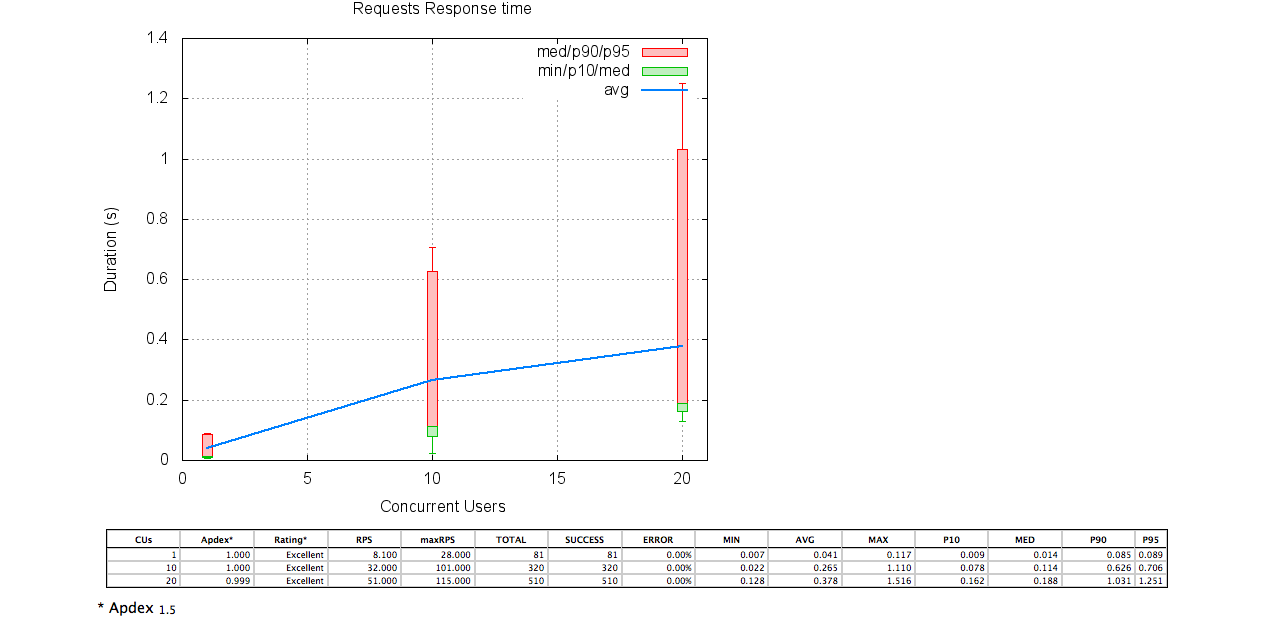
以下の様なHTMLできた。
test_simple-20140831T141432/index.html
(以下は一部抜粋)


今後
以下を行う予定
- 同時接続数などのパラメータの調整方法の調査
- ログインなどを行ったテスト
- 複数ページにまたがるテスト
- 結果表示の内容を確認