下記GitHubにサンプルをアップロードしました。
https://github.com/teradonburi/CognitoUserAuthApiApproval
サーバレスアーキテクチャとは
サーバを運用する場合、大まかにわけて次の3つの選択肢が存在すると思います。
- 自社でサーバを管理するケース(オンプレミス型)
- クラウドサービスでサーバを管理してもらうケース(IaaSクラウド型)
- クラウド上でビジネスロジックのみ記述して、必要な時だけサーバを稼働させ、スケールもクラウドサービスに任せるケース(サーバレス型)
クラウドに依存するほど自前でカスタマイズできる自由度が減る代わりにサーバ運用コストが下がります。
ざっくり言ってしまうとオンプレのサーバは運用が大変なのとコストが高くて自社で持ちたくないのでクラウドのサーバを使いたい。クラウド型だと常時稼働していると運用コストもかかってしまう。そこで、ユーザが使うときにだけ稼働してサーバのスケールアウトも全てクラウドサービスに任せてしまいたいというのがサーバレスアーキテクチャです。
スタートアップのサービスなどでユーザがどれくらいつくかわからないけど
最初はお金をかけたくない、後でスケールアウトも簡単にできるようにしたいという場合に
有効なアーキテクチャです。
サーバレスアーキテクチャに関しては下記が詳しいです。
サーバーレスアーキテクチャという技術分野についての簡単な調査
サーバレスアーキテクチャ構成図
AWS上でのサーバレスアーキテクチャ構成図を描いてみました。
あくまで一例です。
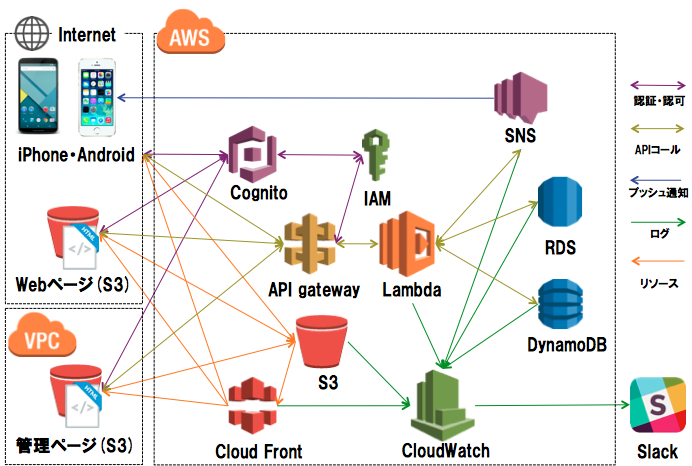
AWSではAPI GatewayとLambdaというサービスがサーバレスアーキテクチャのコアとなるサービスです。
LambdaはビジネスロジックをNodeJSやPythonなどで記述することができ、AWS内の別サービスからトリガーで実行できます。(バックグラウンドではトリガーでの起動時にAmazon Linuxが立ち上がり、ビジネスロジックを実行してくれます。)
API GatewayはAPIのエンドポイント(URL)を提供します。エンドポイントアクセス時にトリガーでLambdaを起動させることができるため、組み合わせることでRest APIをサーバなしで実装することが可能になります。また、Swaggerなどで記述したAPI定義もインポートすることが可能です。
Lambdaは実行回数で課金されるため、稼働していなかった場合、EC2の運用コストより大幅に安いことがメリットです。Lambda料金参考
デメリットはLambdaではC/C++などのネイティブで実装されたミドルウェア(OpenCV、ffmpegなど)のインストールができない点です。
サービスによってはEC2にミドルウェアをインストールしてAPI Gateway経由で呼び出すという形になるのでしょう。
ちなみに、個人でt2.microのEC2サーバを運用していたのですが、月間のページプレビュー数が5リクエストにかかわらず月額6000円以上かかってました。(泣)
上記はRedHatの場合なので実際EC2の最小構成のみでやる場合は
EC2(t2.micro+Amazon Linux)+Route53で月額2000円程度でしょうか(スケールしませんが・・・)
AWSでのユーザ認証・API認可
2016年の4月中旬にユーザ認証サービスであるCognito User Pool(Beta版)が解放されました。(まだ、us-east-1リージョンのみ)
これにより、ユーザ認証とAPI認可含めてサーバレスアーキテクチャで実現できるようになりました。
今回、世界に先駆けてサーバレスでのユーザ認証とAPI認可を実装してみました。
Cognito User Poolにてユーザ認証を行い、
Cognito Federated Identitlesにてロール認可を行います。
IAMのロール側ではAmazon Security Token Service(STS)という機能を用いて一時認証情報を払い出しします。
一時認証情報を用いてAPI Gatewayの認可APIにアクセスします。
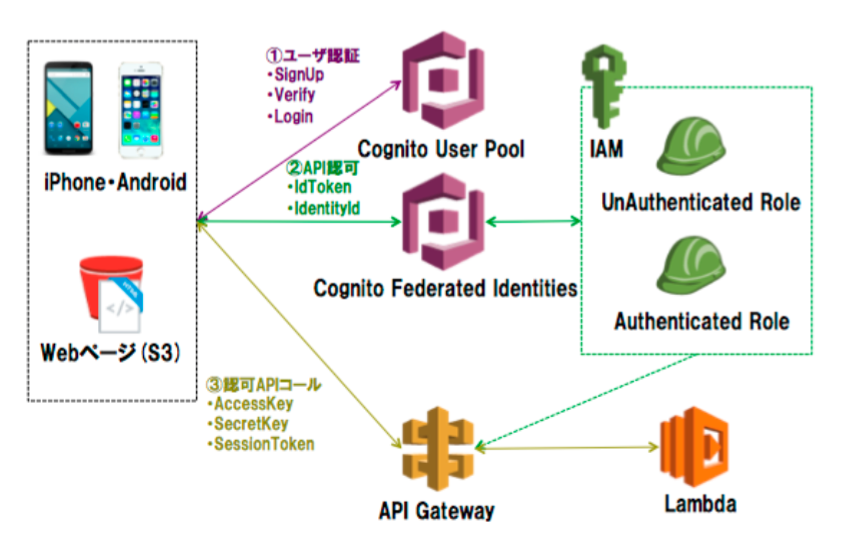
ユーザ認証からAPI認可のフローは次の図のようになります。
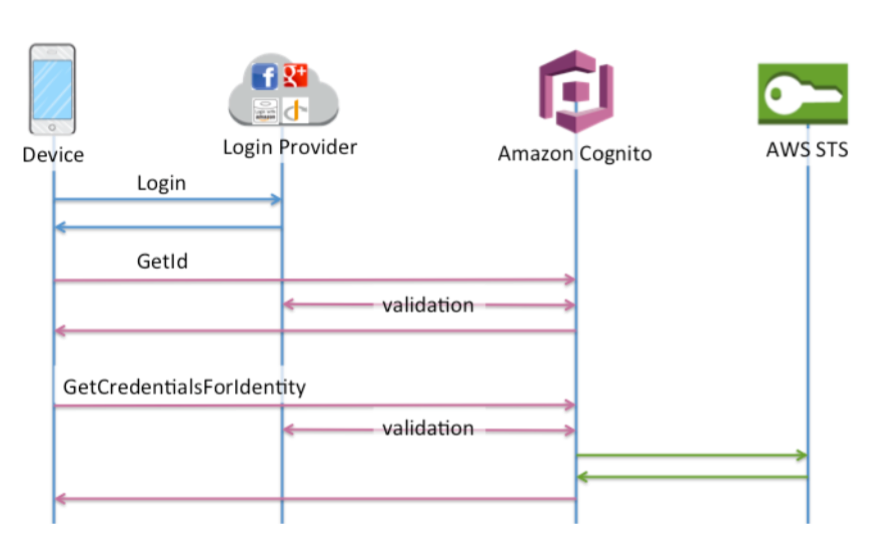
今回、Login ProviderのところにCognito User Poolを使うことができるようになりました。
この図ではAmazon CognitoはCognito Federated Identitiesを指します。
つまり、AWSのCognito User Poolに登録したユーザ認証とFacebook、Twitterなどの外部プロバイダーのユーザ認証をCognito Federated Identitiesで一元化し、STSでIAMロールでの認可を行うことが可能になりました。
AWS側の設定
以下AWSサービスの設定をそれぞれ行います。
- Cognito User Pool
- Cognito Federated Identites
- IAM
- Lambda
- API Gateway
以下、us-east-1リージョンにて設定を行います。
Cognito User Poolの作成
作成方法は下記を参考にさせてもらいました。
[新機能] Amazon Cognito に待望のユーザー認証基盤「User Pools」が追加されました!
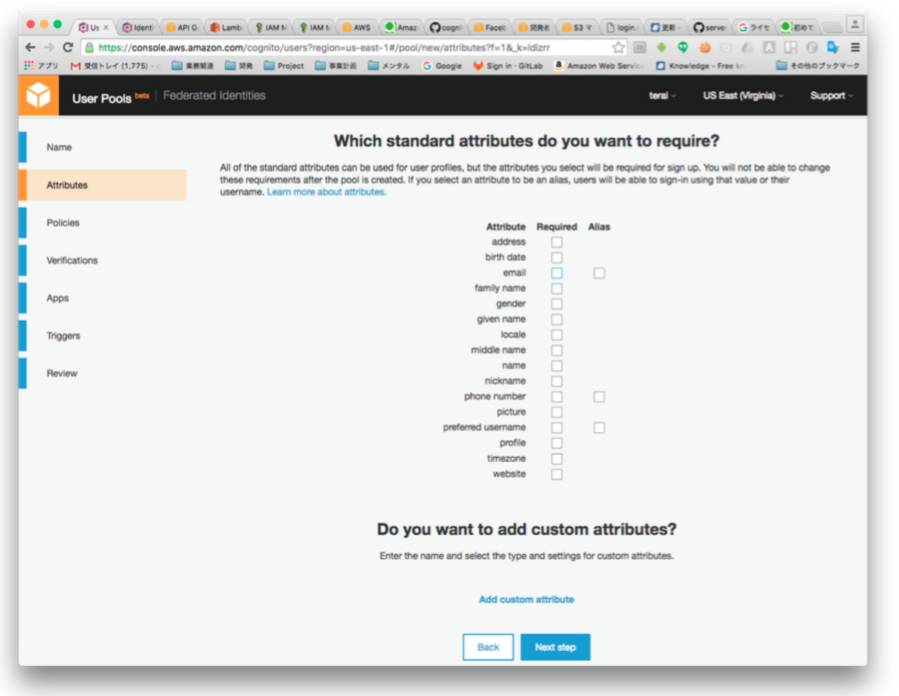
作成時に細かい部分で気をつけたほうが良いことを追記しておきます。
Attributes項目の必須チェックはUser Pool作成後に変更できません。
(この項目はクライアントからユーザ登録する際に必須パラメータとなってしまいます。
ここには記載されていませんが、これと別途にユーザ名とパスワードはユーザ登録時に必須です。
Custom Attributesに関しては後から変更が可能なため、不要な場合は全てチェックを外しておくことをお勧めしておきます。)
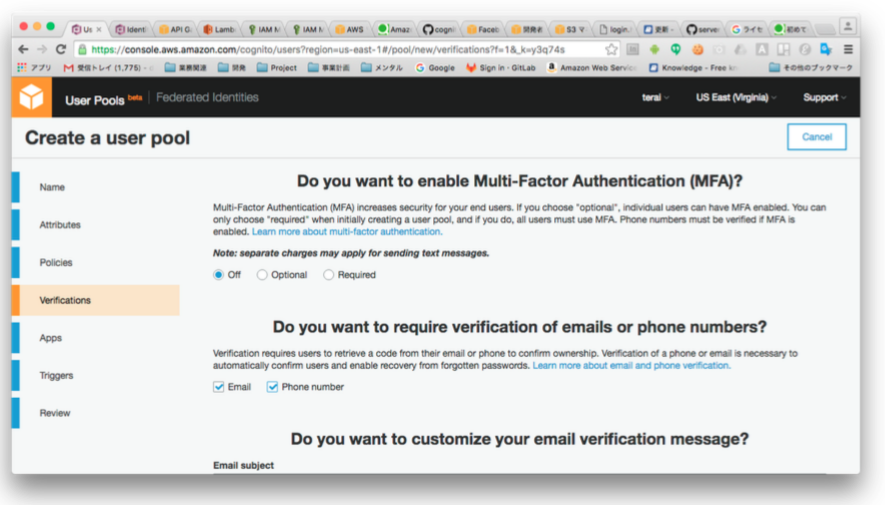
Verificationの項目はEmail、Phone Numberにチェックを入れておきます。
ログインするためにはVerificationによるユーザのConfirmedが必須です。
(ユーザ登録時にメールアドレス、もしくはSMSに送信されたアクティベートコードを入力する必要があります。)
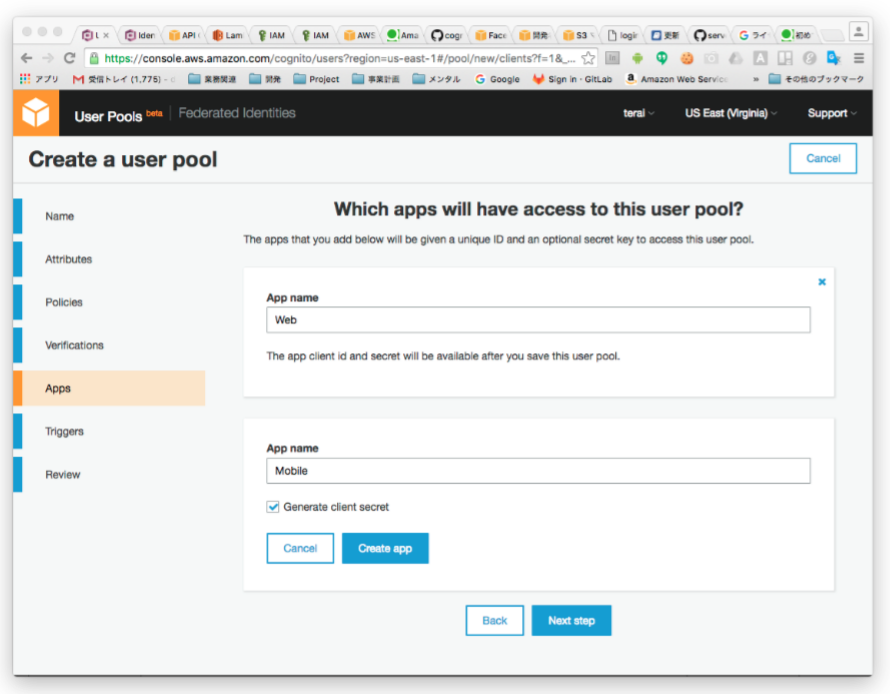
Apps項目で
Webブラウザ用とモバイル用(iOS、Android)にAppを二つ作ります。
Webブラウザ用はGenerate client secretのチェックを外して作成します。(ブラウザからのアクセス時には不要なため)
Cognito Identity Poolの作成
Cognito Identity Poolの作成方法とCognito User Poolの紐付けは下記を参考にしてください。
Amazon Cognito User Poolsを使って、webサイトにユーザ認証基盤を作る
注意点としては、
Identity Poolには1つしかCognito User Poolの割り当てができないため、
ブラウザとモバイルで同一のCognito User Poolを割り当てたい場合は
Identity Pool(とIAMロール)をブラウザ用とモバイル用に2つずつ作成する必要があります。
Lambdaの設定
特にLambda側では特別な設定は必要ありません。
今回のサンプルでは単純に成功を返すLambda関数を作成してテストしてます。
ただし、レスポンスには必ずJavascriptのObject型を返すようにしてください。
理由はAndroid側のAPI Gateway SDKがそれ以外の型に対応していないためです。(後述)
'use strict';
console.log('Loading function');

exports.handler = (event, context, callback) => {
    callback(null, {message:"成功"});
    // callback('Something went wrong');
};
API Gatewayの設定
APIのMethod RequestのAuthorizationにAWS_IAMを設定します。
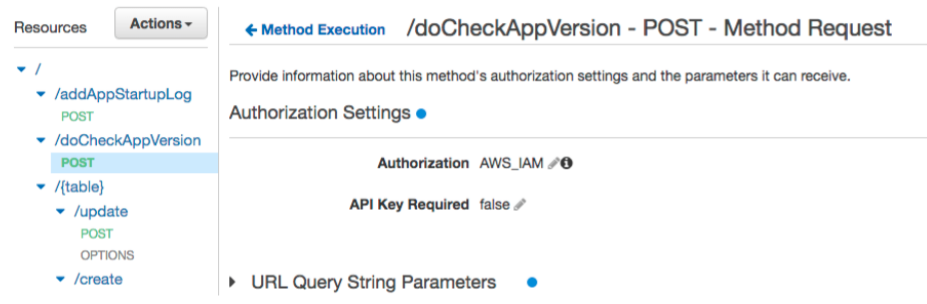
認可したいAPIのarnを控えます。(後述のIAMロールで設定します。)

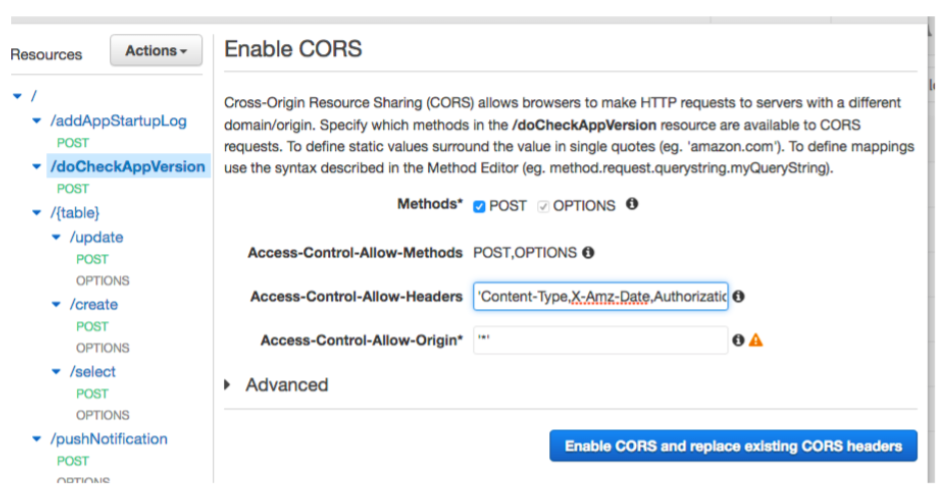
CORSの設定(ブラウザ用APIのみ)
上記に加え、Ajax経由でAPIにアクセスするためには、APIにCORSの設定が別途必要です。
下記を参考にしてください。
jQueryからAmazon API Gatewayを使用する
作成時にAccess-Control-Allow-Headersに下記ヘッダーを設定します。
'Content-Type,X-Amz-Date,Authorization,X-Requested-With,X-Requested-By,X-Amz-Security-Token'
X-Requested-With,X-Requested-ByはXHR(Ajax) で必要なヘッダーパラメータです。
X-Amz-Security-Tokenは今回のようなSTSでのAPI認可には必須ヘッダーパラメータです。
IAMのロールの設定
Cognito Identity Poolで指定したAuthenticatedロールの権限を設定します。
UnAuthenticatedのほうは特に権限を付与する必要はありません。
IAMのロール項目でAuthenticatedロールを開きます。
ポリシーの編集より、ポリシーを編集します。
Actionに"execute-api:invoke"を付与します。
Resourceに認可したいAPI GatewayのAPIのARNを指定します。
{
  "Version": "2012-10-17",
  "Statement": [
  {
  "Effect": "Allow",
  "Action": [
  "execute-api:Invoke",
  "cognito-sync:*",
  "cognito-identity:*"
  ],
  "Resource": [
     "arn:aws:execute-api:us-east-1:<AccountID>:<API Gateway API ID>/*/<Method Type>/<API名>"
  ]
 }
]
}
信頼関係の編集より
1.Actionがsts:AssumeRoleWithWebIdentity
2.cognito-identity.amazonaws.com:audが対象のIdentity Pool Id
3.cognito-identity.amazonaws.com:amrにauthenticated(UnAuthenticatedのロールの方はunauthenticatedになっています)
になっていることを確認してください
{
  "Version": "2012-10-17",
  "Statement": [
  {
   "Effect": "Allow",
   "Principal": {
      "Federated": "cognito-identity.amazonaws.com"
  },
  "Action": "sts:AssumeRoleWithWebIdentity",
  "Condition": {
     "StringEquals": {
      "cognito-identity.amazonaws.com:aud": ""us-east-1:<Identity Pool Id>"
     },
     "ForAnyValue:StringLike": {
      "cognito-identity.amazonaws.com:amr": "authenticated"
     }
  }
 }
 ]
}
実装
Javascript(ブラウザ)での実装
ローカルから起動する場合はAWS-CLIの設定が必要です。
AWS CLI インストール&セットアップ メモ(Mac)
導入
- Cognito SDKの導入
Crypto.jsに関しては--with-codecBytes オプションをつけて自前でビルドする必要があります。
- API Gateway SDKの導入
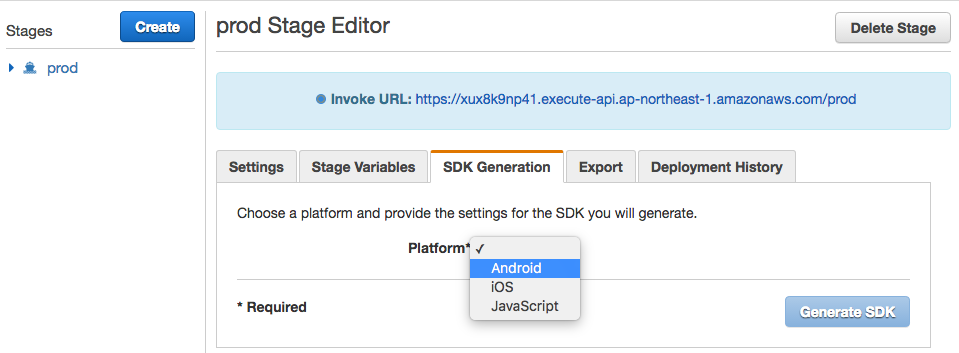
API GatewayのステージからSDKをダウンロードします。
- 初期設定
下記パラメータを設定してください(AWSのID)
        /////////////////////////
        // Config Param
        /////////////////////////

        var UserPoolId = 'us-east-1_<Pool Id>'; // Cognito User Pool Id
        var ClientId = '<Client Id>'; // Client Id(Cognito User Pool App Client Id)
        var IdentityPoolId = 'us-east-1:<Identity Pool Id>'; // Cognito Identity Pool Id
        var endpoint = 'https://<API>.execute-api.us-east-1.amazonaws.com/<Stage>'; // API Gateway EndPoint
        var testAPI = '/<API>'; // API Gateway API

        /////////////////////////
ユーザの登録・ユーザのアクティベート・ユーザのログイン
下記記事と変わりませんので割愛します。
Amazon Cognito User Poolsを使って、webサイトにユーザ認証基盤を作る
認可
AccessTokenではなく、IdTokenで認可を行います。
getId関数で認証プロバイダー(Cognito User Pool)に問い合わせを行い、
GetCredentialsForIdentity関数で認可を行います。(Authenticateのロールに切り替わります。)
        var cognitoUser = new AWSCognito.CognitoIdentityServiceProvider.CognitoUser(userData);
            cognitoUser.authenticateUser(authenticationDetails, {
                onSuccess: function (result) {
                    var IdToken = result.getIdToken().getJwtToken();
                    console.log('IdToken:' + IdToken);


                    var provider = {};
                    provider['cognito-idp.us-east-1.amazonaws.com/' + UserPoolId] = IdToken;

                    var params = {
                        IdentityPoolId:IdentityPoolId,
                        Logins: provider
                    };
                    var cognitoidentity = new AWS.CognitoIdentity({apiVersion: '2016-04-18'});
                    cognitoidentity.getId(params, function(err, data) {
                        if (err){
                            console.log(err, err.stack);
                        }
                        else{

                            var params = {
                                IdentityId: data.IdentityId,
                                Logins:provider
                            };

                            cognitoidentity.getCredentialsForIdentity(params, function(err, data) {
                                if (err){
                                    console.log(err, err.stack);
                                }
                                else{
                                    console.log("data.Credentials:",data.Credentials);
                                    // Access AWS resources here.
                                    callAPIGateway(data.Credentials);
                                }
                            });


                        }
                    });


                },

                onFailure: function(err) {
                    alert(err);
                }

            });
認可APIのコール
STSより取得した一時認証情報
- AccessKeyId
- SecretKey
- SessionToken
を用いてAPI GatewayのAPIをコールします。
       function callAPIGateway(token){
            var apigClient = apigClientFactory.newClient(endpoint,{
                accessKey: token.AccessKeyId,
                secretKey: token.SecretKey,
                sessionToken:token.SessionToken,
                region: 'us-east-1' // OPTIONAL: The region where the API is deployed, by default this parameter is set to us-east-1
            });

            var param = {
            }

            var body = {
            };

            apigClient.doPost(testAPI,param, body)
                .then(function(result){
                console.log("result:",result);
            }).catch( function(result){
                console.log("err:",result);
            });
        }
API GatewayのSDKに関しては自動生成されるAPI(apigClient.js)が気に入らなかったので汎用化してます。
var apigClientFactory = {};
apigClientFactory.newClient = function (gatewayPath,config) {
    var apigClient = { };
    if(config === undefined) {
        config = {
            accessKey: '',
            secretKey: '',
            sessionToken: '',
            region: '',
            apiKey: undefined,
            defaultContentType: 'application/json',
            defaultAcceptType: 'application/json'
        };
    }
    if(config.accessKey === undefined) {
        config.accessKey = '';
    }
    if(config.secretKey === undefined) {
        config.secretKey = '';
    }
    if(config.apiKey === undefined) {
        config.apiKey = '';
    }
    if(config.sessionToken === undefined) {
        config.sessionToken = '';
    }
    if(config.region === undefined) {
        config.region = 'us-east-1';
    }
    //If defaultContentType is not defined then default to application/json
    if(config.defaultContentType === undefined) {
        config.defaultContentType = 'application/json';
    }
    //If defaultAcceptType is not defined then default to application/json
    if(config.defaultAcceptType === undefined) {
        config.defaultAcceptType = 'application/json';
    }


    // extract endpoint and path from url
    var invokeUrl = gatewayPath;
    var endpoint = /(^https?:\/\/[^\/]+)/g.exec(invokeUrl)[1];
    var pathComponent = invokeUrl.substring(endpoint.length);

    var sigV4ClientConfig = {
        accessKey: config.accessKey,
        secretKey: config.secretKey,
        sessionToken: config.sessionToken,
        serviceName: 'execute-api',
        region: config.region,
        endpoint: endpoint,
        defaultContentType: config.defaultContentType,
        defaultAcceptType: config.defaultAcceptType
    };

    var authType = 'NONE';
    if (sigV4ClientConfig.accessKey !== undefined && sigV4ClientConfig.accessKey !== '' && sigV4ClientConfig.secretKey !== undefined && sigV4ClientConfig.secretKey !== '') {
        authType = 'AWS_IAM';
    }

    var simpleHttpClientConfig = {
        endpoint: endpoint,
        defaultContentType: config.defaultContentType,
        defaultAcceptType: config.defaultAcceptType
    };

    var apiGatewayClient = apiGateway.core.apiGatewayClientFactory.newClient(simpleHttpClientConfig, sigV4ClientConfig);


    apigClient.doGet = function (path,params, body, additionalParams) {
        if(additionalParams === undefined) { additionalParams = {}; }

        apiGateway.core.utils.assertParametersDefined(params, [], ['body']);

        var GetRequest = {
            verb: 'get'.toUpperCase(),
            path: pathComponent + uritemplate(path).expand(apiGateway.core.utils.parseParametersToObject(params, [])),
            headers: apiGateway.core.utils.parseParametersToObject(params, []),
            queryParams: apiGateway.core.utils.parseParametersToObject(params, []),
            body: body
        };


        return apiGatewayClient.makeRequest(GetRequest, authType, additionalParams, config.apiKey);
    };

    apigClient.doPost = function (path,params, body, additionalParams) {
        if(additionalParams === undefined) { additionalParams = {}; }

        apiGateway.core.utils.assertParametersDefined(params, [], ['body']);

        var PostRequest = {
            verb: 'post'.toUpperCase(),
            path: pathComponent + uritemplate(path).expand(apiGateway.core.utils.parseParametersToObject(params, [])),
            headers: apiGateway.core.utils.parseParametersToObject(params, []),
            queryParams: apiGateway.core.utils.parseParametersToObject(params, []),
            body: body
        };


        return apiGatewayClient.makeRequest(PostRequest, authType, additionalParams, config.apiKey);
    };


    return apigClient;
};
iOSでの実装
導入
- AWS SDKの導入
Cocoa Podにて依存ライブラリをインストールします。
platform :ios, '8.0'

pod 'UICKeyChainStore','2.1.0'
pod 'AWSCore','2.4.2'
pod 'AWSCognitoIdentityProvider','2.4.2'
pod 'AWSCognito','2.4.2'
pod 'AWSAPIGateway','2.4.2'
- API Gateway SDKの導入
API GatewayのステージからSDKをダウンロードします。
- 初期設定
下記パラメータを設定してください(AWSのID)
    //////////////////////
    // Config Param
    //////////////////////

    var UserPoolId = "us-east-1_<Pool Id>" // Cognito User Pool Id
    var ClientId = "<Client Id>" // Cognito User Pool Client Id
    var ClientSecret = "<Client Secret>" // Cognito User Pool Client Secret
    var IdentitityPoolId = "us-east-1:<Identity Pool Id>" // Cognito Identity Pool Id
    let EndPoint = "https://<API>.execute-api.us-east-1.amazonaws.com/<Stage>" // API Gateway Endpoint
    let API = "/<API>" // API Gateway API

    //////////////////////
ユーザの登録・ユーザのアクティベート・ユーザのログイン
下記記事と変わらないので割愛します。
Amazon Cognito User Poolsを使って、webサイトにユーザ認証基盤を作る
一箇所だけ補足で現在Cognito User Pool SDKのバグで英語以外の言語(ロケール)でログインできないバグがあります。
https://forums.aws.amazon.com/thread.jspa?messageID=719881
AWS iOS SDK 2.4.2で修正されたようです。
認可
Cognito User Poolログイン後、IdTokenを取得し、
AWSCognitoCredentialsProviderクラスでCognito User Providerを認証プロバイダーとして設定します。
credentialメソッドで一時認証情報を取得します。
キャッシュとして認証情報は保持されるようなので(ポリシーの変更が即時反映されない)
キャッシュクリアする場合はclearKeychainメソッドを呼びます。
        let user: AWSCognitoIdentityUser = pool!.getUser(self.loginName.text!)


        user.getSession(self.loginName.text!, password: self.loginPassword.text!, validationData: nil, scopes: nil).continueWithBlock({task in
            if((task.error) != nil) {
                print(task.error)
            } else {
                print(task.result)

                let cognitoIdentityPoolId = self.IdentitityPoolId
                let ret = task.result as! AWSCognitoIdentityUserSession
                let IdToken : String =  ret.idToken!.tokenString

                // 認証プロバイダーにUser Poolを使う
                let provider = "cognito-idp.us-east-1.amazonaws.com/" + self.UserPoolId

                let userpoolProvider = UserPoolProvider()
                userpoolProvider.setting(provider, token: IdToken)
                let credentialsProvider = AWSCognitoCredentialsProvider(
                    regionType: .USEast1,
                    identityPoolId: cognitoIdentityPoolId,
                    identityProviderManager: userpoolProvider
                )
                // credentialのキャッシュをクリア
                credentialsProvider.clearKeychain()


                // credential取得
                credentialsProvider.credentials().continueWithBlock { (task: AWSTask!) -> AnyObject! in

                    if (task.error != nil) {
                        print(task.error)

                    } else {
                        print(task.result)

                        // 認証情報を渡し、API GatewayのAPIをコール
                        self.callAPI(credentialsProvider)


                    }
                    return nil
                }


            }

            return nil
        })
UserPoolProviderクラスはAWSIdentityProviderManagerを実装したクラスです。
参考:モバイルアプリでユーザー認証やデータ同期が行えるAmazon CognitoがiOSで動かないのを何とか調べた話
import Foundation

public class UserPoolProvider:NSObject, AWSIdentityProviderManager{

    var providerName:String!
    var token:String!

    public func setting(providerName:String,token:String){
        self.providerName = providerName
        self.token = token
    }

    public func logins() -> AWSTask {
        var providers = [String:String]()
        providers[self.providerName] = self.token
        return AWSTask(result: providers as AnyObject)
    }
}
認可APIのコール
認証に成功すると認証プロバイダークラス内で一時認証情報を保持するようになります。
API Gatewayのクラスに認証プロバイダーをセットし、
認可APIをコールします。
     func callAPI(credentialsProvider:AWSCognitoCredentialsProvider){

        // API Gatewayのエンドポイント設定
        ServerlessClient.setEndPoint(EndPoint)

        // Cognito identityPoolIdによるAPI認可
        let configuration = AWSServiceConfiguration(region: .USEast1, credentialsProvider: credentialsProvider)
        ServerlessClient.registerClientWithConfiguration(configuration,forKey: "Auth")


        ///////////////////////API認可されたAPIの呼び出し///////////////////////////


        let client = ServerlessClient(forKey: "Auth")

        client.Post(API,param: ["":""]).continueWithBlock { (task: AWSTask!) -> AnyObject! in

            if (task.error != nil) {
                print(task.error)

            } else {
                print(task.result)

            }
            return nil
        }

    }
エクスポートされたAPI Gatewayのクラスのほうは汎用性に欠けるのでカスタマイズしています。
(Serverless.h、Serverless.m)
# import <Foundation/Foundation.h>
# import <AWSAPIGateway/AWSAPIGateway.h>
# import <AWSCore/AWSCore.h>

@interface ServerlessClient: AWSAPIGatewayClient

+ (void)setEndPoint:(NSString*)endpoint;


+ (instancetype)defaultClient;
+ (void)registerClientWithConfiguration:(AWSServiceConfiguration *)configuration forKey:(NSString *)key;
+ (instancetype)clientForKey:(NSString *)key;
+ (void)removeClientForKey:(NSString *)key;

- (AWSTask *)Get:(NSString *)path
            param:(NSDictionary *)param;

- (AWSTask *)Post:(NSString *)path
            param:(NSDictionary *)param;


@end
# import "ServerlessClient.h"
# import <AWSCore/AWSSignature.h>
# import <AWSCore/AWSSynchronizedMutableDictionary.h>
# import <AWSCognitoIdentityProvider/AWSCognitoIdentityProvider.h>


@interface SeverlessModel : AWSModel

@property (strong, nonatomic) NSDictionary* param;

@end

@implementation SeverlessModel

+ (NSDictionary *)JSONKeyPathsByPropertyKey {
    return @{};
}

@end


@interface AWSAPIGatewayClient()

// Networking
@property (nonatomic, strong) NSURLSession *session;

// For requests
@property (nonatomic, strong) NSURL *baseURL;

// For responses
@property (nonatomic, strong) NSDictionary *HTTPHeaderFields;
@property (nonatomic, assign) NSInteger HTTPStatusCode;

- (AWSTask *)invokeHTTPRequest:(NSString *)HTTPMethod
                     URLString:(NSString *)URLString
                pathParameters:(NSDictionary *)pathParameters
               queryParameters:(NSDictionary *)queryParameters
              headerParameters:(NSDictionary *)headerParameters
                          body:(id)body
                 responseClass:(Class)responseClass;

@end

@interface ServerlessClient()

@property (nonatomic, strong) AWSServiceConfiguration *configuration;

@end

@interface AWSServiceConfiguration()

@property (nonatomic, strong) AWSEndpoint *endpoint;

@end

@implementation ServerlessClient

@synthesize configuration = _configuration;

static AWSSynchronizedMutableDictionary *_serviceClients = nil;
static NSString *url = nil;


+ (void)setEndPoint:(NSString*)endpoint;
{
    url = endpoint;
}

+ (instancetype)defaultClient {
    AWSServiceConfiguration *serviceConfiguration = nil;
    if ([AWSServiceManager defaultServiceManager].defaultServiceConfiguration) {
        serviceConfiguration = AWSServiceManager.defaultServiceManager.defaultServiceConfiguration;
    } else {
        serviceConfiguration = [[AWSServiceConfiguration alloc] initWithRegion:AWSRegionUnknown
                                                           credentialsProvider:nil];
    }

    static ServerlessClient *_defaultClient = nil;
    static dispatch_once_t onceToken;
    dispatch_once(&onceToken, ^{
        _defaultClient = [[ServerlessClient alloc] initWithConfiguration:serviceConfiguration];
    });

    return _defaultClient;
}

+ (void)registerClientWithConfiguration:(AWSServiceConfiguration *)configuration forKey:(NSString *)key {
    static dispatch_once_t onceToken;
    dispatch_once(&onceToken, ^{
        _serviceClients = [AWSSynchronizedMutableDictionary new];
    });
    [_serviceClients setObject:[[ServerlessClient alloc] initWithConfiguration:configuration]
                        forKey:key];
}

+ (instancetype)clientForKey:(NSString *)key {
    return [_serviceClients objectForKey:key];
}

+ (void)removeClientForKey:(NSString *)key {
    [_serviceClients removeObjectForKey:key];
}

- (instancetype)init {
    @throw [NSException exceptionWithName:NSInternalInconsistencyException
                                   reason:@"`- init` is not a valid initializer. Use `+ defaultClient` or `+ clientForKey:` instead."
                                 userInfo:nil];
    return nil;
}

- (instancetype)initWithConfiguration:(AWSServiceConfiguration *)configuration {
    if (self = [super init]) {
        _configuration = [configuration copy];

        NSString *URLString = url;
        if ([URLString hasSuffix:@"/"]) {
            URLString = [URLString substringToIndex:[URLString length] - 1];
        }
        _configuration.endpoint = [[AWSEndpoint alloc] initWithRegion:_configuration.regionType
                                                              service:AWSServiceAPIGateway
                                                                  URL:[NSURL URLWithString:URLString]];

        AWSSignatureV4Signer *signer = [[AWSSignatureV4Signer alloc] initWithCredentialsProvider:_configuration.credentialsProvider endpoint:_configuration.endpoint];

        _configuration.baseURL = _configuration.endpoint.URL;
        _configuration.requestInterceptors = @[[AWSNetworkingRequestInterceptor new], signer];
    }

    return self;
}


- (AWSTask *)Get:(NSString *)path
            param:(NSDictionary *)param
{


    NSDictionary *headerParameters = @{
                                       @"Content-Type": @"application/json",
                                       @"Accept": @"application/json",
                                       };


    NSDictionary *queryParameters = @{


                                      };
    NSDictionary *pathParameters = @{

                                     };


    SeverlessModel* model = [[SeverlessModel alloc] init];
    model.param = param;

    return [self invokeHTTPRequest:@"GET"
                         URLString:path
                    pathParameters:pathParameters
                   queryParameters:queryParameters
                  headerParameters:headerParameters
                              body:model
                     responseClass:nil];

}


- (AWSTask *)Post:(NSString *)path
            param:(NSDictionary *)param
{


    NSDictionary *headerParameters = @{
                                       @"Content-Type": @"application/json",
                                       @"Accept": @"application/json",
                                       };


    NSDictionary *queryParameters = @{


                                    };
    NSDictionary *pathParameters = @{

                                     };


    SeverlessModel* model = [[SeverlessModel alloc] init];
    model.param = param;

    return [self invokeHTTPRequest:@"POST"
                         URLString:path
                    pathParameters:pathParameters
                   queryParameters:queryParameters
                  headerParameters:headerParameters
                              body:model
                     responseClass:nil];

}

@end
Androidでの実装
下記参考にしてます。
導入
- AWS SDKの導入
Android Studioのbuild.gradleのdependenciesにAWS SDKの各種ライブラリを追加します。
dependencies {
    compile fileTree(include: ['*.jar'], dir: 'libs')
    testCompile 'junit:junit:4.12'
    compile 'com.android.support:appcompat-v7:23.3.0'
    compile 'com.amazonaws:aws-android-sdk-core:2.2.17+'
    compile 'com.amazonaws:aws-android-sdk-cognito:2.2.17+'
    compile 'com.amazonaws:aws-android-sdk-cognitoidentityprovider:2.2.17+'
    compile 'com.amazonaws:aws-android-sdk-apigateway-core:2.2.17+'
}
- API Gateway SDKの導入
下記、API GatewayのステージからSDKをダウンロードしません
理由はカスタマイズが利かないからです。
ダウンロードしたSDKはMavenにてJarファイルを作成する形式になっているのですが
この方式だとAPI GatewayのAPIを追加、変更するたびにダウンロードして、
Mavenでコンパイルしてjarを作成するという作業が必要になります。
そのため、今回Android版はAPIコール部分はスクラッチで実装します。(後述)
- 初期設定
下記パラメータを設定してください(AWSのID)
    //////////////////////
    // Config Param
    //////////////////////
    private static final String userPoolId = "us-east-1_<User Pool Id>";
    private static final String clientId = "<User Pool Client Id>";
    private static final String clientSecret = "<User Pool Client Secret>";
    private static final String identityPoolId = "us-east-1:<Identity Pool Id>";
    //////////////////////
ユーザの登録・ユーザのアクティベート・ユーザのログイン
どうもAndroid版のほうも言語設定をEnglishにしないとCognito User PoolにログインできないSDKのバグがあるようです。(Beta版だし仕方ないね・・・)
https://github.com/aws/aws-sdk-android/issues/132
AWS Android SDK 2.2.17で修正されたようです。
- Cognito User Pool初期化
コンストラクタにて初期化パラメータを渡してCognitoUserPoolクラスを作成します。
CognitoUserPool userPool = new CognitoUserPool(this, userPoolId, clientId, clientSecret, new ClientConfiguration());
- ユーザ登録
CoginitoUserPoolクラスのsignUpInBackgroundメソッドでユーザ登録します。
                // Read user data and register
                CognitoUserAttributes userAttributes = new CognitoUserAttributes();

                String name = nameEdit.getText().toString();
                String password = passwordEdit.getText().toString();
                String email = emailEdit.getText().toString();
                userAttributes.addAttribute("email", email);

                userPool.signUpInBackground(name, password, userAttributes, null, new SignUpHandler() {
                    @Override
                    public void onSuccess(CognitoUser user, boolean signUpConfirmationState,
                                          CognitoUserCodeDeliveryDetails cognitoUserCodeDeliveryDetails) {
                        // Check signUpConfirmationState to see if the user is already confirmed
                        Boolean regState = signUpConfirmationState;
                        if (signUpConfirmationState) {
                            // User is already confirmed
                            Toast.makeText(getApplicationContext(), "すでにConfirmedされています", Toast.LENGTH_LONG).show();
                        }
                        else {
                            // User is not confirmed
                            Toast.makeText(getApplicationContext(), "認証コードを入力してアクティベートしてください", Toast.LENGTH_LONG).show();
                        }
                    }

                    @Override
                    public void onFailure(Exception exception) {
                        Toast.makeText(getApplicationContext(), "ユーザ登録に失敗しました", Toast.LENGTH_LONG).show();
                    }
                });
- ユーザのアクティベート
confirmSignUpInBackgroundメソッドにてアクティベートします。
User Poolの登録ユーザがConfirmedされます。
                String verifyName = verifyNameEdit.getText().toString();
                String activateCode = activateCodeEdit.getText().toString();

                userPool.getUser(verifyName).confirmSignUpInBackground(activateCode, true, new GenericHandler() {
                    @Override
                    public void onSuccess() {
                        Toast.makeText(getApplicationContext(), "アクティベートされました", Toast.LENGTH_LONG).show();
                    }

                    @Override
                    public void onFailure(Exception exception) {

                    }
                });
- ユーザのログイン
getSessionInBackgroundメソッドにてログインします。
                String loginName = loginNameEdit.getText().toString();
                final String loginPassword = loginPasswordEdit.getText().toString();


                userPool.getUser(loginName).getSessionInBackground(new AuthenticationHandler() {
                    @Override
                    public void onSuccess(CognitoUserSession cognitoUserSession) {
                        Toast.makeText(getApplicationContext(), "ログイン成功", Toast.LENGTH_LONG).show();

                                                // API認可の処理

                    }

                    @Override
                    public void getAuthenticationDetails(AuthenticationContinuation authenticationContinuation, String username) {

                        AuthenticationDetails authenticationDetails = new AuthenticationDetails(username, loginPassword, null);
                        authenticationContinuation.setAuthenticationDetails(authenticationDetails);
                        authenticationContinuation.continueTask();

                    }

                    @Override
                    public void getMFACode(MultiFactorAuthenticationContinuation multiFactorAuthenticationContinuation) {
                        // MFAの設定がない場合は不要
                    }

                    @Override
                    public void onFailure(Exception e) {
                        Toast.makeText(getApplicationContext(), "ログインに失敗しました", Toast.LENGTH_LONG).show();
                    }
                });
認可
ユーザログイン後に
CognitoCredentialsProviderクラスに
User Pool認証プロバイダーとログインユーザのIdTokenを指定し、
setLoginsメソッドで認可します。
                        CognitoCredentialsProvider credentialsProvider = new CognitoCredentialsProvider(
                                identityPoolId,Regions.US_EAST_1);
                        //credentialsProvider.clear();

                        Map<String, String> logins = new HashMap<String, String>();
                        String userPoolProvider = "cognito-idp.us-east-1.amazonaws.com/" + userPoolId;
                        logins.put(userPoolProvider, cognitoUserSession.getIdToken().getJWTToken());
                        credentialsProvider.setLogins(logins);
                        //credentialsProvider.getCredentials();

                        // 認可後、APIコール
                        callAPI(credentialsProvider);
認可APIのコール
認可後の認証プロパイダーをAPIClientFactoryクラスに設定します。
APIClientFactoryクラスのbuildメソッドによりAPIコールクライアントを作成します。
内部的にはProxyクラスによるApiClientHandlerクラスのインジェクションと
APIコール時にはGsonライブラリによりJSONとモデルクラスのORマッピングを行っています。
    private void callAPI(final CognitoCredentialsProvider credentialsProvider)
    {


        new AsyncTask<Void, Void, Void>() {
            @Override
            protected Void doInBackground(Void... params) {
                ApiClientFactory factory = new ApiClientFactory();

                if(credentialsProvider != null){
                    factory.credentialsProvider(credentialsProvider);
                }

                // Build
                final TestClient client = factory.build(TestClient.class);


                Gson gson = new Gson();
                RequestData requestData = new RequestData("パラメータです");

                ResponseData data = client.testPost(gson.toJson(requestData));
                return null;
            }


        }.execute();


    }
APIクライアントクラス(TestClientクラス)は次のように定義します。
Serviceアノテーションのendpointの部分はAPI GatewayのステージデプロイURLに合わせて変更してください。
OperationアノテーションにAPIのパスとメソッド形式を指定します。
package com.example.teraidaiki.serverless;

import com.amazonaws.mobileconnectors.apigateway.annotation.Operation;
import com.amazonaws.mobileconnectors.apigateway.annotation.Service;

@Service(
        endpoint = "https://<API Gateway Stage ID>.execute-api.us-east-1.amazonaws.com/test"
)
public interface TestClient {
    @Operation(
            path = "/test",
            method = "POST"
    )
    ResponseData testPost(String param);

}
RequestDataクラスは送信用パラメータを定義したクラスです。
GsonライブラリでJSON文字列化します。
package com.example.teraidaiki.serverless;

public class RequestData {
    String someData;

    public RequestData(String someData){
        this.someData = someData;
    }
}
ResponseDataクラスはレスポンスで受け取るデータを定義したモデルクラスです。
package com.example.teraidaiki.serverless;

public class ResponseData {
    String message;// レスポンスデータに合わせて変える

    public ResponseData() {
    }
}
Android側でレスポンスデータを取得するためには、ResponseDataクラスのメンバ変数を適宜変える必要があります。
今回、Lambda側からはレスポンスで次のようなデータを返却します。
{message:"成功"}
上記のようなJavascriptのObject型のレスポンスでないとAPIコール時にGsonライブラリ内でORマッピングに失敗し、Androidアプリが落ちます。