React16以降の機能の実践サンプル
React16以降の機能の実践サンプルをまとめておきます。
地味に強力な機能が多かったり、次期バージョンの非同期描画に備えてライフサイクル周りで破壊的な変更があったりします。
ReactJSが初めての人はこちらもどうぞ
ReactJSで作る今時のSPA入門(基本編)
配列返し
ReactJS v16から配列形式のrender DOM返却ができるようになりました。
参考:Arrays in React 16 and the necessity of keys
これにより、renderの最上位DOMが必ず1つであるという制約がなくなります。
ただし、この場合、keyが必須です。
import React from 'react'
import Rect from './Rect'

class App extends React.Component {
  render () {
    return [
      <Rect key='rect_1' num={1} bgcolor='#e02020' />,
      <Rect key='rect_2' num={2} bgcolor='#20e020' />,
      <Rect key='rect_3' num={3} bgcolor='#2020e0' />,
    ]
  }
}
さらに短く書く場合は次のように書けます。
import React from 'react'
import Rect from './Rect'

class App extends React.Component {
  render () {

    const rects = [
      {key: 'rect_1', num: 1, bgcolor: '#e02020'},
      {key: 'rect_2', num: 2, bgcolor: '#20e020'},
      {key: 'rect_3', num: 3, bgcolor: '#2020e0'},
    ]

    return rects.map((r) => <Rect key={r.key} num={r.num} bgcolor={r.bgcolor} />)
  }
}
React.Fragment
React v16.2からReact.Fragmentという機能が追加されました。
配列同様にFragment部分のDOMはレンダリングされません。
配列の場合はkeyが必要でしたが、Fragmentの場合はkeyが不要です。
import React from 'react'
import Rect from './Rect'
const Fragment = React.Fragment

export default class App extends React.Component {

  render () {
    return (
      <Fragment>
        <Rect />
        <Rect num={1} bgcolor='#e02020' />
        <Rect num={2} bgcolor='#20e020' />
        <Rect num={3} bgcolor='#2020e0' />
      </Fragment>
    )
  }
}
React Context API
React v16.3から新Context APIが登場しました。
ProviderとConsumerというComponentを使うことで
ProviderでwrapしたComponent以下はConsumer経由でいつでもProviderに設定されたパラメータをpropsで参照できます。
こちらの記事にも同じようなこと書かれていますが
使ってみた感じ、Reduxを置き換えるものではありません。
どちらかというとアプリケーション共通のグローバル定数やモジュールを末端のComponentに受け渡すのに便利な機能といった印象です。
アプリケーション全体のデータはやはりReduxで管理したほうが良いでしょう。
実際に使うときはHOC(High Order Component)化しておくと利用するときに便利です。
HOCの作り方に関しては下記記事を参考にしてください。
参考:ReactのHigher Order Components詳解 : 実装の2つのパターンと、親Componentとの比較
参考:React の Higher-order Components の利用方法
axiosモジュールを受け渡す例
一般的にはReduxのreducerのactionなどでAPIコールする場合が多いと思います。
ただし、reducerにデータを保存しないようなAPIコールの場合は、actionを作成するのではなく、
直接ComponentからAPIコールしたい場合があります。
今回、APIコールのライブラリにaxiosを使っている前提で、
axiosモジュールをProvider経由で末端のComponentのpropsに渡す想定で作ってみます。
以下のようなwithApiClient HOCを作成します。
import React from 'react'

const ApiClientContext = React.createContext(null)

export const ApiClientProvider = ApiClientContext.Provider

export function withApiClient(Component) {
  return function WrappedComponent(props) {
    return (
      <ApiClientContext.Consumer>
        {apiClient => <Component {...props} apiClient={apiClient} />}
      </ApiClientContext.Consumer>
    )
  }
}
ApiClientProviderでアプリケーション全体をwrapします。
この際、Providerのvalueにaxiosモジュールをセットします。
import React from 'react'
import ReactDOM from 'react-dom'
import client from 'axios'

function render() {
  const App = require('components/App').default
  ReactDOM.render(
    <ApiClientProvider value={client}>
       <App />
    </ApiClientProvider>,
    document.getElementById('root')
  )
}
render()
利用側はwithApiClientでComponentをwrapしてやれば、
apiClientパラメータ(axiosモジュール)を参照できます。
import React from 'react'
import { withApiClient } from 'contexts/amp'

class App extends React.Component {
  state = {data: {}}

  componentDidMount() {
    this.props.apiClient
      .get('https://randomuser.me/api')
      .then(res => this.setState({data: res.data}))
  }

  render() {
    return <div>{this.state.data}</div>
  }
}

export default withApiClient(App)
AMPの描画処理を分ける例
SSRでAMP処理をしたい場合に次のようなHOCを作成しておくと
AMPと非AMP共通のComponentに対し、AMPの描画をするのか通常ページの描画をするのか判別するのが楽です。
SSRに関してはこちらを参考にしてください。
webpack4でReact16のSSR(サーバサイドレンダリング)をする
import React from 'react'

// defaultの値はfalse
const AmpContext = React.createContext(false)

export const AmpProvider = AmpContext.Provider

export function withAMP(Component) {
  return function WrappedComponent(props) {
    return (
      <AmpContext.Consumer>
        {isAMP => <Component {...props} isAMP={isAMP} />}
      </AmpContext.Consumer>
    )
  }
}
サーバ側でSSRする際に、AmpProviderで全体をwrapしてやります。
AMPのURLの場合、isAMPをtrueにします。
import React from 'react'
// SSR用ライブラリ
import ReactDOMServer from 'react-dom/server'

// クライアントサイドと同じComponentを使う
import UserPage from '../components/UserPage'
// AmpProviderを利用する
import { AmpProvider } from '../contexts/amp'

export default function ssr(req, res, initialData) {
  const isAmp = /^\/amp/.test(req.path) // AMPのurlの場合、true

  const body = () => (
   <AmpProvider value={isAMP}>
     <UserPage />
    </AmpProvider>
  )

  // htmlを生成
  ReactDOMServer.renderToNodeStream(
    <HTML>
      {body}
    </HTML>
  ).pipe(res)
}

const HTML = (props) => {
  return (
    <html lang='ja'>
      <head>
        <meta charSet="utf-8" />
        <title>learnReactJS</title>
      </head>
      <body>
        <div id='root'>{props.children}</div>
        <script type='text/javascript' src='/bundle.js'></script>
      </body>
    </html>
  )
}
利用側はwithAMPでComponentをwrapしてやれば、
isAMPパラメータを参照できます。
(AMP用描画、通常描画の切り分け)
import React from 'react'
import { withAMP } from 'contexts/amp'

const UserPage = (isAMP) => (
 isAMP ? <div>AMPページ</div> : <div>通常ページ</div>
)

export default withAMP(UserPage)
React.createRef
何らかの事情でDOMのイベントを別のDOMに反映させたい場合があります。
この場合、refsを使うことで対応できます。
refsはReactのライフサイクルを無視して直接DOMを操作するため、必要な場面以外は極力使わないようにしましょう。
以前はcomponentDidMountでも参照できていましたがReact16からは非推奨になりました。
参照する際はイベントコールバック内のみに留めるようにしましょう。
React.createRefから変数生成する方法(React v16.3以降)とコールバックで取得する方法と二通りあります。
変数生成する方法はReact.createRefでref変数生成し、ref属性にref変数を指定します。
ref変数のcurrentプロパティ経由でDOM(HTMLElement)オブジェクトが参照できます。
export default class App extends React.Component {

  constructor (props) {
    super(props)
    // createRefでref変数作成
    this.upload = React.createRef()
    this.done = React.createRef()
  }

  // アップロードされたファイルの処理
  handleUpload = (e) => {
    const file = e.target.files[0]
    const reader = new FileReader()
    reader.readAsText(file, 'UTF-8')
    reader.onload = e => {
      alert(e.target.result)
    }
    e.target.value = null

    // currentプロパティ経由で生のHTMLElementを操作できる
    this.done.current.style.display = ''
  }

  render () {
    return (
      <div>
        <input type='file' ref={this.upload} style={{display: 'none'}} onChange={this.handleUpload} />
        <button onClick={() => this.upload.current.click()}>アップロード</button>
        <div ref={this.done} style={{display: 'none'}}>アップロード完了</div>
      </div>
    )
  }
}
refにコールバックを指定して変数値として持つことも可能です。
次の例はコールバック経由でref変数を取得し、別のDOMを操作する例です。
export default class App extends React.Component {

  // フォーカス
  focusInput = () => {
    this.input.focus()
  }

  render () {
    return (
      <div>
        <div>
          <input type="text" ref={(input) => { this.input = input }} />
          <button onClick={this.focusInput}>入力フォーカス</button>
        </div>
      </div>
    )
  }
}
refsを使えば、子コンポーネントの参照を親コンポーネントに渡すことも可能です。
今回の例では、子コンポーネントの入力欄をref参照して、入力連動させています。
const TextInput = (props) => {
  return <input ref={props.inputRef} />
}

export default class App extends React.Component {

  // 入力連動
  changeInput = () => {
    this.textInput.value = this.input.value
  }

  render() {
    return (
      <div>
        <input type="text" ref={(input) => { this.input = input }} onChange={this.changeInput} />
        <TextInput inputRef={el => this.textInput = el} />
      </div>
    )
  }
}
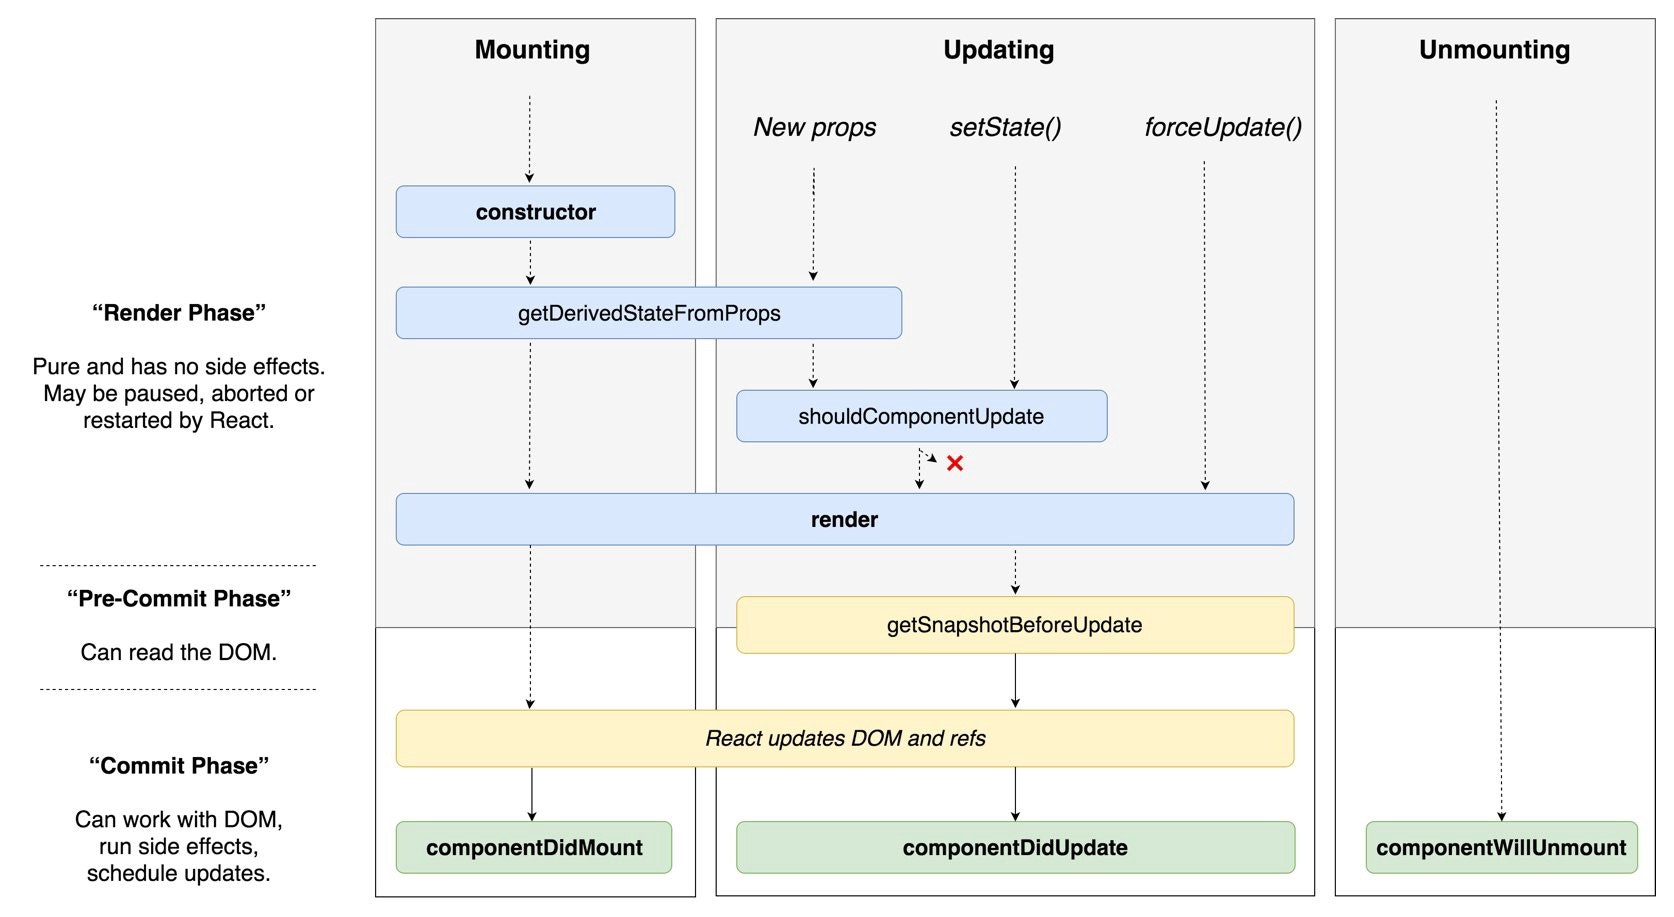
getDerivedStateFromProps
React v16.3以降、
ライフサイクルメソッドのcomponentWillMountとcomponentWillReceivePropsはdeprecatedになるため、
getDerivedStateFromPropsで代用する必要があります。
componentWillMount内の処理はconstructorやcomponentDidMountに移行します。
(初期化処理はconstructor、reducerのAPIコールのactionはcomponentDidMountメソッドに移行すると良いと思います。)
getDerivedStateFromPropsはstaticなメソッドでthis.propsが使えないことに注意です。
getDerivedStateFromPropsは次のようなタイミングでコールバックされます。
参考:Playing with Component lifecycle methods of React 16.3
React v16.3以降のライフサイクルのメソッドの説明は次記事がまとまっています。
参考:React v16.3 changes
getDerivedStateFromPropsの第一引数は変更があった場合、変更されようとしているprops、Componentの現在のstateが第二引数に入ります。
戻り値は変更したいstateを代入します。(setStateと等価)
変更がない場合はnullを返します。
staticメソッドのため、this.propsが使えない代わりにstateで状態を保持し、前の状態と比較する必要があります。
constructor (props) {
  super(props)
  this.state = {
    location: this.props.location,
  }
}

static getDerivedStateFromProps(nextProps, prevState){
 return { location: nextProps.location }
}
componentWillReceivePropsを同等の処理をするためには、updatingのタイミングで
nextPropsとprevStateを比較し、違いがある場合に戻り値に違いがあるパラメータのstateを返却します。
その後、componentDidUpdateにてprevPropsと返却されたstateを比較します。
(そもそもcomponentWillReceivePropsが必要になる場合というのは、react-routerで画面遷移したときにComponentがUnmountされずに使い回しされるので必要になる場合が多いと思います。)
react-routerで同じComponentを利用したパスに遷移して表示させたいものが違う場合は、
APIコールをcomponentDidUpdateにて行う必要があります。
(遷移した先のComponentが同じ場合はUnmountされないため、componentDidMountが呼ばれない)
参考:Replacing ‘componentWillReceiveProps’ with ‘getDerivedStateFromProps’
以下にサンプルを作成しました。
(path)?model=trueのときはメッセージを開き、閉じたときにurlを(path)に戻すサンプルです。
直接メッセージが開いた状態の画面に遷移させたいときなどに使います。
import React from 'react'
import qs from 'qs'
import { withRouter } from 'react-router'

class App extends React.Component {

  constructor (props) {
    super(props)
    const state = this.props.location.state || qs.parse(this.props.location.search.slice(1))
    this.state = {
      open: !!(state && state.modal),
      location: this.props.location,
    }
  }

  static getDerivedStateFromProps(nextProps, prevState) {
    if (nextProps.location.pathname !== prevState.location.pathname) {
      return { location: nextProps.location }
    }
    if (nextProps.location.search !== prevState.location.search) {
      const state = qs.parse(nextProps.location.search.slice(1))
      return {
        open: !!(state && state.modal),
        location: nextProps.location,
      }
    }
    return null
  }

  componentDidUpdate(prevProps) {
    if (prevProps.location.pathname !== this.state.location.pathname) {
      this.setState({location: prevProps.location})
    }
  }

  handleClickOpen (user) {
    this.props.history.replace(`${this.props.location.pathname}?modal=true`)
  }

  handleClickClose () {
    this.setState({ open: false })
    this.props.history.replace(`${this.props.location.pathname}`)
  }

  render () {
    return (
      <div>
        <button onClick={() => this.handleClickOpen()}>開く</button>
        {
          this.state.open &&
          <div>
            <h1>運営からのメッセージ</h1>
            <div>ほげほげという機能を実装しました</div>
            <button onClick={() => this.handleClickClose()}>閉じる</button>
          </div>
        }
      </div>
    )
  }
}

export default withRouter(App)
Pointer Eventsのサポート
イベントハンドラにPointer eventsがサポートされました。
参考:React v16.4.0: Pointer Events をサポート【日本語翻訳】
以下は React DOM で利用可能なイベントの種類です。
- onPointerDown
- onPointerMove
- onPointerUp
- onPointerCancel
- onGotPointerCapture
- onLostPointerCapture
- onPointerEnter
- onPointerLeave
- onPointerOver
- onPointerOut
