ふと、Web会議ってどういう仕組みなんだろうと思ったので、作ってみることにしました。
Web会議システムの仕組み
WebRTC(Web Real-Time Communications)というものを使ってP2Pにて相互通信を行っているそうです。
WebRTC (Web Real-Time Communications、ウェブリアルタイムコミュニケーション) は、ウェブアプリケーションやウェブサイトにて、仲介を必要とせずにブラウザー間で直接、任意のデータの交換や、キャプチャしたオーディオ/ビデオストリームの送受信を可能にする技術です。 WebRTC に関する一連の標準規格は、ユーザーがプラグインやサードパーティ製ソフトウェアをインストールすることなく、ピア・ツー・ピアにて、データ共有や遠隔会議を実現することを可能にします。
引用:WebRTC API
サーバーを開始て通信を行うMCUやSFUといった方式もあるようですが、今回はピア接続についてみていこうと思います。
WebRTCの接続手順
以下の手順で接続を行うようです。
- 呼び出す側が navigator.mediaDevices.getUserMedia() を通じてローカルメディアを取得する
- 呼び出す側が RTCPeerConnection を作成し、 RTCPeerConnection.addTrack() を実行する。(addStream が非推奨であるため)
- 呼び出す側がオファーを作成するために RTCPeerConnection.createOffer() を実行する
- 呼び出す側がオファーを local description (ローカル側の接続の記述) として設定するために RTCPeerConnection.setLocalDescription() を実行する
- 呼び出す側は setLocalDescription() を実行した後、STUN サーバーに問い合わせて ICE 候補を生成する
- 呼び出す側がシグナリングサーバーを使ってオファーを届けたい相手に送る
- 受け取る側がオファーを受け取り、それを remote description (相手側の接続の記述) として記録するために RTCPeerConnection.setRemoteDescription() を実行する
- 受け取る側がコールに必要なセットアップを行う。ローカルメディアを取得し、 RTCPeerConnection.addTrack() を通じてメディアトラックをピア接続にアタッチする
- 受け取る側が RTCPeerConnection.createAnswer() を実行することでアンサーを作成する
- 受け取る側が RTCPeerConnection.setLocalDescription() に作成したアンサーを渡して実行し、アンサーを自身の local description としてセットする。この時点で受け取る側は両側の接続設定を知ることになる。
- 受け取る側がシグナリングサーバーを使ってアンサーを呼び出す側に送る
- 呼び出す側がアンサーを受け取る。
- 呼び出す側がアンサーを remote description として設定するために RTCPeerConnection.setRemoteDescription() を実行する。これで呼び出す側も両者の設定を知ることになる。設定した通りにメディアが流れ始める。
引用:シグナリング
シーケンス図で表すと以下のようになるそうです

引用:The entire exchange in a complicated diagram
環境構築
WebRTCを実現するためにはサーバーを4つ立てる必要があります
- Webサーバー
- アプリサーバー
- シグナリングサーバー
- TURNサーバー
アプリサーバーについてはAngular+NestJSのモノリポ環境をなるべくシンプルに作るで作ったプロジェクトをベースに作成し、シグナリングサーバーの役割もNestJSの機能を使って一緒に載せちゃいます
他のサーバーについてはめんどくさいのでdocker-composeで一括で構築します。
dockerコンテナ
- https-portalでWebサーバーを立てます
- 後でAWS上にデプロイしますが、SSL化したいので(ドメインはwww.teracy.tkです)
- DOMAINSはRoute53でEC2と紐づけているドメインを指定
- STAGEは.envで環境ごとに切り替えられるようにしておきます(ローカルだと不要なのでここまでやる必要もないですが。。。)
- TURNサーバーは良く分からないので、
instrumentisto/coturnイメージを使います- usernameとpasswordを設定するためにconfファイルをボリュームに設定してます
version: '3'
services:

  https-portal:
    image: steveltn/https-portal:1
    ports:
      - '80:80'
      - '443:443'
    environment:
      DOMAINS: 'www.teracy.tk -> http://server:3000'
      STAGE: $STAGE

  server:
    image: node:12-alpine
    container_name: server
    ports:
      - 3000:3000
    volumes:
      - .:/develop
    links:
      - turn-server
    working_dir: /develop
    command: [/bin/sh, -c, npm install && npm run dev]

  turn-server:
    image: instrumentisto/coturn
    volumes:
      - ./turnserver/turnserver.conf:/etc/coturn/turnserver.conf
    container_name: turn-server
    ports:
      - 3478:3478
      - 49152-65535:49152-65535/udp
    network_mode: host
# ユーザ名とパスワードを指定
user=username:password
# 長期的な資格情報メカニズムを使用
lt-cred-mech
# TLSは使用しない
no-tls
# realm
realm=www.teracy.tk
(2020/11/10 追記)
lt-cred-mechとno-tlsを追記
シグナリングサーバー
NestJSのGateway機能でシグナリングサーバーを実現します
socket.ioのインストール
npm i --save @nestjs/websockets @nestjs/platform-socket.io
npm i --save-dev @types/socket.io
シグナリングサーバー
-
namespace: 'signaling'を指定して、シグナリングだけで使うようにします - messageを受け取ったら、接続中のクライアントに対して受け取ったデータをそのままemitするだけです
import { SubscribeMessage, WebSocketGateway, WebSocketServer } from '@nestjs/websockets';
import { Server, Socket } from 'socket.io';

@WebSocketGateway({ namespace: 'signaling' })
export class ConnectionGateway {
    @WebSocketServer() server: Server;

    @SubscribeMessage('message')
    handleMessage(client: Socket, payload: any) {
        console.log('message', payload.type)
        this.server.clients().emit('message', payload);
    }
}
AppModuleでprovidersに指定することでウェブソケットが使えるようになります
・・・
@Module({
  ・・・
  providers: [AppService, ConnectionGateway],
})
export class AppModule {}
フロント側の実装
シグナリングサーバーのURLを定義
AWS環境ではhttpsのURLを指定します
export const environment = {
  production: true,
  signalingServerUrl: 'https://www.teracy.tk/signaling',
};
export const environment = {
  production: true,
  signalingServerUrl: 'http://localhost:3000/signaling',
};
シグナリングサーバーとやり取りするサービスを作成
socket.io-clientをラッピングするサービスです
まずAngular側にsocket.io-clientをインストールします
npm install socket.io-client --save
npm install @types/socket.io-client --save-dev
サービスを作成します
import { Injectable, OnInit } from '@angular/core';
import { environment } from 'src/environments/environment';
import * as io from 'socket.io-client';

export type MessageType = 'offer' | 'answer' | 'connect_client' | 'new-ice-candidate';
interface SignalingMessage {
    type: MessageType;
    data: any;
}

@Injectable()
export class SignalingService {
    private socket: SocketIOClient.Socket;
    onconnect: () => void;
    ondisconnect: () => void;
    onmessage: (type: MessageType, data: any) => void;

    /**
     * シグナリングサーバーと接続
     */
    init() {
        this.socket = io(environment.signalingServerUrl, {});
        this.socket.on('connect', () => {
            if (this.onconnect) {
                this.onconnect();
            }
        });
        this.socket.on('disconnect', () => {
            if (this.ondisconnect) {
                this.ondisconnect()
            }
        });
        this.socket.on('message', (event: SignalingMessage) => this.onmessage(event.type, event.data));
    }

    /**
     * シグナリングサーバーから切断
     */
    disconnect() {
        this.socket?.disconnect();
    }

    sendMessage(type: MessageType, data: any) {
        const message: SignalingMessage = { type, data };
        this.socket?.emit('message', message);
    }

}
WebRTC接続を行うクラスを作成
とりあえず、シンプルにピア接続して映像を出すだけの機能を想定しているので、映像や音声のON/OFF切り替えとかには対応してないです。
このページに書いてある手順にあわせてコメントに番号書いてます
import { Injectable } from '@angular/core';
import { SignalingService, MessageType } from './signaling.service';

/**
 * 参考:https://developer.mozilla.org/ja/docs/Web/API/WebRTC_API/Connectivity#%E3%82%B7%E3%82%B0%E3%83%8A%E3%83%AA%E3%83%B3%E3%82%B0
 */
@Injectable()
export class WebRTCService {
    localMediaStream: MediaStream;
    remoteMediaStream: MediaStream = new MediaStream();
    private isHost: boolean;

    constructor(private signaling: SignalingService) { }

    /**
     * ホストとして接続
     */
    async connectionAsHost(constraints: MediaStreamConstraints) {
        this.isHost = true;
        try {
            // 1. ホスト側のメディアストリームを取得
            this.localMediaStream = await navigator.mediaDevices.getUserMedia(constraints);

            // 2. ホスト側でPeerConnectionを作成し、トラックを追加
            const pc = this.createPeerConnection();
            this.localMediaStream.getTracks().forEach(track => pc.addTrack(track, this.localMediaStream));

            this.signaling.init();
            // ソケット接続時にオファーを送信
            this.signaling.onconnect = () => this.sendOffer(pc);
            this.signaling.onmessage = this.handleMessage(pc);
        } catch (err) {
            console.error(err);
        }
    }

    /**
     * クライアントとして接続
     */
    async connectionAsClient(constraints: MediaStreamConstraints) {
        this.isHost = false;
        try {
            this.localMediaStream = await navigator.mediaDevices.getUserMedia(constraints);

            const pc = this.createPeerConnection();

            this.signaling.init();
            // クライアント接続時にホストからofferを送ってもらうためにシグナル送信
            this.signaling.onconnect = () => this.signaling.sendMessage('connect_client', null);
            this.signaling.onmessage = this.handleMessage(pc);
        } catch (err) {
            console.error(err);
        }
    }

    /**
     * 切断
     */
    disconnect() {
        // メディアを停止
        [this.localMediaStream, this.remoteMediaStream].forEach(stream => stream?.getTracks().forEach(track => track.stop()));
        // ソケット切断
        this.signaling.disconnect();
    }

    private createPeerConnection() {
        const pcConfig: RTCConfiguration = {
            iceServers: [
                { urls: "stun:www.teracy.tk:3478" },
                { urls: "turn:www.teracy.tk:3478?transport=udp", "username": "username", "credential": "password" },
                { urls: "turn:www.teracy.tk:3478?transport=tcp", "username": "username", "credential": "password" },
            ]
        };

        const pc = new RTCPeerConnection(pcConfig);
        // リモートのトラック受信
        pc.addEventListener('track', (event: RTCTrackEvent) => this.remoteMediaStream.addTrack(event.track));
        // 5. ICE候補を追加
        pc.addEventListener('icecandidate', event => {
            if (event.candidate) {
                this.signaling.sendMessage('new-ice-candidate', event.candidate);
            }
        });

        return pc;
    }

    private async sendOffer(peerConnection: RTCPeerConnection) {
        // 3. オファーを作成
        const offer = await peerConnection.createOffer();
        // 4. 作成したオファーをローカル接続の記述として設定
        await peerConnection.setLocalDescription(offer);
        // 6. オファーを送信
        this.signaling.sendMessage('offer', offer);
    }

    private handleMessage(peerConnection: RTCPeerConnection,) {
        return async (type: MessageType, data: any) => {
            switch (type) {
                case 'offer':
                    if (!this.isHost) {
                        // 7. クライアント側で受信したofferをリモート側の接続情報としてセット
                        const remoteDesc = new RTCSessionDescription(data);
                        await peerConnection.setRemoteDescription(remoteDesc);
                        // 8. ローカルのメディアトラックをピア接続にアタッチ
                        this.localMediaStream.getTracks().forEach(track => peerConnection.addTrack(track, this.localMediaStream));
                        // 9. アンサー作成
                        const answer = await peerConnection.createAnswer();
                        // 10. アンサーをローカルの接続情報としてセット
                        await peerConnection.setLocalDescription(answer);
                        // 11. アンサーを送信
                        this.signaling.sendMessage('answer', answer);
                    }
                    break;
                case 'answer':
                    // 12. ホスト側でアンサーを受信
                    if (this.isHost) {
                        // 13. アンサーをリモート側の接続情報としてセット
                        const remoteDesc = new RTCSessionDescription(data);
                        await peerConnection.setRemoteDescription(remoteDesc);
                    }
                    break;
                case 'connect_client':
                    if (this.isHost) {
                        // クライアントが接続してきたらオファーを投げてやる
                        this.sendOffer(peerConnection);
                    }
                    break;
                case 'new-ice-candidate': peerConnection.addIceCandidate(data); break;
            }
        }
    }

}
(2020/11/10 修正)
STUN/TURNサーバーの設定を修正しました
画面の作成
import { Component, OnDestroy, OnInit } from '@angular/core';
import { ActivatedRoute } from '@angular/router';
import { WebRTCService } from '../shared/services/web-rtc.service';

@Component({
    selector: 'app-web-meeting',
    templateUrl: './web-meeting.component.html',
    styleUrls: ['./web-meeting.component.scss']
})
export class WebMeetingComponent implements OnInit, OnDestroy {
    isLoading = true;

    get localMediaStream() { return this.webRtcService.localMediaStream; }
    get remoteMediaStream() { return this.webRtcService.remoteMediaStream; }
    get isAvailableLoalMedia() { return this.localMediaStream?.getTracks().length; }
    get isAvailableRemoteMedia() { return this.remoteMediaStream?.getTracks().length; }

    constructor(private webRtcService: WebRTCService, private activatedRoute: ActivatedRoute) { }

    async ngOnInit() {
        if (this.activatedRoute.snapshot.queryParams?.host) {
            this.webRtcService.connectionAsHost({ audio: true, video: true });
        } else {
            this.webRtcService.connectionAsClient({ audio: true, video: true });
        }
        this.isLoading = false;
    }

    ngOnDestroy() {
        this.webRtcService.disconnect();
    }
}
<div class="panel">
    <div class="video-panel">
        <div class="my-video" *ngIf="isAvailableLoalMedia">
            <video [srcObject]="localMediaStream" autoplay muted playsinline></video>
        </div>
        <div class="remote-video" *ngIf="isAvailableRemoteMedia">
            <video [srcObject]="remoteMediaStream" autoplay muted playsinline></video>
        </div>
    </div>
</div>
あとはイイ感じにcss当てます
動かしてみる
AWS上にデプロイ
実際に複数の端末で接続してみたいのでAWS上にデプロイします。
- EC2インスタンスを立ち上げ
- Route53でEC2のIPにドメインを紐づけ
- EC2内でシステム起動(docker-compose up)
※EC2はEC2をt2.microで立てたときにやることメモで書いている内容で立ち上げています
無料ドメインの取得とRoute53については以下を参考にさせていただきました
無料ドメイン(.tk)とRoute53を利用して0円でHTTPS環境を設定してみた
いざ!
いよいよデプロイした環境にアクセスします。
PCでホストとして接続を開始し、スマホでクライアントとして接続します。
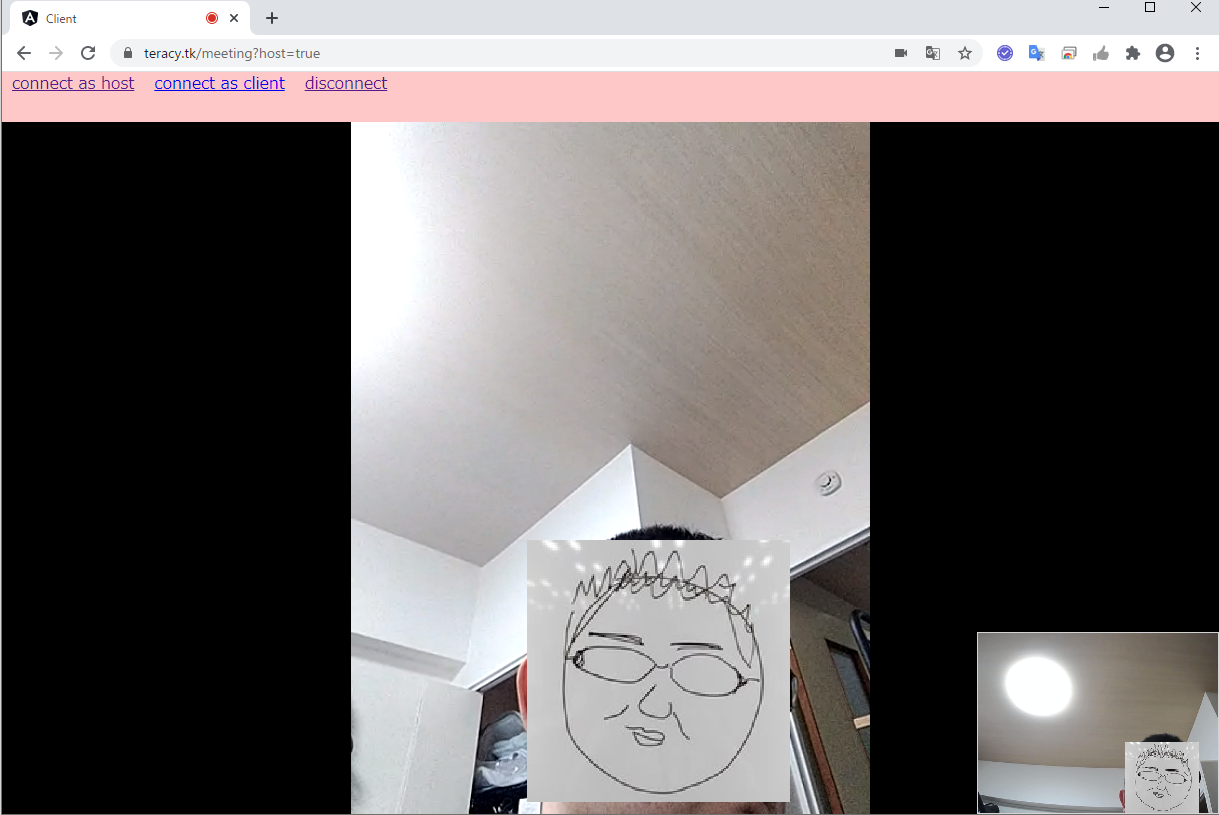
映像が出ました!!
ホスト(PC)の映像が右下にクライアント(スマホ)の映像が中央に出てます。
ちゃんと映像も更新されます^^
ただ、スマホのWiFiを切って4Gにすると接続できませんでした。。。
NAT越えが出来てないと思うので、今後TURNサーバーについても調べて分かり次第更新しようと思います。
TURNサーバーの設定が足りてませんでした。
以下を参考にturnserver.confを修正したところ接続できました!
壁を越えろ!WebRTCでNAT/Firewallを越えて通信しよう
Configure TURN | BigBlueButton
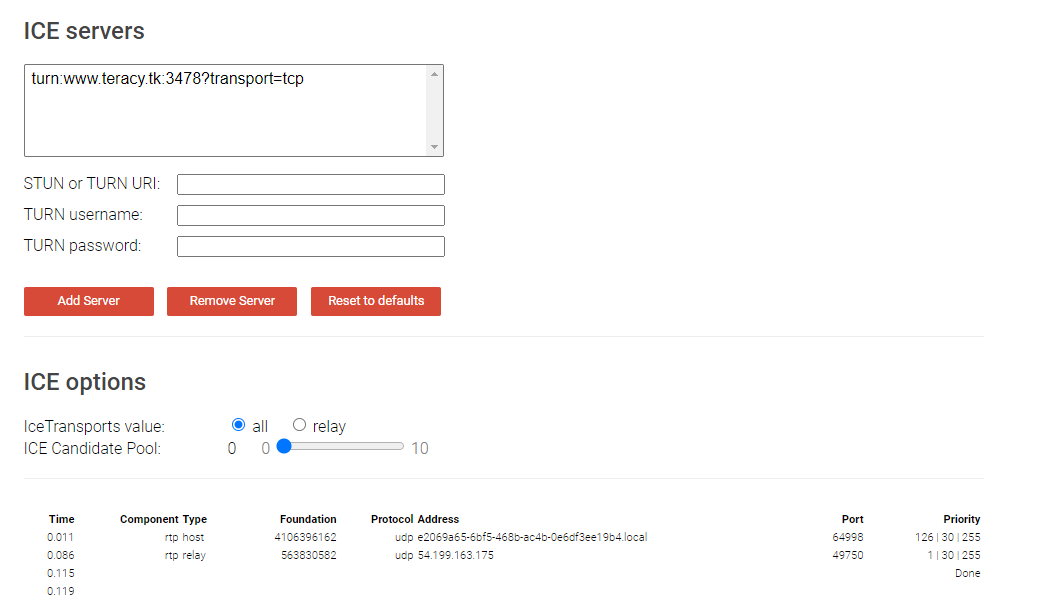
TURNサーバーの確認
(2020/11/10 追記)
Tricle-ICEというサイトで確認できるので、外部のネットワークとつながらない場合はここで見てみると良いです。
https://webrtc.github.io/samples/src/content/peerconnection/trickle-ice/
(私の場合は「rtp relay」が来てませんでした。)
↓つながった時の出力
まとめ
ちょこちょこ躓きはしたものの、基本的には手順に沿って実装していくだけで実現することが出来ました!
今後は複数人でのWeb会議とかも作ってみたいですね^^
今回作成したものはGitHubにプッシュしてます
https://github.com/teracy55/webrtc-sample
参考
WebRTC API
webrtc.org
【初心者向け】STUN/TURNサーバをざっくり解説してみた
壁を越えろ!WebRTCでNAT/Firewallを越えて通信しよう
instrumentisto/coturn | docker hub
無料ドメイン(.tk)とRoute53を利用して0円でHTTPS環境を設定してみた