もくじ
やりたいこと
マウスオーバーしたときやクリックしたときのボタン等の色を好きな色にしたい、ということはよくあることだが、それを実現するための方法に、知っている限りでstyleを使う方法、Templateを使う方法、最後の最後にUserControlを使う方法があって、どれを使えばよいか、いまだに迷う。
この際どれをどういうケースで使うのか、はっきりさせておきたい。
現時点での結論
下記ページに、見た目の変え方が書かれてる。
このページの内容と、今までの経験から、styleとTemplateはどう使い分けたらいいかは、個人的に下記のように考えている。
-
まず**【style】と【Template】**は、
- 画面や画面に使っている部品の見た目をいじるためにある
- そのいじった見た目をいろいろな個所で利用できるようリソース化するためにある
-
【style】 は、、
- FrameworkElement または FrameworkContentElement から派生するもの(WindowやButton、Rectangleなど)に使える
- 対象が元から持っているプロパティを変更するだけのためのもの(なのでシンプル)
- 一般的に、xamlのResourcesセクションにリソースとして宣言される(配置した要素に直接書くことも可能)
- styleの詳細はこちら
-
【Template】 は、、
- 特定のコントロール(たぶん
Controlから派生したもの)に使える - コントロール全体の見た目を書き換えることができる(なのでstyleよりだいぶ複雑)
- 一般的に、xamlのResourcesセクションにリソースとして宣言される(配置した要素に直接書くことも可能)(styleと同じ)
- テンプレートを使えば、既存のコントロールの動きはそのままで、見た目だけを変える(カッコよくする)ことができる。
それでUserControlを作る必要は無くなるケースが多い。
(個人的感覚では、1つのコントロールをカスタムしたいならテンプレート、複数のコントロールを組み合わせたものを作りたいならUserContorlと思ってる) - 元からあるプロパティの値を変えるだけだからstyleでやろうとしてみてもうまく見た目に反映されてくれないとき (※下の**「styleだけで簡単にいけそうなのにいけないケース」** の項目を参照)
- Templateの詳細はこちら
- 特定のコントロール(たぶん
-
styleやテンプレートではなく
UserControlを作るべきなのはどんなときか?- 複数のコントロールを組み合わせたものをつくりたいとき
- 1つのコントロールでも、
- 既存では存在しないプロパティ―や設定を作りたいとき
- 詳しくはこちらを参照→MSDocs ControlTemplate を作成するタイミング について
styleだけで簡単にいけそうなのにいけないケース
現象
基本は上記のように考えているが、元からあるプロパティの値を変えるだけだからstyleでやろうとしてみてもうまく見た目に反映されてくれないときが結構ある。
例えばButtonのマウスオーバーの時の色を変えたい、というときに、Backgroundの値を変えればいいだけだから、上の基準に則ってstyleでやろうとすると、うまくいかない。
<Window x:Class="WpfApp3.MainWindow"
        xmlns="http://schemas.microsoft.com/winfx/2006/xaml/presentation"
        xmlns:x="http://schemas.microsoft.com/winfx/2006/xaml"
        xmlns:d="http://schemas.microsoft.com/expression/blend/2008"
        xmlns:mc="http://schemas.openxmlformats.org/markup-compatibility/2006"
        xmlns:local="clr-namespace:WpfApp3"
        mc:Ignorable="d"
        Title="MainWindow" Height="450" Width="800">
    <Grid>
        <Button Margin="50" Content="あいうえお">
            <Button.Style>
                <Style TargetType="Button">
                    <Style.Triggers>
                        <Trigger Property="IsMouseOver" Value="True">
                            <!-- ボタンは、IsMouseOverがTrueの時の色をstyleで設定しようとしても反映されずデフォのMouseOver時の色になる -->
                            <Setter Property="Background" Value="Red" />
                        </Trigger>
                        <Trigger Property="IsMouseOver" Value="False">
                            <!-- False時の動きはstyleが反映される -->
                            <Setter Property="Background" Value="Yellow" />
                        </Trigger>
                    </Style.Triggers>
                </Style>
            </Button.Style>
        </Button>
    </Grid>
</Window>
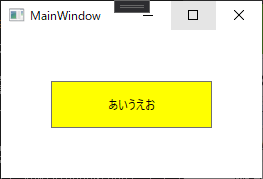
マウスオーバーしていないときの色

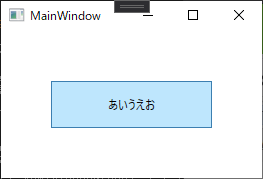
マウスオーバーしているときの色

IsMouseOverがTrueのときにRedになってほしいのに、そうはならない。
原因
これは、ButtonのデフォルトのTemplateの中にIsMouseOverがTrueのときの動きが固定値で定義されているが、Falseのときの動きは固定値で定義されていない、という違いだと思われる。
(styleは、ControlTemplateで指定されたプロパティの値を上書きできない)
ButtonのデフォルトのTemplateの値は下記のようになっている。
    <Window.Resources>
        <Style x:Key="FocusVisual">
            <Setter Property="Control.Template">
                <Setter.Value>
                    <ControlTemplate>
                        <Rectangle Margin="2" SnapsToDevicePixels="true" Stroke="{DynamicResource {x:Static SystemColors.ControlTextBrushKey}}" StrokeThickness="1" StrokeDashArray="1 2"/>
                    </ControlTemplate>
                </Setter.Value>
            </Setter>
        </Style>
        <SolidColorBrush x:Key="Button.Static.Background" Color="#FFDDDDDD"/>
        <SolidColorBrush x:Key="Button.Static.Border" Color="#FF707070"/>
        <SolidColorBrush x:Key="Button.MouseOver.Background" Color="#FFBEE6FD"/>
        <SolidColorBrush x:Key="Button.MouseOver.Border" Color="#FF3C7FB1"/>
        <SolidColorBrush x:Key="Button.Pressed.Background" Color="#FFC4E5F6"/>
        <SolidColorBrush x:Key="Button.Pressed.Border" Color="#FF2C628B"/>
        <SolidColorBrush x:Key="Button.Disabled.Background" Color="#FFF4F4F4"/>
        <SolidColorBrush x:Key="Button.Disabled.Border" Color="#FFADB2B5"/>
        <SolidColorBrush x:Key="Button.Disabled.Foreground" Color="#FF838383"/>
        <Style x:Key="ButtonStyle1" TargetType="{x:Type Button}">
            <Setter Property="FocusVisualStyle" Value="{StaticResource FocusVisual}"/>
            <Setter Property="Background" Value="{StaticResource Button.Static.Background}"/>
            <Setter Property="BorderBrush" Value="{StaticResource Button.Static.Border}"/>
            <Setter Property="Foreground" Value="{DynamicResource {x:Static SystemColors.ControlTextBrushKey}}"/>
            <Setter Property="BorderThickness" Value="1"/>
            <Setter Property="HorizontalContentAlignment" Value="Center"/>
            <Setter Property="VerticalContentAlignment" Value="Center"/>
            <Setter Property="Padding" Value="1"/>
            <Setter Property="Template">
                <Setter.Value>
                    <ControlTemplate TargetType="{x:Type Button}">
                        <Border x:Name="border" BorderBrush="{TemplateBinding BorderBrush}" BorderThickness="{TemplateBinding BorderThickness}" Background="{TemplateBinding Background}" SnapsToDevicePixels="true">
                            <ContentPresenter x:Name="contentPresenter" Focusable="False" HorizontalAlignment="{TemplateBinding HorizontalContentAlignment}" Margin="{TemplateBinding Padding}" RecognizesAccessKey="True" SnapsToDevicePixels="{TemplateBinding SnapsToDevicePixels}" VerticalAlignment="{TemplateBinding VerticalContentAlignment}"/>
                        </Border>
                        <ControlTemplate.Triggers>
                            <Trigger Property="IsDefaulted" Value="true">
                                <Setter Property="BorderBrush" TargetName="border" Value="{DynamicResource {x:Static SystemColors.HighlightBrushKey}}"/>
                            </Trigger>
                            <Trigger Property="IsMouseOver" Value="true">
                                <Setter Property="Background" TargetName="border" Value="{StaticResource Button.MouseOver.Background}"/>
                                <Setter Property="BorderBrush" TargetName="border" Value="{StaticResource Button.MouseOver.Border}"/>
                            </Trigger>
                            <Trigger Property="IsPressed" Value="true">
                                <Setter Property="Background" TargetName="border" Value="{StaticResource Button.Pressed.Background}"/>
                                <Setter Property="BorderBrush" TargetName="border" Value="{StaticResource Button.Pressed.Border}"/>
                            </Trigger>
                            <Trigger Property="IsEnabled" Value="false">
                                <Setter Property="Background" TargetName="border" Value="{StaticResource Button.Disabled.Background}"/>
                                <Setter Property="BorderBrush" TargetName="border" Value="{StaticResource Button.Disabled.Border}"/>
                                <Setter Property="TextElement.Foreground" TargetName="contentPresenter" Value="{StaticResource Button.Disabled.Foreground}"/>
                            </Trigger>
                        </ControlTemplate.Triggers>
                    </ControlTemplate>
                </Setter.Value>
            </Setter>
        </Style>
    </Window.Resources>
上記の中の<ControlTemplate.Triggers>の中に、
<Trigger Property="IsMouseOver" Value="true">
    <Setter Property="Background" TargetName="border" Value="{StaticResource Button.MouseOver.Background}"/>
    <Setter Property="BorderBrush" TargetName="border" Value="{StaticResource Button.MouseOver.Border}"/>
</Trigger>
という部分があり、IsMouseOverがtrueのときのBackgroundの値が固定値で「水色"#FFBEE6FD"」にされているからである。
逆に、IsMouseOverがfalseのときのBackgroundの値を指定する部分はないので、ただのstyleで指定することができていた。
※Buttonのように、Controlから派生してできているコントロールにはTemplateを設定できるので、そういうヤツでこういうケースがあるっぽい。
Rectangleのように、Controlから派生していないがstyleを使えるようなヤツの場合はTemplateを設定できないので、試した限りではこういうことにはならないっぽい。
対処方法
こういうケースの場合は、単純にstyleだけでMouseOver時のボタンの色を変えることができないので、、、
<Button>を使う側が、各Buttonごとに色を変えたりしなくてよい場合は、
上に挙げたTemplateのIsMouseOver時の色を直接変えてやれば実現できるので、Templateを使える。
<Button>を使う側が、各Buttonごとに色を変えたりしたい場合は、
既存では存在しないプロパティに色を指定するような形になり(<Button MouseOverBackGround="Yellow">のような)
新しいプロパティを作成する必要があるので、UserControlを使わないといけない。
と思っている。
メモ:デフォルトのTemplateを見る方法
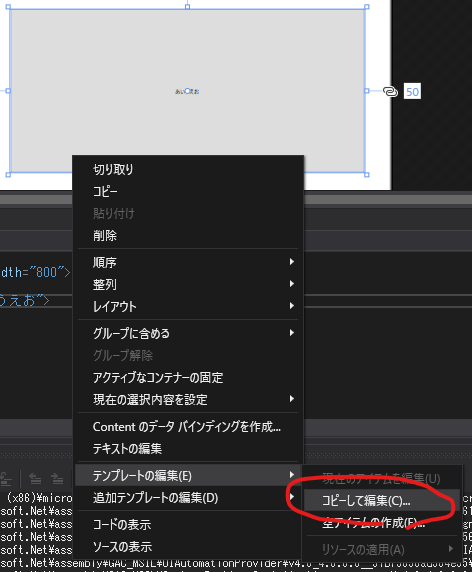
xamlのデザイナー画面で
右クリック > [テンプレートの編集] > [コピーして編集]
とやると、同じxamlのResourcesにテンプレートの中身がコピーされる。

恐らく下記のページに書かれているのと同じテンプレートが貼り付けられると思われる。
メモ:自分がStyleとTemplateをなんでややこしく感じたか?
しょーもないことだが、この記事を書いていて思ったこと。
- Styleはあくまで画面の部品自身が元から持ってるプロパティの値をトリガーをきっかけに変更するだけ
- Templateは、部品の見た目自体を変える
という分担であるにも関わらず、

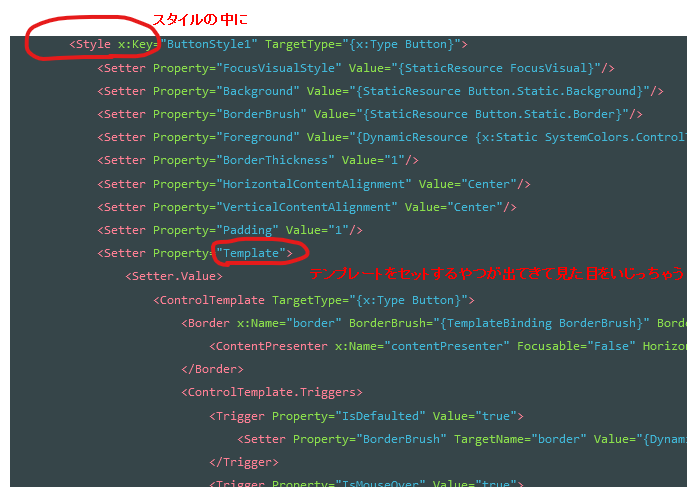
デフォルトのStyleを出して、それをもとにStyleの編集を勉強してると、Styleの中にTemplateをセットする部分が出てきて、そこに見た目を変更するようなことを書くので、何となく**Styleを使って部品の見た目をいじった!**という記憶、感触が残ってしまい、後で思い出そうとしたときにどっちやったっけ?わけわからん、となってたのでは?
どっちがどういうものなのか、を最初からはっきりさせておけば混乱しなくてすんだのかも。
メモ:どれをどういうときに使うか(追記)
こういうときにどれを使う、というのを一言で書こうとして、ややこしくなり失敗した。
でも消すのがもったいないので下記に残す。
- **【Style】**は、、、
- 画面の部品に対して簡単な動きをつけたいときに使う
- 自分自身のプロパティの値を固定値で設定もしくは各種トリガーで変化させればよいだけの場合に使う
- マウスオーバーしたら背景の色を変えるとか
- **【Template】**は、、、
- 画面の部品に対して見た目の変化をさせたいときに使う
- ボタンを四角から丸にするとか、チェックボックスをレ点のつくやつからスイッチみたいな形にするとか
- 見た目はそういうふうに変えたいが、機能はそのままでよいときに使う
- チェックボックスだったら、チェックしたらレ点ではなく●がつくようにしたが、やってること自体は変わらないとか
- 新しいプロパティを追加したりはできない
- チェックボックスのチェックを2つにするとか、スライダーのツマミを2つにするとか
- 画面の部品に対して見た目の変化をさせたいときに使う
- **【UserControl】**は、、、
- 画面の部品に対して、複雑な見た目の変化や機能追加をしたいときに使う
- 新しいプロパティを追加できる
- 複数のコントロールを組み合わせて1つの新しいコントロールを作れる
- 標準のコントロールでは持てない情報を保持できる
- チェックボックスのチェックを2つにするとか、スライダーのツマミを2つにするとか
- 標準のコントロールでは持てない情報を保持できる
- 画面の部品に対して、複雑な見た目の変化や機能追加をしたいときに使う
**【Style】と【Template】**を両方使えば、見た目の変化をさせつつ、簡単な動きを付けることができる
参考
styleとTemplateのまとめ
styleの作り方
Tenplateの作り方
styleではなくTemplateを作るべきなのはいつ?