この記事は2020年12月1日に開催された 【オンライン】enebular developer meetup で発表した内容をベースにしています。
はじめに
UXデザイナーの どたてつや です。
普段はUI設計やUX開発などの仕事の傍ら、趣味でプロトタイプなどを作ったりしています。
先日、Eテキスタイルを使ったインプットモジュール「nüno」をnanbwrks さんと作りました。
nünoの最新バージョンはver.2ですが、
今回は余ってるnüno ver.1を使用しての空席通知システムを作ってみました。
nünoについては2018年12月の記事「enebularで布センサーからLINEに通知できるようにしたよ」も参考にしてください!!
できるもの
最終的にできるものの動画はこちらです
nunoのデモ! #enebular pic.twitter.com/G7WTTFYqt4
— 野良ハック(ざっきー) (@Zakkiea) 2020年12月1日
わかりづらいですが、一番右下の座布団が黄色になっていますね。(なっています!)
こちらについてご説明します。
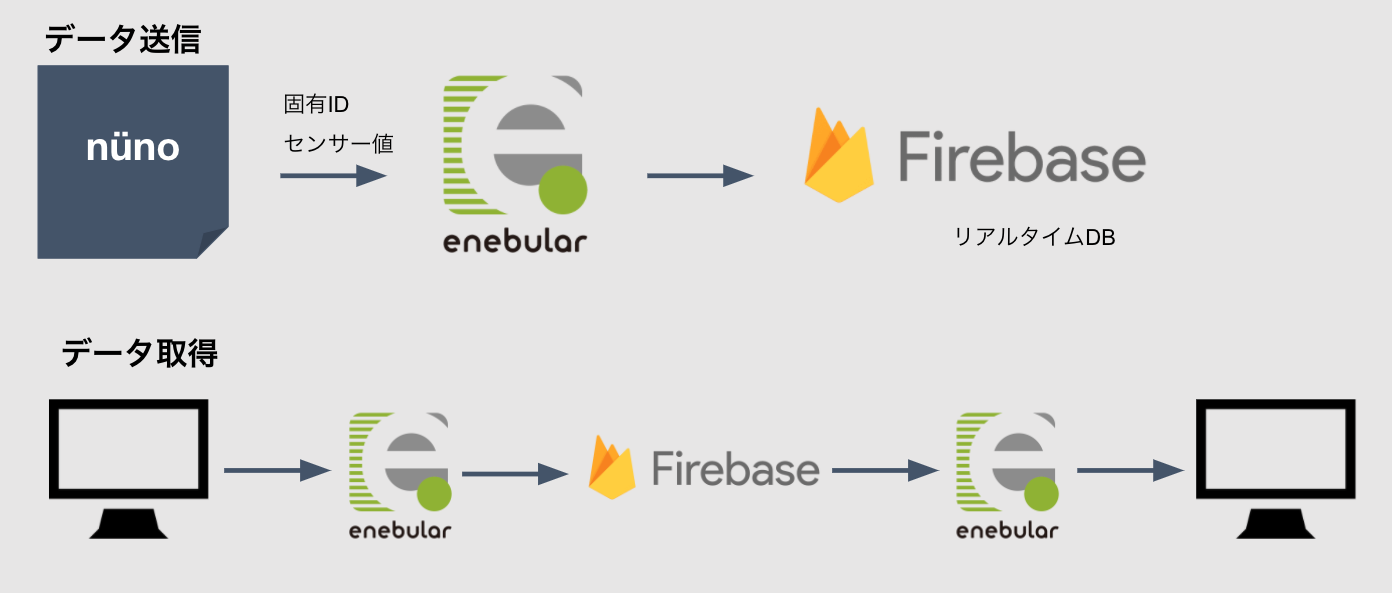
全体の構成
構成として空席データ送信はnünoからM5Stack経由でWifiを使用してenebularに接続、
enebularからFirebaseへ検知情報を送っています。
そして空席情報を表示するためのデータ取得はPC(スマホ)からenebularにリクエストを送信、
enbularがFirebaseからデータ尾を取得し、PCへ空席情報を表示する、という流れです。
ハードウェア
プロトタイプ感まるだしてですが、ハードウェアはこちら。
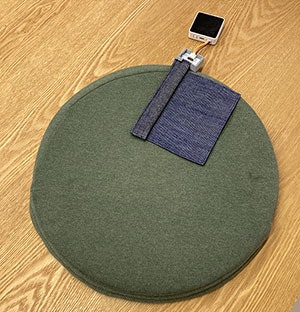
無印良品の座布団にnünoを接続し、M5Stack Core2を使用しています。
M5Stack Core2とnünoの通信はI2Cを使用しています。
Arduino
まずはArduinoから
また、 nünoではMTCH6102という静電タッチセンサをつかっているので、
プログラムと同じ階層にこちらから借りてきた
- MTCH6102.h
- MTCH6102.cpp
を利用させてもらっています。
# include <M5Core2.h>
# include <Arduino.h>
# include <Wire.h>
# include "MTCH6102.h"
# include <WiFi.h>
# include <HTTPClient.h>
# include <Arduino_JSON.h>

# define ADDR 0x25
# define ScreenWidth 320
# define ScreenHeight 240

MTCH6102 mtch = MTCH6102();

const int len = 8;//感知ポイント数
int nuno_mode = 2;
int cnt; //ループ用変数
uint32_t chipId = 0;


const bool ONLINE = true;//オンラインモード
const char* WIFI_SSID ="SSID";
const char* WIFI_PASSWORD = "PASSWORD";
const char* POST_URL = "URL";

WiFiClient client;

void setup() {
  delay(1000);

  // Initialize the M5Stack object
  M5.begin();
  //M5.Power.begin();
  M5.Lcd.fillScreen(TFT_BLACK);
  Serial.begin(115200);
  //mtch6102
  mtch.begin(ADDR);
  delay(100);
  mtch.writeRegister(MTCH6102_NUMBEROFXCHANNELS, 0x08);
  mtch.writeRegister(MTCH6102_NUMBEROFYCHANNELS, 0x03);//最低3点必要なため
  mtch.writeRegister(MTCH6102_MODE, MTCH6102_MODE_FULL);
  mtch.writeRegister(MTCH6102_HORIZONTALSWIPEDISTANCE, 0x04);
  mtch.writeRegister(MTCH6102_MINSWIPEVELOCITY, 0x02);
  mtch.writeRegister(MTCH6102_TAPDISTANCE, 0x02);
  mtch.writeRegister(MTCH6102_SWIPEHOLDBOUNDARY, 0x04);

  mtch.writeRegister(MTCH6102_BASEPOSFILTER, 0x00);
  mtch.writeRegister(MTCH6102_BASENEGAFILTER, 0x00);

  mtch.writeRegister(MTCH6102_CMD, 0x20);
  delay(500);

  //chipID
  for(int i=0; i<17; i=i+8) {
    chipId |= ((ESP.getEfuseMac() >> (40 - i)) & 0xff) << i;
  }
  Serial.print("chip Id:");
  Serial.println(chipId);

  //WIFI
  if (ONLINE) {
    WiFi.mode(WIFI_STA);
    WiFi.disconnect(true);
    delay(1000);
    WiFi.begin(WIFI_SSID, WIFI_PASSWORD);
    Serial.println("connecting");
    M5.Lcd.print("========== WIFI connecting ==========\n\n");

    while (WiFi.status() != WL_CONNECTED) {
      Serial.print(".");
      delay(500);
      Serial.print(WiFi.status());
      Serial.print(",");
    }
    Serial.println();
    Serial.print("connected: ");
    Serial.println(WiFi.localIP());
    M5.Lcd.print("========== WIFI connected ==========\n\n");
  }
}


const int log_max = 10;
JSONVar move_log;
int move_current = 0;

//動作ログ送信
void SendLog() {
  if (!ONLINE) return;
  if (WiFi.status() != WL_CONNECTED) return;

  HTTPClient http;
  Serial.print("[HTTP] begin...\n");
  http.begin(POST_URL); //HTTP
  http.addHeader("Content-Type", "application/json");
  String jsonString = JSON.stringify(move_log);
  int httpCode = http.POST(jsonString);
  http.end();
}


void loop() {

    M5.update();
    M5.lcd.clear();
    M5.Lcd.setCursor(0, 70);

    byte data;
    int sensVals[len];

    for (int i = 0; i < len; i++) {
      data = mtch.readRegister(MTCH6102_SENSORVALUE_RX0 + i);
      sensVals[i] = data;
      M5.Lcd.fillRect(30 + (i * 35), ScreenHeight - 20, 30, 10, TFT_BLACK);
      M5.Lcd.setCursor(30 + (i * 35), ScreenHeight - 20);
      M5.Lcd.print(data);
    }

    Serial.println(String(chipId));
    for (int j = 0; j < len; j++) {
      move_log["chipId"] = String(chipId);
      move_log["value"][j] = sensVals[j];
      Serial.print(sensVals[j]);
      Serial.print(",");
    }
    Serial.println();
    //ログ投げる


    M5.Lcd.setCursor(0, 70);
    //背景ライン
    for (int i = 0; i < len; i++) {
      M5.Lcd.drawLine((i + 1) * 35, ScreenHeight - 40, (i + 1) * 35, 0, 0x0000cc);
    }
    for (int i = 1; i < 11; i++) {
      M5.Lcd.drawLine(0, i * 20, ScreenWidth, i * 20, 0x0000cc);
    }
    //グラフ線の描画
    for (int i = 0; i < len + 1; i++) {
      float prev = 0;
      float current = 0;
      if (i == 0) {
        prev = 0;
      }else{
        prev = sensVals[i - 1];
      }
      if (i == len) {
        current = 0;
      } else {
        current = sensVals[i];
      }
      M5.Lcd.drawLine(i * 35, 200 - (prev / 255) * 200, ((i + 1) * 35), 200 - (current / 255) * 200, TFT_WHITE);
    }

  SendLog();
  delay(5000);//10秒に1回投げる
}
将来的に複数のデバイスが稼働することを想定しているので
chipId |= ((ESP.getEfuseMac() >> (40 - i)) & 0xff) << i;
ここでチップIDを取得して、どのデバイスから送信された値かを判別できるようにしています。
Firebase
Firebase側ではRealtimeデータベースを使用しています。
Realtimeデータベースとしてはこちらの記事を参考にさせてもらい、設定しました。
enebular
enebularnのフローはこちらです。
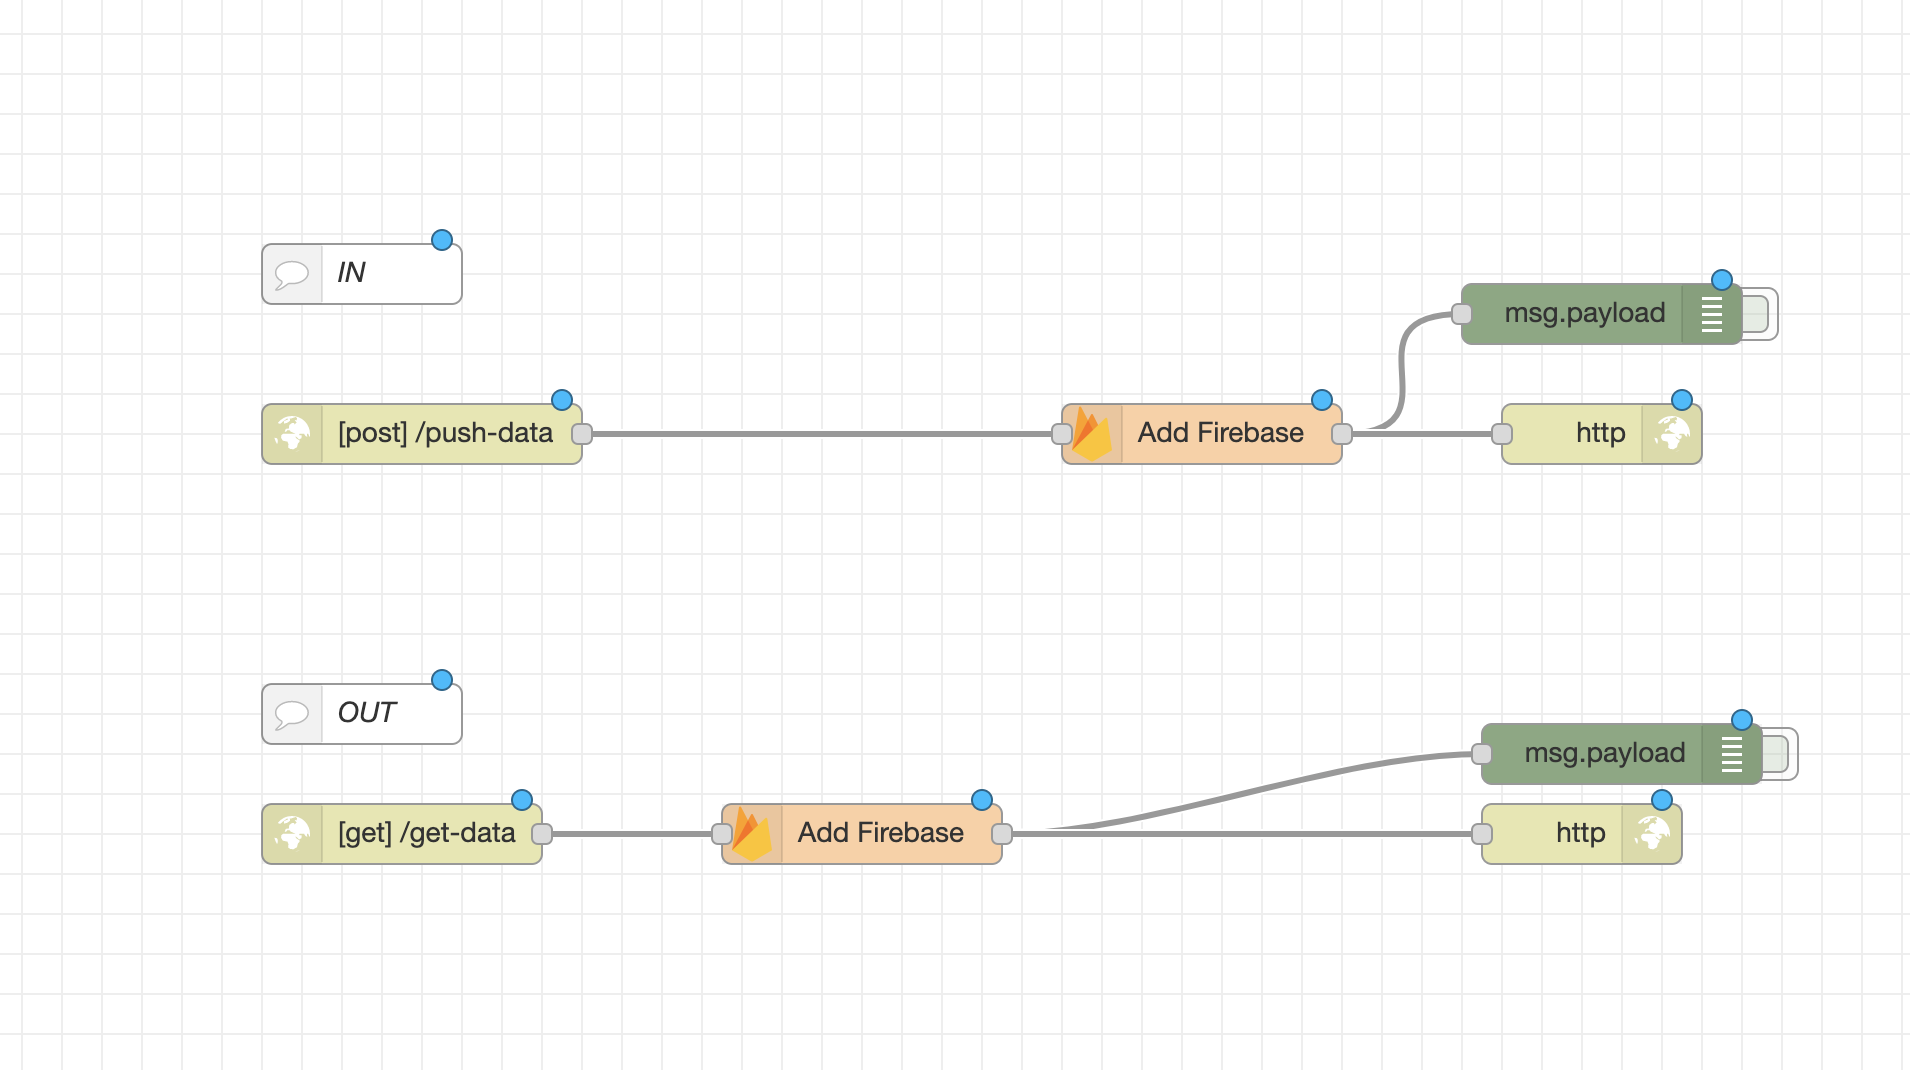
上が送信用、下が取得ようのフローです。
非常にシンプルですがFirebaseノードが便利ですぐにFirebaseとの連携が実現できました。
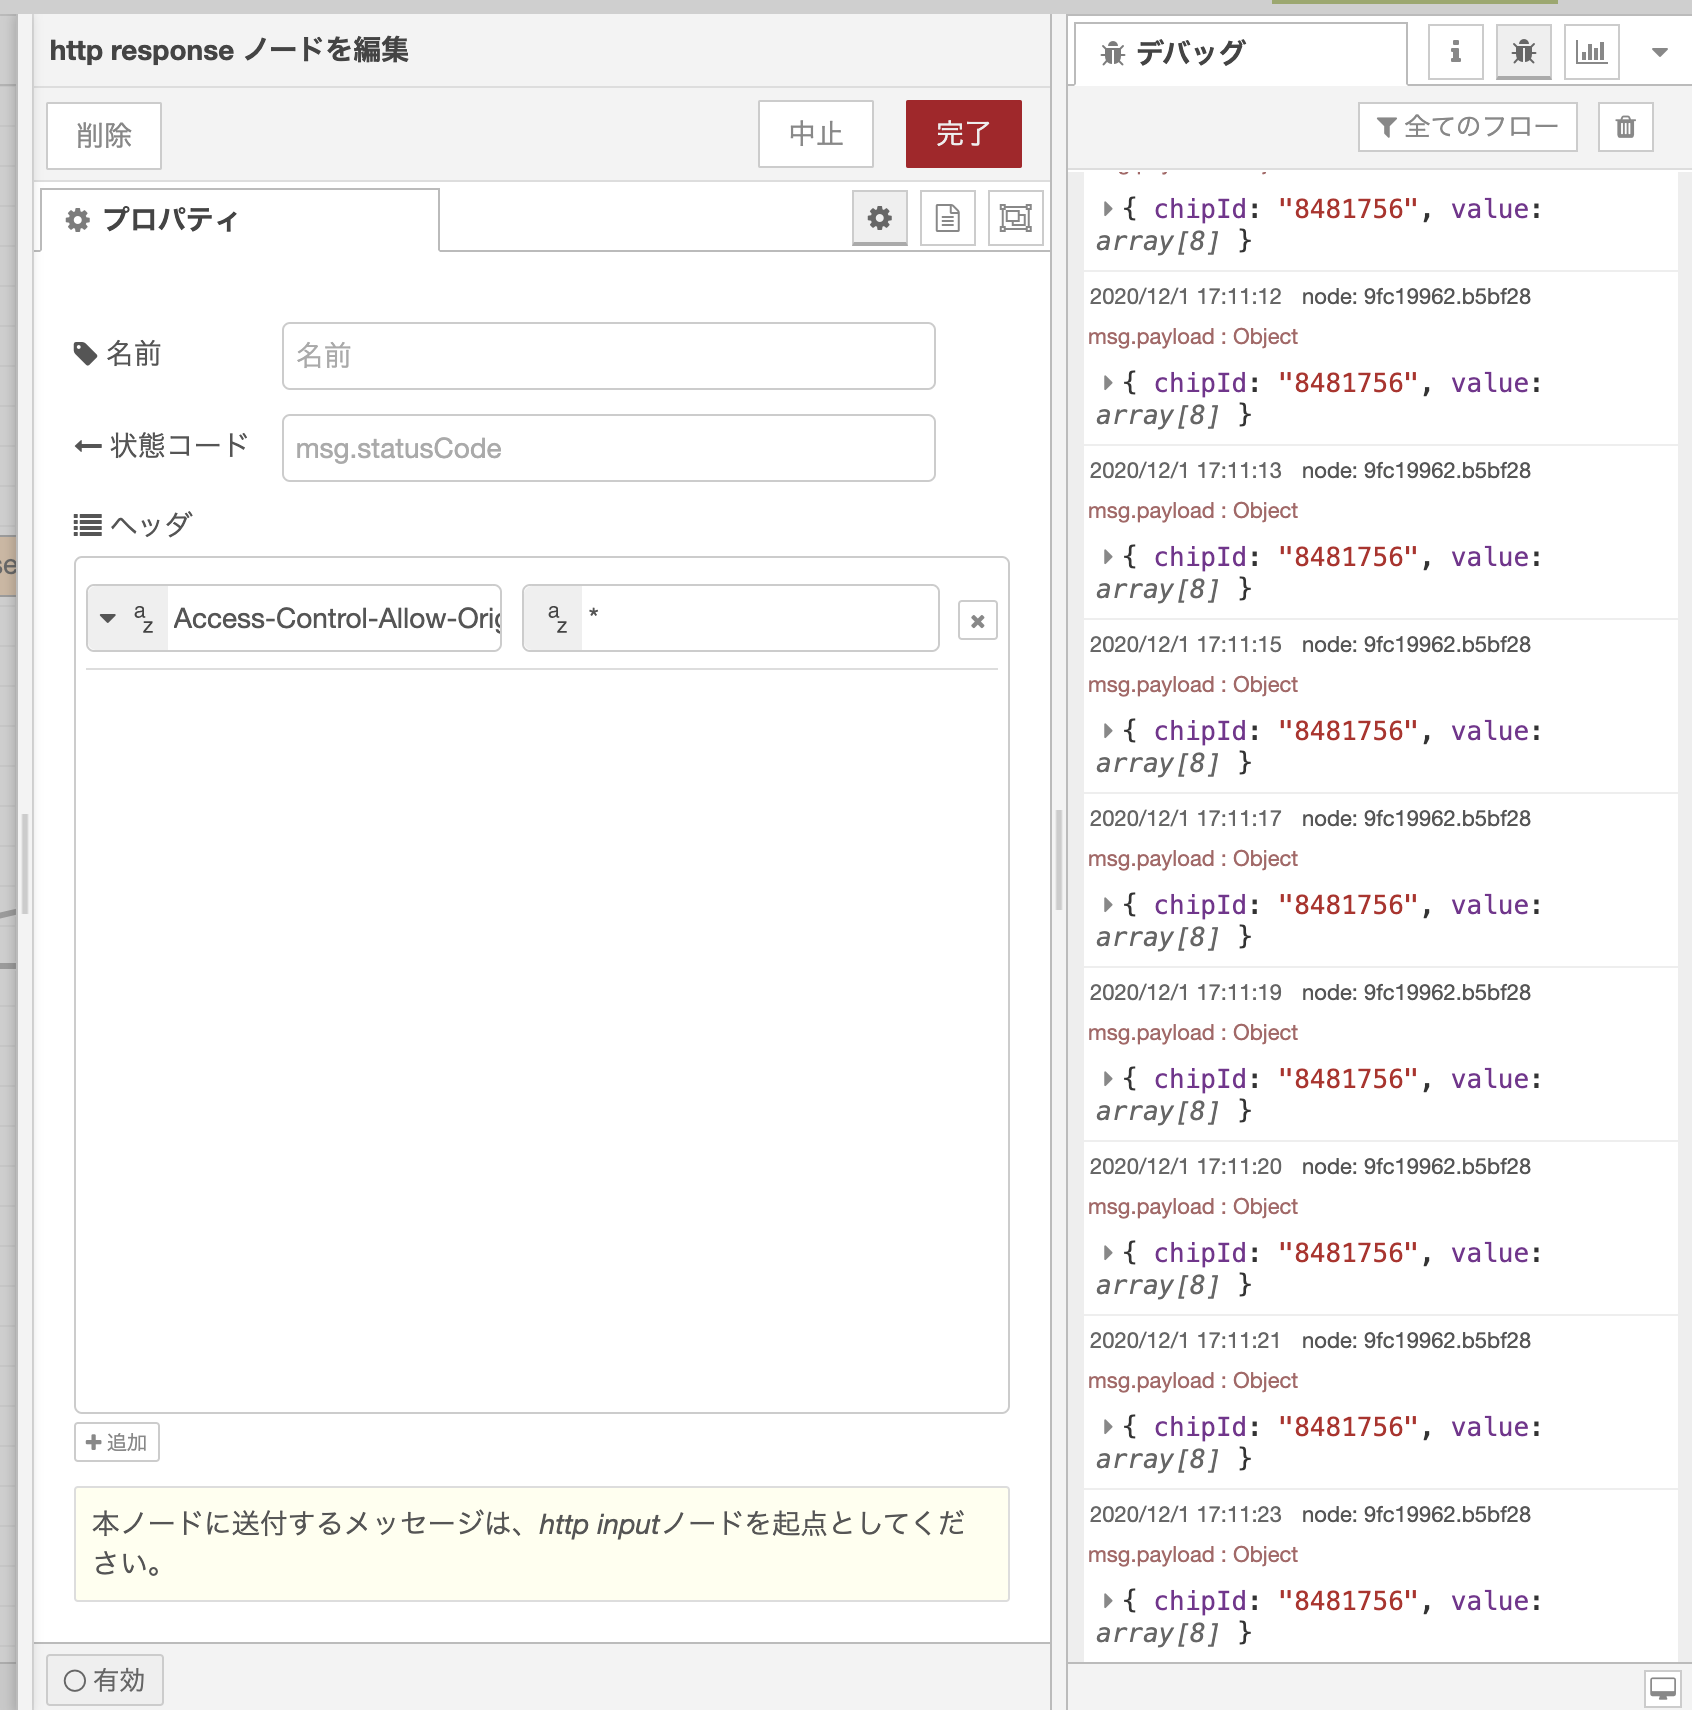
1点つまづきポイントとして、データ取得時にCORSのエラーが表示されたので、
http responseノードにCORSのワイルドカードを設定して事なきを得ました。
javascript
今回はお手軽実装なのでjQueryを使用しています。
nünoのデータは0~255の静電容量値が8点返ってくるので、
その8点のなかで1つでも150以上の値がある場合は着席状態として seated クラスを付与して状態を変更しています。
$(document).ready(function(){

	setInterval(function(){
		$.ajax({
			url: 'https://nuno-seat2.herokuapp.com/get-data',
			success: function(result) {
				refreshChair(result);
			}
		})
	}, 1000);

	function refreshChair(data){
		$.each(data,function(index, value){
			if(index == "value"){
				console.log(value);
				var m = Math.max.apply(null, value);
				if(m > 150){
					 $('#seat_8481756').addClass('seated');
				 }else{
					 $('#seat_8481756').removeClass('seated');
				 }
			 }

		});
	}

});
完成!
これで空席検知ができるようになりました。
かんたんなシステムであれば1日くらいで作れるので非常にいいですね!
皆様、よいenebularライフを〜!