TECOTEC Advent Calendar 2017の19日目担当の佐野です。
アプリを作る際、基本的にはみなさん日本に住んでいると思いますので日本語のみで作りますよね。
しかしグローバル化が広がる現代、海外からも気軽にアプリがインストールできる今日、
アプリも複数の言語に対応させたい、そんな方もいらっしゃると思います。
実際、海外進出している日本のスマホゲームは最近増えてきている印象があり、
課金で有名なあのFate/GrandOrderも、中国や欧米諸国への配信を行ったりしています。
今回、Androidでローカライズを扱う方法をご説明します。
環境
今回、環境は特に問題ではないですが、以下でサンプルを作成しました。
・AndroidStudio3.0
・Kotlin
手順
AndroidStudioで新規プロジェクト作成したものをサンプルとして使います。
package test.test.globallanguage

import android.support.v7.app.AppCompatActivity
import android.os.Bundle

class MainActivity : AppCompatActivity() {

	override fun onCreate(savedInstanceState: Bundle?) {
		super.onCreate(savedInstanceState)
		setContentView(R.layout.activity_main)
	}
}
<?xml version="1.0" encoding="utf-8"?>
<android.support.constraint.ConstraintLayout
    xmlns:android="http://schemas.android.com/apk/res/android"
    xmlns:app="http://schemas.android.com/apk/res-auto"
    xmlns:tools="http://schemas.android.com/tools"
    android:layout_width="match_parent"
    android:layout_height="match_parent"
    tools:context="test.test.globallanguage.MainActivity">

    <TextView
        android:layout_width="wrap_content"
        android:layout_height="wrap_content"
        android:text="Hello World!"
        android:textSize="30sp"
        app:layout_constraintBottom_toBottomOf="parent"
        app:layout_constraintLeft_toLeftOf="parent"
        app:layout_constraintRight_toRightOf="parent"
        app:layout_constraintTop_toTopOf="parent"/>

</android.support.constraint.ConstraintLayout>
起動すると、TextViewにセットされた「Hello World!」が表示されます。
この「Hello World!」部分をローカライズしてみましょう。
ステップ1
まず、TextViewに直書きされている「Hello World!」を、strings.xmlで定義して呼び出すように変更します。
<resources>
    <string name="app_name">GlobalLanguage</string>

    <string name="hello_world">Hello World!</string>

</resources>
<?xml version="1.0" encoding="utf-8"?>
<android.support.constraint.ConstraintLayout
    xmlns:android="http://schemas.android.com/apk/res/android"
    xmlns:app="http://schemas.android.com/apk/res-auto"
    xmlns:tools="http://schemas.android.com/tools"
    android:layout_width="match_parent"
    android:layout_height="match_parent"
    tools:context="test.test.globallanguage.MainActivity">

    <TextView
        android:layout_width="wrap_content"
        android:layout_height="wrap_content"
        android:text="@string/hello_world"
        android:textSize="30sp"
        app:layout_constraintBottom_toBottomOf="parent"
        app:layout_constraintLeft_toLeftOf="parent"
        app:layout_constraintRight_toRightOf="parent"
        app:layout_constraintTop_toTopOf="parent"/>

</android.support.constraint.ConstraintLayout>
こうすることで、Strings.xmlで定義した「hello_world」を参照して表示してくれるようになります。
「Hello World!」部分を書き換えることで、表示される内容を変更することができます。
ステップ2
このままだと、app/src/main/res/values/strings.xmlに定義したものが呼ばれるだけなので、
ここから各言語に対応させていきます。
デフォルトは英語、それ以外に日本語・中国語・フランス語に対応するようにしてみましょう。
やるべきことは2つです。
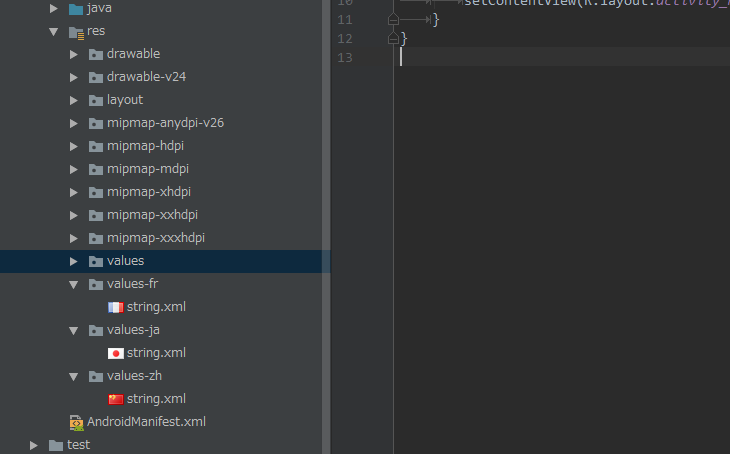
その1 各言語用のフォルダを用意する
app/src/main/resの階層に、「values-◯◯」というフォルダを作成します。
◯◯の部分には各地域毎に決められたISO 639-1コードを入れる必要があります。
ISO 639-1コードはこちらに記載されています。
今回は日本語・中国語・フランス語に対応したいので以下のようになります。
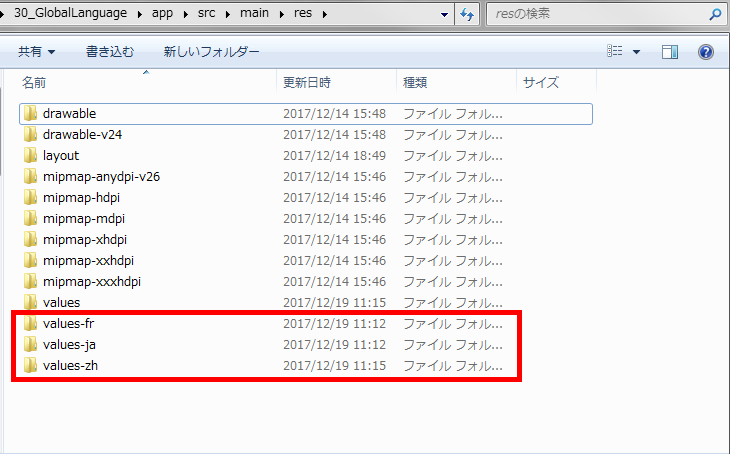
その2 各言語用のフォルダに入れるString.xmlを用意する
上記で格納先のフォルダを作成したので、String.xmlを格納していきます。
ここでの取り決めなどは特になく、単純に同じ名前のファイルを配置するだけです。
配置後、AndroidStudio側から上記ファイルをみると
以下のように、各国旗のマークになるので視覚的に分かりやすくなります。
逆に国旗のアイコンが表示されていない場合はフォルダ名やファイル名に誤りがあるということになります。
その3 各String.xmlのHello World!を各言語に置き換える
最後に、各フォルダに格納したString.xmlの単語をそれぞれの言語で置換えます。
今回はGoogle翻訳先生に、「Hello World!」で変換してもらい、それに置換えました。
<resources>
    <string name="app_name">GlobalLanguage</string>

    <string name="hello_world">こんにちは世界!</string>

</resources>
<resources>
    <string name="app_name">GlobalLanguage</string>

    <string name="hello_world">你好,世界!</string>

</resources>
<resources>
    <string name="app_name">GlobalLanguage</string>

    <string name="hello_world">Bonjour le monde!</string>

</resources>
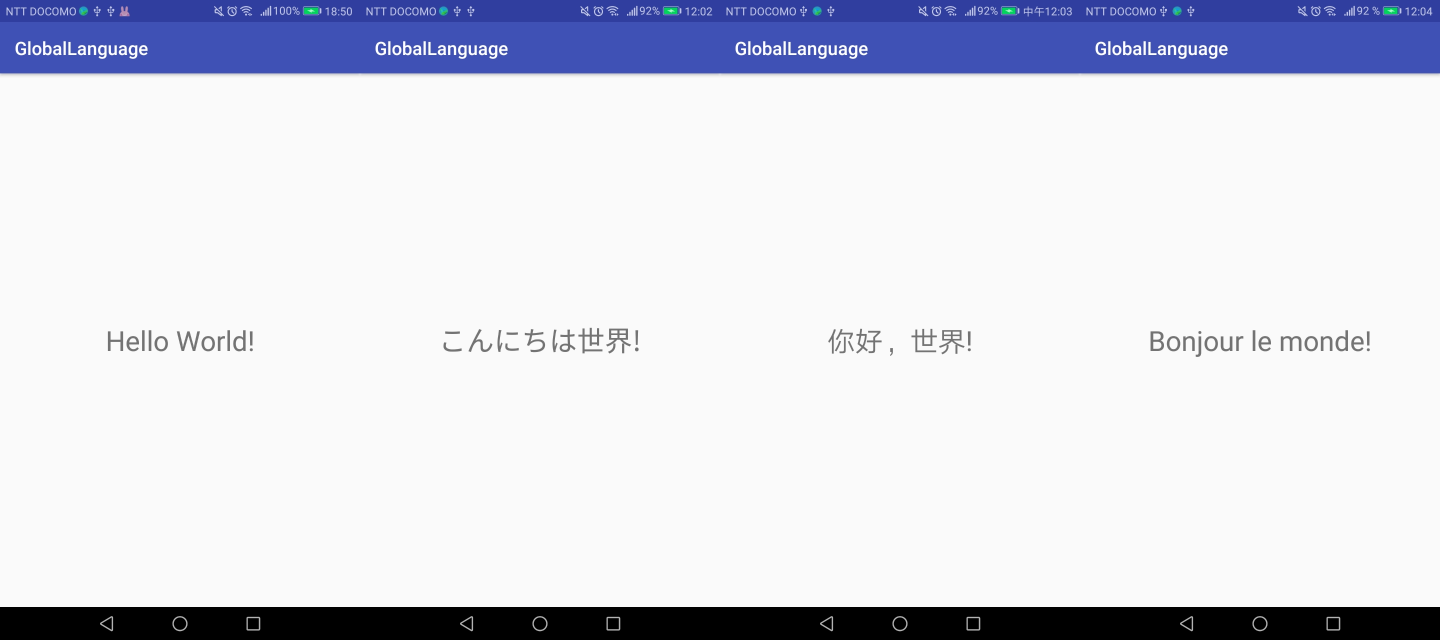
これで完了です。
端末の言語設定により、読み込まれる言語ファイルが切り替わるようになりました。
以下のように、日本語・中国語・フランス語にすれば各言語が、それ以外にすると英語が表示されるようになります。
最後に
いかがだったでしょうか?
このように簡単に切り替えることが出来るので、今後Androidでアプリを作る際、
ぜひともローカライズに挑戦してみていただければと思います!!
翻訳は手間ですが、その価値はあるかなと思います。