はじめに
Cisco VIRL(Virtual Internet Routing Lab)とは、Ciscoや他ベンダの仮想プラットフォームやサーバを、仮想環境内で互いに接続したり、外部の物理環境と接続したりできるシミュレーターです。
具体的には、IOSv、IOSv Layer-2、IOS-XRv、NX-OSv、CSR1000v、ASAvのようなCisco OSを使用可能です。
通常は、VM MaestroというGUIを使って環境構築することが多いのですが、virlutilsというCLIのユーティリティを使い、VIRLファイルで定義した環境をvirl upすることも可能です。(Vagrantと同様の考え方)
今回は、無料のCisco DevNet Sandbox環境を使い、CLIで簡単なシミュレーション環境を構築してみました。
利用したVIRL環境
Open NX-OS with Nexus 9KvというSandboxを使わせて頂きました。
Sandboxの利用方法は、様々な記事で紹介されているので割愛します。
virlutilsのセットアップ
SandboxのDevBox (CentOS 7 Workstation)に、あらかじめvirlutilsがインストールされています。
.virlrc(VIRLサーバのログイン情報が記載されたファイル)も、ホームディレクトリ配下とPython3.6.5の仮想環境内に作成されていましたので、今回は仮想環境の方を使って進めて行きます。
[developer@devbox ~]$pip freeze | grep virlutils
virlutils==0.8.4

[developer@devbox ~]$find . -name .virlrc
./code/sbx_nxos/.virlrc
./.virlrc

[developer@devbox ~]$cat ./code/sbx_nxos/.virlrc
VIRL_HOST=<VIRLサーバのIPアドレス>
VIRL_USERNAME=<VIRLサーバのユーザ名>
VIRL_PASSWORD=<VIRLサーバのパスワード>
なお、自身のLinux端末でvirlutilsをセットアップする場合の手順は以下の通りです。
参考URL: GitHub CiscoDevNet/virlutils
(1)インストール
以下はpipを使った例です。GitHubからクローンすることも可能です。
[centos@localhost ~]$ sudo pip install virlutils
(2).virlrcファイルの作成
ホームディレクトリ配下などに、以下のファイルを格納します。
本ファイルは、後述のVIRLファイルと同じディレクトリに格納する必要があります。
VIRL_HOST=<VIRLサーバのIPアドレス>
VIRL_USERNAME=<VIRLサーバのユーザ名>
VIRL_PASSWORD=<VIRLサーバのパスワード>
仮想環境のアクティベーション
.virlrcが格納されているディレクトリへの移動、およびPython仮想環境のアクティベーションを行います。
[developer@devbox ~]$cd ./code/sbx_nxos/
[developer@devbox sbx_nxos]$source ~/code/sbx_nxos/venv/bin/activate
既存シミュレーションの停止
virl lsコマンドで、現在使われているシミュレーションを確認できます。
デフォルトでNexus9000のシミュレーションが作成されているため、virl downコマンドで停止します。
2つ以上の環境が作成されている場合は、シミュレーションの名前を指定する必要があるようです。
(venv) [developer@devbox sbx_nxos]$virl ls
Running Simulations
╒═════════════════════════╤══════════╤════════════════════════════╤═══════════╕
│ Simulation              │ Status   │ Launched                   │ Expires   │
╞═════════════════════════╪══════════╪════════════════════════════╪═══════════╡
│ sbx_nxos_default_iaWXIF │ ACTIVE   │ 2019-03-26T16:55:18.982537 │           │
╘═════════════════════════╧══════════╧════════════════════════════╧═══════════╛

(venv) [developer@devbox sbx_nxos]$virl down
Removing ./.virl/default
Shutting Down Simulation sbx_nxos_default_iaWXIF.....
SUCCESS

(venv) [developer@devbox sbx_nxos]$virl ls
Running Simulations
╒══════════════╤══════════╤════════════╤═══════════╕
│ Simulation   │ Status   │ Launched   │ Expires   │
╞══════════════╪══════════╪════════════╪═══════════╡
╘══════════════╧══════════╧════════════╧═══════════╛
VIRLファイルの検索
次に、virl search iosコマンドを実行し、Cisco IOS用のVIRLファイル(トポロジーやConfigが定義されたファイル)のサンプルを検索します。「virlfiles/2-ios-router」が見つかりましたので、これ以降、本ファイルを使いたいと思います。
ちなみに、virl searchコマンドを実行すると、現時点でGitHub virlfilesに登録されている、計10件のVIRLファイルが表示されます。
(venv) [developer@devbox sbx_nxos]$virl search ios
Displaying 1 Results For ios
╒════════════════════════╤═════════╤══════════════════════╕
│ Name                   │   Stars │ Description          │
╞════════════════════════╪═════════╪══════════════════════╡
│ virlfiles/2-ios-router │       0 │ hello world virlfile │
╘════════════════════════╧═════════╧══════════════════════╛

(venv) [developer@devbox sbx_nxos]$virl search
Displaying 10 Results
╒══════════════════════════════╤═════════╤══════════════════════════════════════════════════════════════════════════════╕
│ Name                         │   Stars │ Description                                                                  │
╞══════════════════════════════╪═════════╪══════════════════════════════════════════════════════════════════════════════╡
│ virlfiles/2-ios-router       │       0 │ hello world virlfile                                                         │
├──────────────────────────────┼─────────┼──────────────────────────────────────────────────────────────────────────────┤
│ virlfiles/extranet           │       3 │ mock extranet hub and spoke topology (1 headend + internet + 4 partners)     │
├──────────────────────────────┼─────────┼──────────────────────────────────────────────────────────────────────────────┤
│ virlfiles/9_router_mesh      │       0 │ Simple 9 router mesh with link level config                                  │
├──────────────────────────────┼─────────┼──────────────────────────────────────────────────────────────────────────────┤
│ virlfiles/datacenter         │       0 │ A classic data center design with core/distribution/access layer             │
├──────────────────────────────┼─────────┼──────────────────────────────────────────────────────────────────────────────┤
│ virlfiles/genie_learning_lab │       0 │ Topology used for Genie learning labs                                        │
├──────────────────────────────┼─────────┼──────────────────────────────────────────────────────────────────────────────┤
│ virlfiles/devbox             │       0 │                                                                              │
├──────────────────────────────┼─────────┼──────────────────────────────────────────────────────────────────────────────┤
│ virlfiles/core-dist-access   │       2 │ Basic Core (IOS XE) - Distribution (NX-OS) - Access (NX-OS) 5 node topology. │
├──────────────────────────────┼─────────┼──────────────────────────────────────────────────────────────────────────────┤
│ virlfiles/spine-leaf         │       0 │ Spine-Leaf topology using Nexus 9000 Switches                                │
├──────────────────────────────┼─────────┼──────────────────────────────────────────────────────────────────────────────┤
│ virlfiles/5_router_mesh      │       1 │ Simple 5 IOS Router Mesh                                                     │
├──────────────────────────────┼─────────┼──────────────────────────────────────────────────────────────────────────────┤
│ virlfiles/ccnx_study         │       0 │ Basic topology for CCNA and CCNP studies.                                    │
╘══════════════════════════════╧═════════╧══════════════════════════════════════════════════════════════════════════════╛
VIRLファイルのインポート
virl pull <VIRLファイル名>コマンドで、レポジトリ上のファイルを「topology.virl」という名前でローカルに保存します。
(venv) [developer@devbox sbx_nxos]$virl pull virlfiles/2-ios-router
Pulling from virlfiles/2-ios-router
Saved topology as topology.virl

(venv) [developer@devbox sbx_nxos]$ls -l | grep topology.virl
-rw-r--r-- 1 developer docker 6606 Mar 26 10:11 topology.virl
シミュレーションの開始
virl up <VIRLファイル名>コマンドで、シミュレーションを開始します。
virl lsコマンドの結果から、「sbx_nxos_default_7Onysl」というシミュレーションが作成されていることが分かります。
(venv) [developer@devbox sbx_nxos]$virl up virlfiles/2-ios-router
Creating default environment from topology.virl
Localizing {{ gateway }} with: 172.16.30.254
Localizing {{ dns_server }} with: 4.2.2.3
Localizing rsa modulus 768 with: rsa modulus 1024

(venv) [developer@devbox sbx_nxos]$virl ls
Running Simulations
╒═════════════════════════╤══════════╤════════════════════════════╤═══════════╕
│ Simulation              │ Status   │ Launched                   │ Expires   │
╞═════════════════════════╪══════════╪════════════════════════════╪═══════════╡
│ sbx_nxos_default_7Onysl │ ACTIVE   │ 2019-03-26T17:04:54.852388 │           │
╘═════════════════════════╧══════════╧════════════════════════════╧═══════════╛
さらにvirl nodesコマンドで、シミュレーション内のノード情報を確認できます。
(venv) [developer@devbox sbx_nxos]$virl nodes
Here is a list of all the running nodes
╒═════════╤════════╤═════════╤═════════════╤════════════╤══════════════════════╤════════════════════╕
│ Node    │ Type   │ State   │ Reachable   │ Protocol   │ Management Address   │ External Address   │
╞═════════╪════════╪═════════╪═════════════╪════════════╪══════════════════════╪════════════════════╡
│ router1 │ IOSv   │ ACTIVE  │ UNKNOWN     │ telnet     │ 172.16.30.105        │ N/A                │
├─────────┼────────┼─────────┼─────────────┼────────────┼──────────────────────┼────────────────────┤
│ router2 │ IOSv   │ ACTIVE  │ UNKNOWN     │ telnet     │ 172.16.30.106        │ N/A                │
╘═════════╧════════╧═════════╧═════════════╧════════════╧══════════════════════╧════════════════════╛
NW機器へのログイン
virl consoleコマンドで特定の機器にコンソール接続できます。
(venv) [developer@devbox sbx_nxos]$virl console router1
Attempting to connect to console of router1
Trying 10.10.20.160...
Connected to 10.10.20.160.
Escape character is '^]'.

**************************************************************************
* IOSv is strictly limited to use for evaluation, demonstration and IOS  *
* education. IOSv is provided as-is and is not supported by Cisco's      *
* Technical Advisory Center. Any use or disclosure, in whole or in part, *
* of the IOSv Software or Documentation to any third party for any       *
* purposes is expressly prohibited except as otherwise authorized by     *
* Cisco in writing.                                                      *
**************************************************************************
router1>
SSH接続する場合はvirl sshコマンドで、ホスト名指定でログイン可能です。ユーザ名/パスワードはVIRLファイルで設定したものです。
(venv) [developer@devbox sbx_nxos]$virl ssh router1
Attemping ssh connectionto router1 at 172.16.30.105
Warning: Permanently added '172.16.30.105' (RSA) to the list of known hosts.

**************************************************************************
* IOSv is strictly limited to use for evaluation, demonstration and IOS  *
* education. IOSv is provided as-is and is not supported by Cisco's      *
* Technical Advisory Center. Any use or disclosure, in whole or in part, *
* of the IOSv Software or Documentation to any third party for any       *
* purposes is expressly prohibited except as otherwise authorized by     *
* Cisco in writing.                                                      *
**************************************************************************
cisco@172.16.30.105's password:

**************************************************************************
* IOSv is strictly limited to use for evaluation, demonstration and IOS  *
* education. IOSv is provided as-is and is not supported by Cisco's      *
* Technical Advisory Center. Any use or disclosure, in whole or in part, *
* of the IOSv Software or Documentation to any third party for any       *
* purposes is expressly prohibited except as otherwise authorized by     *
* Cisco in writing.                                                      *
**************************************************************************
router1#
(参考) Ansible Inventoryファイルの生成
virl generate ansibleコマンドで、AnsibleのInventoryファイル生成も可能です。
引数として、--nameでファイル名、--styleで出力形式(YAML/INI)を指定可能です。styleを指定しない場合、YAML形式で出力されます。
YAML形式の出力結果
(venv) [developer@devbox sbx_nxos]$virl generate ansible --output inventory1.yml
Placing router1 into ansible group all
Placing router2 into ansible group all
Writing inventory1.yml

(venv) [developer@devbox sbx_nxos]$cat inventory1.yml
# virlutils generated ansible file for sim id
#
# the overall structure of the inventory follows best practices
# at http://docs.ansible.com/ansible/latest/intro_inventory.html

# we've rendered what we think is best if you disagree, override
# virl.generators.ansible_inventory_generator

# you can modify grouping behavior by adding extension entries
# to your .virl file as such

# <node name="router1" type="SIMPLE" subtype="CSR1000v" location="361,129" ipv4="172.16.252.6" ipv6="2001:db8:b:0:1::2">
#    <extensions>
#        <entry key="ansible_group" type="String">mygroup</entry>
#    </extensions>
# </node>

all:
  children:
    all:
      hosts:

        router1:
          ansible_host: 172.16.30.105
          console_server: 10.10.20.160
          console_port: 17001

        router2:
          ansible_host: 172.16.30.106
          console_server: 10.10.20.160
          console_port: 17003
INI形式の出力結果
(venv) [developer@devbox sbx_nxos]$virl generate ansible --output inventory1 --style ini
Placing router1 into ansible group all
Placing router2 into ansible group all
Writing inventory1

(venv) [developer@devbox sbx_nxos]$cat inventory1
~#部分はYAMLと同じのため中略~
[all]
router1 ansible_host=172.16.30.105 console_server=10.10.20.160 console_port=17001
router2 ansible_host=172.16.30.106 console_server=10.10.20.160 console_port=17003
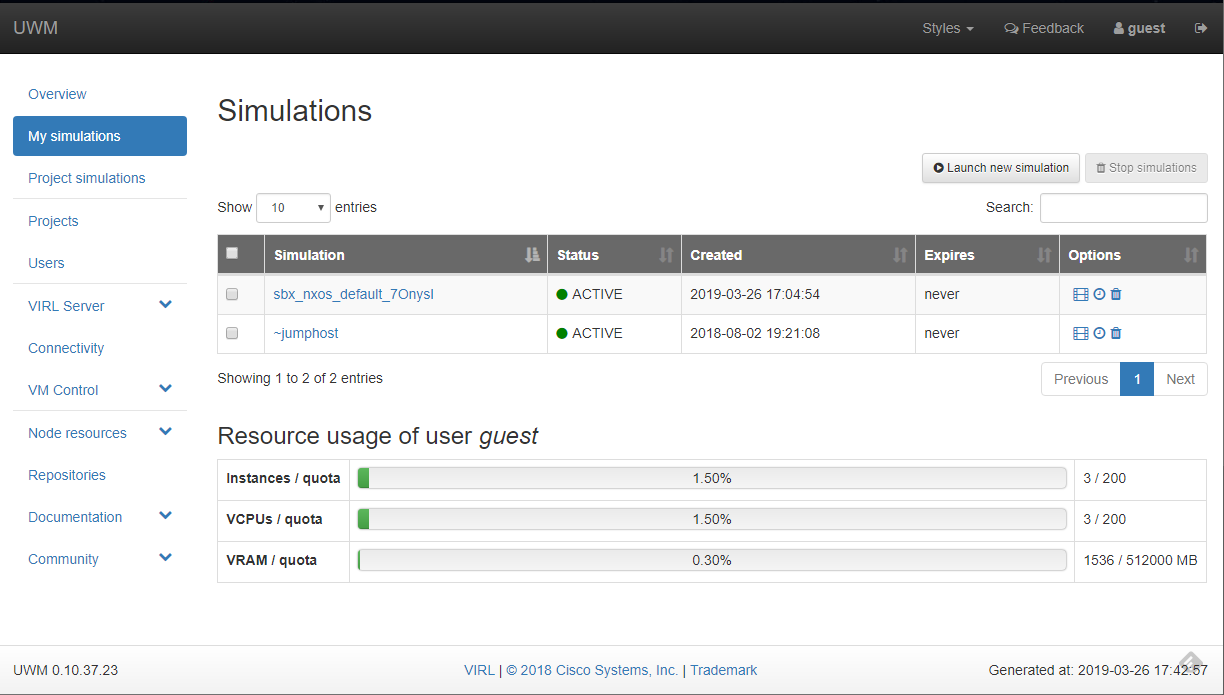
(参考) VIRLサーバ画面
SandboxのVIRLサーバにアクセスし、My simulationsを選択すると、シミュレーション「sbx_nxos_default_7Onysl」が起動していることが確認できます。
(GUIでシミュレーションを停止する場合は、Optionsのごみ箱アイコンをクリック。)
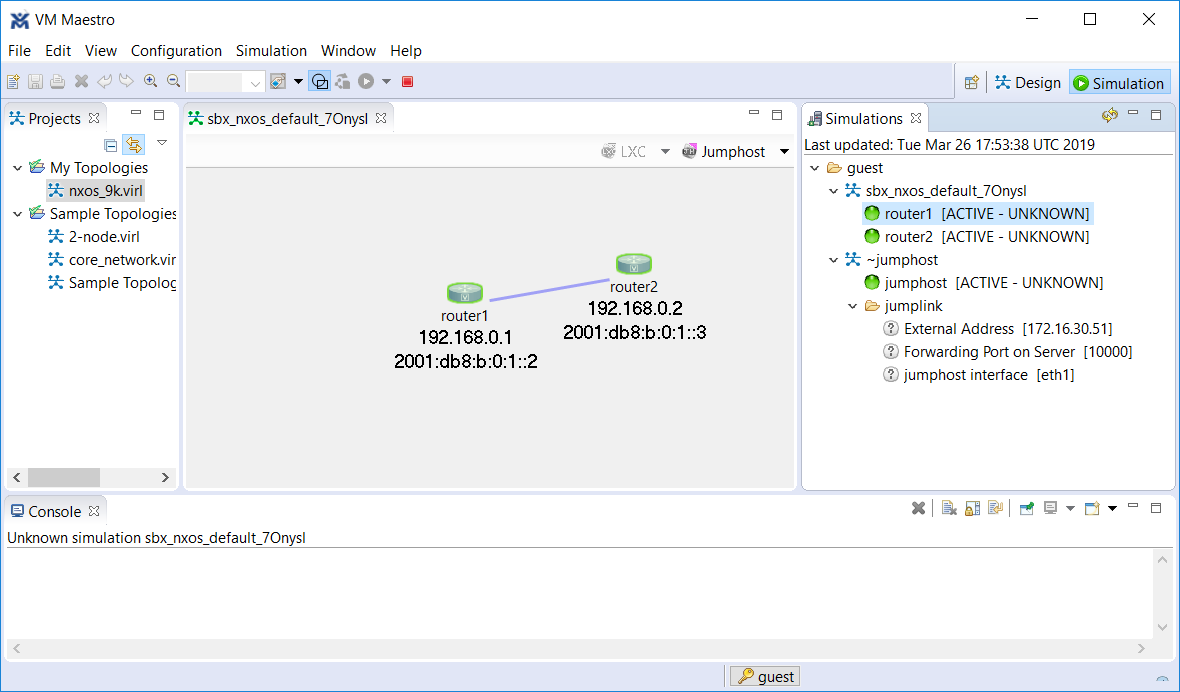
(参考) VM Maestro画面
SandboxのVM Maestroにリモートデスクトップ接続し、アプリを起動すると、今回のルータ2台構成が表示されていることが分かります。