はじめに
Cisco VIRLをAnsibleから操作する(VIRLサーバ操作編)に続き、トポロジーファイル(VIRLファイル)の作成と、Ansibleによる動作確認を行ってみました。
トポロジーファイルの作成
以下を満たすファイルを作成します。
- テスト用のネットワークと、マネジメントネットワーク(172.16.30.0/24)をVRFで分割。
- ローカル環境から、マネジメントネットワーク経由でVIRLの各NW機器にSSH/Telnetアクセス。
(今回はDevNet Sandbox VIRLの各NW機器にVPN経由でアクセス。) - virlutilsの
virl generate ansibleコマンドで、Ansible Inventoryファイルを自動生成できる。
1. プロジェクトの作成
VM Maestroを起動し、プロジェクトを作成します。今回は既存のMy Topologiesを流用しました。
2. トポロジーファイルの作成
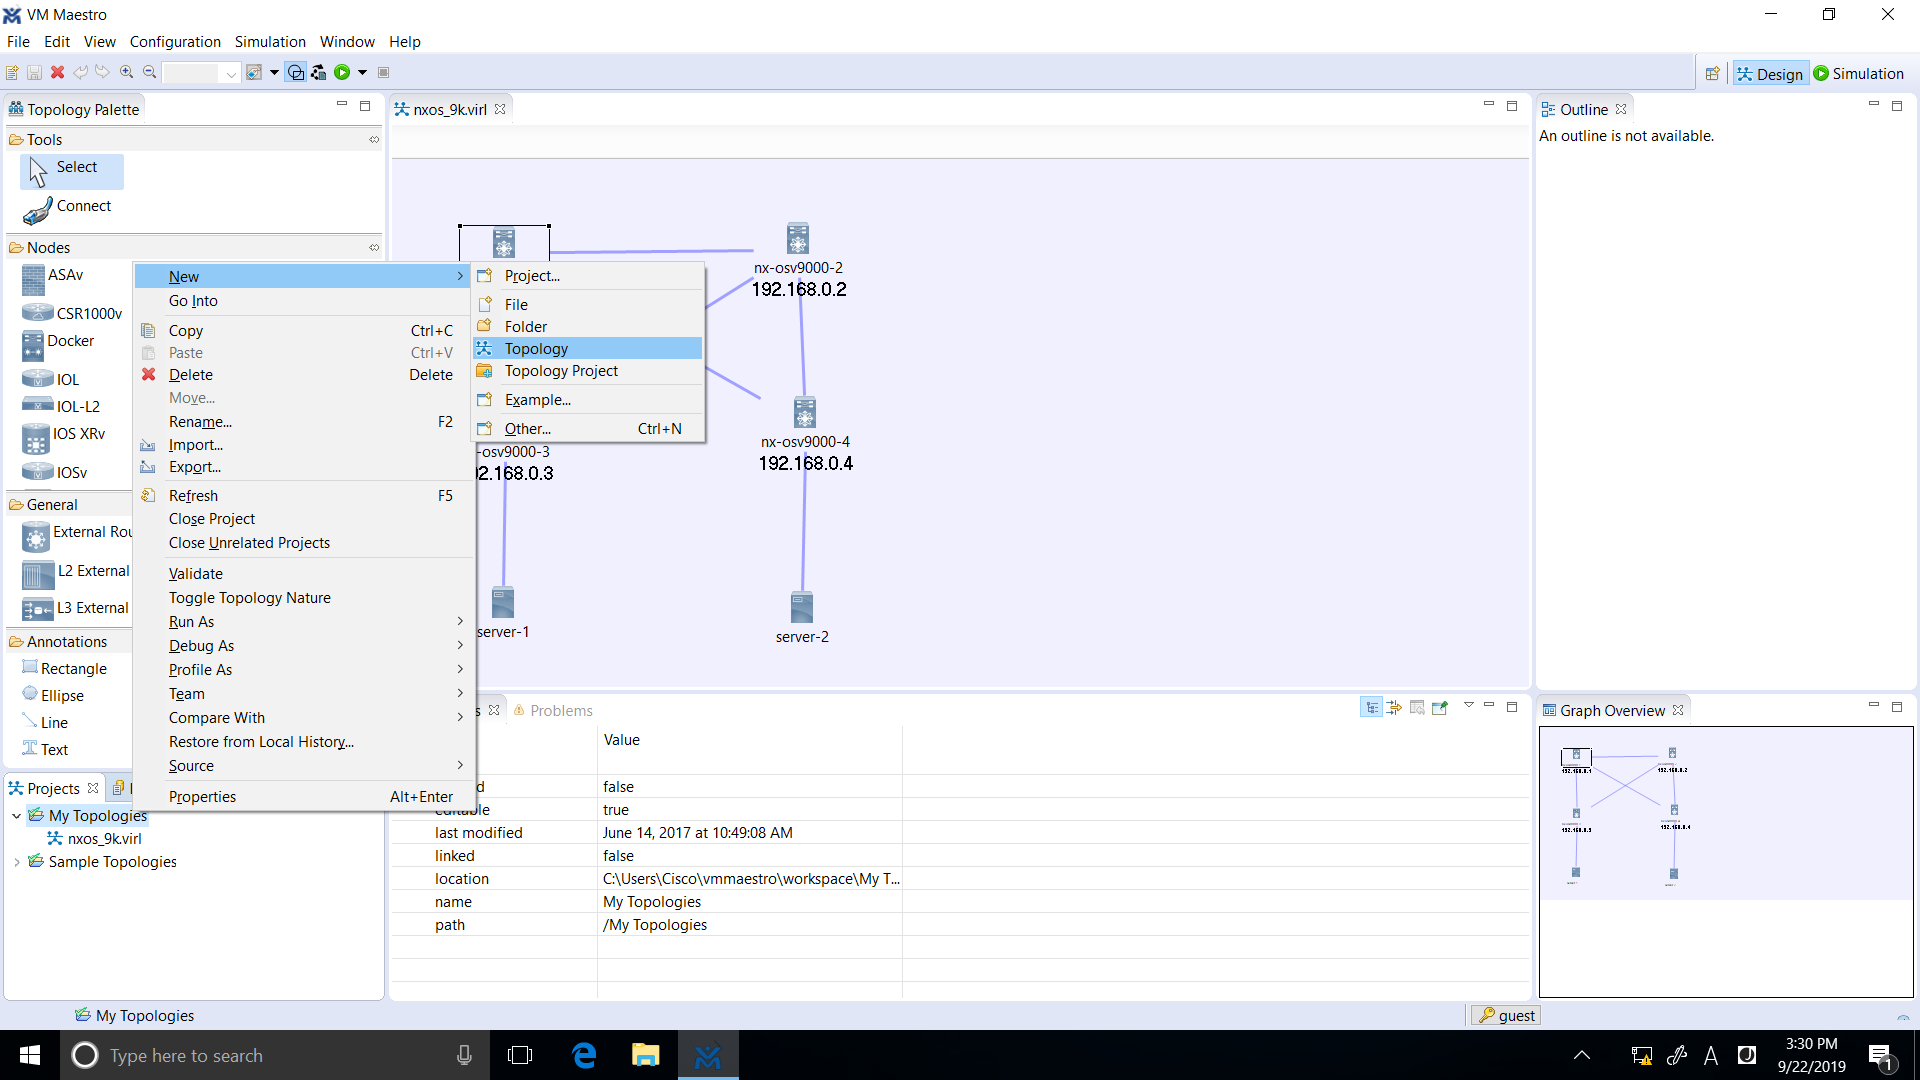
プロジェクトを右クリックし、New > Topologyを選択します。
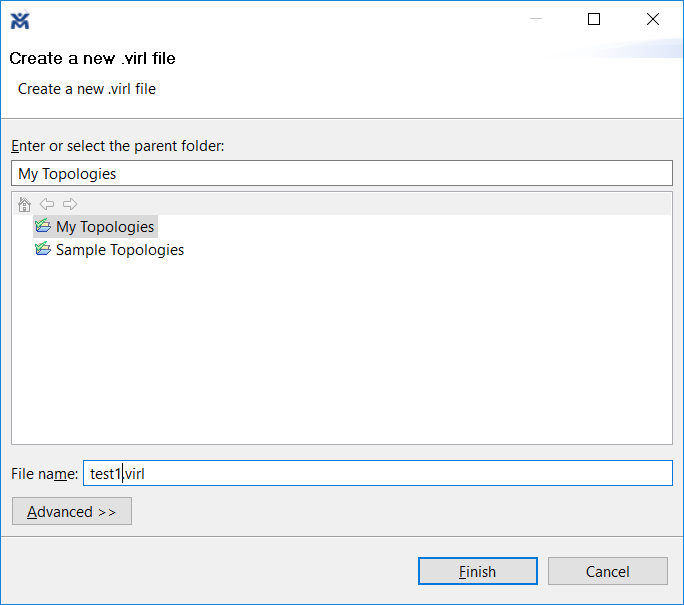
ファイル名を指定します。今回はtest1.virlとしています。
3. トポロジーの作成
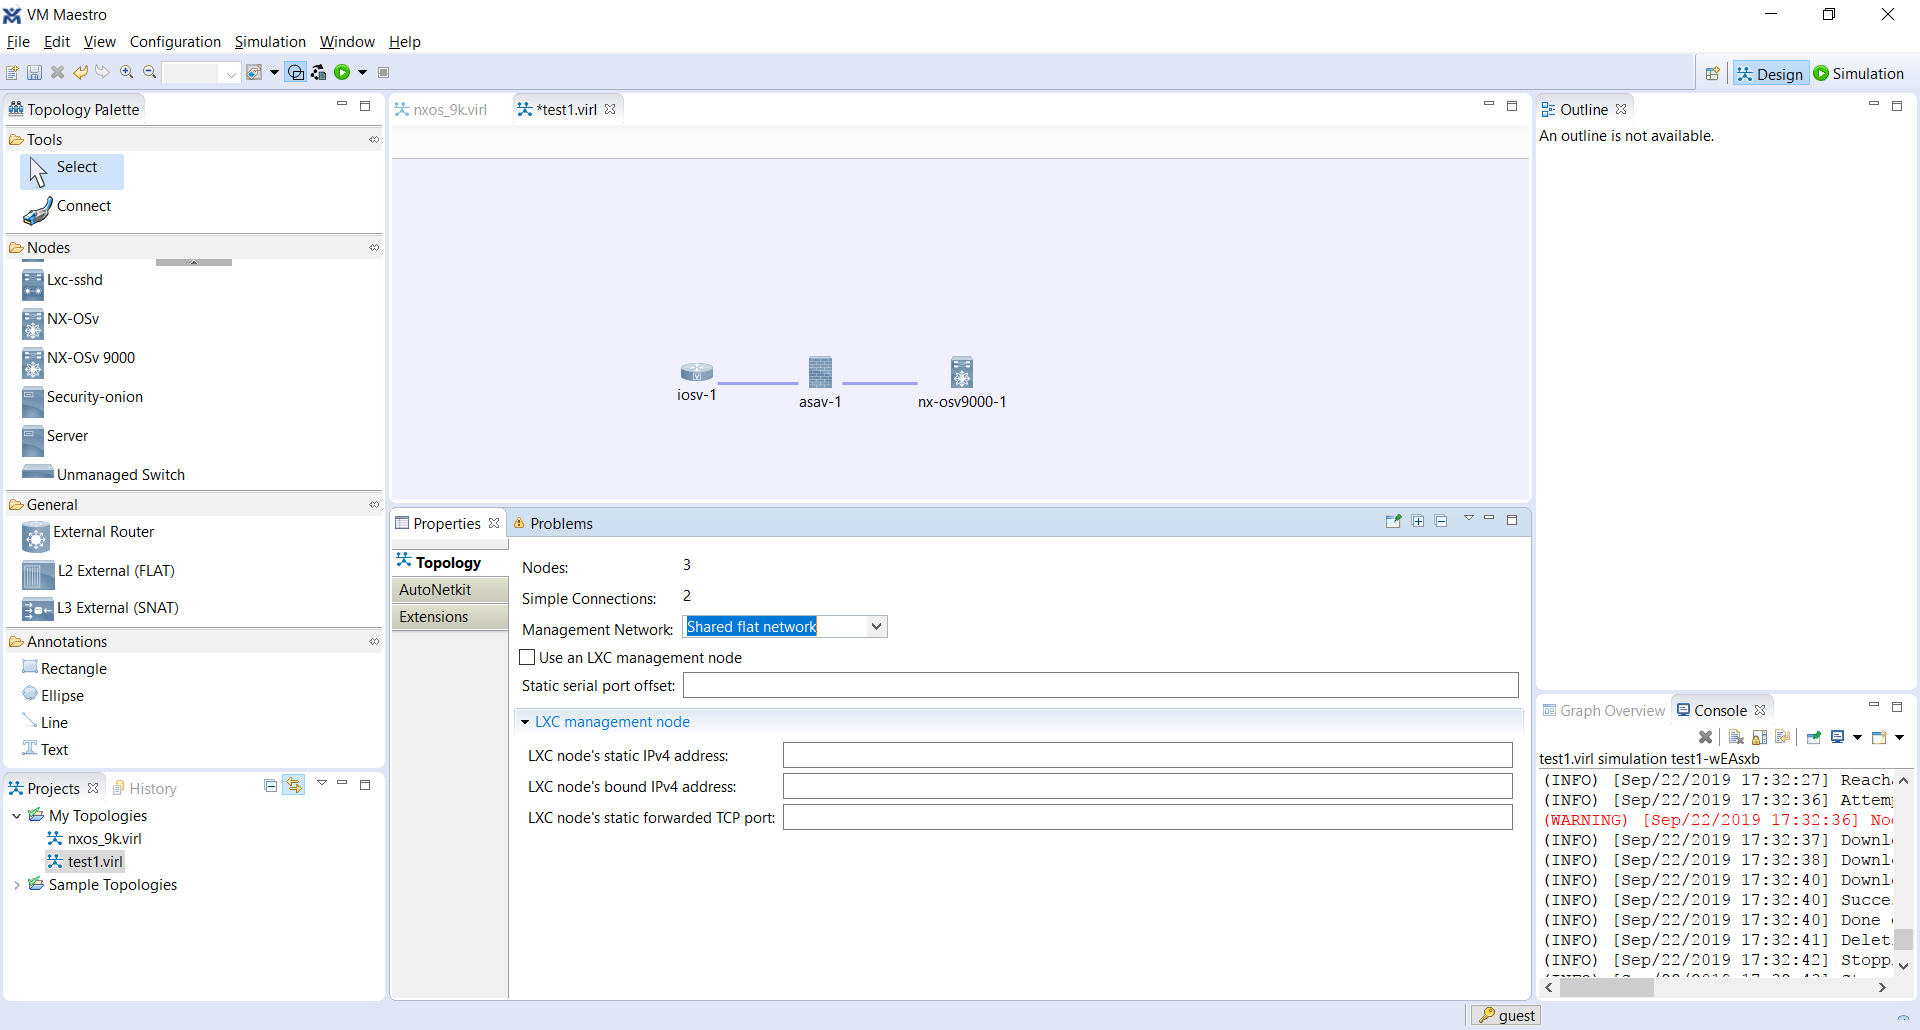
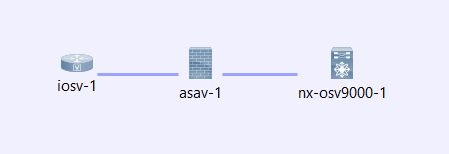
画面左のTopology Paletteから、ノード「IOSv、ASAv、NX-OSv9000」を選択し、互いに接続します。
また、画面下のProperties > Topologyで、「Management Network」をShared flat networkにし、「Use an LXC management node」のチェックを外します。
4. Configの自動作成
画面下のProperties > AutoNetkitでConfig自動作成の設定をします。
今回は、Addressing > IP Address FaimilyをNoneにし、IPアドレスの割り当てやルーティングプロトコル設定は行わないようにします。
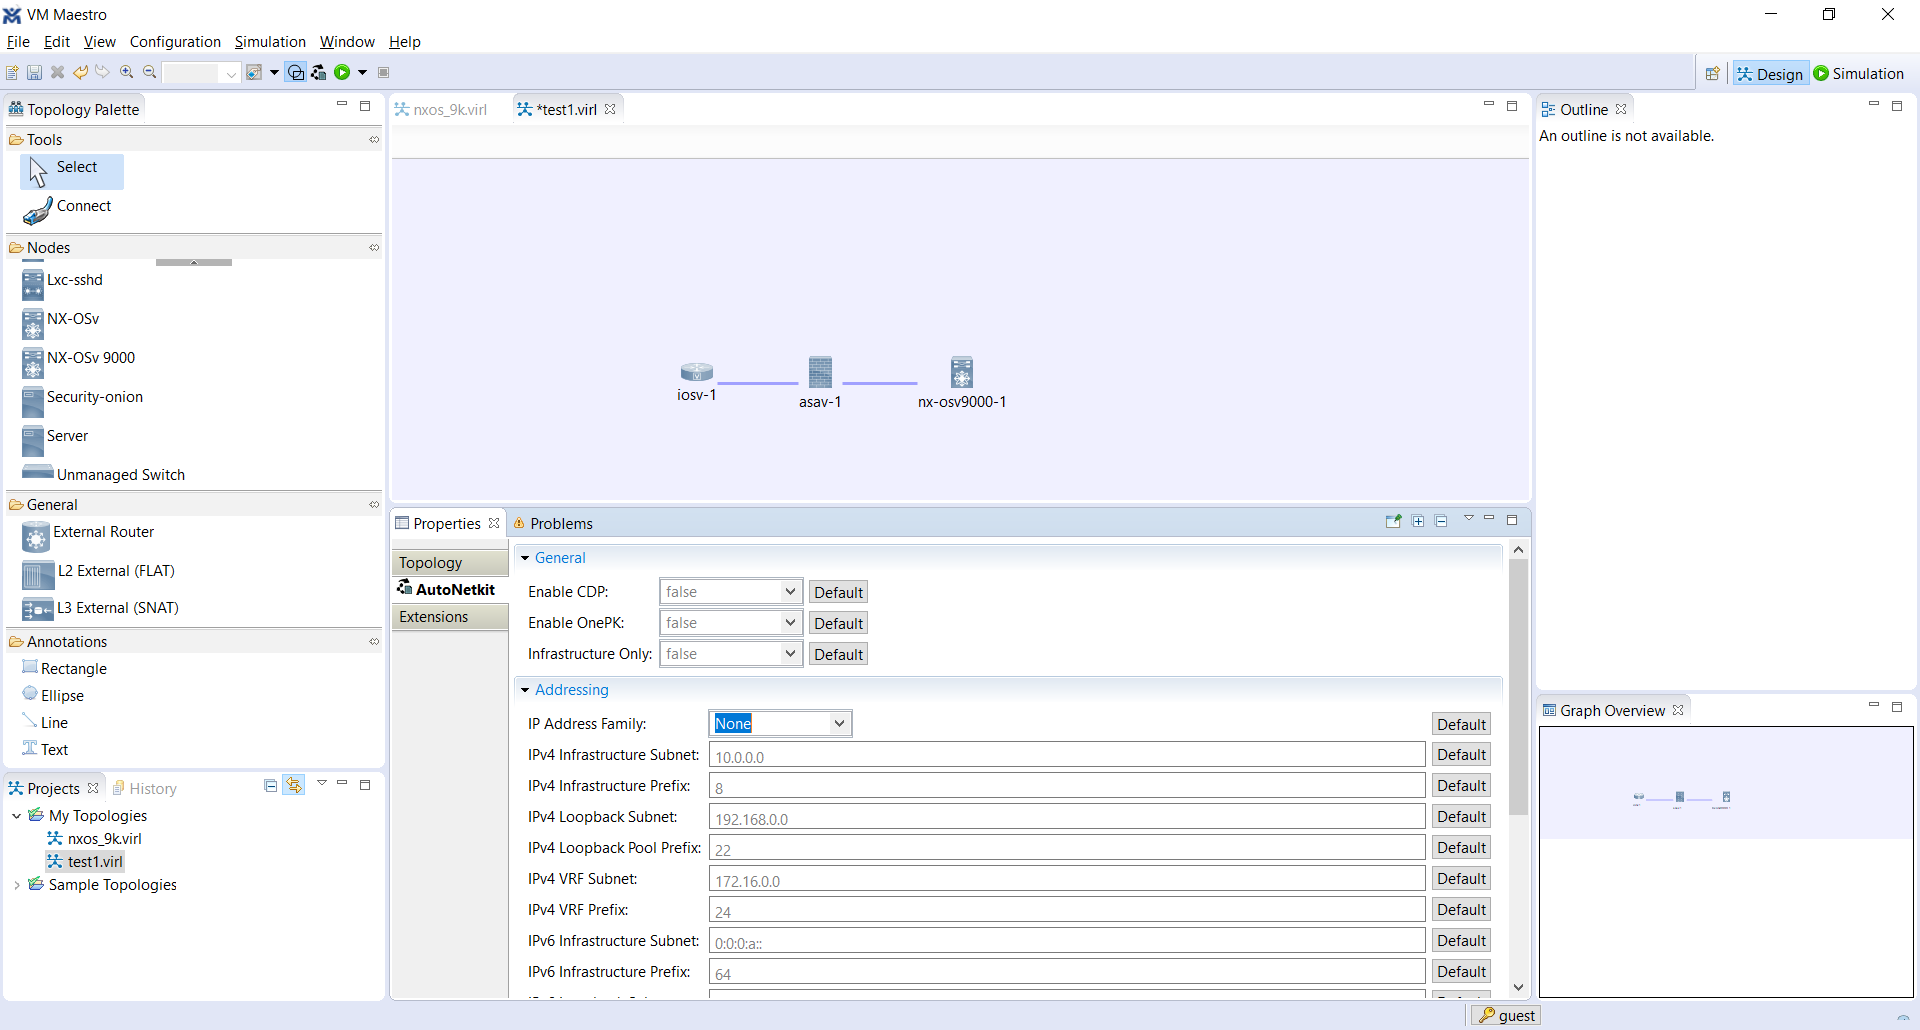
続いて、赤枠の「Build Initial Configurations」をクリックします。

5. Extensionsの設定
(1) ansible_groupの作成
Ansible Inventoryファイル生成のため、Properties > ExtensionsでNW機器毎に以下の設定を行います。ValueはInventoryのグループ名になります。
| Node | Key | Value | Type |
|---|---|---|---|
| iosv-1 | ansible_group | ios | String |
| asav-1 | ansible_group | asa | String |
| nx-osv9000-1 | ansible_group | nxos | String |
(2) Configの修正
Key「config」を見ると、マネジメントI/F設定が作成されている事が分かります。
interface GigabitEthernet0/0
  description OOB Management
  vrf forwarding Mgmt-intf
  ! Configured on launch
  no ip address
  duplex full
  speed auto
  no shutdown
interface Management0/0
  description OOB Management
  duplex full
  management-only
  nameif mgmt
  security-level 100
  no shutdown
  ! Configured on launch
  no ip address
vrf context management
interface mgmt0
  description OOB Management
  ! Configured on launch
  no ip address
  mac-address fa16.3e00.0002
  no shutdown
  vrf member management
IPアドレスがno ip addressとなっているのは、起動時に172.16.30.0/24のセグメント帯から、他のNW機器で使われていないものを自動的に割り当てるためです。
ローカル環境が直接マネジメントネットワークに接続されていない場合、本設定だけではアクセスできないため、Edit Extensionボタンをクリックし、以下のデフォルトルート設定を追加します。
ip route vrf Mgmt-intf 0.0.0.0 0.0.0.0 172.16.30.254
route mgmt 0.0.0.0 0.0.0.0 172.16.30.254
vrf context management   ← 既存設定
  ip route 0.0.0.0/0 172.16.30.254
6. 保存、エクスポート
File > Export > Export Topology file to File Systemを選択し、トポロジーファイルを任意のディレクトリに保管します。
作成したトポロジーファイルはGitHubにアップロードしています。
見て頂くと分かると思いますが、SSH設定も自動作成されています。
トポロジーファイルの動作確認
1. シミュレーションの起動
VM Maestroの「Launch Simulation」ボタンをクリックすることで起動できますが、今回はvirlutilsを使って起動を行います。
セットアップ方法、基本的な操作方法は以下記事を参照頂ければと思います。
virlutilsを使ってCisco VIRLをCLIで構築してみた
$ virl up -e TEST1 -f test1.virl
Creating TEST1 environment from test1.virl
Localizing rsa modulus 768 with: rsa modulus 1024
$
$ virl ls
Running Simulations
╒══════════════════════╤══════════╤════════════════════════════╤═══════════╕
│ Simulation           │ Status   │ Launched                   │ Expires   │
╞══════════════════════╪══════════╪════════════════════════════╪═══════════╡
│ ansible_TEST1_Nw1wo7 │ ACTIVE   │ 2019-09-23T08:05:01.025889 │           │
╘══════════════════════╧══════════╧════════════════════════════╧═══════════╛
$
$ virl nodes TEST1
Here is a list of all the running nodes
╒══════════════╤═════════════╤═════════╤═════════════╤════════════╤══════════════════════╤════════════════════╕
│ Node         │ Type        │ State   │ Reachable   │ Protocol   │ Management Address   │ External Address   │
╞══════════════╪═════════════╪═════════╪═════════════╪════════════╪══════════════════════╪════════════════════╡
│ asav-1       │ ASAv        │ ACTIVE  │ REACHABLE   │ telnet     │ 172.16.30.145        │ N/A                │
├──────────────┼─────────────┼─────────┼─────────────┼────────────┼──────────────────────┼────────────────────┤
│ iosv-1       │ IOSv        │ ACTIVE  │ REACHABLE   │ telnet     │ 172.16.30.146        │ N/A                │
├──────────────┼─────────────┼─────────┼─────────────┼────────────┼──────────────────────┼────────────────────┤
│ nx-osv9000-1 │ NX-OSv 9000 │ ACTIVE  │ REACHABLE   │ telnet     │ 172.16.30.147        │ N/A                │
╘══════════════╧═════════════╧═════════╧═════════════╧════════════╧══════════════════════╧════════════════════╛
2. Ansible Inventoryファイルの生成
(1) YAML形式
以下コマンドでInventoryファイル「inventory_virl1.yml」を生成します。
$ virl generate ansible --output inventory_virl1.yml TEST1
Placing asav-1 into ansible group asa
Placing iosv-1 into ansible group ios
Placing nx-osv9000-1 into ansible group nxos
Writing inventory_virl1.yml
ファイルの中身を見ると、asav-1のansible_network_osがunknownになっていたので、asaに修正します。
# コメント部分省略
all:
  children:
    asa:
      hosts:

        asav-1:
          ansible_host: 172.16.30.145
          console_server: 10.10.20.160
          console_port: 17001
          ansible_network_os: unknown   # asaに修正が必要

    ios:
      hosts:

        iosv-1:
          ansible_host: 172.16.30.146
          console_server: 10.10.20.160
          console_port: 17002
          ansible_network_os: ios

    nxos:
      hosts:

        nx-osv9000-1:
          ansible_host: 172.16.30.147
          console_server: 10.10.20.160
          console_port: 17004
          ansible_network_os: nxos
(2) ini形式
--styleオプションでiniを指定することで、ini形式のファイルも生成可能です。
$ virl generate ansible --output inventory_virl1 --style ini TEST1
Placing asav-1 into ansible group asa
Placing iosv-1 into ansible group ios
Placing nx-osv9000-1 into ansible group nxos
Writing inventory_virl1
[asa]
asav-1 ansible_host=172.16.30.145 console_server=10.10.20.160 console_port=17001 ansible_network_os=unknown   # asaに修正が必要
[ios]
iosv-1 ansible_host=172.16.30.146 console_server=10.10.20.160 console_port=17002 ansible_network_os=ios
[nxos]
nx-osv9000-1 ansible_host=172.16.30.147 console_server=10.10.20.160 console_port=17004 ansible_network_os=nxos
3. Ansibleによる動作確認
(1) グループ変数ファイルの準備
上記のInventoryにはユーザ名/パスワード情報が含まれていないため、group_varsディレクトリ配下に以下ファイルを作成しました。
ansible_user: cisco
ansible_password: cisco
ansible_become: yes
ansible_become_method: enable
ansible_become_pass: cisco
ansible_user: cisco
ansible_password: cisco
ansible_become: no
(2) Playbookの準備
マルチOS対応モジュールであるcli_commandを使って、show versionを取得してみます。
---

- hosts: all
  gather_facts: no
  connection: network_cli

  tasks:
    - name: run show command on remote device
      cli_command:
        command: show version
      register: result

    - name: debug
      debug:
        msg:
          - "{{ result.stdout_lines }}"
(3) (オプション)ansible.cfgの修正
都度シミュレーションを立ち上げてテストする場合を想定し、SSH keyチェックを無効化しています。また、VIRL環境はSSH接続やコマンド実行に時間がかかる時があるため、タイムアウト値を30から60秒に変更しています。
[defaults]
host_key_checking = False
[persistent_connection]
connect_timeout = 60   #デフォルトは30秒
command_timeout = 60   #デフォルトは30秒
(4) 実行結果
いずれも問題なくログ取得できている事が分かります。
$ ansible-playbook -i inventory_virl1 playbook_virl1.yml

PLAY [all] ********************************************************************************************************************************

TASK [run show command on remote device] **************************************************************************************************
ok: [nx-osv9000-1]
ok: [asav-1]
ok: [iosv-1]

TASK [debug] ******************************************************************************************************************************
ok: [asav-1] => {
    "msg": [
        [
            "Cisco Adaptive Security Appliance Software Version 9.8(2) ",
            "Firepower Extensible Operating System Version 2.2(2.52)",
            "Device Manager Version 7.8(2)",
            "",
            "Compiled on Sun 27-Aug-17 13:08 PDT by builders",
            "System image file is \"boot:/asa982-smp-k8.bin\"",
            "Config file at boot was \"startup-config\"",
            ""
            (省略)
        ]
    ]
}
ok: [iosv-1] => {
    "msg": [
        [
            "Cisco IOS Software, IOSv Software (VIOS-ADVENTERPRISEK9-M), Version 15.6(3)M2, RELEASE SOFTWARE (fc2)",
            "Technical Support: http://www.cisco.com/techsupport",
            "Copyright (c) 1986-2017 by Cisco Systems, Inc.",
            "Compiled Wed 29-Mar-17 14:05 by prod_rel_team"
            (省略)
        ]
    ]
}
ok: [nx-osv9000-1] => {
    "msg": [
        [
            "Cisco Nexus Operating System (NX-OS) Software",
            "TAC support: http://www.cisco.com/tac",
            "Documents: http://www.cisco.com/en/US/products/ps9372/tsd_products_support_series_home.html",
            "Copyright (c) 2002-2018, Cisco Systems, Inc. All rights reserved.",
            "The copyrights to certain works contained herein are owned by",
            "other third parties and are used and distributed under license.",
            "Some parts of this software are covered under the GNU Public",
            "License. A copy of the license is available at",
            "http://www.gnu.org/licenses/gpl.html.",
            "",
            "Nexus 9000v is a demo version of the Nexus Operating System",
            "",
            "Software",
            "  BIOS: version ",
            "  NXOS: version 9.2(1)",
            "  BIOS compile time:  ",
            "  NXOS image file is: bootflash:///nxos.9.2.1.bin",
            "  NXOS compile time:  7/17/2018 16:00:00 [07/18/2018 00:21:19]"
            (省略)
        ]
    ]
}

PLAY RECAP ********************************************************************************************************************************
asav-1                     : ok=2    changed=0    unreachable=0    failed=0    skipped=0    rescued=0    ignored=0
iosv-1                     : ok=2    changed=0    unreachable=0    failed=0    skipped=0    rescued=0    ignored=0
nx-osv9000-1               : ok=2    changed=0    unreachable=0    failed=0    skipped=0    rescued=0    ignored=0
最後に
一度トポロジーファイルを作成してしまえば、それ以降は、後半で紹介したような方法で、Ansibleと連携したテストを実現できます。
GitLab等のCIツールと組み合わせれば、GitレポジトリにpushしたPlaybookやモジュールを、VIRL環境で自動テストすることも可能です。
