どうも、
Photoshopも一部をオープンソースで開発し始めているんですね。
便利な世の中になったなぁ。 なら、その機能を早速使ってみよう。
Adobe-Photoshop / Generator-core
Adobe Photoshop CC 2014くらいからGeneratorというものが標準装備されまして、任意のレイヤー名の後ろに.jpgとかつけるだけで、それを画像として吐き出してくれるようになっています。 もちろんレイヤーごとなので、背景透過とかもきちんとされている嬉しさ。
詳しくはこちらの記事をどうぞ:
ベテランほど知らずに損してるPhotoshopの新常識(4)まだスライスで消耗してるの?「画像アセットの生成」でスライス不要のサクサク切り出し:
https://blogs.adobe.com/creativestation/dtp-photoshop-kihon-tips-04
ただし、この機能はデフォルトだと生成された画像にICCプロファイルが付かないのでウェブ業界で使うには致命的でした...そう。
_人人人人人人人人人人人人人人人人人人人人人人人人_
> 作ったイメージと生成されたイメージの色が違う! <
 ̄Y^Y^Y^Y^Y^Y^Y^Y^Y^Y^Y^Y^Y^Y^Y^Y^Y^Y^Y^Y^ ̄
どうやら標準の機能をoffにして、自分でソースコードから使えるようにするとちゃんと設定できるようになるらしいので、やってみましょう。
デザイナーさん向けにできるだけ詳しく手順を書きます。
Photoshopの設定をいじる
・Photoshop CCのバージョンが2015.5なのを確認してください。
(もしくはアップデートしてください。)
・まずは環境設定のプラグインsにあるGeneratorを有効に使うをオフに
・リモート接続を有効にするをオンに
・パスワードはpasswordに変更
こんな感じ
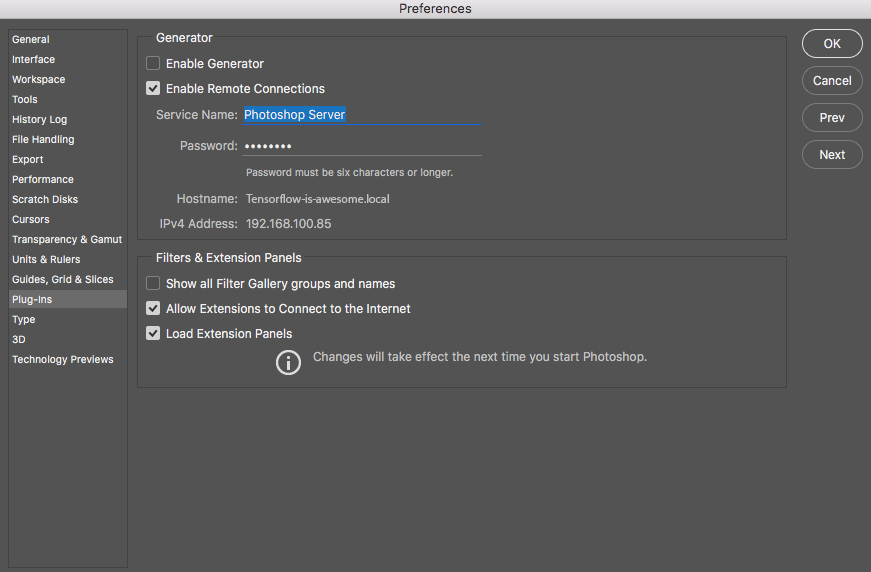
・Photoshop再起動
黒い画面:ターミナルで準備
Macならデフォルトでターミナルというアプリケーションが入っています。
そちらを起動して、一行ずつ実行していきます。入力するときに$サインは入りません
/usr/bin/ruby -e "$(curl -fsSL https://raw.githubusercontent.com/Homebrew/install/master/install)"

$ brew update
$ brew upgrade
$ brew install node, git
$ node --version
$ npm --version
$ git --version

$ cd /Applications/Adobe\ Photoshop\ CC\ 2015.5/Plug-ins
$ mkdir generator
$ cd generator
$ git clone https://github.com/adobe-photoshop/generator-core.git
$ cd generator-core
$ npm install

$ cd ../
$ mkdir plugins
$ cd plugins
$ git clone https://github.com/adobe-photoshop/generator-assets.git
$ cd generator-assets
$ npm install
ここまででインストール完了
ここからプログラム起動
$ cd /Applications/Adobe\ Photoshop\ CC\ 2015.5/Plug-ins/generator/generator-core/
$ node app.js -v -f ../plugins
するとこんな感じのメッセージが出ます。
Parsed config file: /Users/tawago/generator.js
[debug:core 20:35:03.846 generator.js:103:17] Launching with config:
{
  "generator-assets": {
    "svg-enabled": true,
    "svgomg-enabled": true,
    "css-enabled": false,
    "use-smart-scaling": false,
    "include-ancestor-masks": false,
    "allow-dither": false,
    "use-psd-smart-object-pixel-scaling": false,
    "use-pngquant": true,
    "convert-color-space": true,
    "webp-enabled": false,
    "interpolation-type": "bicubicAutomatic"
  }
}
実はこれではまだICCプロファイルが追加されないので、一旦プログラムを止めます。
control+cを押してください。
で、おそらくFinderのユーザー部分にgenerator.jsというものがひょっこりあると思うので、
そちらをメモ帳なりなんなりで編集します。
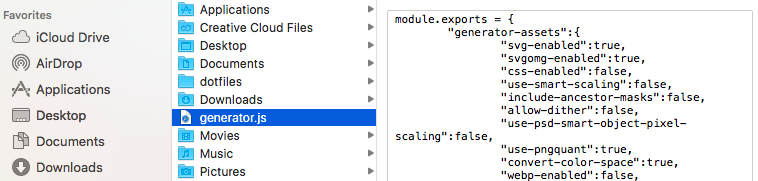
"use-flite": true, "icc-profile": "sRGB IEC61966-2.1", "embed-icc-profile": true
を追記することで生成される画像にICCプロファイルが付与されるようになります。
もう一度ターミナルで $ node app.js -v -f ../pluginsを実行しましょう
Parsed config file: /Users/tawago/generator.js
[debug:core 20:35:03.846 generator.js:103:17] Launching with config:
{
  "generator-assets": {
    "svg-enabled": true,
    "svgomg-enabled": true,
    "css-enabled": false,
    "use-smart-scaling": false,
    "include-ancestor-masks": false,
    "allow-dither": false,
    "use-psd-smart-object-pixel-scaling": false,
    "use-pngquant": true,
    "convert-color-space": true,
    "webp-enabled": false,
    "interpolation-type": "bicubicAutomatic",
    "use-flite": true,
    "icc-profile": "sRGB IEC61966-2.1",
    "embed-icc-profile": true
  }
}
こうなっていれば、photoshopで普通にファイル > 生成 > 画像アセットのメニューが使えるようになっています。
結果
適当なボタンの画像で比べてみました。
デフォルトの画像アセット生成機能: ICCプロファイルなし

ソースからインストールした画像アセット生成機能: ICCプロファイルあり

きちんと色が出るようになりましたね。 わーい^q^
--
Mac BookproのRetinaで見たら違いがわからなかったので、端末によっては上の画像の違いが分かりづらいかもしれません。
書いてみてから思ったけど、もしかしたらこんなことしないでgenerator.jsだけいじればいけるのかもしれない...