はじめに
Cocos Creator を知る機会がありました。
Cocos Creator はゲーム開発ツールの統一パッケージです。
ワークフロー、Cocos2d-x ベースのゲームエンジン、リソース管理、シーン編集、ゲームプレビュー、プロジェクトのデバッグ、複数のプラットフォームへ公開する機能が含まれます。
知っている人曰く Unity と概念や使用感が似ているらしく、Unity 経験があればスムーズに Cocos Creator を使えるようになることが出来ると思われます。
本記事では、学生時代に作成したゲームを Cocos Creator で作ってみて勉強した軌跡を記載します。
最終的にできた Web ゲームは次のようなものです。
(操作するためにキー入力が必要なのでスマホで操作できずイケてない)
| ゲーム画面 |
|---|
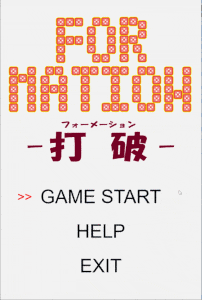 |
| https://github.com/ryu-sato/daha-cocos |
Cocos Creator の概要
先に述べた通り、Cocos Creator はゲーム開発ツールの統一パッケージです。
[UnityとCocos2d-xのいいとこ取り] CocosCreatorの紹介 に書かれた内容を一通り読んで概要を理解しましょう。
キャプチャ画面を見ると分かる通り、ゲーム開発のための統合開発環境であることが分かります。
Cocos Creator のチュートリアル
まずは Cocos Creator をこちらからインストールします。アカウントは適宜作成してください。バージョンは 1.10.1 を使いました。
次に Cocos Creator のチュートリアルを開始します。
順序通りチュートリアルを進めればよいと思いますが、事前に Cocos Creator で取り扱う概念について説明します。
下記、基本的な概念があります。
- シーン (Scene)
- ノード (Node)
- コンポーネント (Component)
- プレハブ (Prefab)
- タイムライン (Timeline)
ゲームは複数のシーンがあり、状況に応じてシーンが切り替わることで画面遷移が行われます。
シーンには複数のノードが配置されます。ノードは抽象的な概念であり、テキスト表示ノードや、画像表示ノード、レイアウトを制御するノード等、具体的な役割を持つコンポーネントがあり、Cocos Creator 画面からこれらのノード及びコンポーネントを配置していくことになります。
コンポーネントはノードに複数関連付けることが出来、1つのノードに複数の役割を持たせることが出来ます。スクリプトもコンポーネントとして扱われます。但し、同じコンポーネントを関連付けることは出来ません。
このノードをパーツ化させ、様々なシーンで使ったり同一のシーンで位置の異なる複数のノードとして配置できるようにしたものをプレハブと呼びます。
ノードは初期配置以外にアニメーションを作成することが出来ます。この機能をタイムラインと呼び、時間経過に応じて変化する画像を設定し、コード内で自由にアニメーションを開始・停止・再開等の操作をすることが出来ます。
Sprite の作成
Sprite は画像を1つ持つコンポーネントです。これにより画像を画面に表示することが出来ます。
スクリプトによるノード操作
表示した Sprite は静止したままです。移動させるためには予め作成した Sprite とスクリプトを関連付けておいた上で、スクリプトに移動処理を記述する必要があります。
スクリプトは JavaScript, TypeScript, CoffeeScript のいずれも利用することが出来ます。私は CoffeeScript に馴染みは無く、JavaScript, TypeScript のどちらかを選択するとしたら TypeScript 一択だと思いますのでこれを選択します。
スクリプトにはゲームから発行されるイベントに対して任意の処理を記述します。
画像を移動させる場合はマイフレーム毎に呼び出される update() メソッドに座標を移動させる処理を記述します。
GAME START
    |
    ↓
INITIALIZATION
    |                  +----------- RENDER <---------+
    ↓                  ↓                             |
CREATE GAME LOOP -> GET INPUT                  UPDATE WORLD
    |                  |                             ↑
    ↓                  +-------> Update PHYSICS -----+
CLEANUP
    |
    ↓
GAME END
スクリプトを作成・コードを実装したら、先に作成した Sprite に Add Componennt ボタンを使ってスクリプトを紐づけます。
また、スクリプトの変数を @property アノテーションを使って宣言すると Cocos Creator 画面から初期値として入力することが出来ます。
こうすることで、同じ Sprite を操作するスクリプトであっても移動するスピードを変更する等の調整が出来ます。
実装が終わったらゲームを起動すると Speed の違う 2 つの Sprite を移動できていることが分かります。
const {ccclass, property} = cc._decorator;
@ccclass
export default class Mover extends cc.Component {
    @property
    speed: number = 100;

    // LIFE-CYCLE CALLBACKS:
    update (dt) {
        this.node.setPositionX(this.node.position.x -= this.speed * dt);
        if(this.node.position.x < -(this.node.parent.width/2) - this.node.width/2)
            this.node.setPositionX(this.node.parent.width/2 + this.node.width/2);
    }
}
Debug 設定
Visual Studio Code を使っている場合の設定が書かれています。
- Visual Studio Code の拡張機能
chromeをインストールする - Cocos Creator から
Developer -> VS Code Workflow -> Add Chrome Debug Settingsを選択してデバッグ設定を追加する
以上で設定は終わりです。後は Cocos Creator でメニューから Debug -> Start Debugging を選択するか、 F5 を押すことでデバッグモードで起動することが出来ます。
尚、シーンが複数ある場合はシーンを選択してから実行することで、そのシーンから開始することが出来ます。(デバッグモードでも同様)
キー・マウス入力を受け付ける
イベントにはビルトインイベントとシステムイベントの 2 種類がある。
ビルトインシステムはノードレベルでハンドルすることが出来、システムイベントはグローバルにブロードキャストされる。
イベントをハンドルするには事前に cc.systemEvent.on メソッドを使って事前に特定のキーに対してコールバック関数を設定します。
コールバック関数では引数として cc.Event.EventCustom を受け取ってどのキーが押されたか調べることが出来ます。
const { ccclass, property } = cc._decorator;
@ccclass
export default class KeyboardScript extends cc.Component {
  public keys: Map<number, boolean> = new Map();
  onKeyDown(e: cc.Event.EventCustom) {
    this.keys.set(e.keyCode, true);
    switch (e.keyCode) {
      case cc.KEY.right:
        if (this.keys.has(cc.KEY.shift))
          console.log("Right and shift pressed");
        else
          console.log("Right pressed");
        break;
    }
    console.log(this.keys.size);
  }
  onKeyUp(e: cc.Event.EventCustom) {
    this.keys.delete(e.keyCode);
  }
  onLoad() {
    cc.systemEvent.on(cc.SystemEvent.EventType.KEY_DOWN,
      this.onKeyDown, this);
    cc.systemEvent.on(cc.SystemEvent.EventType.KEY_UP,
      this.onKeyUp, this);
  }
}
一方でマウスイベントはノードレベルで処理します。
受け取りたいノードインスタンスの on メソッドを使って事前に特定のキーに対してコールバック関数を設定します。
コールバック関数では引数として cc.Event.EventMouse を受け取ってどのボタンが押されたか調べることが出来ます。
const { ccclass, property } = cc._decorator;
@ccclass
export default class MouseScript extends cc.Component {
  onLoad() {
    this.node.on(cc.Node.EventType.MOUSE_DOWN, (e: cc.Event.EventMouse) => {
      console.log("Mouse down on top of selected node");
      e.bubbles = false; // Handled event don't let it propogate!
    });
    this.node.on(cc.Node.EventType.MOUSE_LEAVE, (e: cc.Event.EventMouse) => {
      console.log("Mouse no longer over " + e.currentTarget.name);
    });
    this.node.parent.on(cc.Node.EventType.MOUSE_DOWN, (e: cc.Event.EventMouse) => {
      console.log("Mouse button pressed on parent.  Button: " + e.getButton());
    });
  }
}
サウンドと音楽を鳴らす
サウンドや音楽リソースをノードに AudioSource として追加し、スクリプトから this.node.getComponent(cc.AudioSource) で取得し、 play() メソッドで再生する。
var anime = this.getComponent(cc.AudioSource);
anime.play();
アニメーション
Cocos Creator からノードに対して Timeline を追加して作成開始します。
Timeline が追加されると編集画面へ遷移するので、AnimClip でアニメーションクリップを追加し、ビデオ編集画面のように時間軸上に Sprite を配置していきます。
編集が完了したらコードから次のように play(), pause() で呼び出します。再生しているかどうかは isPaused で調べられます。
var walk = this.getComponent(cc.Animation).getAnimationState("walk");
walk.play();
var walk = this.getComponent(cc.Animation).getAnimationState("walk");
walk.pause();
var walk = this.getComponent(cc.Animation).getAnimationState("walk");
walk.isPaused;
先に紹介したキーの入力を受け付ける方法と合わせると、キー入力を受け付けている間だけアニメーションを再生することが出来ます。
const { ccclass, property } = cc._decorator;

@ccclass
export default class NewClass extends cc.Component {
  start() {
    this.getComponent(cc.Animation).play();
    cc.systemEvent.on(cc.SystemEvent.EventType.KEY_DOWN, (e) => {
      if (e.keyCode == cc.KEY.right) {
        if (this.getComponent(cc.Animation).getAnimationState("walk").isPaused) {
          this.getComponent(cc.Animation).getAnimationState("walk").play();
        }
        this.node.setPositionX(this.node.position.x + 3);
        // 画面右端に到達したら画面左端に戻る
        if (this.node.position.x > (this.node.parent.width / 2) + this.node.width / 2) {
          this.node.setPositionX(-(this.node.parent.width / 2) - this.node.width / 2);
        }
      }
    }, this);

    cc.systemEvent.on(cc.SystemEvent.EventType.KEY_UP, (e) => {
      this.getComponent(cc.Animation).getAnimationState("walk").pause();
    });
  }
}
Cocos Creator のチュートリアル終わり
ここまででチュートリアルを終えました。
チュートリアルを実施していた当時、Animation のページ内に次へ進むボタンが無かったため気が付きませんでしたが、本記事をまとめた '18/09/24 時点では他にチュートリアルが存在するようです。
特に Collision は作成したシューティングゲームでも使っているため、もし衝突判定をしたい場合は読んでおくとよいのではないでしょうか。
シューティングゲームを作成する
ここからチュートリアルで学んだことを基にシューティングゲームを作成し始めました。
リポジトリを作成する
GitHub に空のリポジトリを作成します。次に Cocos Creator でプロジェクトを作成します。
作成したローカルディレクトリを Git 管理するため git init した後、リモートリポジトリとして GitHub を設定しました。
$ cd ${プロジェクトディレクトリ}
$ git init
$ git remote add origin ${リポジトリURL}
リポジトリ操作方法はこの辺が参考になると思います。(https://qiita.com/koshihikari/items/dcf126fa9c0de2b6fa7e)
.gitignore は GitHub > cocos-creator/example-cases にあったものをコピーしました。
スタート画面を作成する
まずは比較的簡単だと思われたスタート画面を作成することにしました。
学習したポイントは次の点です。
-
@propertyで配列を設定する方法-
@property([cc.Label])のように ClassType を[]で括る - 変数の宣言でも同じ型で配列を指定する
- Cocos Creator で配列の個数を設定するとその下に
[0],[1]が表示されるので、対応する値を設定すると配列が初期化できる
-
- シーンを変更する方法
-
cc.director.loadScene()メソッドにシーン名を渡す (シーン名はassets/scenes/Playing.fireの Playing 等の部分)
-
事前にシーンを用意しておき、そのシーンに応じたメニューをスタート画面に表示しました。
そして、メニューを選択するカーソルを用意し、上下のキー入力に応じてカーソルを移動し、スペースキーでメニューを選択してシーンを移動するようにしました。
const { ccclass, property } = cc._decorator;

@ccclass
export default class GameTitleCanvas extends cc.Component {

  // オプション選択用カーソル
  @property(cc.Label)
  cursor: cc.Label = null;

  @property([cc.Label])
  menus: cc.Label[] = [];

  /* クラス変数(内部処理用) */
  selected_index: number = 0;
  cursor_dy: number = 0;

  /**
   * カーソルを操作するキーボードイベントを処理する
   * @param e キーボードイベント
   */
  moveCursor(moveNext: boolean) {
    this.selected_index = (this.selected_index + (moveNext ? 1 : -1) + this.menus.length) % this.menus.length;
    this.cursor.node.setPositionY(this.menus[this.selected_index].node.position.y);
  }

  // LIFE-CYCLE CALLBACKS:
  start() {
    this.cursor.node.setPositionY(this.menus[0].node.position.y);
    this.cursor_dy = this.menus[1].node.position.y - this.menus[0].node.position.y;

    cc.systemEvent.on(cc.SystemEvent.EventType.KEY_DOWN, (e) => {
      switch(e.keyCode) {
        case cc.KEY.down:
          return this.moveCursor(true);
        case cc.KEY.up:
          return this.moveCursor(false);
      }

      /* スペースキーでシーンを遷移する */
      // [TODO] Exit メニューでアプリケーションを終了させる
      if (e.keyCode == cc.KEY.space) {
        const scene_names: string[] = ['Playing', 'Option', 'Help', 'Exit'];
        cc.director.loadScene(scene_names[this.selected_index]);
      }
    }, this);
  }
}
プレイ画面を作成する
次にプレイ画面の作成に取り掛かりました。
まずは敵機とプレイヤー機を配置することにしました。
ただ、ライフや状態遷移は予め決めていたため変数として定義し、メソッドは空の定義だけしておきました。
学習したポイントは次の点です。
- Prefab を作成する方法
- Cocos Creator で Prefab 化したいノードをシーン上に作成する
- 作成したノードをドラッグして Assets の prefabs ディレクトリへドロップする
- コードから Prefab を呼び出す方法 (恐らく複数の方法があると思いますが、 Cocos Creator 上で変更がしやすいように
@propertyとして事前に設定しておく方法をとることにします)- コードに
@property(cc.Prefab)を設定する - Cocos Creator で作成した Prefab をコピーして該当の property へドロップする
- コードで
cc.instantiate()でインスタンス化する - ※ インスタンス化した後はノードとして扱えるので表示するためには十分ですが、コンポーネントを継承した Enemy クラスのメソッドを呼び出す場合は別の方法を使います。
- コードに
- ノードに
addChild()メソッドで追加すると画面上に描画され、更新処理が呼び出される- 子ノードは親ノードを基準とした座標となる
- ノードから
removeChild()メソッドで削除すると画面上に描画されなくなり、更新処理も呼び出されなくなる
const { ccclass, property } = cc._decorator;

@ccclass
export default class Enemy extends cc.Component {

  // [TODO] Enum 型を使う
  state_live_list: string[] = ['ALIVE', 'EXPLODING', 'DEAD'];
  state_move_list: string[] = ['STOP', 'FALL'];

  state_live: string = 'ALIVE';   // 生存ステータス
  state_move: string = 'STOP';    // 動作ステータス

  life: number = 1;               // 機体のライフ(デフォルト値は1だがフォーメーションを組むと増える)
  // fall_step_elapsed: number = 0;  // 落下アニメーションの経過ステップ数(MAXになったら0にリセットされる)

  @property
  max_fall_step: number = 540;      // 落下アニメーションの最大ステップ数

  processExplode() {
    // [TODO] 爆発アニメーションを作成する
  }

  update (dt) {
    switch (this.state_live) {
      case 'ALIVE':
        this.node.setPositionY(this.node.position.y
          - (this.node.height / this.max_fall_step));
        return;
      case 'EXPLODING':
        this.processExplode();
        return;
    }
  }
}
const { ccclass, property } = cc._decorator;

@ccclass
export default class Player extends cc.Component {

  @property(cc.Sprite)
  sprite_stop: cc.Sprite = null;

  @property(cc.Sprite)
  sprite_move_left: cc.Sprite = null;

  @property(cc.Sprite)
  sprite_move_right: cc.Sprite = null;

  // [TODO] Enum 型を使う
  state_live_list: string[] = ['ALIVE', 'EXPLODING', 'DEAD', 'REVIVING'];
  state_move_list: string[] = ['STOP', 'MOVE_LEFT', 'MOVE_RIGHT'];

  state_live: string = 'ALIVE';   // 生存ステータス
  state_move: string = 'STOP';    // 動作ステータス

  life: number = 1;               // 機体のライフ(デフォルト値は1だがフォーメーションを組むと増える)
  // fall_step_elapsed: number = 0;  // 落下アニメーションの経過ステップ数(MAXになったら0にリセットされる)

  move_dx: number = 20;           // 移動速度

  /**
   * プレイヤーを移動させる
   * @param moveLeft 左への移動可否(否なら右へ移動))
   */
  movePlayer(moveLeft: boolean) {
    const half_width_of_parent = this.node.parent.width / 2;
    const half_width_myself = this.node.width / 2;
    const new_x = Math.max(-(half_width_of_parent) + half_width_myself, // 左端
                    Math.min(half_width_of_parent - half_width_myself,  // 右端
                      this.node.position.x - (moveLeft ? this.move_dx : -(this.move_dx))));  // 移動予定場所
    this.node.setPositionX(new_x);
  }

  /**
   * プレイヤーの画像をステータスに応じて再設定する
   */
  resetSpriteFrameByMoveState() {
    const sprite = this.node.getComponent(cc.Sprite);
    switch(this.state_move) {
      case 'STOP':
        sprite.spriteFrame = this.sprite_stop.spriteFrame;
        return;
      case 'MOVE_LEFT':
        sprite.spriteFrame = this.sprite_move_left.spriteFrame;
        return;
      case 'MOVE_RIGHT':
        sprite.spriteFrame = this.sprite_move_right.spriteFrame;
        return;
    }
  }

  processExplode() {
    // [TODO] 爆発アニメーションを作成する
  }

  processReviving() {
    // [TODO] 復活アニメーションを作成する
  }

  start() {
    // キーボード入力でプレイヤーを移動させる
    cc.systemEvent.on(cc.SystemEvent.EventType.KEY_DOWN, (e) => {
      switch (e.keyCode) {
        case cc.KEY.left:
          this.state_move = 'MOVE_LEFT';
          this.movePlayer(true);
          break;
        case cc.KEY.right:
          this.state_move = 'MOVE_RIGHT';
          this.movePlayer(false);
          break;
      }
      this.resetSpriteFrameByMoveState();
    }, this);
    cc.systemEvent.on(cc.SystemEvent.EventType.KEY_UP, (e) => {
      this.state_move = 'STOP';
      this.resetSpriteFrameByMoveState();
    }, this);
  }

  update(dt) {
    switch (this.state_live) {
      case 'ALIVE':
        return;
      case 'REVIVING':
        this.processReviving();
        return;
      case 'EXPLODING':
        this.processExplode();
        return;
    }
  }
}
const { ccclass, property } = cc._decorator;

@ccclass
export default class PlayingCanvas extends cc.Component {

  @property(cc.Prefab)
  enemy_prefab: cc.Prefab = null; // 敵機

  start() {
    for (let x: number = 0; x < 10; x++) {
      const enemy_prefab = cc.instantiate(this.enemy_prefab);
      enemy_prefab.setPosition(x * 30, 300);
      this.node.addChild(enemy_prefab);
    }
  }

  update() {
    // this.enemies.forEach(enemy => {});
  }
}
プレイヤー機・敵機からビームを発射して相手を破壊する
プレイヤーからビームを発射して敵機に当たったら破壊できるようにします。
敵機も同様にビームを発射してプレイヤー機に当たったら破壊できるようにします。
ここで、ビームとプレイヤー機・敵機に当たり判定を設定します。プレイヤー機、ビームも敵機も Prefab としました。
また、敵機がいなくなった場合(暫定で Canvas 上のノード数が 1 になった時とした)又は、プレイヤー機の状態が DEAD となった場合にゲームタイトルへ遷移するようにしました。
学習したポイントは次の点です。
- あたり判定を設定する方法
- Cocos Creator で Beam と Enemy に BoxCollider コンポーネントを追加する
- 衝突範囲を指す形の違いで Box, Chain, Circle, Polygon がある
- BoxCollider コンポーネントに任意の Tag(数値) を設定する
-
onEnable()メソッドでcc.director.getCollisionManager().enabled = true;を設定して、あたり判定を有効化する -
onCollisionEnter()メソッドであたり判定を行う-
onCollisionEnter()は衝突した際に呼び出される - 衝突した相手は tag の値で判別する
-
- Cocos Creator で Beam と Enemy に BoxCollider コンポーネントを追加する
- シーン上にあるノードのコードを読み取る方法
-
cc.find()でノードを探して、ノードに関連付けられたコンポーネントをgetComponent()で探す- 例
cc.find('Canvas/player').getComponent(Player);
- 例
-
- Prefab のコードを読み取る方法
-
cc.instantiate()メソッドで Prefab からノードを作成する - 作成したノードからコードを
getComponent()メソッドで探す- 例
cc.instantiate(this.enemy_prefab).getComponent(Enemy);
- 例
-
import PlayingCanvas from "../Playing/PlayingCanvas";

const { ccclass, property } = cc._decorator;

@ccclass
export default class PlayerBeam extends cc.Component {

  canvas: PlayingCanvas = null;

  @property(cc.Node)
  direction: cc.Node = null; // 移動方向 [TODO]dx,dyをクラス変数で扱う

  life_count = 300;          // 寿命(凡そ画面外に抜けるだろう期間※画面との包含関係で確認したい)

  /* ===== LIFE-CYCLE CALLBACKS ===== */

  update (dt) {
    // 移動
    this.node.setPosition(
      this.node.position.x + this.direction.width,
      this.node.position.y + this.direction.height
    );

    // 画面外に出たら削除する
    // [NOTE] プレイヤー機からの相対値なので、ゲーム画面に座標は全て揃えたい
    const parent_size = this.node.parent.getContentSize();
    if (this.life_count-- <= 0) {
      this.node.parent.removeChild(this.node);
    }
  }
}
import PlayingCanvas from "../Playing/PlayingCanvas";

const { ccclass, property } = cc._decorator;

@ccclass
export default class EnemyBeam extends cc.Component {

  canvas: PlayingCanvas = null;

  @property(cc.Node)
  direction: cc.Node = null; // 移動方向 [TODO]dx,dyをクラス変数で扱う

  life_count = 300;          // 寿命(凡そ画面外に抜けるだろう期間※画面との包含関係で確認したい)

  /* ===== LIFE-CYCLE CALLBACKS ===== */

  update (dt) {
    // 移動
    this.node.setPosition(
      this.node.position.x + this.direction.width,
      this.node.position.y + this.direction.height
    );

    // 画面外に出たら削除する
    // [NOTE] プレイヤー機からの相対値なので、ゲーム画面に座標は全て揃えたい
    const parent_size = this.node.parent.getContentSize();
    if (this.life_count-- <= 0) {
      this.node.parent.removeChild(this.node);
    }
  }
}
import PlayingCanvas from "../Playing/PlayingCanvas";

const { ccclass, property } = cc._decorator;

@ccclass
export default class Enemy extends cc.Component {

  canvas: PlayingCanvas = null;

  // [TODO] Enum 型を使う
  state_live_list: string[] = ['ALIVE', 'EXPLODING', 'DEAD'];
  state_move_list: string[] = ['STOP', 'FALL'];

  state_live: string = 'ALIVE';     // 生存ステータス
  state_move: string = 'STOP';      // 動作ステータス

  life: number = 1;                 // 機体のライフ(デフォルト値は1だがフォーメーションを組むと増える)

  @property(cc.Sprite)
  sprite_stop: cc.Sprite = null;    // 停止

  @property(cc.Sprite)
  sprite_explode: cc.Sprite = null; // 爆発アニメーション

  @property(cc.Sprite)
  sprite_fall: cc.Sprite = null;    // 落下アニメーション

  @property
  max_fall_step: number = 0;        // 落下アニメーションの最大ステップ数

  @property(cc.Prefab)
  beam_prefab: cc.Prefab = null;    // ビーム

  shooting_span: number = 0;        // 発射後の経過(intervalに達すると発射され、その後0にリセットされる))
  shooting_interval: number = 60;   // 発射間隔

  beams: cc.Node[] = [];

  processAlive() {
    switch (this.state_move) {
      case 'FALL':
        const fall_anime_state = this.sprite_fall.getComponent(cc.Animation).getAnimationState("fall");
        if (!fall_anime_state.isPlaying || fall_anime_state.isPaused) {
          fall_anime_state.play();
        }
        this.node.setPositionY(this.node.position.y
          - (this.node.height / this.max_fall_step));
        return;
      case 'STOP':
        this.shooting_span++;
        if (this.shooting_span >= this.shooting_interval) {
          this.shoot();
        }
        return;
    }
  }

  processExplode() {
    const explode_anime_state = this.sprite_explode.getComponent(cc.Animation).getAnimationState("explode");
    if (!explode_anime_state.isPlaying || explode_anime_state.isPaused) {
      explode_anime_state.play();
    } else if (explode_anime_state.time > 0.20) {
      this.state_live = 'DEAD';
    }
  }

  processDead() {
    this.node.parent.removeChild(this.node);
    // this.destroy();
  }

  shoot(): void {
    const beam = cc.instantiate(this.beam_prefab);

    beam.setPosition(this.node.position.x, this.node.position.y - this.node.height / 2);
    let dx: number = 0, dy: number = -3;
    // [TODO] フォーメーションに応じて攻撃方法を変える
    const direction = beam.getChildByName('direction');
    direction.width = dx;
    direction.height = dy;

    this.node.parent.addChild(beam);
    this.beams.push(beam);
    this.shooting_span = 0;
  }

  /**
   * 敵機の画像をステータスに応じて再設定する
   */
  resetSpriteFrameByMoveState(): void {
    const sprite = this.node.getComponent(cc.Sprite);
    if (this.state_live === 'ALIVE') {
      switch(this.state_move) {
        case 'STOP':
          sprite.spriteFrame = this.sprite_stop.spriteFrame;
          return;
        case 'FALL':
          sprite.spriteFrame = this.sprite_fall.spriteFrame;
          return;
      }
    } else {
      switch(this.state_live) {
        case 'EXPLODING':
          sprite.spriteFrame = this.sprite_explode.spriteFrame;
          return;
        case 'DEAD':
          return;
      }
    }
  }

  onEnable() {
    // 衝突判定を有効にする
    cc.director.getCollisionManager().enabled = true;
  }

  /**
   * ノード同士の処理処理
   * @param other 衝突相手
   * @param self 自分
   */
  onCollisionEnter(other, self) {
    if (other.tag === 2) {  // プレイヤービームとの衝突
      this.life--;
      if (this.life <= 0) {
        this.state_live = 'EXPLODING';
      }
    }
  }

  update(dt) {
    switch (this.state_live) {
      case 'ALIVE':
        this.processAlive();
        break;
      case 'EXPLODING':
        this.processExplode();
        break;
      case 'DEAD':
        this.processDead();
        break;
      default:
        console.log('invalid state: ' + this.state_live);
        break;
    }
    this.resetSpriteFrameByMoveState();
  }
}
import PlayingCanvas from "../Playing/PlayingCanvas";

const { ccclass, property } = cc._decorator;

@ccclass
export default class Player extends cc.Component {

  @property(cc.Sprite)
  sprite_stop: cc.Sprite = null;

  @property(cc.Sprite)
  sprite_move_left: cc.Sprite = null;

  @property(cc.Sprite)
  sprite_move_right: cc.Sprite = null;

  @property(cc.Sprite)
  sprite_explode: cc.Sprite = null; // 爆発アニメーション

  @property(cc.Prefab)
  beam_prefab: cc.Prefab = null;  // ビーム

  // [TODO] Enum 型を使う
  state_live_list: string[] = ['ALIVE', 'EXPLODING', 'EXPLODED', 'REVIVING', 'DEAD'];
  state_move_list: string[] = ['STOP', 'MOVE_LEFT', 'MOVE_RIGHT'];

  state_live: string = 'ALIVE';   // 生存ステータス
  state_move: string = 'STOP';    // 動作ステータス

  life: number = 3;               // 機体のライフ(ビーム1発で爆発するが復活でき、その回数)

  move_dx: number = 20;           // 移動速度
  shooting_span: number = 0;      // 発射後の経過(intervalに達すると発射され、その後0にリセットされる))
  shooting_interval: number = 1;  // 発射間隔
  reviving_span: number = 0;      // 復活アニメーションの経過時間
  max_reviving_span: number = 300;// 復活アニメーションの所要時間

  beams: cc.Node[] = [];
  sprite_empty: cc.Sprite = new cc.Sprite;  // 透明表示用の空sprite
  playingCanvas: PlayingCanvas = null;

  /**
   * プレイヤーを移動させる
   * @param moveLeft 左への移動可否(否なら右へ移動))
   */
  movePlayer(moveLeft: boolean): void {
    this.state_move = moveLeft ? 'MOVE_LEFT' : 'MOVE_RIGHT';
    const half_width_of_parent = this.node.parent.width / 2;
    const half_width_myself = this.node.width / 2;
    const new_x = Math.max(-(half_width_of_parent) + half_width_myself, // 左端
                    Math.min(half_width_of_parent - half_width_myself,  // 右端
                      this.node.position.x - (moveLeft ? this.move_dx : -(this.move_dx))));  // 移動予定場所
    this.node.setPositionX(new_x);
  }

  /**
   * プレイヤーを停止させる
   */
  stopPlayer(): void {
    this.state_move = 'STOP';
  }

  /**
   * プレイヤーの画像をステータスに応じて再設定する
   */
  resetSpriteFrameByMoveState(): void {
    const move_sprites_map: {[key: string]: cc.Sprite} = {
      STOP:       this.sprite_stop,
      MOVE_LEFT:  this.sprite_move_left,
      MOVE_RIGHT: this.sprite_move_right
    };

    if (this.state_live === 'ALIVE') {
      const sprite = this.node.getComponent(cc.Sprite);
      sprite.spriteFrame = move_sprites_map[this.state_move].spriteFrame;
    } else if (this.state_live === 'EXPLODING') {
      const sprite = this.node.getComponent(cc.Sprite);
      sprite.spriteFrame = this.sprite_explode.spriteFrame;
    } else if (this.state_live === 'REVIVING') {
      /* 復活所要時間中は点滅させる */
      if (this.reviving_span % 30 <= 5) {
        const sprite = this.node.getComponent(cc.Sprite);
        sprite.spriteFrame = this.sprite_empty.spriteFrame;
      } else {
        const sprite = this.node.getComponent(cc.Sprite);
        sprite.spriteFrame = move_sprites_map[this.state_move].spriteFrame;
      }
    }
  }

  processExploding() {
    const explode_anime_state = this.sprite_explode.getComponent(cc.Animation).getAnimationState("explode");
    if (!explode_anime_state.isPlaying || explode_anime_state.isPaused) {
      explode_anime_state.play();
    } else if (explode_anime_state.time > 0.20) {
      explode_anime_state.stop();
      this.state_live = 'EXPLODED';
    }
  }

  processExploded() {
    this.life--;
    if (this.life > 0) {
      this.state_live = 'REVIVING';
      return;
    }
    this.state_live = 'DEAD';
  }

  processReviving() {
    this.reviving_span++;

    /* 復活所要時間が経過したらステータスを ALIVE にして画像を再設定する */
    if (this.reviving_span >= this.max_reviving_span) {
      this.reviving_span = 0;
      this.state_live = 'ALIVE';
      return;
    }
  }

  /**
   * ビームを発射する
   */
  shoot(): void {
    const beam = cc.instantiate(this.beam_prefab);

    beam.setPosition(this.node.position.x, this.node.position.y + this.node.height / 2);
    let dx: number = 0, dy: number = 10;
    switch (this.state_move) {
      case 'STOP':
        dx = 0;
        break;
      case 'MOVE_LEFT':
        dx = 2;
        break;
      case 'MOVE_RIGHT':
        dx = -2;
        break;
    }
    const direction = beam.getChildByName('direction');
    direction.width = dx;
    direction.height = dy;

    this.node.parent.addChild(beam);
    this.beams.push(beam);
    this.shooting_span = 0;
  }

  onEnable() {
    // 衝突判定を有効にする
    cc.director.getCollisionManager().enabled = true;
  }

  /**
   * ノード同士の処理処理
   * @param other 衝突相手
   * @param self 自分
   */
  onCollisionEnter(other, self) {
    if (this.state_live === 'ALIVE' && other.tag === 3) {  // 敵機ビームとの衝突
      this.state_live = 'EXPLODING';
    }
  }

  /* ===== LIFE-CYCLE CALLBACKS ===== */

  start() {
    // キーボード入力でプレイヤー移動とビーム発射を行う
    cc.systemEvent.on(cc.SystemEvent.EventType.KEY_DOWN, (e) => {
      switch (e.keyCode) {
        case cc.KEY.left:
          this.state_move = 'MOVE_LEFT';
          this.movePlayer(true);
          break;
        case cc.KEY.right:
          this.state_move = 'MOVE_RIGHT';
          this.movePlayer(false);
          break;
        case cc.KEY.space:
          this.shooting_span++;
          if (this.shooting_span >= this.shooting_interval) {
            this.shoot();
          }
          break;
      }
    }, this);
    cc.systemEvent.on(cc.SystemEvent.EventType.KEY_UP, (e) => {
      this.state_move = 'STOP';
    }, this);
  }

  update(dt) {
    switch (this.state_live) {
      case 'ALIVE':
        break;
      case 'REVIVING':
        this.processReviving();
        break;
      case 'EXPLODING':
        this.processExploding();
        break;
      case 'EXPLODED':
        this.processExploded();
        break;
    }
    this.resetSpriteFrameByMoveState();
  }
}
import Player from "../Player/Player";

const { ccclass, property } = cc._decorator;

@ccclass
export default class PlayingCanvas extends cc.Component {

  @property(cc.Prefab)
  enemy_prefab: cc.Prefab = null;  // 敵機

  @property(cc.Prefab)
  player_prefab: cc.Prefab = null; // 自機

  enemies: cc.Node[] = [];
  player: cc.Node = null;

  start() {
    // 自機を初期化する
    const player = cc.instantiate(this.player_prefab);
    player.setPosition(0, -(this.node.height / 2) + (player.height / 2));
    this.player = player;
    this.node.addChild(player);

    // 敵機を初期化する
    for (let x: number = 0; x < 10; x++) {
      const enemy = cc.instantiate(this.enemy_prefab);
      enemy.setPosition(
        -(this.node.width / 2) + (enemy.width / 2) + enemy.width * x,
        (this.node.height / 2) - (enemy.height / 2)
      );
      this.node.addChild(enemy);
      this.enemies.push(enemy);
    }
  }

  update() {
    if (this.node.childrenCount === 1) {  // [TODO] 残り子数ではなく enemies = 0 で判別する
      cc.director.loadScene('GameTitle');
    }
    const player: Player = cc.find('Canvas/player').getComponent(Player);
    if (player.state_live === 'DEAD') {
      cc.director.loadScene('GameTitle');
    }
  }
}
敵機がフォーメーション組めるようにする、その他完成させる
コードは本記事への掲載を割愛します。詳細は GitHub を参照してください。
学習したポイントは次の点です。
- Sprite に追加した画像は自動でトリミングされる
-
Size Mode: RAWにすると自動でトリミングされない
-
- PageView コンポーネントを操作する方法
-
getCurrentPageIndex()で表示中のページ番号を取得する -
setCurrentPageIndex()で表示するページ番号を切り替える (最初と最後よりも大きい番号を指定しても無視される)
-
- RichText コンポーネントは BBCode format で記述する
- BBCode format で対応しているものは次を参照
最後に
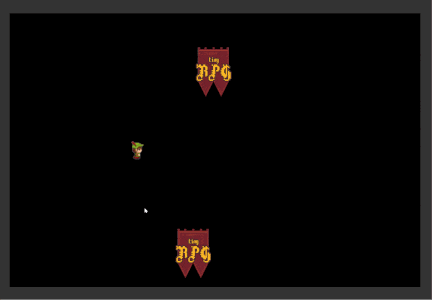
これでゲームはひとまず完成しました。
| ゲーム画面 |
|---|
|
| https://github.com/ryu-sato/daha-cocos |
バグはありますがゲームに必要な基本的操作は盛り込めたかなと思います。
大きく不足している点とすれば、バックエンドとなるサーバと通信をする方法でしょうか。
ゲームによっては不要かもしれませんが、シューティングゲームでもスコアを保存するだけでも必要になるはずです。
まだ未学習のため、本記事ではバックエンドとの通信方法は紹介しません。
機会がありましたら紹介できればと思います。
以上、これから Cocos Creator を学ぼうとしてる方の一助となれば幸いです。
情報
Cocos Creator で情報を調べたいときに参考にしたページです。
公式ページ
- Cocos Creator User Manual
- Cocos Creator API
その他
- DayByDay
- モーリーのメモ