はじめに
これまで WEB アプリケーションを作成してきましたが、今回は継続的に WEB アプリケーションを開発するための CI/CD 環境を設定してみることにします。
ここで利用している WEB アプリケーションは以下の記事で作成したものです。
- Node.js, Express, sequelize, React で始めるモダン WEB アプリケーション入門
概要
react-scripts をインストールすると Jest がインストールされています。
Jest は Node ベースで動作する Facebook 社製のテストフレームワークです。
Jest にはテストフレームワークで提供されている Mock やカバレッジレポートの出力に加えて、動的にステートが変かする React コンポーネントをテストするための snapshot 機能等があるため、今回の React アプリケーションをテストするために十分な機能を持っています。
そこで今回は Jest を使ってテストを作成し、CI/CD 環境を構築していくことにします。
最終的には次のような CI/CD 環境を構築することを目標とします。
- テストフレームワーク: Jest
- CI/CDツール: Circle CI
- デプロイ先環境: Heroku
テストフレームワーク Jest を使ってテストする
Jest を導入して実行設定する
Jest はテスト実行時に、デフォルト動作として node_modules ディレクトリ以外の実行されたディレクトリ配下の全ディレクトリを検索して *.test.js ファイルを実行します。
しかし、react-scripts テストでは次の条件にマッチするテストファイルが検索されます。
- testMatch 設定
src/__tests__/*.{js,jsx,mjs}src/**?(*.)(spec|test).{js,jsx,mjs}
テストファイルをまとめるため、 src 配下に __tests__ ディレクトリを作成してその中にテストファイルをまとめることにします。
但し、公式ドキュメントで推奨されている通り __tests__ ディレクトリはなるべくテスト対象と同列のディレクトリ配置となるようにします。(参考URL)
We recommend to put the test files (or
__tests__folders) next to the code they are testing so that relative imports appear shorter. For example, if App.test.js and App.js are in the same folder, the test just needs to import App from './App' instead of a long relative path. Colocation also helps find tests more quickly in larger projects.
Jest が動作することを確認するため、公式ドキュメントに書かれているサンプルのとおり sum.test.js を作成して実行してみることにします。
function sum(a, b) {
  return a + b;
}

test('adds 1 + 2 to equal 3', () => {
  expect(sum(1, 2)).toBe(3);
});
sum.test.js は与えられた 2 つの引数の和を返す sum 関数が正しく動作することをテストします。
テスト項目は test() 関数で定義します。
1番目の引数にはテストする内容を示す文字列で "adds 1 + 2 to equal 3" のように指定します。
2番目の引数にはテスト処理を行う関数を指定します。
expect は引数に渡した値に対して続く .toBe() 等のマッチャを指定することで期待する動作を記述します。
つまり、上記テストは sum 関数に引数として 1,2 を渡して実行した結果が 3 と一致すれば成功することになります。
試しにテストを実行してみます。(終了するには q)
$ ./node_modules/.bin/react-scripts test
 PASS  test/sum.test.js
  √ adds 1 + 2 to equal 3 (2ms)

Test Suites: 1 passed, 1 total
Tests:       1 passed, 1 total
Snapshots:   0 total
Time:        0.792s, estimated 1s
Ran all test suites related to changed files.

Watch Usage
 › Press a to run all tests.
 › Press p to filter by a filename regex pattern.
 › Press t to filter by a test name regex pattern.
 › Press q to quit watch mode.
 › Press Enter to trigger a test run.
上記のとおり sum 関数をテストした結果、 1 passed になれば成功です。
今後もテストを実行するために、package.json の scripts にテスト実行用の test オプションを追加しておくことにします。
{
  "scripts": {
    "test": "react-scripts test --env=jsdom"
  }
}
これで以後は、 npm run test または npm test を実行することで Jest を実行できます。
sum.test.js は使わないので削除しましょう。
テストを追加する
テストを実行する準備が出来たらテストを追加することにします。
今回は React コンポーネントをレンダリングすることが出来るかどうかをテストすることにします。
ベースとなるテストファイルを下記の通り用意し、各 React コンポーネント(ExpressSampleApp, EmployeeList, EmployeeDetail, EmployeeNew, EmployeeEdit) に対してそれぞれ同じメソッドを呼び出すことにします。
/*
 * React Component に対する基本テスト
 * 使い方
 *   import で読み込んで必要なテストを実行する。all を呼び出すと全てのテストを実行する。
 */

import React from 'react';
import ReactDOM from 'react-dom';
import * as TestUtils from 'react-dom/test-utils';

export function component_can_be_rendered(reactClass) {
  test(reactClass.name + ' can be rendered', () => {
    const e = React.createElement;
    const component = TestUtils.renderIntoDocument(e(reactClass.name.toLowerCase()));
    const node = ReactDOM.findDOMNode(component);

    expect(node).not.toBeNull();
  });
}

// テストが最低1つ記述されていないといけないためダミーで追加したテスト(skipなので実行されない)
test.skip('', () => {});
次にコンポーネントをテストするファイルを作成します。
今回はコンポーネント1つに対して1つファイルを作成することにしました。
import * as ReactComponentTestBase from '../../__tests__/react_component_base.test';
import EmployeeList from '../employee_list';

describe('EmployeeList', () => {
  ReactComponentTestBase.component_can_be_rendered(EmployeeList);
});
他同様にテストファイルを作成します。
作成が終わったら npm run test を実行してみましょう。5つのコンポーネントように作成したテストが5つ全て成功すると思います。
$ npm run test
 PASS  src/__tests__/express_sample_app.test.js
 PASS  src/employee/__tests__/employee_list.test.js
 PASS  src/employee/__tests__/employee_detail.test.js
 PASS  src/employee/__tests__/employee_new.test.js
 PASS  src/employee/__tests__/employee_edit.test.js

Test Suites: 1 skipped, 5 passed, 5 of 6 total
Tests:       6 skipped, 5 passed, 11 total
Snapshots:   0 total
Time:        0.687s, estimated 1s
Ran all test suites related to changed files.
CircleCI にプロジェクトの CI/CD 環境を構築する
CI 環境を構築する
- CircleCI へアカウント登録してログインする
- Add Project でプロジェクトを追加する
- GitHub に CircleCI と連携するためのイベントフック設定が自動で行われる
- CircleCI の設定ファイルを追加する
- .circleci/config.yml を追加する
- config.yml の中身はサンプルをほぼそのまま利用する
- config.yml の node バージョンを適宜修正する
- master ブランチに作成した CircleCI の設定ファイルをコミットする
# Javascript Node CircleCI 2.0 configuration file
#
# Check https://circleci.com/docs/2.0/language-javascript/ for more details
#
version: 2
jobs:
  build:
    docker:
      # specify the version you desire here (★ノードバージョンを修正した)
      - image: node:8.12.0

      # Specify service dependencies here if necessary
      # CircleCI maintains a library of pre-built images
      # documented at https://circleci.com/docs/2.0/circleci-images/
      # - image: circleci/mongo:3.4.4

    working_directory: ~/repo

    steps:
      - checkout

      # Download and cache dependencies
      - restore_cache:
          keys:
          - v1-dependencies-{{ checksum "package.json" }}
          # fallback to using the latest cache if no exact match is found
          - v1-dependencies-

      - run: yarn install

      - save_cache:
          paths:
            - node_modules
          key: v1-dependencies-{{ checksum "package.json" }}

      # run tests!
      - run: yarn test
リポジトリに push が行われたタイミングで CircleCI で設定に応じた処理が行われ、全て処理が成功したら OK です。
ビルドステータスを成功に保つ
master ブランチが常にビルド成功している状態に保ち、PR はレビューを通して品質を保つようにするため、次のような設定を行います。
- topic ブランチを master ブランチへマージする際、テストとビルドが失敗する場合はマージできないようにする
- これにより master ブランチが必ずテストとビルドが成功する状態を保てます
- PR はレビューが行われないとマージできない
- master ブランチが更新されたらテストとビルドを実行し、失敗した場合は Notification を行う
- これにより master ブランチが何かのタイミングでテストとビルドが失敗したことを知ることが出来る
Notification は Slack 通知が良いと思いますが、簡易的な方法として README.md にビルドステータスを指すバッジを追加することにします。
バッジがあれば開発者やリポジトリの利用者が常にビルドステータスを知ることが出来ます。
GitHub にて Repository Settings から Branches > Branch protection rule を辿り、master ブランチへ以下の設定を行います。
- Require pull request reviews before merging
- Require status checks to pass before merging
以上で、PR のビルドが通らない場合はマージが出来ないようになります。
試しにビルドが通らないような変更を行って PR を作成してみます。
  : <snip>
class EmployeeList extends React.Component {
  : <snip>
  // thead タグの閉じ文字を削除してビルドが失敗するようにした
    return(
      <Table responsive>
        <thead
          <tr>
            <th>ID</th>
            <th>Name</th>
            <th>Department</th>
            <th>Gender</th>
            <th>Action</th>
          </tr>
        </thead>
        <tbody>
          {employee_list}
        </tbody>
      </Table>
    );
  }
}

export default EmployeeList;
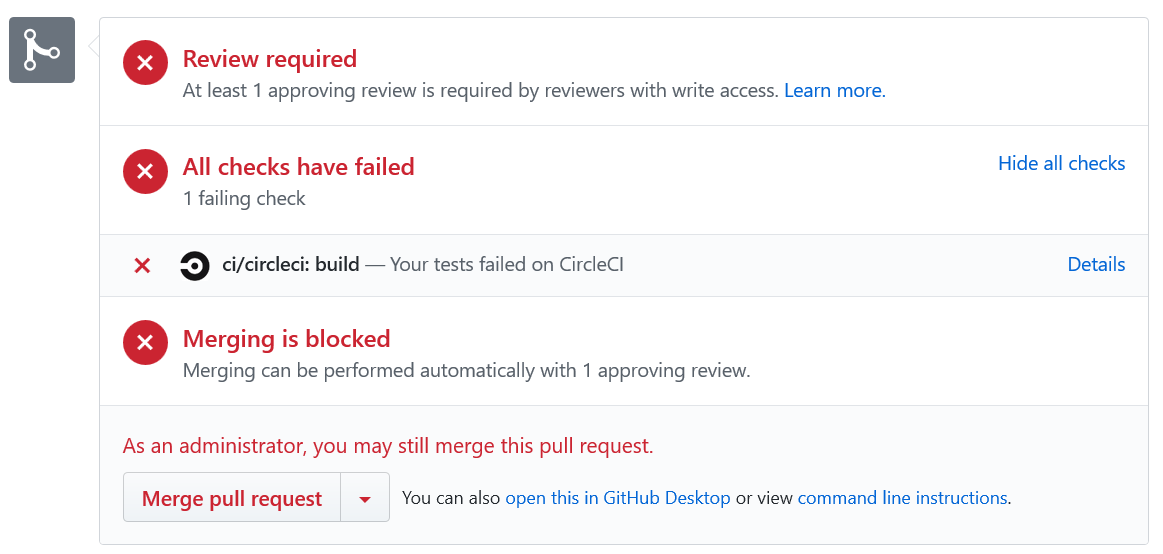
すると次のように CircleCI によるビルドが失敗し、かつレビューが行われていないため Merge pull request ボタンが基本的に押せない状態になります。
master ブランチが更新されたらデプロイする
先ほど設定した CI 環境にデプロイ設定を追加します。
ここで、デプロイ先は Heroku を使うことにし、常に master ブランチの動作が確認できる staging 環境として扱うことにします。(Heroku を本番環境として使う場合は master ブランチではなく、本番デプロイ用に別ブランチ stable 等を作成するとよいと思います)
- Heroku アカウントを作成する
- Heroku の API キーを発行する
- CircleCI で Heroku のアプリケーション名と API キーをビルド時に使える変数として保存する (参考 URL)
- .circleci/config.yml にデプロイ設定を追加する
# Javascript Node CircleCI 2.0 configuration file
#
# Check https://circleci.com/docs/2.0/language-javascript/ for more details
#
version: 2
jobs:
  build_and_test:
    docker:
      # specify the version you desire here
      - image: node:8.12.0

      # Specify service dependencies here if necessary
      # CircleCI maintains a library of pre-built images
      # documented at https://circleci.com/docs/2.0/circleci-images/
      # - image: circleci/mongo:3.4.4

    working_directory: ~/repo

    steps:
      - checkout

      # Download and cache dependencies
      - restore_cache:
          keys:
          - v1-dependencies-{{ checksum "package.json" }}
          # fallback to using the latest cache if no exact match is found
          - v1-dependencies-

      - run: yarn install

      - save_cache:
          paths:
            - node_modules
          key: v1-dependencies-{{ checksum "package.json" }}

      # run tests!
      - run: yarn test

  deploy:
    docker:
      - image: buildpack-deps:trusty
    steps:
      - checkout
      - run:
          name: Deploy Master to Heroku
          command: |
            git push https://heroku:$HEROKU_API_KEY@git.heroku.com/$HEROKU_APP_NAME.git master

workflows:
  version: 2
  build-deploy:
    jobs:
      - build_and_test
      - deploy:
          requires:
            - build_and_test
          filters:
            branches:
              only: master
以上で、master ブランチが更新されると自動で Heroku へデプロイされるようになります。
