作成日は2020年9月26日です。
環境
Windows10 home
Python 3.8.3
google-auth-oauthlib 0.4.1
google-api-python-client 1.12.2
やりたいこと
ローカル環境でPythonを動かし、GmailにAPI経由で下書きを作りたい。
この記事では必要最低限だけのエラーハンドリングもクソもないコードを書きます。
悪しからず。
手順
大まかな手順は以下のようになっています。
- GCPでプロジェクトの作成
- GCPで認証情報の作成
- Pythonスクリプトの作成
1. GCPでプロジェクトの作成〜 2. 認証情報の作成
1と2に関しては記事→「Python を使い、Gmail API 経由で Gmail の送受信を行う」
が大変にわかりやすいです。
基本的に記事に従っていけば問題はないはずですが、自分の場合「VivaldiでGCPにアクセスをするとclient_<id>.jsonがダウンロード出来ない」というバグがありました。
これはChromeを使用することで回避出来ました。
3. Pythonスクリプトの作成
流れとしては、
OAuth認証のフローに従ってアクセストークンを取得
↓
送るメールのデータを作成
↓
Gmail APIを叩いて下書きを作成
という感じです。
1. アクセストークンの取得
アクセストークン取得をする必要最低限の関数は以下のような感じです。
参考→API の認証と呼び出し(Google Cloudのガイド)
from google_auth_oauthlib.flow import InstalledAppFlow
# APIのスコープを設定(どのAPIを使うのかの設定)
SCOPES = ["https://www.googleapis.com/auth/gmail.modify"]

def get_credential():
    launch_browser = True
    flow = InstalledAppFlow.from_client_secrets_file("client_id.json", SCOPES)
    flow.run_local_server()
    cred = flow.credentials
    return cred
InstalledAppFlow.from_client_secrets_fileにGCPから落としてきたJSONファイルと、使用したいAPIの情報を入れFlowインスタンスを作成し、run_local_server()をするとブラウザが立ち上がりお馴染みの許可画面が出てきます。
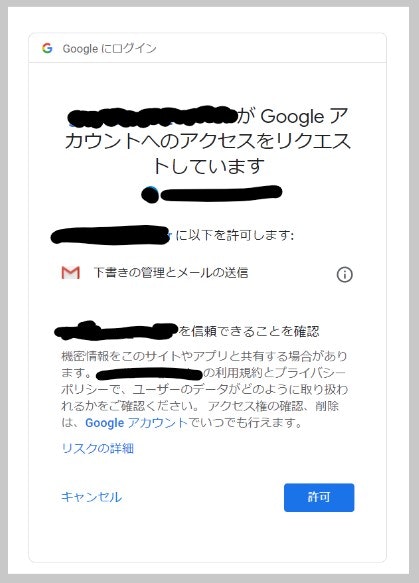
これで許可を押すとアクセストークンが手に入ります。
因みに、このまではプログラムの実行毎に許可画面が立ち上がるので、アクセストークンをpickle化して保存するのが実用上は簡便でよさそうです。
2. メールの下書きの作成
from email.mime.text import MIMEText
import base64

def create_message(sender, to, subject, message_text):
    enc = "utf-8"
    message = MIMEText(message_text.encode(enc), _charset=enc)
    message["to"] = to
    message["from"] = sender
    message["subject"] = subject
    encode_message = base64.urlsafe_b64encode(message.as_bytes())
    return {"raw": encode_message.decode()}
Gmail APIドキュメントのCreating draft messagesに載っているものですが、ドキュメントの場合、create_message関数の最後の行が
return {'raw': base64.urlsafe_b64encode(message.as_string())}
となっています。
しかし、base64.urlsafe_b64encode()は入力として文字列ではなくbyteを入れる必要があるため、
encode_message = base64.urlsafe_b64encode(message.as_bytes())
と変更し、後の下書きに保存する過程ではstr型が求められるので
return {"raw": encode_message.decode()}
とデコードします。
3. Gmail APIで作成したメールのデータを下書きに保存する
先ほど作成したメールのデータを下書きに追加します。
def create_draft(service, user_id, message_body):
    message = {'message':message_body}
    draft = service.users().drafts().create(userId=user_id, body=message).execute()
    return draft
この中で使われているserviceはGmail APIを使う時の親玉みたいなやつで、Gmail APIのReferenceに載っている関数が入ったインスタンスです。
これは以下のコードで作ります。
from googleapiclient.discovery import build

service = build("gmail", "v1", credentials=creds, cache_discovery=False)
以上をまとめて一つのプログラムにすると以下のような感じになります。
from google_auth_oauthlib.flow import InstalledAppFlow
from googleapiclient.discovery import build

import base64
from email.mime.text import MIMEText

SCOPES = ["https://www.googleapis.com/auth/gmail.compose",]


def get_credential():
    launch_browser = True
    flow = InstalledAppFlow.from_client_secrets_file("client_id.json", SCOPES)
    flow.run_local_server()
    cred = flow.credentials
    return cred


def create_message(sender, to, subject, message_text):
    enc = "utf-8"
    message = MIMEText(message_text.encode(enc), _charset=enc)
    message["to"] = to
    message["from"] = sender
    message["subject"] = subject
    encode_message = base64.urlsafe_b64encode(message.as_bytes())
    return {"raw": encode_message.decode()}


def create_draft(service, user_id, message_body):
    message = {'message':message_body}
    draft = service.users().drafts().create(userId=user_id, body=message).execute()
    return draft


def main(sender, to, subject, message_text):
    creds = get_credential()
    service = build("gmail", "v1", credentials=creds, cache_discovery=False)
    message = create_message(sender, to, subject, message_text)
    create_draft(service, "me", message)


if __name__ == "__main__":

    sender = "メールの送り主のアドレス"
    to = "送信先のアドレス"
    subject = "件名"
    message_text = "本文"

    main(sender=sender, to=to, subject=subject, message_text=message_text)
これを実行すれば、Gmailに下書きが追加されます。
やったね!(・∀・)
参考
・一番お世話になった記事
https://qiita.com/muuuuuwa/items/822c6cffedb9b3c27e21
・FlowクラスやInstalledAppFlowクラスのドキュメント
google_auth_oauthlib.flow module
・googleapiclient.discovery.buildのドキュメント
https://googleapis.github.io/google-api-python-client/docs/epy/googleapiclient.discovery-module.html#build