はじめに
Gmail にはご存知の通りGmail API があり、SMTP や POP3 を使うことなく、検索機能など Gmail 独自の機能を活用することができます。
この記事では、Python を使って Gmail API の有効化から、スクリプトの作成、実行までの手順をステップバイステップで紹介します。
Gmail API を利用するまでに、プロジェクトを作成したり、APIを有効化したり、スコープを設定したり、認証情報を作成したりと、準備が割と大変なので、備忘録として書きました。
- 2020年4月時点の Gmail API の内容です。
- Python 3.7.x を想定しています。
利用前の準備
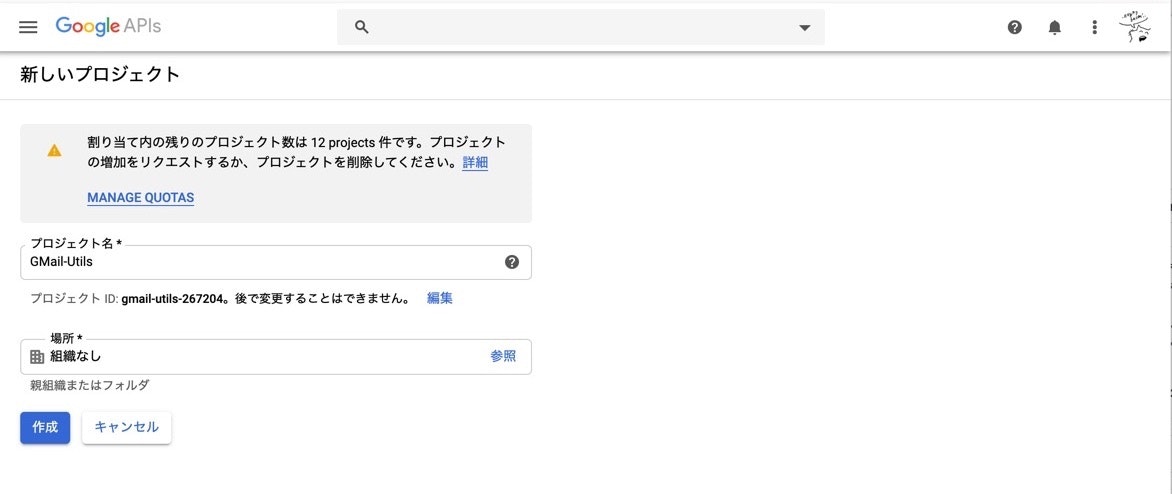
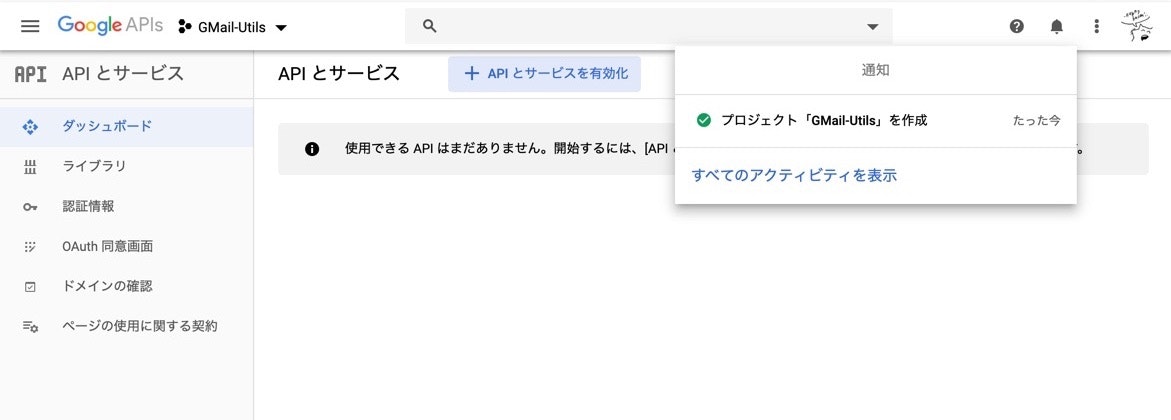
Goole API を利用するプロジェクトを作成する
利用する Gmail アカウントの Gmail を開いたブラウザで、 Google Cloud Platform コンソール ( https://console.cloud.google.com/ )を開きます。
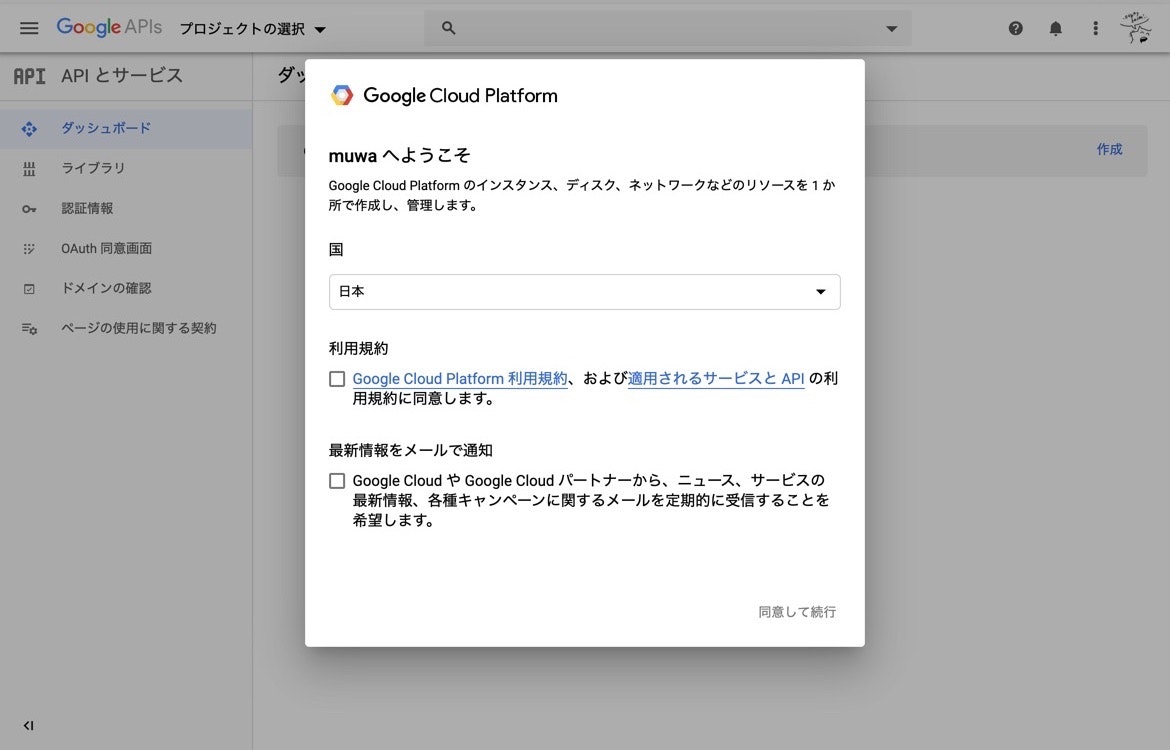
下記の画面が出るので規約等に同意し、「同意して実行」をクリックします。
Gmail APIを有効化する
「APIとサービスを検索」から「Gmail API」を検索する

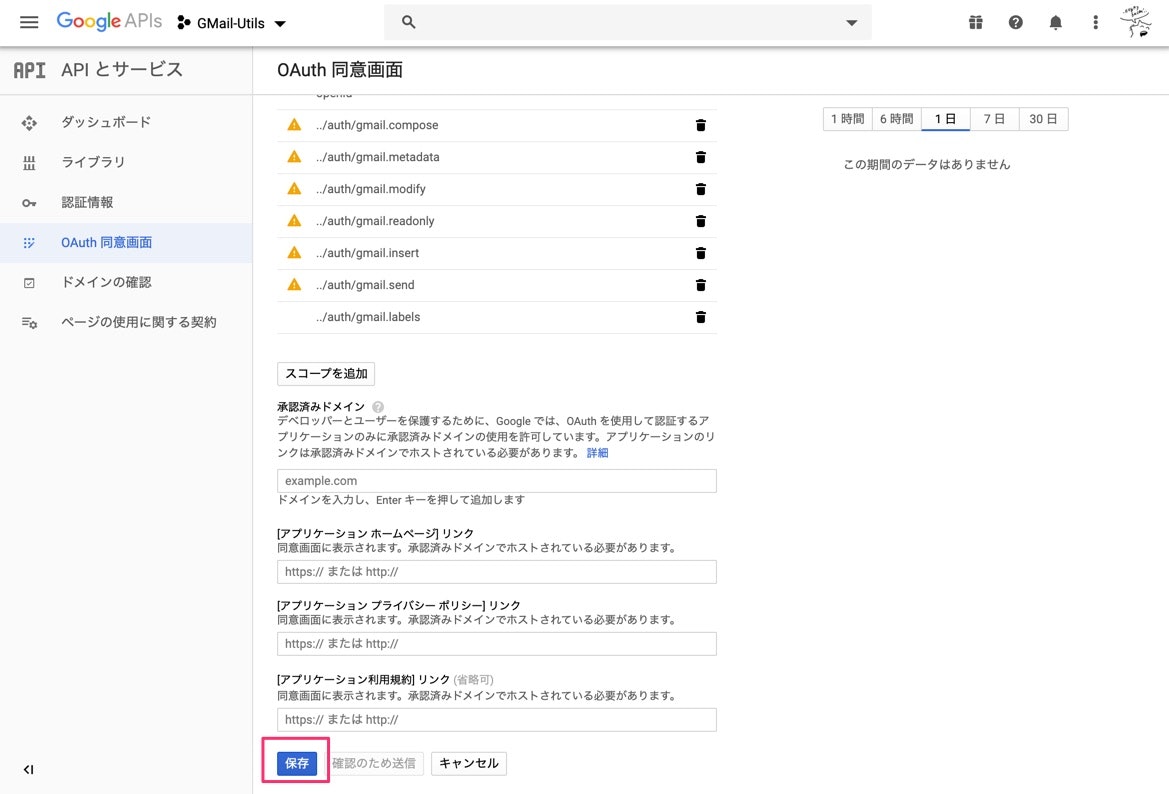
OAuth同意画面を作成する
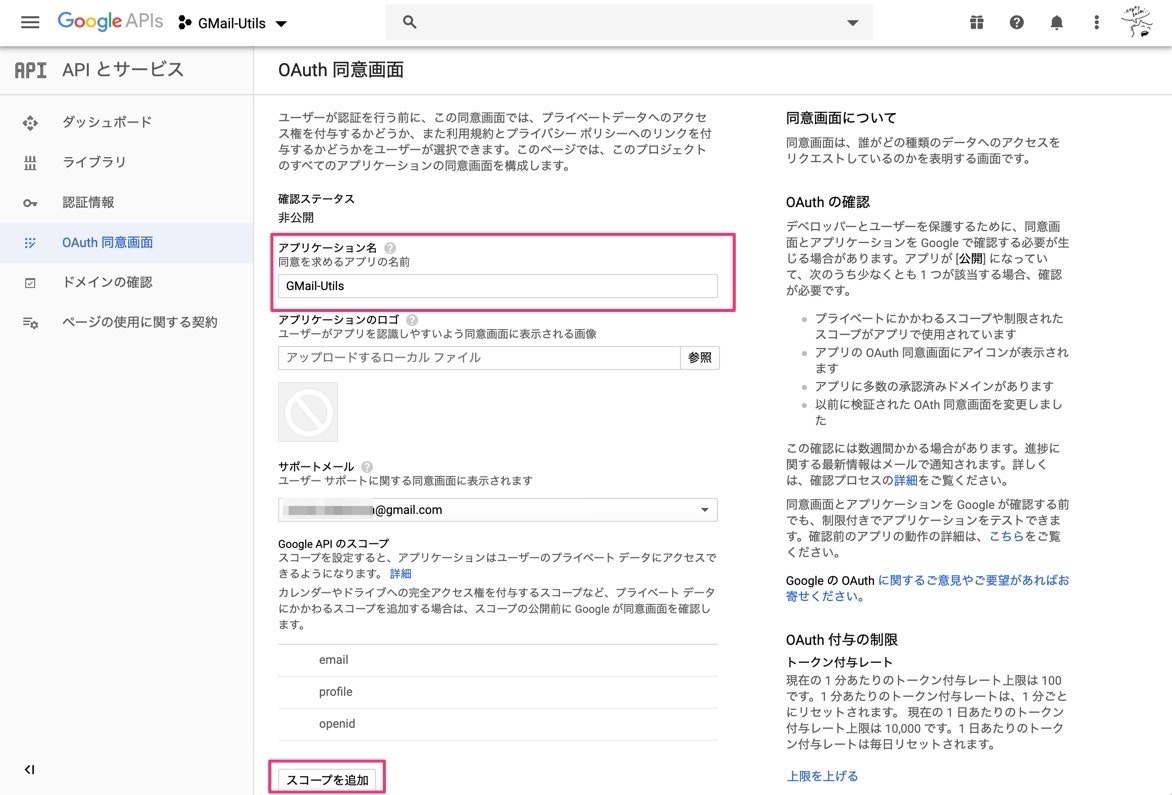
「アプリケーション名」に適切な名前を設定し、「スコープを追加」をクリック
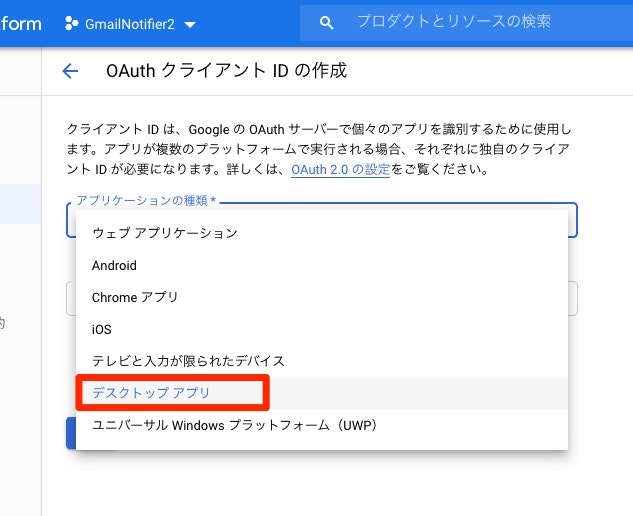
認証情報を作成する
2020年6月14日現在、下記の手順でウィザードを実行すると、エラーが発生するようです。下記手順で回避できました。
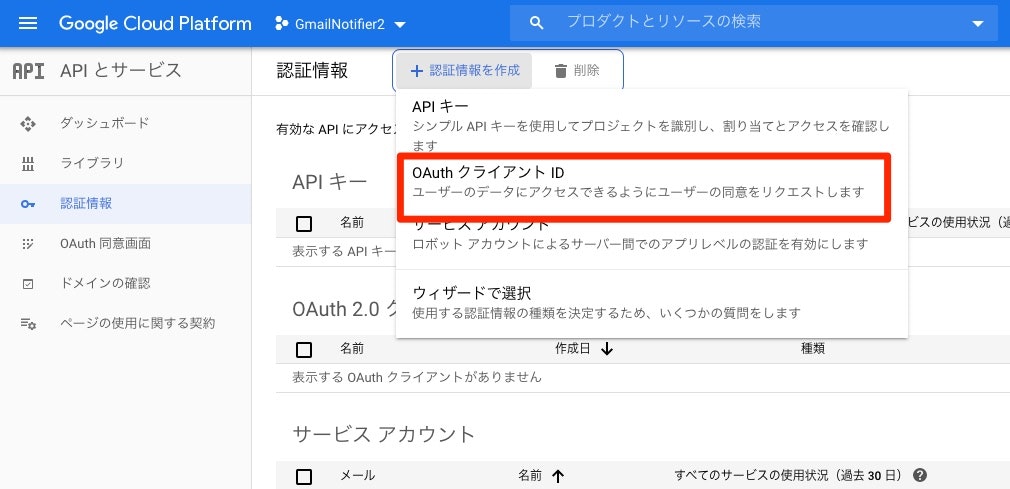
「認証情報」を選択し「認証情報を作成」をクリックして表示されるメニューから「OAuthクライアントID」をクリック
あとは、一覧画面から認証情報をダウンロード(client_id.json)します。
ウィザードを使う
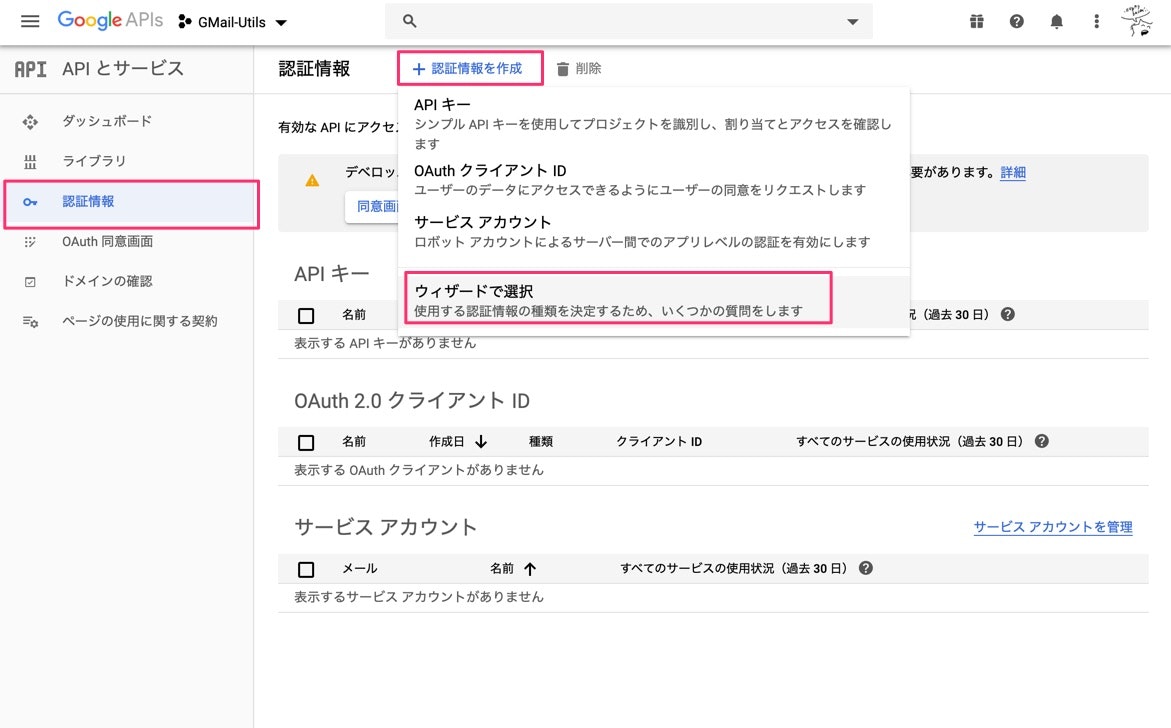
「認証情報」を選択し「認証情報を作成」をクリックして表示されるメニューから「ウィザードで選択」をクリック
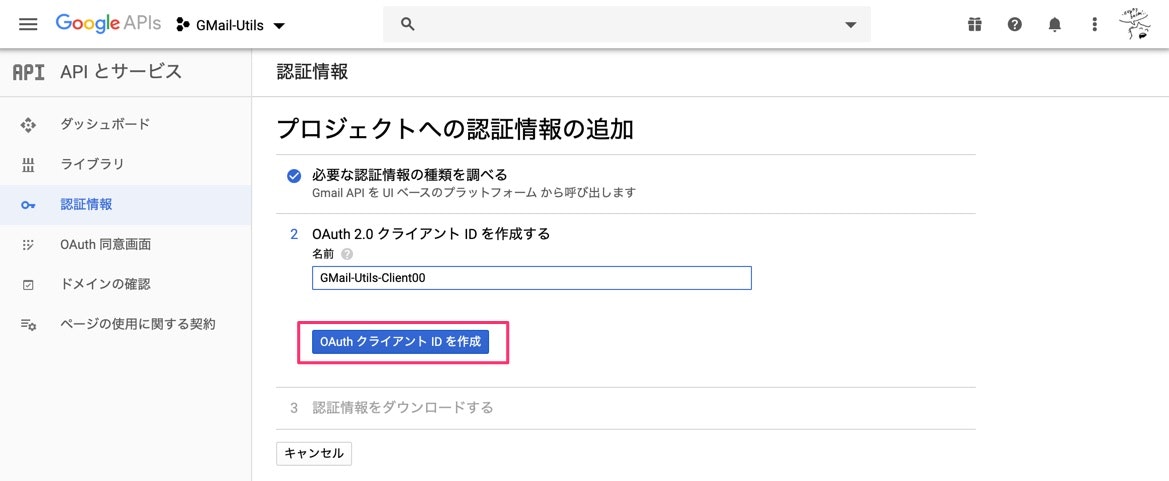
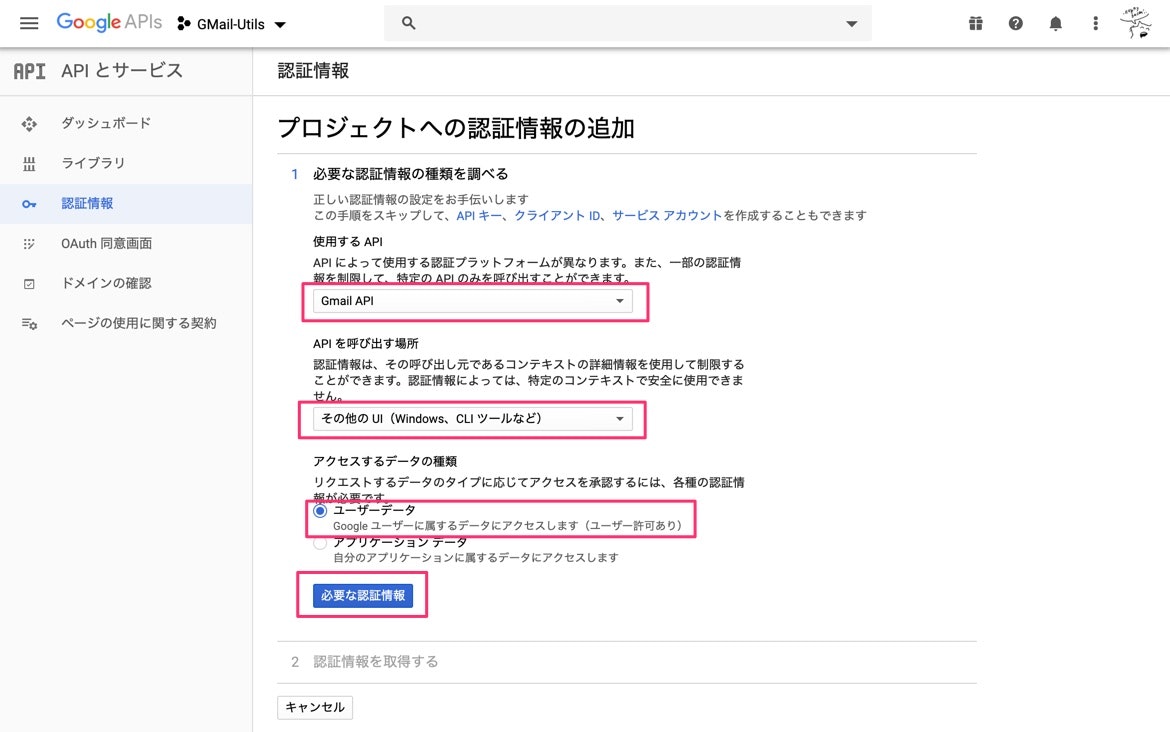
「プロジェクトへの認証情報の追加」画面で、下図のように設定し、「必要な認証情報」をクリック
認証情報をダウンロード(client_id.json)し、「完了」をクリック

ダウンロードした認証情報ファイル client_id.json は後ほど Python スクリプトから利用します。
補足:認証情報について
認証情報ではAPIキー、OAuth2.0クライアントID、サービスアカウントキーのいずれかを作成できます。ユーザーデータを扱う場合は、OAuth2.0クライアントID を使うことが一般的のようです。
Google Cloud ドキュメント 認証の概要ページに、それぞれの認証方法の用途について解説されています。
クレデンシャルの Refresh Token の有効期限については、下記に記載があります。一度認証して Refresh Token が払い出されると、6ヶ月放置するか、50以上のトークンが払い出されない限り、期限切れになることはないようです。RPA などの自動化の仕組みでも許容できそうです。
https://developers.google.com/identity/protocols/OAuth2#expiration
You must write your code to anticipate the possibility that a granted refresh token might no longer work. A refresh token might stop working for one of these reasons:

* The user has revoked your app's access.
* The refresh token has not been used for six months.
* The user changed passwords and the refresh token contains Gmail scopes.
* The user account has exceeded a maximum number of granted (live) refresh tokens.
* There is currently a limit of 50 refresh tokens per user account per client. If the limit is reached, creating a new refresh token automatically invalidates the oldest refresh token without warning. This limit does not apply to service accounts.
Python スクリプトの準備
ようやく準備が整いましたので、これから実行する Python スクリプトを用意します。
Python 環境の準備
(この部分はすでにすんでいる方も多いと思います)
Python のインストール
ここ にしたがってインストールを行います。3.7.x をインストールしてください。
pipenv のインストール
ここ の手順に従ってインストールします。
Python スクリプトの作成
適当なディレクトリを用意し、python スクリプトを準備します。先の手順で保存した client_id.json も同じディレクトリに保存します。Gmail API のサンプルをつなぎ合わせました ![]()
Gmail API のリファレンスに、サンプルコードが載ってます。ここまでくると利用しやすいですね!
import os
import pickle
from google.auth.transport.requests import Request
from google_auth_oauthlib.flow import InstalledAppFlow


# Gmail APIのスコープを設定
SCOPES = [
    "https://www.googleapis.com/auth/gmail.compose",
    "https://www.googleapis.com/auth/gmail.readonly",
    "https://www.googleapis.com/auth/gmail.labels",
    "https://www.googleapis.com/auth/gmail.modify",
]


def get_credential():
    """
    アクセストークンの取得

    カレントディレクトリに pickle 形式でトークンを保存し、再利用できるようにする。(雑ですみません。。)
    """
    creds = None
    if os.path.exists("token.pickle"):
        with open("token.pickle", "rb") as token:
            creds = pickle.load(token)
    if not creds or not creds.valid:
        if creds and creds.expired and creds.refresh_token:
            creds.refresh(Request())
        else:
            flow = InstalledAppFlow.from_client_secrets_file("client_id.json", SCOPES)
            # creds = flow.run_local_server()
            creds = flow.run_console()
        with open("token.pickle", "wb") as token:
            pickle.dump(creds, token)
    return creds
"""
list GMail Inbox.

Usage:
  listmail.py <query> <tag> <count>
  listmail.py -h | --help
  listmail.py --version

Options:
  -h --help     Show this screen.
  --version     Show version.
"""
import pickle
import base64
import json
import io
import csv
import os.path
from googleapiclient.discovery import build
from google_auth_oauthlib.flow import InstalledAppFlow
from google.auth.transport.requests import Request
import base64
from email.mime.text import MIMEText
from apiclient import errors
import logging
from docopt import docopt
from gmail_credential import get_credential

logger = logging.getLogger(__name__)


def list_labels(service, user_id):
    """
    label のリストを取得する
    """
    labels = []
    response = service.users().labels().list(userId=user_id).execute()
    return response["labels"]


def decode_base64url_data(data):
    """
    base64url のデコード
    """
    decoded_bytes = base64.urlsafe_b64decode(data)
    decoded_message = decoded_bytes.decode("UTF-8")
    return decoded_message


def list_message(service, user_id, query, label_ids=[], count=3):
    """
    メールのリストを取得する

    Parameters
    ----------
    service : googleapiclient.discovery.Resource
        Gmail と通信するためのリソース
    user_id : str
        利用者のID
    query : str
        メールのクエリ文字列。 is:unread など
    label_ids : list
        検索対象のラベルを示すIDのリスト
    count : str
        リターンするメール情報件数の上限

    Returns
    ----------
    messages : list
        id, body, subject, from などのキーを持った辞書データのリスト
    """
    messages = []
    try:
        message_ids = (
            service.users()
            .messages()
            .list(userId=user_id, maxResults=count, q=query, labelIds=label_ids)
            .execute()
        )

        if message_ids["resultSizeEstimate"] == 0:
            logger.warning("no result data!")
            return []

        # message id を元に、message の内容を確認
        for message_id in message_ids["messages"]:
            message_detail = (
                service.users()
                .messages()
                .get(userId="me", id=message_id["id"])
                .execute()
            )
            message = {}
            message["id"] = message_id["id"]
            # 単純なテキストメールの場合
            if 'data' in message_detail['payload']['body']:
                message["body"] = decode_base64url_data(
                    message_detail["payload"]["body"]["data"]
                )
            # html メールの場合、plain/text のパートを使う
            else:
                parts = message_detail['payload']['parts']
                parts = [part for part in parts if part['mimeType'] == 'text/plain']
                message["body"] = decode_base64url_data(
                    parts[0]['body']['data']
                    )
            # payload.headers[name: "Subject"]
            message["subject"] = [
                header["value"]
                for header in message_detail["payload"]["headers"]
                if header["name"] == "Subject"
            ][0]
            # payload.headers[name: "From"]
            message["from"] = [
                header["value"]
                for header in message_detail["payload"]["headers"]
                if header["name"] == "From"
            ][0]
            logger.info(message_detail["snippet"])
            messages.append(message)
        return messages

    except errors.HttpError as error:
        print("An error occurred: %s" % error)


def remove_labels(service, user_id, messages, remove_labels):
    """
    ラベルを削除する。既読にするために利用(is:unread ラベルを削除すると既読になる)
    """
    message_ids = [message["id"] for message in messages]
    labels_mod = {
        "ids": message_ids,
        "removeLabelIds": remove_labels,
        "addLabelIds": [],
    }
    # import pdb;pdb.set_trace()
    try:
        message_ids = (
            service.users()
            .messages()
            .batchModify(userId=user_id, body=labels_mod)
            .execute()
        )
    except errors.HttpError as error:
        print("An error occurred: %s" % error)


# メイン処理
def main(query="is:unread", tag="daily_report", count=3):
    creds = get_credential()
    service = build("gmail", "v1", credentials=creds, cache_discovery=False)
    # ラベル一覧
    labels = list_labels(service, "me")
    target_label_ids = [label["id"] for label in labels if label["name"] == tag]
    # メール一覧 [{'body': 'xxx', 'subject': 'xxx', 'from': 'xxx'},]
    messages = list_message(service, "me", query, target_label_ids, count=count)
    # unread label
    unread_label_ids = [label["id"] for label in labels if label["name"] == "UNREAD"]
    # remove labels form messages
    remove_labels(service, "me", messages, remove_labels=unread_label_ids)
    logger.info(json.dumps(messages, ensure_ascii=False))
    if messages:
        return json.dumps(messages, ensure_ascii=False)
    else:
        return None


# プログラム実行部分
if __name__ == "__main__":
    arguments = docopt(__doc__, version="0.1")
    query = arguments["<query>"]
    tag = arguments["<tag>"]
    count = arguments["<count>"]
    logging.basicConfig(level=logging.DEBUG)

    messages_ = main(query=query, tag=tag, count=count)
    print(messages_)
送信スクリプトはこんな感じです。
※ Users.messages.send の Python サンプルコードでは、 return {'raw': base64.urlsafe_b64encode(message.as_string())} となっていましたが、それでは動かなかったので修正しています。
"""
Send E-Mail with GMail.

Usage:
  sendmail.py <sender> <to> <subject> <message_text_file_path>  [--attach_file_path=<file_path>] [--cc=<cc>]
  sendmail.py -h | --help
  sendmail.py --version

Options:
  -h --help     Show this screen.
  --version     Show version.
  --attach_file_path=<file_path>     Path of file attached to message.
  --cc=<cc>     cc email address list(separated by ','). Default None.
"""
import pickle
import os.path
from googleapiclient.discovery import build
from google_auth_oauthlib.flow import InstalledAppFlow
from google.auth.transport.requests import Request
import base64
from email.mime.base import MIMEBase
from email.mime.text import MIMEText
from email.mime.image import MIMEImage
from email.mime.audio import MIMEAudio
from pathlib import Path

from email.mime.multipart import MIMEMultipart
import mimetypes
from apiclient import errors
from gmail_credential import get_credential
from docopt import docopt
import logging

logger = logging.getLogger(__name__)


def create_message(sender, to, subject, message_text, cc=None):
    """
    MIMEText を base64 エンコードする
    """
    enc = "utf-8"
    message = MIMEText(message_text.encode(enc), _charset=enc)
    message["to"] = to
    message["from"] = sender
    message["subject"] = subject
    if cc:
        message["Cc"] = cc
    encode_message = base64.urlsafe_b64encode(message.as_bytes())
    return {"raw": encode_message.decode()}


def create_message_with_attachment(
    sender, to, subject, message_text, file_path, cc=None
):
    """
    添付ファイルつきのMIMEText を base64 エンコードする
    """
    message = MIMEMultipart()
    message["to"] = to
    message["from"] = sender
    message["subject"] = subject
    if cc:
        message["Cc"] = cc
    # attach message text
    enc = "utf-8"
    msg = MIMEText(message_text.encode(enc), _charset=enc)
    message.attach(msg)

    content_type, encoding = mimetypes.guess_type(file_path)

    if content_type is None or encoding is not None:
        content_type = "application/octet-stream"
    main_type, sub_type = content_type.split("/", 1)
    if main_type == "text":
        with open(file_path, "rb") as fp:
            msg = MIMEText(fp.read(), _subtype=sub_type)
    elif main_type == "image":
        with open(file_path, "rb") as fp:
            msg = MIMEImage(fp.read(), _subtype=sub_type)
    elif main_type == "audio":
        with open(file_path, "rb") as fp:
            msg = MIMEAudio(fp.read(), _subtype=sub_type)
    else:
        with open(file_path, "rb") as fp:
            msg = MIMEBase(main_type, sub_type)
            msg.set_payload(fp.read())
    p = Path(file_path)
    msg.add_header("Content-Disposition", "attachment", filename=p.name)
    message.attach(msg)

    encode_message = base64.urlsafe_b64encode(message.as_bytes())
    return {"raw": encode_message.decode()}


def send_message(service, user_id, message):
    """
    メールを送信する

    Parameters
    ----------
    service : googleapiclient.discovery.Resource
        Gmail と通信するためのリソース
    user_id : str
        利用者のID
    message : dict
        "raw" を key, base64 エンコーディングされた MIME Object を value とした dict

    Returns
    ----------
    なし
    """
    try:
        sent_message = (
            service.users().messages().send(userId=user_id, body=message).execute()
        )
        logger.info("Message Id: %s" % sent_message["id"])
        return None
    except errors.HttpError as error:
        logger.info("An error occurred: %s" % error)
        raise error


#  メイン処理
def main(sender, to, subject, message_text, attach_file_path, cc=None):
    # アクセストークンの取得とサービスの構築
    creds = get_credential()
    service = build("gmail", "v1", credentials=creds, cache_discovery=False)
    if attach_file_path:
        # メール本文の作成
        message = create_message_with_attachment(
            sender, to, subject, message_text, attach_file_path, cc=cc
        )
    else:
        message = create_message(
            sender, to, subject, message_text, cc=cc
        )
    # メール送信
    send_message(service, "me", message)


# プログラム実行部分
if __name__ == "__main__":
    arguments = docopt(__doc__, version="0.1")
    sender = arguments["<sender>"]
    to = arguments["<to>"]
    cc = arguments["--cc"]
    subject = arguments["<subject>"]
    message_text_file_path = arguments["<message_text_file_path>"]
    attach_file_path = arguments["--attach_file_path"]

    logging.basicConfig(level=logging.DEBUG)

    with open(message_text_file_path, "r", encoding="utf-8") as fp:
        message_text = fp.read()

    main(
        sender=sender,
        to=to,
        subject=subject,
        message_text=message_text,
        attach_file_path=attach_file_path,
        cc=cc,
    )
python スクリプトの実行準備
python スクリプトを作成したディレクトリに移動し、必要なモジュールをインストールします。
% pipenv install google-api-python-client oauth2client google-auth-httplib2 google-auth-oauthlib docopt
Python スクリプトの実行
% pipenv run python listmail.py is:unread 見積もり依頼 10
などと実行すると、初回実行時にには cmd.exe の画面に OAuth 認証画面URL が表示されるので、ブラウザから開き、承認します。2回目以降は OAuth 認証画面URLは表示されません。
% pipenv run python listmail.py is:unread 見積もり依頼 10
Please visit this URL to authorize this application: https://accounts.google.com/o/oauth2/auth?response_type=code&client_id=AAAAAAAAAAAAAA
Enter the authorization code:
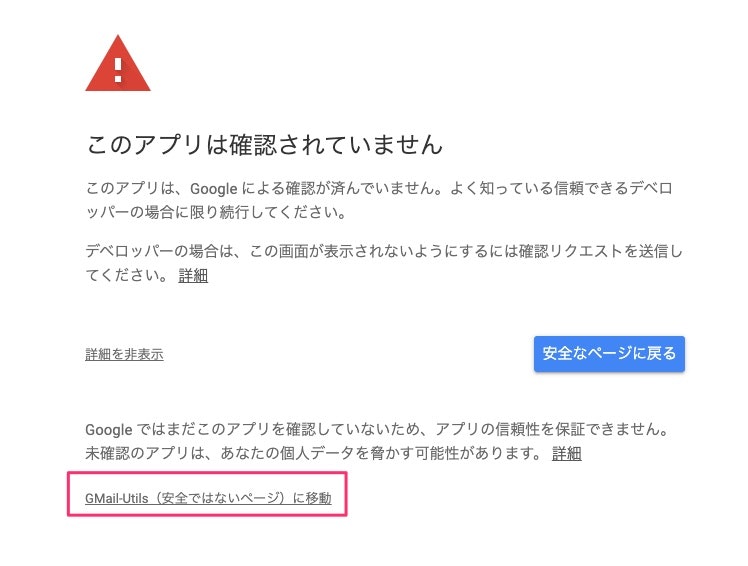
上記のコンソールに表示されるURLを開くと、下記のような画面が表示されます。

「詳細」をクリックして表示されるリンク「〇〇(安全ではないページ)に移動」をクリックします。
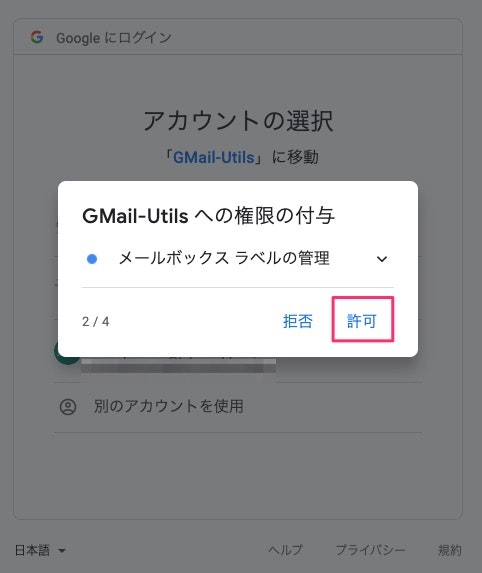
権限付与のダイアログが何度か表示されるので、それぞれ許可します。
下記画面からコードをコピーし、Enter the authorization code: に続けてペーストすると、スクリプトが実行されます。

さいごに
Gmail の強力なフィルタ、ラベル機能やクエリをそのまま使えるので、Gmail APIは面白いですね。

