※本稿は,ビジネスデータサイエンス研究会開催の『ハイパフォーマンスPython 』勉強会【#3】における発表内容の一部を整理し記事化したものです。
内容
本稿では,オライリーから出ているハイパフォーマンスPythonの7章 Cにコンパイルする, 9章 multiprocessingモジュールの内容をもとに,CythonとCPUレベルでの並列処理に絞っていくつかのPython高速化手法を試してみた結果をまとめます。
前回の記事では,実用性は皆無だけどとりあえず簡単なコードを題材にして比較を行い,
- Cythonで変数の型を指定するだけで2000倍以上高速化した
- joblibによる並列化ではCythonには及ばないものの最大でコア数分高速化できた
という結果が得られました。
今回後半ではもう少し実用性のあるコードへの応用ということで,二分割線形フィットによる変化点解析コードを題材に高速化手法を試していきます。
ソースコードはこちらにアップしております。
実行環境
※前回から変更しました。
MacBook Pro 13インチ(2018年モデル)
コア数:4
メモリ:16GB
OS:macOS Mojave 10.14.1
Python 3.7.1
Cython 0.29.2
対象アルゴリズム
概要
時系列データを念頭に,2分割線形フィットによる変化点検知アルゴリズムを考えます。
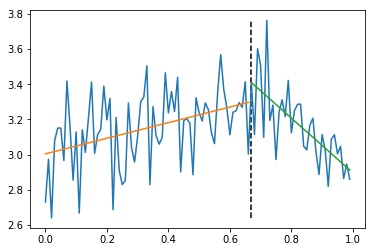
上の図のようにデータを適当な場所で二分割して,前半と後半の断片をそれぞれ別々に線形フィットします。
分割点を片っぱしから変えてフィットを行い,誤差が最小になる点を探索します。
実行コード
実行コードは以下になります。
import numpy as np

def linear_fit(x, y):
    N_ = len(x)
    y_ = np.array(y)
    X_ = np.vstack([x, np.ones(N_)]).T

    fit_results = np.linalg.lstsq(X_, y_, rcond=None)

    a_, b_ = fit_results[0]
    r2error_ = fit_results[1][0]

    return a_, b_, r2error_


def piece_wise_linear_fit(x, y, division_point):
    left_slope, left_intercept, left_r2error = linear_fit(x[0:division_point + 1], y[0:division_point + 1])
    right_slope, right_intercept, right_r2error = linear_fit(x[division_point:], y[division_point:])

    return left_slope, left_intercept, left_r2error, right_slope, right_intercept, right_r2error


def detect_a_cp(x, y):
    data_len = len(x)

    results_dict = {}
    error_sum_list = []
    for division_point in range(2, data_len-2):
        left_slope, left_intercept, left_r2error, right_slope, right_intercept, right_r2error = piece_wise_linear_fit(x, y, division_point)

        results_dict[division_point] = ((left_slope, right_slope), (left_intercept, right_intercept), (left_r2error, right_r2error))
        error_sum_list.append(left_r2error + right_r2error)

    optimal_index = np.argmin(error_sum_list)+2
    fit_results = results_dict[optimal_index]

    return optimal_index, fit_results
detect_a_cp(x, y)に時系列のx, y座標成分を入力することで,変化点のインデックスoptimal_indexと,フィットの傾き・y切片・誤差の入ったfit_resultsが返ってきます。
途中で呼び出している関数piece_wise_linear_fit(x, y, division_point)は与えられた分割点division_pointを境に左右別々に線形フィットした結果を返します。
本体detect_a_cp(x, y)内のforループ部分for division_point in range(2, data_len-2):で分割点を変えて二分割フィットを試し,左右の誤差の和をerror_sum_listに格納します。
最終的にoptimal_index = np.argmin(error_sum_list)+2により誤差が最小になる点を探し,その点でのフィット結果とともに出力します。
実行例
以下のようにへの字に曲がったデータを用意します。
x=0~1の間に値を持ち,x=0.7で傾きが0.5から-1.5に変化するデータ列に,標準偏差0.2のガウスノイズを加えました。
def mock_data(length=100, cp_location_rate=0.7, a_left=0.5, a_right=-1.5, b=3.0, noise_sigma=0.2):
    x = np.arange(0,length)*(1.0 / length)

    cp_index = int(length * cp_location_rate)
    y1 = a_left * x + b

    y1[cp_index:] = y1[cp_index] + a_right * (x[cp_index:]-x[cp_index])

    y = y1 + np.random.randn(length) * noise_sigma

    return x,y
これを先ほどの変化点検出プログラムにかけると以下のように返ってきます。
In [1]: import modules.cpa_comparison as cpa
In [2]: X, y = cpa.mock_data(length=1000)
In [3]: cp_index, result = cpa.detect_a_cp(X,y)
In [4]: X[cp_index]
Out[4]: 0.759
In [5]: result
Out[5]: ((0.5168381351577442, -1.3762728114955758),
 (2.9905983611647917, 4.286137186199838),
 (27.902733679225967, 9.85025735643543))
resultには,((左断片傾き, 右断片傾き), (左断片y切片, 右断片y切片), (左断片誤差, 右断片誤差))のように値が入っています。
変化点位置,傾きに多少のズレはありますが,だいたいノイズを加える前のデータの性質を再現できています。
実行時間
上記のコードでの実行時間を計測すると,以下のようになりました。
In [1]: %timeit cp_index, result = cpa.detect_a_cp(X,y)
        81.2 ms ± 4.14 ms per loop (mean ± std. dev. of 7 runs, 10 loops each)
比較する実装
今回は,以下の実装で比較を行いました。
- joblibによる並列処理
- Cython(型指定)
なお,OpenMP(Cython + 並列処理)についても試しましたが,現時点ではうまくいかなかったので,今回はその様子だけお伝えします。
joblibによる並列処理
CPUレベルの並列処理用ライブラリとしては比較的使い勝手の良いjoblibから試しました。
必要なライブラリを加えたうえで,本体部分を以下のように書き換えます。
from joblib import Parallel, delayed
from functools import partial

def detect_a_cp_joblib(x, y):
    data_len = len(x)

    pwl_partial = partial(piece_wise_linear_fit, x, y)
    results_list = Parallel(n_jobs=-1)([delayed(pwl_partial)(i) for i in range(2, data_len-2)])

    results_array = np.array(results_list)
    error_sums = results_array[:, 2] + results_array[:, 5]
    optimal_arg = np.argmin(error_sums)

    optimal_results = results_array[optimal_arg]

    return optimal_arg+2, optimal_results
partial関数を使うことでpiece_wise_linear_fit関数にデータのx,y成分を予め代入し,分割点iだけを引数にとる関数pwl_partial(i)として扱えるようになります。
実行時間
In [1]: %timeit cp_index, result = cpa.detect_a_cp_joblib(X,y)
        69.4 ms ± 5.25 ms per loop (mean ± std. dev. of 7 runs, 1 loop each)
逐次処理のとき81.2msだったことと比べると,ほんの少し速くはなっていますが,コア数4個分とまでは行っていません。
時系列の長さを1000で計算していますが,処理の大きさがそこまで大きくないため,入出力時等のオーバーヘッドが目立ってしまっているものと思われます。
入力データを長くしていくにつれ,並列化の効果が明確になっていきます。
| 時系列長さ | 逐次処理 実行時間 | 並列処理 実行時間 |
|---|---|---|
| 1000 | 81.2ms | 69.4ms |
| 10000 | 1.7s | 844ms |
| 100000 | 2min | 45.1s |
Cython(型指定)
Cythonにより,変数の型を指定してコンパイルし,呼び出してみます。
ほぼ全変数型指定
まずは愚直にほぼ全ての変数で型を指定してみました。
import numpy as np
cimport numpy as np


ctypedef np.float64_t DOUBLE_t

cdef linear_fit(np.ndarray[DOUBLE_t, ndim=1] x, np.ndarray[DOUBLE_t, ndim=1] y):
  cdef unsigned int N_ = len(x)
  cdef np.ndarray[DOUBLE_t, ndim=2] X_ = np.vstack([x, np.ones(N_)]).T
  cdef double a_, b_, r2error_

  fit_results = np.linalg.lstsq(X_, y, rcond=None)

  a_, b_ = fit_results[0]
  r2error_ = fit_results[1][0]

  return a_, b_, r2error_


cdef piece_wise_linear_fit(np.ndarray[DOUBLE_t, ndim=1] x, np.ndarray[DOUBLE_t, ndim=1] y, unsigned int division_point):
  cdef double left_slope, left_intercept, left_r2error
  cdef double right_slope, right_intercept, right_r2error

  left_slope, left_intercept, left_r2error = linear_fit(x[0:division_point + 1], y[0:division_point + 1])
  right_slope, right_intercept, right_r2error = linear_fit(x[division_point:], y[division_point:])

  return left_slope, left_intercept, left_r2error, right_slope, right_intercept, right_r2error


def detect_a_cp(np.ndarray[DOUBLE_t, ndim=1] x, np.ndarray[DOUBLE_t, ndim=1] y):
  cdef unsigned int data_len = len(x)
  cdef unsigned int division_point, optimal_index
  cdef double left_slope, left_intercept, left_r2error
  cdef double right_slope, right_intercept, right_r2error

  results_dict = {}
  error_sum_list = []
  for division_point in range(2, data_len-2):
      left_slope, left_intercept, left_r2error, right_slope, right_intercept, right_r2error = piece_wise_linear_fit(x, y, division_point)

      results_dict[division_point] = ((left_slope, right_slope), (left_intercept, right_intercept), (left_r2error, right_r2error))
      error_sum_list.append(left_r2error + right_r2error)

  optimal_index = np.argmin(error_sum_list)+2
  fit_results = results_dict[optimal_index]

  return optimal_index, fit_results
Cythonのnumpyを使うため,冒頭でcimport numpyとしています。
さらに,numpyのfloat64型をDOUBLE_tとしてCythonでも使うことを,ctypedef np.float64_t DOUBLE_tのように宣言します。
そのうえで関数の引数定義部分や関数内の変数宣言cdefで,一つ一つ型を指定していきます。
結果,二分割フィットの結果を格納するresult_dictとerror_sum_listの二つを除き全て型を指定した形になっています。
この二つだけは,np.array等に置き換える方法が思いつかなかったので,そのままにしています。
コンパイル時の注意点
前回の記事でも解説したようにsetup.pyファイルを作成・実行してコンパイルを行えば良いのですが,cimport numpyを使う場合はnumpyのPATHを指定しておく必要があります。
(この点はテキストでは触れられていないので注意が必要です。)
from distutils.core import setup
from distutils.extension import Extension
from Cython.Distutils import build_ext
import numpy

setup(
    cmdclass={'build_ext': build_ext},

    ext_modules=[Extension("cython_func", ["linearfit_cython.pyx"], include_dirs = [numpy.get_include()])]
)
Extension()の中のinclude_dirs = [numpy.get_include()]が要追記箇所です。
冒頭でもnumpyをimportしておく必要があります。
実行時間
単純なコードでは型指定だけで格段と速くなったので,こちらでもさぞかし・・・と実行してみた結果がこちらになります。
In [1]: from modules import cython_func
In [2]: %timeit cp_x, result = cython_func.detect_a_cp(X, y)
        88.6 ms ± 923 µs per loop (mean ± std. dev. of 7 runs, 10 loops each)
あれ?あんま変わらない,というかむしろ遅くなってる…
考えられる原因としては,型の変換で余計なオーバーヘッドがかかっている,というものです。
今回の入力は,呼び出し側(Jupyter notebook)で作成した通常のnumpyのarrayでした。
これを,cython_finc.detect_a_cp()内でCython用のnumpy arrayへと変換する必要が生じたのではないか,と考えています。
試しに,入力のnumpy arrayは型指定せずそのまま使ってみることにしました。
一部の変数のみ型指定
import numpy as np


cdef linear_fit(x, y):
  cdef unsigned int N_ = len(x)
  X_ = np.vstack([x, np.ones(N_)]).T
  cdef double a_, b_, r2error_

  fit_results = np.linalg.lstsq(X_, y, rcond=None)

  a_, b_ = fit_results[0]
  r2error_ = fit_results[1][0]

  return a_, b_, r2error_


cdef piece_wise_linear_fit(x, y, unsigned int division_point):
  cdef double left_slope, left_intercept, left_r2error
  cdef double right_slope, right_intercept, right_r2error

  left_slope, left_intercept, left_r2error = linear_fit(x[0:division_point + 1], y[0:division_point + 1])
  right_slope, right_intercept, right_r2error = linear_fit(x[division_point:], y[division_point:])

  return left_slope, left_intercept, left_r2error, right_slope, right_intercept, right_r2error


def detect_a_cp(x, y):
  cdef unsigned int data_len = len(x)
  cdef unsigned int division_point, optimal_index
  cdef double left_slope, left_intercept, left_r2error
  cdef double right_slope, right_intercept, right_r2error

  results_dict = {}
  error_sum_list = []
  for division_point in range(2, data_len-2):
      left_slope, left_intercept, left_r2error, right_slope, right_intercept, right_r2error = piece_wise_linear_fit(x, y, division_point)

      results_dict[division_point] = ((left_slope, right_slope), (left_intercept, right_intercept), (left_r2error, right_r2error))
      error_sum_list.append(left_r2error + right_r2error)

  optimal_index = np.argmin(error_sum_list)+2
  fit_results = results_dict[optimal_index]

  return optimal_index, fit_results
x, yの型指定np.ndarray[DOUBLE_t, ndim=1]を無くしました。
実行時間
In [1]: from modules import cython_func
In [2]: %timeit cp_x, result = cython_func.detect_a_cp(X, y)
        76.1 ms ± 616 µs per loop (mean ± std. dev. of 7 runs, 10 loops each)
Cythonを使わずに書いた時の81.2msと比べて,ほんの少しだけ速くなっています。
ただ,微々たる差です。
OpenMP(Cython + 並列処理)
最後に,OpenMPについても試してみました。
前回の要領で行くと,for分のrangeをprangeに変更してnogil=TrueによりGIL(Global Interpreter Lock)を解除してやればいいだけです。
import numpy as np
from cython.parallel import prange

# (中略)

def detect_a_cp(x, y):
  cdef unsigned int data_len = len(x)
  cdef unsigned int division_point, optimal_index
  #cdef double[:,:] fit_results
  cdef double left_slope, left_intercept, left_r2error
  cdef double right_slope, right_intercept, right_r2error

  results_dict = {}
  error_sum_list = []
  for division_point in prange(2, data_len-2, nogil=True):
      left_slope, left_intercept, left_r2error, right_slope, right_intercept, right_r2error = piece_wise_linear_fit(x, y, division_point)

      results_dict[division_point] = ((left_slope, right_slope), (left_intercept, right_intercept), (left_r2error, right_r2error))
      error_sum_list.append(left_r2error + right_r2error)

  optimal_index = np.argmin(error_sum_list)+2
  fit_results = results_dict[optimal_index]

  return optimal_index, fit_results
しかしながら,これをコンパイルしようとすると怒られてしまいます。
------------------------------------------------------------
...
  cdef double right_slope, right_intercept, right_r2error

  results_dict = {}
  error_sum_list = []
  for division_point in prange(2, data_len-2, nogil=True):
      left_slope, left_intercept, left_r2error, right_slope, right_intercept, right_r2error = piece_wise_linear_fit(x, y, division_po
int)
     ^
------------------------------------------------------------

cpa_openmp.pyx:38:6: Assignment of Python object not allowed without gil
エラー表示にもあるように,GILを解除するとコードの書き方に制約が課せられ,Pythonで普段使っている表記が一部使えなくなってしまうのです。
テキストのP. 147にもこう書かれています。
GILを無効にする場合は、リストなどの通常のPythonオブジェクトを操作してはいけません。基本データ型と、memoryviewのインターフェースをサポートしているオブジェクトのみを操作できます。
コンパイルが通るように色々とコードをいじってみましたが,今の所うまく行っていません。
少し複雑なコードではOpenMPを使用するのは難しいようです。
まとめと考察
| 実装内容 | 実行時間 | 扱いやすさ |
|---|---|---|
| Python | 81.2ms | |
| joblib(並列処理) | 69.4ms | 処理の大きさに注意が必要 |
| Cython(型指定) | 76.1ms | 指定する型に相当気を配る必要がある |
| OpenMP(Cython + 並列処理) | ? | 時として大幅なコード改変が必要 |
numpy使えるならCython導入は非効率
前回大幅な高速化を実現できたCythonは,今回は期待したほどの効果が得られませんでした。
型の指定方法に気をつけないと逆に遅くなってしまうこともあり,全く労力に見合っていません。
さらにOpenMPを使おうとすると,GIL解除とともに使用可能な記法に制限が加わるため,厄介なことこのうえありません。
おそらく今回のケースでは,最初のコードの時点でnumpyで大部分を記述していたため,Cython化による恩恵を受けられる部分がそもそもほとんどなかったのでしょう。
Cythonを使うよりは,numpyをうまく使いこなす方法を探った方が効率が良さそうです。
joblib並列化は比較的使い勝手が良い
一方でjoblibについては,繰り返す処理一つ一つがある程度の大きさを持っていさえすれば,それなりの効果を発揮するようです。
コードの改変量もそれほど多くありませんし,こちらについては一考の余地があるように思います。
おわりに
普段業務でも使うようなまとまりのあるコードを題材に高速化する方法を探ってみましたが,
Cythonが思ったほど効果を発揮できないのは予想外でした。
単に書き方が悪いだけの可能性もありますが,基本的にはnumpyやscipyで事足りるようです。
numpyやscipyでもカバーできないような演算処理が必要になった時に,Cythonが力を発揮するのかもしれません。
ここら辺はGitHubでオープンソースを読みながらユースケースを学んでいきたいと思います。