※作ったファイルはGitHubで公開しています(リンクは後半で)
#背景
ASP.NETの学習をしている際にvisual studioではReactでのテンプレートが組み込まれており、フロントエンド側の設定をReactにした場合の為にゼロから環境構築をしてみようと思った為。
ゼロから環境構築してみた際に、GitHubに連携した状態にも出来たので、そんな環境構築を考えている方は是非読んでみてください
##~始める前に~
この記事は React環境構築【for mac】 を参考にして自身の環境構築をしていた後に、errorで詰まるところが幾つかあったので、それを解消できたよ。という内容になっています
##環境
- Mac (macOS Big Sur 11.2)
##0.1.0 始める前の現時点での環境確認
Node.jsとnpmのがセッティングされているのかどうかをバージョン確認からチェックしましょう
$ node -v
   #バージョンが表示されれば問題ありません
$ npm -v
   #こちらもバージョンが表示されれば問題ありません
もしもNode.jsがインストールされていない場合は こちら を参考にしてみてください
##0.2.0 GitHubで環境構築した内容を保存するリポジトリを用意する
####GitHubでリポジトリを新規作成
(※私はブラウザ上からnew repositoryを作ってやったのでその方法で。ここではリポジトリの新規作成する方法は公式ドキュメントの こちら を参照いただければと思います。)

####0.2.1 自身のmacのローカル環境にリポジトリをcloneする
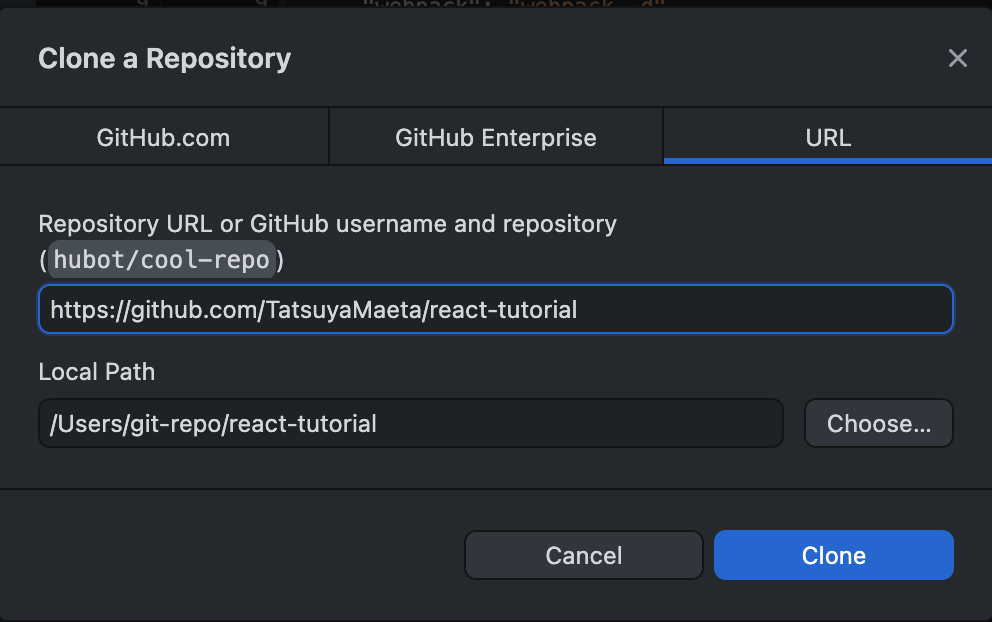
GitHubから新規作成したリポジトリのURLをコピーし、GitHub DeskTopにてClone a Repositoryする
(ターミナルでなく、GitKrakenでもなくDesktopを使っている私って、マイノリティ!?? w)

GitHubで作った新規repositoryのURLを入力し,ローカル環境のどのディレクトリに環境構築するのかLocal Pathを指定する
GitHub Desktopのインストールは(こちら)
#####ここに色々なファイルを入れていきます! いよいよスタート!!!
##1.0 環境構築スタート
ここからはターミナルとvscodeを使用して進めていきます
#####1. 先ほどローカル環境にclone aRepositoryしたディレクトリに移動
$ cd /Users/git-repo/react-tutorial
  # Usersのgit-repoにある先ほど作ったディレクトリに移動
#####2.1. package.json を生成する
$ npm init -y
#####2.2. package.jsonを編集する
{
  "name": "setting-up-react-tutorial",
  "version": "1.0.0",
  "description": "ゼロからreactを環境構築する方法です",
  "main": "index.js",
  "scripts": {
    "test": "echo \"Error: no test specified\" && exit 1"
  },
  "repository": {
    "type": "git",
    "url": "git+https://github.com/TatsuyaMaeta/setting-up-react-tutorial.git"
  },
  "keywords": [],
  "author": "",
  "license": "ISC",
  "bugs": {
    "url": "https://github.com/TatsuyaMaeta/setting-up-react-tutorial/issues"
  },
  "homepage": "https://github.com/TatsuyaMaeta/setting-up-react-tutorial#readme"
}
#####3. npmパッケージをインストールする
$ npm install react react-dom
$ npm install webpack webpack-cli webpack-dev-server --save-dev
$ npm install @babel/core @babel/preset-env @babel/preset-react @babel/cli --save-dev
$ npm install eslint babel-eslint eslint-loader eslint-plugin-react --save-dev
$ npm install css-loader style-loader babel-loader --save-dev
#####4.0. 必要なディレクトリ、ファイルを追加する
$ mkdir src
   #このディレクトリにindex.jsを後で移動します
$ mkdir public
   #このディレクトリにindex.htmlを後で移動します
$ touch .babelrc
$ touch .eslintrc.json
$ touch webpack.config.js
$ touch index.html
$ touch index.js
#####4.1. 新規作成したファイルを編集する
新規に作ったファイルの編集をターミナルのみで完結できると一つ上な感じがするんですが、何だか下手なのと、vscodeでできるので、その役割はvscodeでやってしまいます。
.babelrc ↓
{
  "presets": ["@babel/preset-env", "@babel/preset-react"]
}
.eslintrc.json ↓
{
  "parser": "babel-eslint",
  "env": {
    "browser": true,
    "es6": true
  },
  "parserOptions": {
    "sourceType": "module",
    "ecmaFeatures": {
      "experimentalObjectRestSpread": true,
      "jsx": true
    }
  },
  "extends": ["eslint:recommended", "plugin:react/recommended"],
  "plugins": ["react"],
  "rules": {
    "no-console": "off"
  },
  "settings": {
    "react": {
      "version": "detect"
    }
  }
}
webpack.config.js ↓
module.exports = {
  entry: {
    app: "./src/index.js"
  },
  output: {
    path: __dirname + '/public/js',
    filename: "[name].js"
  },
    devServer: {
    contentBase: __dirname + '/public',
    port: 8080,
    publicPath: '/js/'
  },
  devtool: "eval-source-map",
  mode: 'development',
  module: {
    rules: [{
      test: /\.js$/,
      enforce: "pre",
      exclude: /node_modules/,
      loader: "eslint-loader"
    }, {
      test: /\.css$/,
      loader: ["style-loader","css-loader"]
    }, {
      test: /\.js$/,
      exclude: /node_modules/,
      loader: 'babel-loader'
     }]
  }
};
index.html ↓
<!DOCTYPE html>
<html>
<head>
   <meta charset="utf-8">
   <meta name="viewport" content="width=device-width, initial-scale=1, shrink-to-fit=no">
   <meta http-equiv="X-UA-Compatible" content="IE=Edge, chrome=1" />
   <title>React App</title>
</head>
<body>
   <div id="root"></div>
   <script type="text/javascript" src="js/app.js" charset="utf-8"></script>
</body>
</html>
index.js ↓
import React from 'react'
import ReactDOM from 'react-dom'

ReactDOM.render(
  <h1>Hello, world!!</h1>,
  document.getElementById('root')
)
#####4.2 作ったファイルをディレクトリに移動する
index.htmlはpublic、index.jsはsrcに移動させる
public/index.html
src/index.js
この時点でのファイル構成は下記の通りです。
ただし、.babelrc と .eslintrc.jsonについては隠しファイルのため、このディレクトリ構造には表示されていません。
あと、README.mdはGiHubにて生成されたファイルなので、構成に入っています。このファイルはなくても大丈夫です。
.
├── README.md
├── package-lock.json
├── package.json
├── public
│   └── index.html
├── src
│   └── index.js
└── webpack.config.js
(※ちなみに、このファイル構成図はターミナルで一発で作れるのでめんどくさかったんだよな、っていう方は下記のリンクを参考にしてみてください
【 MacでTreeコマンドを使いディレクトリ構造をテキスト出力する 】
ここで一旦,終了!
それでは起動してみましょう。
$ npm start
  # Reactを起動!!!
成功 ! かと思いきや、Errorになってしまいます。
Error: Cannot find module 'webpack-cli/bin/config-yargs'
とあり、うまくいっていないことがわかります。
webpack-cliのバージョンが設定とマッチしていない為、うまくいきません。
初期設定ではwebpack-cliのバージョンが4の為、ターミナルにある通りのディレクトリ先にconfig-yargsと言うファイルが存在していません。
その為、バージョンを変えてあげる必要があります。
(今回は行いませんが、また別の機会にバージョンを変えない様な方法も今後やってみたいと思います。)
ここからはこれまで編集して作ったpackage.jsonの記述内容である
webpack,webpack-cli,webpack-dev-serverのバージョンを
修正等の編集を行い、その後に再度npmをインストールし直します。
#####5.0 package.jsonを編集
<編集前>
"devDependencies": {
    "webpack": "^5.20.0",
    "webpack-cli": "^4.5.0",
    "webpack-dev-server": "^3.11.2"
 }
<編集後>
"devDependencies": {
    "webpack": "^4.19.1",
    "webpack-cli": "^3.1.0",
    "webpack-dev-server": "^3.1.8"
 }
#####5.1 package.jsonをさらに編集
npm startした際にブラウザが自動で立ち上がる様にコマンドを記述します
<編集前>
  "scripts": {
    "test": "echo \"Error: no test specified\" && exit 1",
  },
<編集後>
  "scripts": {
    "start": "webpack-dev-server --mode development --open",
    "dev": "webpack serve --config ./config/webpack.config.js",
    "webpack": "webpack -d"
  },
#####6 再度、設定変更した内容を反映させる為にインストール
$ npm install
もし、この段階でnpm install がうまくいかないと言うエラーにあっている方は別の記事で書いた下記の記事を参考にして頂ければ解決できるかもしれません
【 npm installしようと思ったらgyp: No Xcode or CLT version detected!でダメなのを解決する件 】
#####7 Node.js 起動
ここまで来ればほぼ完了です。改めてターミナルで起動コマンドを打ってみましょう
$ npm start
 # ℹ 「wdm」: Compiled successfully.
 # とターミナルの最終行に表記されれば無事成功! 自動でブラウザがlocalhostで立ち上がります。
##まとめ
Error: Cannot find module 'webpack-cli/bin/config-yargs'
というエラーに数時間悩まされやっとこさ出来たので、まだまだ環境構築までの内容ですが、ひとしおです。
さらに今回は,GitHubと連携も初期でさせているので変更した内容もすぐGitHubにcommitできて管理しやすい状態になっています。
みなさんも是非トライしてみてください。
今回の環境構築した内容はGitHubにもあげてみました 。
そちらの内容と見比べてやってみてもらうとよりわかりやすいのかなと思います。
setting-up-react-tutorial ( Github )
読んで頂きありがとうございました。
まだ分かりにくいところや、表記がおかしいところがあると思うので適宜加筆修正したいと思います。

