海外の方がすでに見出していた方法をもとに、テストし、関数に仕立てました。
やりたいこと
場合分け処理の使い勝手を、よくすることです。
Power Queryのifは入れ子の数だけelseで閉じないといけない、というようなことはないので、ifの入れ子でも書くことはできます。
ただ、このカスタム関数を作っておけば、条件と処理を表にまとめてそれに従って実行したり、あるいは条件と処理をコードで生成して放り込めたりもでき便利です。
コード
長いですが、最初の約15行BodyOfFunctionの部分が本体です。ここだけ読んでもらえれば、処理内容が分かると思います。
コードの切れ目がよくわからない場合は、全部まとめて詳細エディタにコピペしてください。
[
    //関数の中身。
    BodyOfFunction=(Target as any,ConditionLists as list)=>
            let
                selected = List.Select(ConditionLists,each [
                                //関数でなければ、ここで既定のエラーになる。
                                value =_{0}(Target),
                                //戻り値がlogicalでなければ、エラーに接続する。
                                TypeCheck =List.Contains({true,false},value),
                                answer = if TypeCheck then value
                                         else error "条件式の戻り値がlogical型になるようにしてください。"
                                ][answer]
                           ),
                result = try List.First(selected){1} otherwise error "条件のいずれにも該当しませんでした。"
            in
                result,

//------------------------------設例など関数の説明書き---------------------------------------------
    //設例情報
    example1 =[Description="115を条件式に照らして判定します。3つ目の条件120未満で初めて条件を満たすので、120を返します。",
               Code ="fx_match(115,{
              {each _< 100,100},
              {each _< 110,110},
              {each _< 120,120},
              {each _< 130,130},
              {each _< 140,140}
             }
)",
              Result ="120"],
    example2 =[Description="150を条件式に照らして判定します。いずれの条件も満たさないので、errorを返します。",
               Code ="fx_match(150,{
              {each _< 100,100},
              {each _< 110,110},
              {each _< 120,120},
              {each _< 130,130},
              {each _< 140,140}
             }
)",
              Result ="Expression.Error: 条件のいずれにも該当しませんでした。"],
    example3 =[Description="上記の例の条件式の最後に必ずtrueを返す関数を入れます。この場合、最後の条件式に該当することになり、文字列""else""を返します。",
               Code ="fx_match(150,{
              {each _< 100,100},
              {each _< 110,110},
              {each _< 120,120},
              {each _< 130,130},
              {each _< 140,140}
              {each true,""else""}
             }
)",
              Result ="""else"""],
    example4 =[Description="136を条件式に照らして判定します。ConditionListsはコードで生成しています。",
               Code ="fx_match(136,
         List.Transform( List.Numbers(100,20,5),
                         (x)=>{each _<x,x}
         )
)",
              Result ="140"],

    //設例を入れ込んだ関数型を定義。
    NewFunctionType =type function(Target as any,ConditionLists as list) as any
                        meta[Documentation.Name ="fx_match",
                             Documentation.LongDescription=
                                    "<code>ConditionLists</code>の先頭から順に、<code>Target</code>が条件を満たすかをテストします。"
                                  & "<code>ConditionLists</code>は<code>list</code>の<code>list</code>です。"
                                  & "入れ子の<code>list</code>は、要素0番目は条件式、要素1番目は条件を満たした場合の戻り値としてください。",

                             Documentation.Examples={example1,example2,example3,example4}
                            ],
    //設例の付加処理
    ReplaceType =Value.ReplaceType(BodyOfFunction,NewFunctionType)
][ReplaceType]
↓上記のコードを全部、詳細エディタに貼るとこうなる。
この関数の使用例
基本的な使用例は関数の説明書きに書き込んでありますので、詳細エディタに貼って確認してください。(上手の通り)
下記では「テーブルで条件と戻り値を指定する」方法を試してみます。
そもそも関数の書き方
本記事のカスタム関数fx_matchを使うには、条件表を自分で用意できる必要があります。
関数の定義の仕方は一つではないのですが、個人的には大体、こんな使い分けをしています。
//1.引数が1個で定義も省略する場合。(GUIで書かれるコードはこれ一択)
each _ < 100 //引数が100未満か否かの真偽を返す。

//2.eachの中に関数を定義する場合、あるいは引数が複数個ある場合。
(x,y)=> x+y < 100 //引数xとyの合計が100未満か否かの真偽を返す
本記事の条件式は判定内容がごく単純なのでeachで統一してますが、eachじゃない方で定義しても同じことです。
では条件表を作りましょう
多い場合はExcelで作るのが現実的かなと思います。こんな具合でセルに打ち込んでみます。
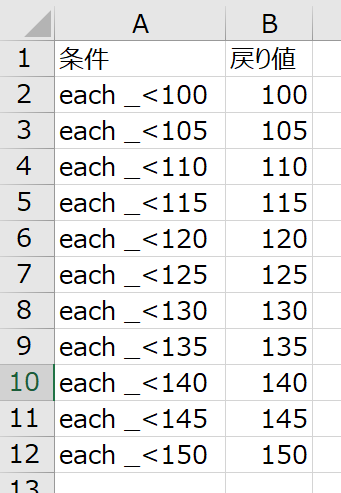
Power BI Desktopなら、「データの入力」作成のメニューに貼り付けできます。

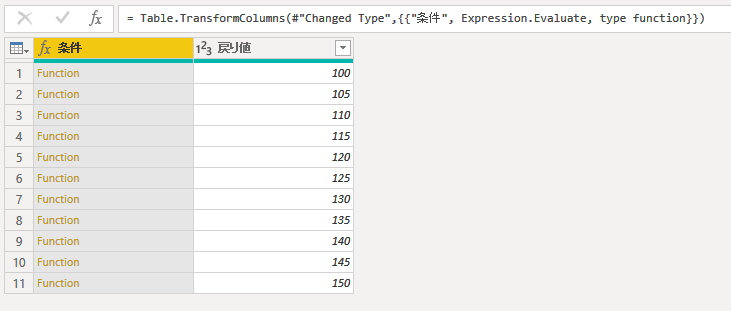
貼り付けただけではただの文字列です。なので、文字列を関数に変換してやります。
文字列をコードとして解釈してくれるExpression.Evaluate関数を、条件列に適用します。(前のステップがChanged Typeです。)
Table.TransformColumns関数はGUIで値の置換などをするときに使われている関数です。
Table.TransformColumns(#"Changed Type",{{"条件", Expression.Evaluate, type function}})
↓実行後。関数になりました。
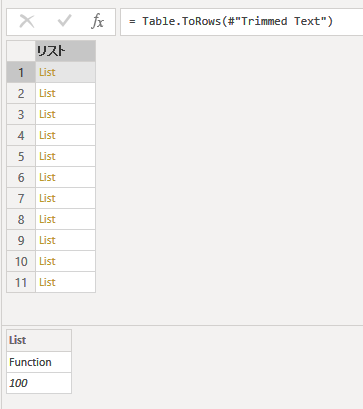
あとは、{条件を定義した関数,戻り値}という形式のlistに変換します。順序が大事です。
ここでは列順を揃えているので、Table.ToRows関数を使えば、「テーブルの各行をリストとする、リスト」に変換できます。(前のステップがTrimmed Textです。)
= Table.ToRows(#"Trimmed Text")
↓実行後
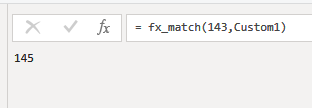
実行してみました。(前のステップがCustom1です。)
検証:条件を満たしたところで条件判定が終わるのか。
ここが大事なところです。本記事のfx_match関数は、ifの入れ子にした場合と同様、上から順に判定していき、trueになった時点で判定が終わるようにしています。
この辺りは、Diagnostics.Trace関数を仕込んで、Power BI Desktopの診断ツールを使うと分かります。以下、テストしたコード、結果を載せておきます。
ifの入れ子テストコード
let
    testfunc =(x as number)=>
              Diagnostics.Trace(
                TraceLevel.Information,
                Number.ToText(x,"executed_if_0"),
                x
              ),
    func =(y)=>
                if y < testfunc(100) then 100
                else if y < testfunc(110) then 110
                else if y < testfunc(120) then 120
                else if y < testfunc(130) then 130
                else if y < testfunc(140) then 140
                else if y < testfunc(150) then 150
                else if y < testfunc(160) then 160
                else if y < testfunc(170) then 170
                else if y < testfunc(180) then 180
                else if y < testfunc(190) then 190
                else if y < testfunc(200) then 200
                else if y < testfunc(210) then 210
                else if y < testfunc(220) then 220
                else if y < testfunc(230) then 230
                else if y < testfunc(240) then 240
                else if y < testfunc(250) then 250
                else if y < testfunc(260) then 260
                else if y < testfunc(270) then 270
                else if y < testfunc(280) then 280
                else if y < testfunc(290) then 290
                else if y < testfunc(300) then 300
                else if y < testfunc(310) then 310
                else if y < testfunc(320) then 320
                else if y < testfunc(330) then 330
                else if y < testfunc(340) then 340
                else if y < testfunc(350) then 350
                else if y < testfunc(360) then 360
                else if y < testfunc(370) then 370
                else if y < testfunc(380) then 380
                else if y < testfunc(390) then 390
                else if y < testfunc(999) then "else"
                else "else",
    test =Diagnostics.Trace(
            TraceLevel.Information,
            "StartMatching",
            ()=>func(341)
           )
in
    test
カスタム関数のテストコード
let
    testfunc =(x as number)=>
              Diagnostics.Trace(
                TraceLevel.Information,
                Number.ToText(x,"executed_0"),
                x
              ),
    test =Diagnostics.Trace(
            TraceLevel.Information,
            "StartMatching",
            ()=>fx_match(341,{
                {each _< testfunc(100),100},
                {each _< testfunc(110),110},
                {each _< testfunc(120),120},
                {each _< testfunc(130),130},
                {each _< testfunc(140),140},
                {each _< testfunc(150),150},
                {each _< testfunc(160),160},
                {each _< testfunc(170),170},
                {each _< testfunc(180),180},
                {each _< testfunc(190),190},
                {each _< testfunc(200),200},
                {each _< testfunc(210),210},
                {each _< testfunc(220),220},
                {each _< testfunc(230),230},
                {each _< testfunc(240),240},
                {each _< testfunc(250),250},
                {each _< testfunc(260),260},
                {each _< testfunc(270),270},
                {each _< testfunc(280),280},
                {each _< testfunc(290),290},
                {each _< testfunc(300),300},
                {each _< testfunc(310),310},
                {each _< testfunc(320),320},
                {each _< testfunc(330),330},
                {each _< testfunc(340),340},
                {each _< testfunc(350),350},
                {each _< testfunc(360),360},
                {each _< testfunc(370),370},
                {each _< testfunc(380),380},
                {each _< testfunc(390),390},
                {each _< testfunc(999),"else"}
                })
           )
in
    test
結果
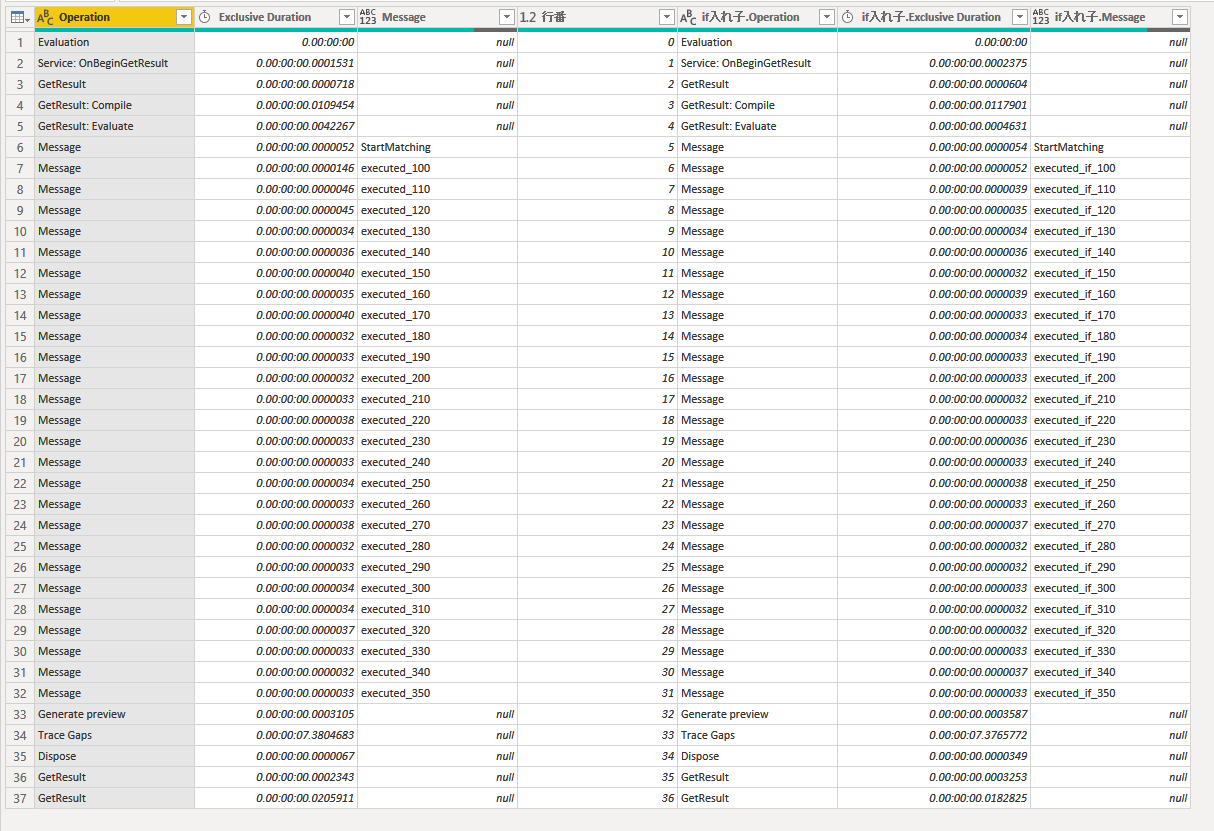
下図の、左端からの3列がカスタム関数、右端からの3列がif入れ子の記録です。いずれも350未満の条件をテストしたところで判定が止まっています。
参考情報
海外の記事
・Conditional logic in Power Query(2014.3.10) | Chris Webb's BI Blog
Power Queryの調べ物をすれば、必ず出てくるであろうWebbさんのブログです。
・Creating a Banding function in Power Query(2016.2.29)|The Excelguru Blog
Power Queryの入門本の著者Ken Pulsさんのブログです。本はKindleで試し読みできますよ。
M is for Data Monkey|amazon.co.jp
公式
Power Query M 関数について
再帰関数の書き方なども説明があります。
その他
@PowerBIxyz さんの記事を二つ紹介しておきます。
・eachについて
ときおり出てくる "each" キーワードと "_" (アンダースコア) とは
・Power BI Desktop診断ツールについて
Power Query のトレースログを見て、どのように処理されているか推測するなど
Diagnostics.Trace関数の公式情報は貧弱なので、同記事を読んで、実際に診断ツールにどう出てくるのか、試してみるのがよいです。