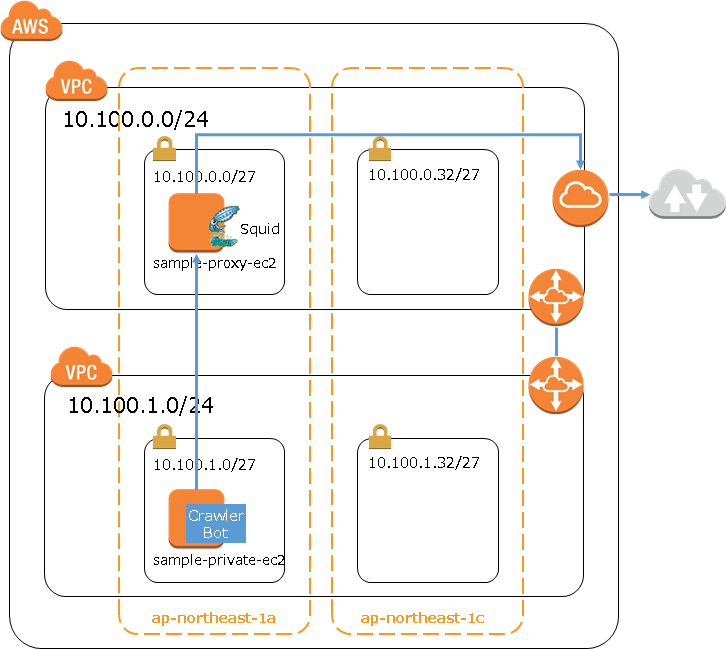
AWS VPC環境構築 ピアリング接続でPublic VPC、Private VPCをそれぞれ作成し、接続可能な環境を構築しました。Private VPCのEC2上にクローラを動かして、NATGateway通してインターネット接続しています。
今回はPublic VPC上にプロキシサーバを導入し、より安全なインターネット接続環境を実現したいです。
今回利用するプロキシサーバーソフトはSquidです。SquidはWebプロキシ、キャッシュプロキシ、リバースプロキシとしても利用できます。
環境構成
EC2はすべてWindows Server 2012を使い、Crawler BotはC#で作られています。
| インスタンス | Private IP | 説明 |
|---|---|---|
| sample-proxy-ec2 | 10.100.0.19 | プロキシサーバ |
| sample-private-ec2 | 10.100.1.12 | CrawlerBotサーバ |
Squidインストール
SquidはUnixベースのシステムで動作するように設計されいますが、Windows 版のSquid については、squid-cache wikiから辿ることができるようです。
squid.msiをダウンロードして実行しますと、ウィザードに従いインストールします。

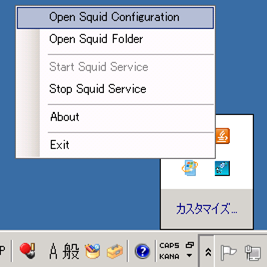
インストール後起動され、Desktopの右下にアイコンが表示され、右クリックすると設定メニューが表示されます。

Open Squid Configurationでsquid.confを開き編集できます。
Squidの設定
Open Squid Configurationでsquid.confを開き、
1.許可するネットワークを指定します
#
# Recommended minimum configuration:
#

# Example rule allowing access from your local networks.
# Adapt to list your (internal) IP networks from where browsing
# should be allowed

# acl localnet src 10.0.0.0/8	# RFC1918 possible internal network
# acl localnet src 172.16.0.0/12	# RFC1918 possible internal network
# acl localnet src 192.168.0.0/16# RFC1918 possible internal network
acl localnet src 10.100.0.0/24  # Public VPC
acl localnet src 10.100.1.0/24  # Private VPC
acl localnet src fc00::/7       # RFC 4193 local private network range
acl localnet src fe80::/10      # RFC 4291 link-local (directly plugged) machines
...
デフォルトのネットワークをコメントアウトして、許可するネットワークを指定します。
acl localnet src 10.100.0.0/24
acl localnet src 10.100.1.0/24
2.Squidの待ち受けポート番号設定
...
# Squid normally listens to port 3128
# http_port 3128
http_port 8080
...
ここで8080を利用
FirewallとSecurityGroupの設定
1. Firewall
プロキシサーバにログインし、コントロールパネルから「Windows ファイヤーウォール」をクリック、詳細設定の画面で「受信の規則」に8080のTCPルール「Squid Proxy Port」を新規追加

プロトコルおよびポートでローカルポートを3128から8080に修正

2. SecurityGroup
sample-proxy-ec2のSecurityGroupを開き、Inboundルールに8080を追加

疎通確認
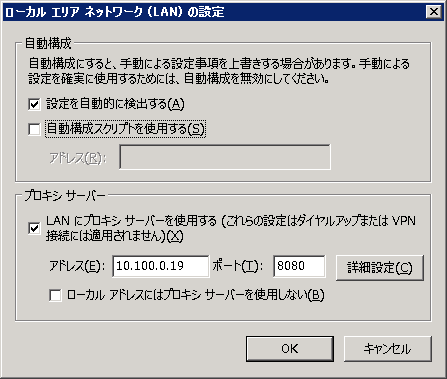
まずIEのインターネットオプション – [接続]タブの、「LAN の設定」をクリックし Squid を経由する設定を行います。

無事インターネットアクセスができました。
CrawlerBotのプログラムも特に調整なしに動いた!
using System;
using System.Net;
using System.Windows.Forms;
using System.IO;

namespace SampleCrawlerBot
{
    public partial class CrawlerBot : Form
    {
        private Logger logger;

        public CrawlerBot()
        {
            InitializeComponent();
        }

        /// <summary>
        /// Crawl html from url
        /// </summary>
        public void Crawl()
        {
            logger = new Logger();
            string url = "https://office.yahoo.co.jp/";
            try
            {
                HttpWebRequest req = (HttpWebRequest)System.Net.WebRequest.Create(url);
                req.Method = "GET";

                HttpWebResponse res;
                //サーバーからの応答を受信するためのWebResponseを取得
                res = (HttpWebResponse)req.GetResponse();

                StreamReader reader = new StreamReader(res.GetResponseStream());

                logger.Write(reader.ReadToEnd());
                req.Abort();
            }
            catch (Exception ex)
            {
                logger.Write(ex.ToString());
            }
        }
    }
}
