JTAppleCalendarの簡単な使い方について。
結構カスタマイズがきくのでよい。が、日本語で説明しているのが全くない...ので、備忘録をかねて。
cocoapodsでのインストール
ターミナルを開き、プロジェクトファイルまで移動し、podfileを生成する。
(プロジェクトファイルを作ってない場合は、まず先にプロジェクトファイルを作る。)
$ pod init
podfileを開き、インストールするコードを書く。
# Uncomment the next line to define a global platform for your project
# platform :ios, '9.0'

target 'アプリ名' do

  use_frameworks!
  # JTAppleCalendarのインストール
    pod 'JTAppleCalendar', '~> 7.0'

  target 'アプリ名Tests' do
    inherit! :search_paths
  end

  target 'アプリ名UITests' do
    inherit! :search_paths
  end

end
今回は、7.0以上のバージョンになるように設定しています。
バージョンを指定しない場合は、pod 'JTAppleCalendar'だけでOK
最後にターミナルに戻り、編集したPodfileを元にJTAppleCalendarをインストールする。
$ pod install
もし、すでにPodfileで他のライブラリを入れていたり、2回目以降は代わりに以下のコマンドでアップデートする。
最後にターミナルに戻り、編集したPodfileを元にJTAppleCalendarをインストールする。
$ pod update
これで、インストールは完了です。
Xcode、コード記入の前の下準備
次にXcodeに移動して、実際にコードを書いて、JTAppleCalendarを追加していきましょう。
通常開く拡張子.xcodeproj青いマークのファイルではなく
以下のマークの、拡張子.xcworkspaceのファイルを開きます。

もし、ここで、エラーがたくさん出ている場合、JTAppleCalendarが最新のswiftバージョンに対応していない可能性があります。(2018/10/28時点では、swift4.2が最新なのに対し、JTAppleCalendarはswift4.0までの対応でした。)
その場合はこちらを参考にしてください。
今回は、UIViewを継承したJTAppleCalendarを表示させるMainCalendarViewを作り、それをViewControllerに表示させる形をとります。
下準備として、UIViewクラスのMainCalendarView.swiftファイルを作成しましょう。
次に、Main.storyboardを開いて、見た目を整えていきます。ViewContorollerにUIViewを起き、その中にCollectionViewを置きます。
UILabelを使用して、曜日の表示もしています。

UIViewのクラスをCalendarViewに、UICollectionViewのクラスをJTAppleCalendarにします。


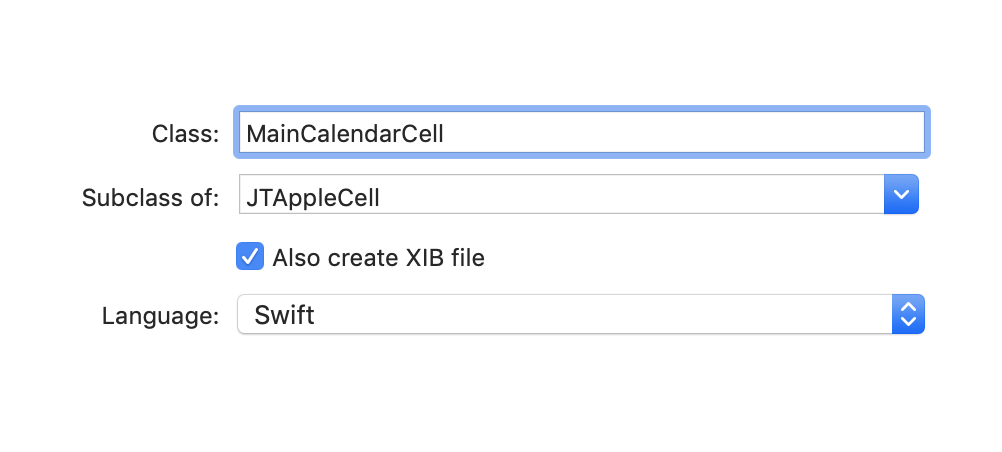
次に、Calendarの日付部分にあたるCell用のファイルを生成します。今回は、MainCalendarCellというクラス名にします。親クラスはUICollectionViewを継承したJTAppleCellです。
Also create XIB fileのチェックを忘れないようにしましょう。

次にMainCalendarCell.xibを開いて、Cellの中に、日付を表示させるようのLabelを置きましょう。

コード記入
実際にコードを書いていきましょう !
まずは、MainCalendarCell.swiftからコードを書いていきます。
JTAppleCalendarを導入します。
import JTAppleCalendar
日付を表示させるLabelの宣言をします。MainCalendarCell.xibとの関連付けも忘れずに。
@IBOutlet var dayLabel: UILabel!
次に、MainCalendarView.swiftのコードを書いていきます。
同様に、JTAppleCalendarを導入します。
import JTAppleCalendar
次に、Main.storyboardでMainCalendarViewにおいたJTAppleCalendarViewを宣言します。関連付けも忘れずに。
@IBOutlet var calendarView: JTAppleCalendarView!
次に、calendarViewrのdelegateとdatasourceの設定をしていきます。
extension MainCalendarView: JTAppleCalendarViewDelegate, JTAppleCalendarViewDataSource {
    func calendar(_ calendar: JTAppleCalendarView, willDisplay cell: JTAppleCell, forItemAt date: Date, cellState: CellState, indexPath: IndexPath) {
    }
    //カレンダーのセル設定
    func calendar(_ calendar: JTAppleCalendarView, cellForItemAt date: Date, cellState: CellState, indexPath: IndexPath) -> JTAppleCell {
    }
    //カレンダー作成に必要なパラメータの設定(何曜始まりにするとか、何週分表示するとか)
    func configureCalendar(_ calendar: JTAppleCalendarView) -> ConfigurationParameters {
    }
}
まず、configureCalendar(1番下のfunc)内にコードを書いていきます。
func configureCalendar(_ calendar: JTAppleCalendarView) -> ConfigurationParameters {
        var calendar = Calendar.current
        let date = Date() //現在時間
        let startDate = calendar.date(byAdding: .year, value: -1, to: calendar.startOfDay(for: date)) //1年前
        let endDate = calendar.date(byAdding: .year, value: +1, to: calendar.startOfDay(for: date)) //1年後
        let parameters = ConfigurationParameters(startDate: startDate!,
                                                 endDate: endDate!,
                                                 numberOfRows: 6,
                                                 calendar: calendar,
                                                 generateInDates: .forAllMonths,
                                                 generateOutDates: .tillEndOfGrid,
                                                 firstDayOfWeek: .monday)
        return parameters
    }
パラメータの意味は以下のようになっています。自分で好きに変更してください。
| パラメータ名 | 意味 |
|---|---|
| startDate | カレンダーに表示する最も過去の日付 |
| endDate | カレンダーに表示する最も未来の日付 |
| numberOfRows | カレンダーに表示する週の数 |
| calendar | 適用するCalendarクラスのインスタンス |
| generateInDates | 一言で説明しにくいので略 |
| generateOutDates | 一言で説明しにくいので略 |
| firstDayOfWeek | 何曜始まりにするか |
略したところを含め、詳細な説明はこちら。
(公式サイトに飛びます。英語です。)
次は、真ん中のfunc内にコードを書いていきます。
func calendar(_ calendar: JTAppleCalendarView, cellForItemAt date: Date, cellState: CellState, indexPath: IndexPath) -> JTAppleCell {
     let cell = calendar.dequeueReusableCell(withReuseIdentifier: "MainCalendarCell", for: indexPath) as! MainCalendarCell
     cell.dayLabel.text = cellState.text
     return cell
}
最後にMainCalendarViewの初期化設定をします。calendarViewを宣言した所のすぐ下に書きます。
override func awakeFromNib() {
        calendarView.calendarDelegate = self
        calendarView.calendarDataSource = self
        //MainCalendarCellの登録
        let nibName = UINib(nibName: "MainCalendarCell", bundle:nil)
        calendarView.register(nibName, forCellWithReuseIdentifier: "MainCalendarCell")
        calendarView.minimumInteritemSpacing = 0
        calendarView.minimumLineSpacing = 0
    }
これで完成です。Runしてください。

calendarのスクロールの仕方を変えたい場合は、Main.storyboardでオレンジ枠内の設定をいじってみてください。

以上です!
まだ、表示されているカレンダーの月の表示などもない、簡単なカレンダーですので、さらなる細かい設定については余力があればまた投稿します。
追加関連記事
[開発日記]JTAppleCalendarでもう少しカスタマイズしてみた①~月の表示~ (2018/10/30追加)