Apple公式のiOSアプリ作成チュートリアルを実行してみたので、結果を纏めてみました。
チュートリアルをこれから実施する方の補助のような役割になればと思います。
私自身Androidアプリの開発は結構経験があるのですが、iOSは初心者ですので間違い箇所等あれば訂正して頂けると幸いです。
公式のチュートリアルは章ごとにまとまってるので本記事では公式の章ごとに個人的に重要と思われる部分を纏めました。
Getting Started
Jump Right In
このチュートリアルを完成すると最終的に自分が食べたもののリストとそれぞれの美味しさを★でメモしておけるアプリを作成出来る。
Building the UI
Build a Basic UI
The App Delegate Source File
- AppDelegate.swiftはプロジェクトを作成した際に自動で生成されるファイルである
- AppDelegate.swiftはアプリが描画されるWindowを用意したり、メインループを生成する
- applicationWillResignActive()やapplicationDidEnterBackground()等のメソッドがスタブ実装されており該当のメソッドに処理を追加することによりアプリが表に来たタイミング等で処理を実行する事が出来る
- AndroidでいうところのActivityみたいな存在?
- こちらに参考になる考察が記載されていました
- AndroidでいうところのActivityみたいな存在?
- 本当に特別な事をする時以外は生成されたものを使用するべきである
The View Controller Source File
- ViewController.swiftはプロジェクトを作成した際に自動で生成されるファイルである
- UIViewControllerの子クラスである。UIViewControllerはひとつの画面におけるMVCのおけるコントローラの役割をする
Open Your Storyboard
iOSの開発ではstoryboardなるものを使用する。名前からある程度想像出来るがアプリの画面と画面間の遷移等をグラフィカルに見ながら作成出来る。
この機能はAndroidStudioには無い(正確には似たようなものはあるらしいが使ったことがない)ので今後便利なのかどうなのかは使って見ながら感じていこうと思う。
※使わなくても開発は出来る模様。
Connect the UI to Code
- storyboardではsceneがひとつの画面を表し、そして基本的に一つのViewControllerを表す
- ViewControllerはAndroidでのActivityのような存在
- ViewControllerは
- ひとつのViewをマネージメントしさらにヒエラルキー上のサブViewを持っている
- アプリのViewとデータモデルの流れを管理する
- ContentViewのライフサイクルを管理する
- 画面の回転をハンドリングする
- アプリ内のナビゲーションを定義する
- ユーザーの入力に対する応答を実装する
Create Outlets for UI Elements
- storyboardからD&Dすることでstoryboardとコードが繋がる
- D&Dした際にActionかOutletかを選べる
- Actionを選ぶとそのViewに対するアクション(ボタンの押下等)が発生した時の処理が記述できる
- Outletを選ぶとそのViewの要素にアクセス出来るようになる(ラベルに表示されてる内容を変更したり)
Define an Action to Perform
- iOSはイベントドリブンプログラミングである
- ユーザーもしくはシステムからのイベントを受けて応答する
- Create Outlets for UI Elementsで説明されたようにD&Dした際にActionを選ぶことでstoryboardとソースが繋がる(Actionメソッドが実装される)
- Actionメソッドはイベントが発生した際にシステムによって呼ばれる
Process User Input
- テキストフィールドへの入力について解説している
- その際にはtext field delegateの助けが必要である
- delegateは他のオブジェクトと連動してイベントを受け取れる
- text field delegateはtext fieldと通信し、重要なイベントを受け取る。例えば編集を開始した時や編集を終了した時等
- どのオブジェクトでも正式なプロトコルを実装すればdelegateになり得る
- Android(Java)でいうところのInterfaceかな
- ViewControllerクラスのviewDidLoad()メソッドでOutletで参照したnameTextFieldに対して自身をdelegateに設定することが可能
ViewController.swift
// Handle the text field’s user input through delegate callbacks.
nameTextField.delegate = self
- 自身じゃなくてクラスを分けたほうが読みやすいように感じる
Work with View Controllers
自分のアプリにImageViewを配置してクリックしたら画像を選択するUIを呼び出して画像が選択されたら、選択された画像をImageViewに表示する流れを解説している。
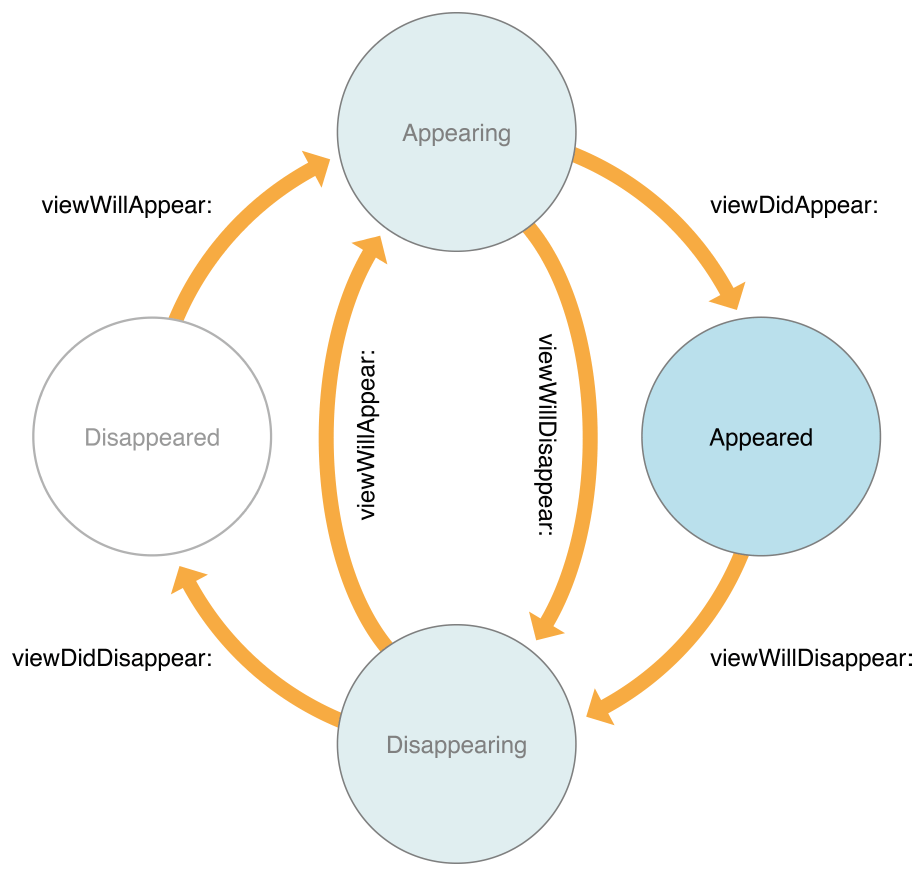
Understand the View Controller Lifecycle
- アプリが複雑になってくると複数のsceneを実装し適切なタイミングでViewを表示したり非表示にしたりする必要が出てくる
- UIViewControllerクラスを継承しているオブジェクトにはviewDidLoad()等Viewヒエラルキーを管理するための複数のメソッドが提供される
- システムはViewControllerのステータスが遷移した際にそれらのメソッドを適切なタイミングで呼び出す
- それらのメソッドが呼び出されたタイミングで自分の子Viewの生成や破棄等の適切な処理を実装する

| メソッド名 | 呼ばれるタイミング |
|---|---|
| viewDidLoad() | ViewControllerのTop Viewが生成されたタイミング。全てのoutletsに正常な値が入っていることが保証されるタイミング。 |
| viewWillAppear() | ViewControllerのTop ViewがアプリのViewヒエラルキーに追加される直前のタイミング。Viewが表示される直前に実行したい処理を実装するべし。ただし必ずしもこの後Viewが表示されるのが保証されたタイミングではない。 |
| viewDidAppear() | ViewControllerのTop ViewがアプリのViewヒエラルキーに追加されたタイミング。アニメーションの表示等表示された直後に実行したい処理を実装するべし。しかしViewが表示されたのを保証するものではない。あくまでViewヒエラルキーに追加された事を通知するメソッドである。 |
| viewWillDisappear() | ViewControllerのTop ViewがアプリのViewヒエラルキーから抜かれる直前タイミング。後処理等を実施するべし。 |
| viewDidDisappear() | ViewControllerのTop ViewがアプリのViewヒエラルキーから抜かれたタイミング。追加の終了処理を実施するべし。 |
Add a Meal Photo
- ImgeViewなどはstorybordにD&Dで追加出来る
Display a Default Photo
- プロジェクト内のAssets.xcassets(asset catalog)にアプリで使用する画像等のリソースを格納出来る
Create a Gesture Recognizer
- Imageviewはボタン等と違いデフォルトではActionを検出出来ない(storyboardからD&DしてもActionが選択肢に出てこない)
- ただし、Gesture recognizersをImageViewに設定してやることで簡単に検出可能である
- AndroidのGestureDetectorのような雰囲気
Create an Image Picker to Respond to User Taps
- UIImagePickerControllerを使用してUIImagePickerControllerDelegateプロトコルを実装することにより、テキスト入力と同じ方法でユーザーに対して端末内の画像を選択するUIを提供する事が出来る
- アプリが端末内の画像にアクセスする際にはユーザに許可を求める必要がある
- Info.plistに項目を追加すれば必要な時に許可を求めてくれる
- AndroidでのRuntime Permission相当
Implement a Custom Control
Create a Custom View
- カスタムView(料理を評価するために★が並んでいるView)の作成方法を解説している
- UIStackViewを継承したRatingControlクラスを作成
- storyboardにhorizontal stack viewを配置してRatingControlクラスを紐付ける
- RatingControlクラス内でUIButtonを生成して管理する
Add Support for Interface Builder
- controllerを@IBDesignableで宣言することによりStoryboard上からカスタムViewの中身等がちゃんと見えるようになる
- さらに@IBInspectableを使用することによりStoryboard上から★の数を変更したりすることが可能になる
- Storyboardで値を変更するとdidSet区が呼ばれる
RaitingContro.swift
@IBInspectable var starSize: CGSize = CGSize(width: 44.0, height: 44.0) {
    didSet {
        setupButtons()
    }
}

@IBInspectable var starCount: Int = 5 {
    didSet {
        setupButtons()
    }
}
Working with Table Views
Create a Table View
Create the Meal List
- iOSには標準でリストでアイテムがスクロールするViewが用意されている(UITableView)
- AndroidのListView
- UITableViewはUITableViewControllerから制御される
Design Custom Table Cells
- Tableviewの各要素(各行)はUITableViewCellによって管理されている
- UITableViewCellの設定はstoryboard上で設定出来る
Display the Data
- Tableviewでは以下のメソッドが大切
| メソッド | 役割 |
|---|---|
| func numberOfSections(in tableView: UITableView) -> Int | selectionの数を返す。selectionとは行のまとまりの数。通常は1を返しておけば良い。 |
| func tableView(_ tableView: UITableView, numberOfRowsInSection section: Int) -> Int | 行数を返す |
| func tableView(_ tableView: UITableView, cellForRowAt indexPath: IndexPath) -> UITableViewCell | 実際に表示されるViewを返す |
Implement Navigation
Add a Segue to Navigate Forward
- シーン間の移動はsegues(セグエ)と言う
- navigation controllerがナビゲーションスタックに基づいてView controller感の遷移を制御してくれる
- navigation controllerはまるで画面のようにstoryboard上に追加する
- navigation controllerを追加すると画面上部にNavigationBarが表示されるようになる
Configure the Navigation Bar for the Scenes
- story board上でD&Dすることで画面の遷移(segues)を追加出来る
Create an Unwind Segue
- seguesがトリガされるとprepare(for:sender:)が呼ばれるので、画面遷移する際の処理をそこに実装することが出来る
- 遷移の発生元がsenderに入ってる
- UnwindSeagueはStoryboard上のD&Dで実装する
Implement Edit and Delete Behavior
- story boardでsegueの遷移IDのようなものを設定することによりソース上のprepare(for:sender:)メソッドにてどの遷移か判断出来る
MealTableViewController.swift
override func prepare(for segue: UIStoryboardSegue, sender: Any?) {

    super.prepare(for: segue, sender: sender)

    switch(segue.identifier ?? "") {

    case "AddItem":  // ★★★★★
        os_log("Adding a new meal.", log: OSLog.default, type: .debug)

    case "ShowDetail":  // ★★★★★
        guard let mealDetailViewController = segue.destination as? MealViewController else {
            fatalError("Unexpected destination: \(segue.destination)")
        }

        guard let selectedMealCell = sender as? MealTableViewCell else {
            fatalError("Unexpected sender: \(sender)")
        }

        guard let indexPath = tableView.indexPath(for: selectedMealCell) else {
            fatalError("The selected cell is not being displayed by the table")
        }

        let selectedMeal = meals[indexPath.row]
        mealDetailViewController.meal = selectedMeal

    default:
        fatalError("Unexpected Segue Identifier; \(segue.identifier)")
    }
}
Support Deleting Meals
- ナビゲーションバーに配置するEditボタンはTableViewControllerから提供されている
MealTableViewController.swift
override func viewDidLoad() {
    super.viewDidLoad()

    // Use the edit button item provided by the table view controller.
    navigationItem.leftBarButtonItem = editButtonItem    //★★★★

    // Load the sample data.
    loadSampleMeals()
}
- あとはコールバックされるメソッドをちゃんと実装すればEdit機能が実装できる
MealTableViewController.swift
// Override to support editing the table view.
override func tableView(_ tableView: UITableView, commit editingStyle: UITableViewCellEditingStyle, forRowAt indexPath: IndexPath) {
    if editingStyle == .delete {   //★★★★
        // Delete the row from the data source
        meals.remove(at: indexPath.row)
        tableView.deleteRows(at: [indexPath], with: .fade)
    } else if editingStyle == .insert {
        // Create a new instance of the appropriate class, insert it into the array, and add a new row to the table view
    }
}
Persist Data
- NSCodingを使用すると簡単にオブジェクトをディスクに保存して読みだすことが可能である
- NSCodingはキー情報を元にデータを保存・取得する
Meal.swift
// 保存
func encode(with aCoder: NSCoder) {
    aCoder.encode(name, forKey: PropertyKey.name)
    aCoder.encode(photo, forKey: PropertyKey.photo)
    aCoder.encode(rating, forKey: PropertyKey.rating)
}

// 復元
required convenience init?(coder aDecoder: NSCoder) {

    // The name is required. If we cannot decode a name string, the initializer should fail.
    guard let name = aDecoder.decodeObject(forKey: PropertyKey.name) as? String else {
        os_log("Unable to decode the name for a Meal object.", log: OSLog.default, type: .debug)
        return nil
    }

    // Because photo is an optional property of Meal, just use conditional cast.
    let photo = aDecoder.decodeObject(forKey: PropertyKey.photo) as? UIImage

    let rating = aDecoder.decodeInteger(forKey: PropertyKey.rating)

    // Must call designated initializer.
    self.init(name: name, photo: photo, rating: rating)

}
Save and Load the Meal List
- オブジェクトをシリアライズ、デシリアライズしてディスクに保存する
MealTablecontroller.swift
// シリアライズして保存
private func saveMeals() {
    let isSuccessfulSave = NSKeyedArchiver.archiveRootObject(meals, toFile: Meal.ArchiveURL.path)
    if isSuccessfulSave {
        os_log("Meals successfully saved.", log: OSLog.default, type: .debug)
    } else {
        os_log("Failed to save meals...", log: OSLog.default, type: .error)
    }
}

// デシリアライズして復元
private func loadMeals() -> [Meal]?  {
    return NSKeyedUnarchiver.unarchiveObject(withFile: Meal.ArchiveURL.path) as? [Meal]
}


