はじめに
この記事は、「CAPで作ったODataをUI5アプリで使う」シリーズの3回目です。
前回の記事ではCAPのODataサービスをフリースタイルのUI5アプリから利用しました。今回は、Fiori Elementsアプリから利用する方法について調べてみたいと思います。
前回の記事と同様に、CAPのプロジェクトとは別のプロジェクトでFiori elementsアプリを作成します。
作成にあたり、以下のGitリポジトリを参考にしました。ここでは、V4のODataサービスをV4のままElementsアプリにしていたので、今回はその方法を踏襲したいと思います。
https://github.com/SAP-samples/cloud-cap-samples/tree/master/fiori
ゴール
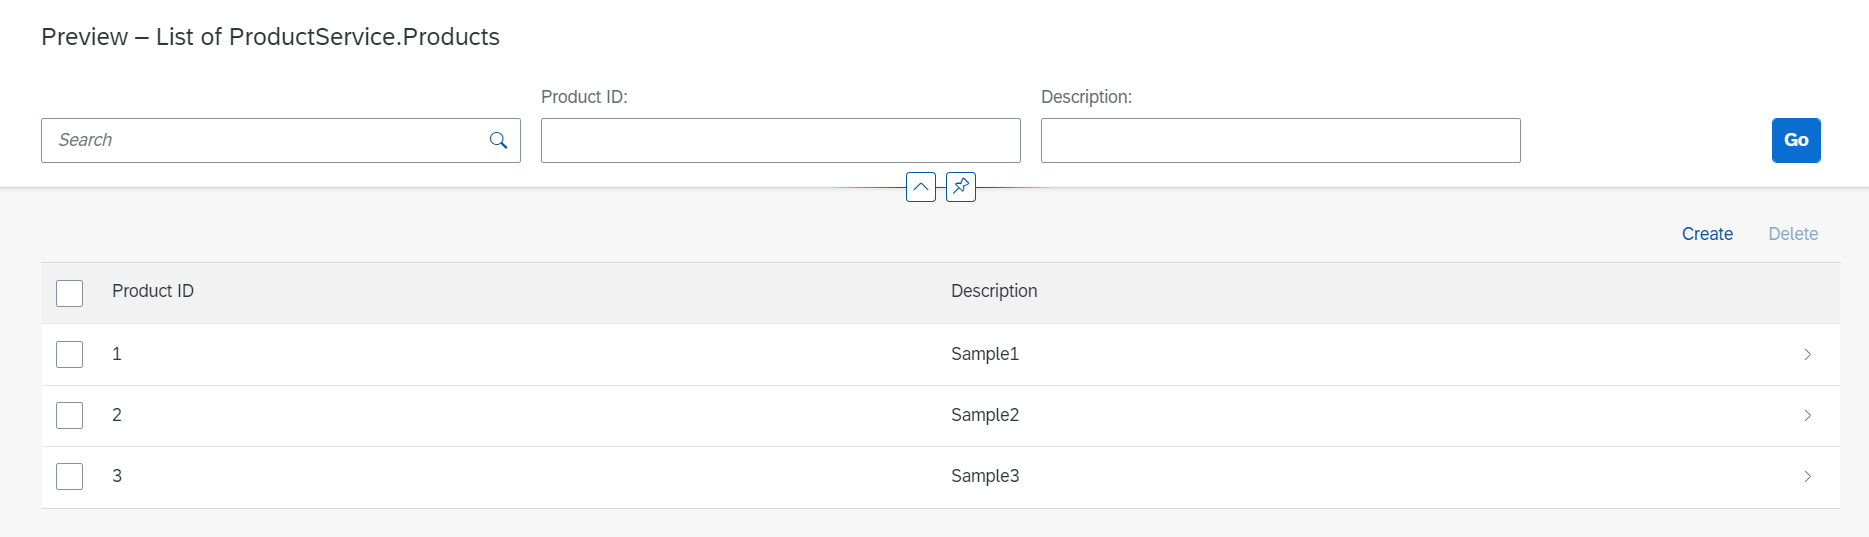
Fiori ElementsでList Reportを作成します。まずは簡単に、リストのみの表示です。

ステップ
- CAPサービスにUIアノテーションを追加
- Elementsプロジェクトを作成
1. CAPサービスにUIアノテーションを追加
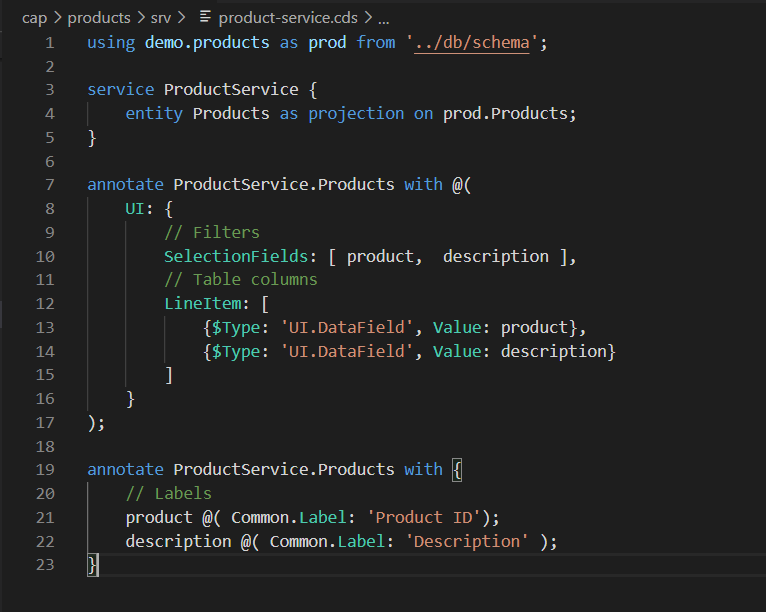
CAPサービスの作成方法については、1回目の記事をご参照ください。product-servece.cdsにUIアノテーションを追加します。
annotate ProductService.Products with @(
    UI: {
        // Filters
        SelectionFields: [ product,  description ],
        // Table columns
        LineItem: [
            {$Type: 'UI.DataField', Value: product},
            {$Type: 'UI.DataField', Value: description}
        ]
    }
);

annotate ProductService.Products with {
    // Labels
    product @( Common.Label: 'Product ID');
    description @( Common.Label: 'Description' );
}
全体は以下のようになります。
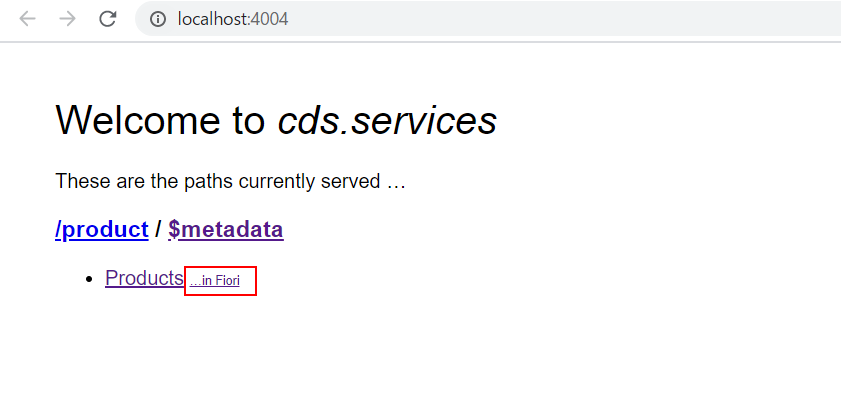
cds watchを実行して、Fioriのプレビューを見てみましょう。
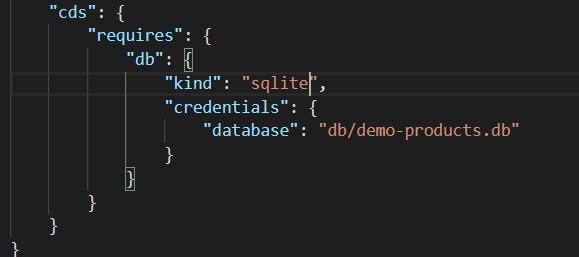
※一度Cloud Platformにデプロイした後では、package.jsonの中のdbの種類が"hana"になっているかもしれません。この状態だとローカルのDBが使えないので、一時的にsqliteに変更します。デプロイするときに元に戻します。
問題なければ、ビルド&デプロイします。
2. Elementsプロジェクトを作成
2.1. プロジェクトを作成
以下のコマンドでプロジェクトを作成します。
yo easy-ui5

2.2. App Routerの設定
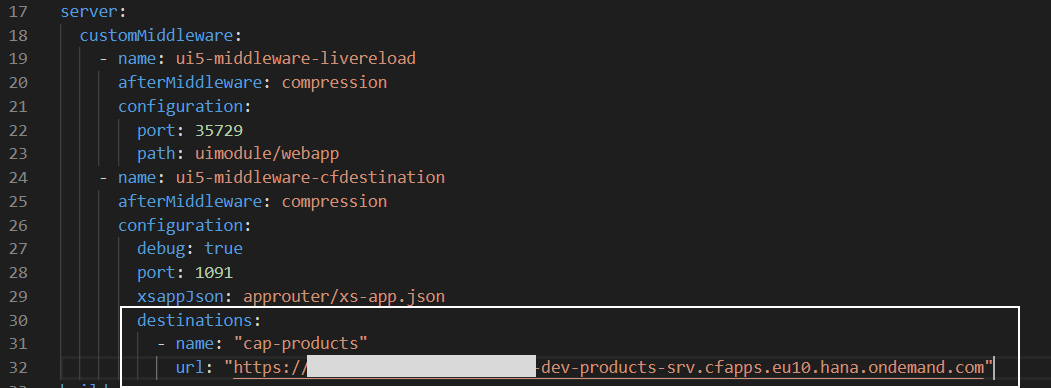
approuterのroutesにCAPのODataサービスの設定を追加します。destination"cap-products"はCloud FoundryサブアカウントのDestinationに登録済です。(前回の記事を参照)
{
  "welcomeFile": "demoproductselements/",
  "authenticationMethod": "none",
  "logout": {
    "logoutEndpoint": "/do/logout"
  },
  "routes": [
    {
      "source": "^/cap-products/(.*)$",
      "target": "$1",
      "authenticationType": "xsuaa",
      "destination": "cap-products",
      "csrfProtection": false
    }
  ]
}
ローカルでテストできるように、ui5.yamlファイルにもdestinationの設定を追加します。
3. Elementsアプリの設定
Elementsアプリはフリースタイルのアプリとは作りが違うので、webappフォルダの中身を消してしまいます。(xs-app.jsonは残す)

3.1. Fiori Launchpadサンドボックス画面を作成
アプリを起動したときに表示する画面として、Fiori Launchpadサンドボックス画面を作成します。
<!DOCTYPE html>
<html>
<head>

	<meta http-equiv="X-UA-Compatible" content="IE=edge" />
	<meta http-equiv="Content-Type" content="text/html;charset=UTF-8" />
	<meta name="viewport" content="width=device-width, initial-scale=1.0" />
	<title>Bookshop</title>

	<script>
		window["sap-ushell-config"] = {
			defaultRenderer: "fiori2",
			applications: {
				"browse-products": {
					title: "Browse Products",
					description: "list",
					additionalInformation: "SAPUI5.Component=demo.productselements",
					applicationType : "URL",
					url: ".",
					navigationMode: "embedded"
				}
			}
		};
	</script>

	<script src="https://sapui5.hana.ondemand.com/test-resources/sap/ushell/bootstrap/sandbox.js"></script>
	<script src="https://sapui5.hana.ondemand.com/resources/sap-ui-core.js"
    	data-sap-ui-libs="sap.m, sap.ushell, sap.collaboration, sap.ui.layout"
    	data-sap-ui-compatVersion="edge"
    	data-sap-ui-theme="sap_fiori_3"
    	data-sap-ui-frameOptions="allow"
	></script>
	<script>
		sap.ui.getCore().attachInit(()=> sap.ushell.Container.createRenderer().placeAt("content"))
	</script>

</head>
<body class="sapUiBody" id="content"></body>
</html>
3.2. manifest.jsonを作成
manifest.jsonファイルを作成します。
{
"_version": "1.8.0",
"sap.app": {
"id": "demo.productselements",
"type": "application",
"title": "{{appTitle}}",
"description": "{{appDescription}}",
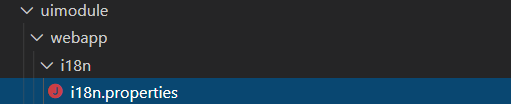
"i18n": "i18n/i18n.properties",
"dataSources": {
"/cap-products/product/": {
"uri": "/cap-products/product/",
"type": "OData",
"settings": {
"odataVersion": "4.0",
"localUri": "localService/cap-products/product/metadata.xml"
}
}
},
"-sourceTemplate": {
"id": "ui5template.basicSAPUI5ApplicationProject",
"-id": "ui5template.smartTemplate",
"-version": "1.40.12"
}
},
"sap.ui5": {
"dependencies": {
"libs": {
"sap.fe.templates": {}
}
},
"models": {
"i18n": {
"type": "sap.ui.model.resource.ResourceModel",
"uri": "i18n/i18n.properties"
},
"": {
"settings": {
"synchronizationMode": "None",
"operationMode": "Server",
"autoExpandSelect": true,
"earlyRequests": true,
"groupProperties": {
"default": {
"submit": "Auto"
}
}
},
"dataSource": "/cap-products/product/"
}
},
"routing": {
"routes": [{
"pattern": ":?query:",
"name": "ProductsList",
"target": "ProductsList"
}, {
"pattern": "Products({key}):?query:",
"name": "ProductsDetails",
"target": "ProductsDetails"
}],
"targets": {
"ProductsList": {
"type": "Component",
"id": "ProductsList",
"name": "sap.fe.templates.ListReport",
"options": {
"settings": {
"entitySet": "Products",
"navigation": {
"Products": {
"detail": {
"route": "ProductsDetails"
}
}
}
}
}
},
"ProductsDetails": {
"type": "Component",
"id": "ProductsDetails",
"name": "sap.fe.templates.ObjectPage",
"options": {
"settings": {
"entitySet": "Products"
}
}
}
}
},
"contentDensities": {
"compact": true,
"cozy": true
}
},
"sap.ui": {
"technology": "UI5",
"fullWidth": false
},
"sap.fiori": {
"registrationIds": [],
"archeType": "transactional"
}
}
i18nフォルダも作成しておきます。
title=demo.productselements
appTitle=demo.productselements
appDescription=Products Elements
3.3. Component.jsを作成
Component.jsファイルを作成します。
sap.ui.define(["sap/fe/core/AppComponent"], function(AppComponent) {
  "use strict";

  return AppComponent.extend("demo.productselements.Component", {
    metadata: {
      manifest: "json"
    }});
});
3.4. ローカルで実行
以上で設定は完了です。npm startコマンドを入力して、アプリを起動してみましょう。
まず、ラウンチパッド画面が開きます。
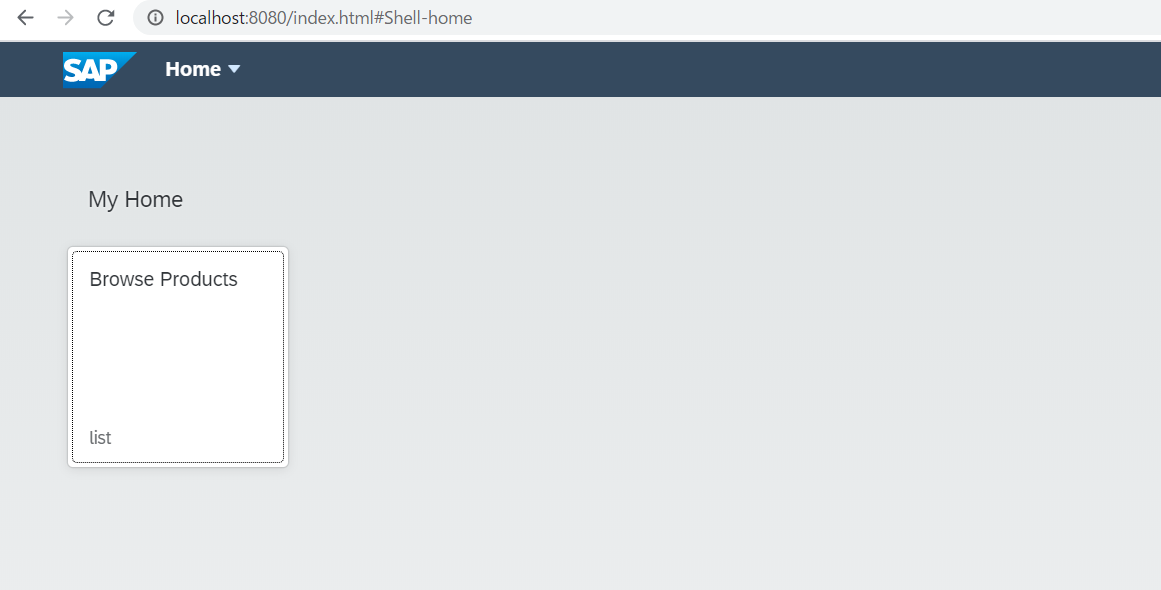
タイルをクリックするとList Report画面が開きます。
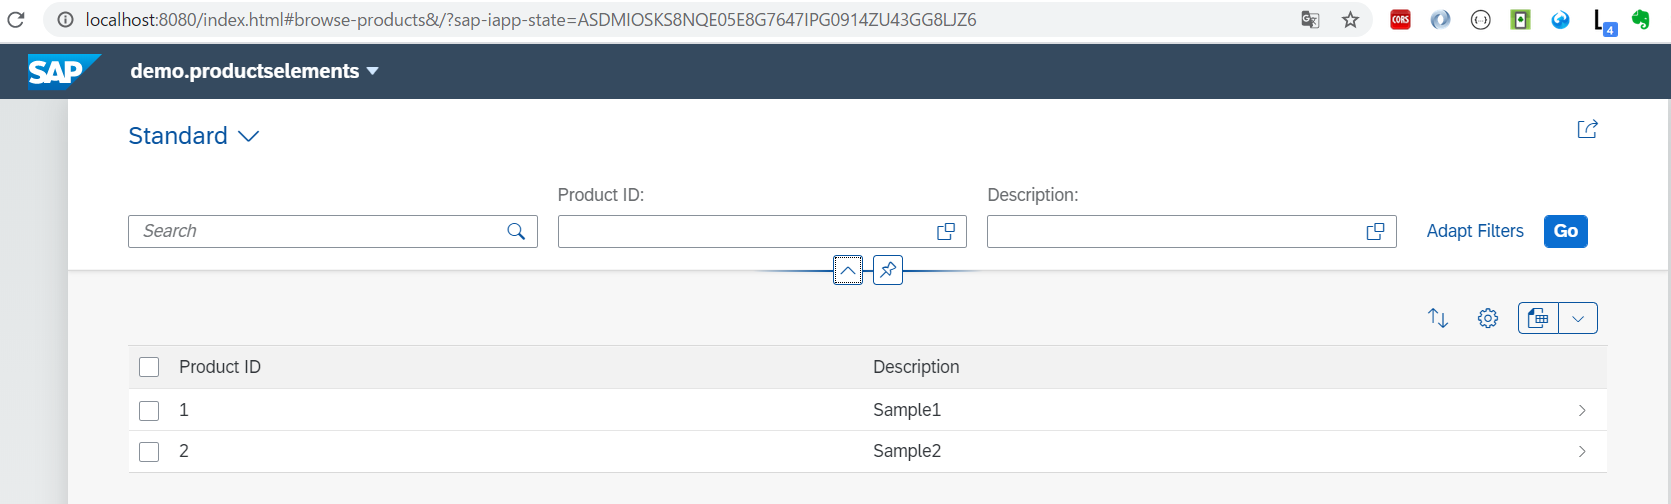
行を選択するとObject Pageに遷移しますが、まだObject Page用のアノテーションを入れていないので何も表示されません。

気づき
manifest.jsonのroutingの設定で、ProductsListのパターンが"pattern": ":?query:"となっていました。これは、任意のパラメータとしてクエリパラメータが付加される可能性があることを示しています。
なぜこれが必要かというと、Object Pageから一覧に戻ったときに、選択画面の状態を保存するためのsap-iapp-stateというパラメータが追加されるからです。もし"pattern": ""としていた場合、Object Pageから戻ったときにパターンがマッチせず、一覧画面が表示されなくなります。

追加情報
CAPでFioriのプレビューを表示するとき、裏でmanifest.json相当の設定が自動生成されています。今回作成したmanifest.jsonファイルは基本的に自動生成された設定と同じになっています。
興味のある方は、CAPプロジェクトのnode_modules/@sap/cds/lib/utils/app/fiori-preview.jsを見てみてください。

参考:Ep.31 – Digging into CAP’s fiori-preview
今後やってみたいこと
- OData V2でCAPを使用したElementsアプリを作成する
- ローカルアノテーションを追加してみる
- Fiori Toolsを使ってCAPのフロントエンドを作成できるか