はじめに
この記事は、OData V4でドラフト対応したアプリを作る シリーズの2回目です。
今回は、フリースタイルのUI5で以下のような画面を作成します。

ソースコードは以下に格納しています。
https://github.com/miyasuta/odata-v4-freestyle/tree/master/app/demo.bookingapp
ステップ
- プロジェクトを生成
- CAPのODataにアクセス
- 一覧表示用のビューを作成
- 削除処理
1. プロジェクトを生成
generator-easy-ui5を使用してUI5プロジェクトを作成します。/appフォルダに移動して以下のコマンドを実行します。
yo easy-ui5
generatorの選択で、"generator-ui5-project"を選択します。

以下のように質問に回答します。今回はローカルのみで実行するので、プラットフォームの選択で"Static webserver"を指定しました。ここはデプロイ先の環境に合わせて指定してください。

プロジェクトが生成されました。

2. CAPのODataにアクセス
2.1. モデルを追加
以下のコマンドでmanifest.jsonにモデル(ODataサービス)を追加します。
コマンドのリファレンス:https://github.com/ui5-community/generator-ui5-project/
yo easy-ui5 project newmodel

モデルのタイプでOData v4を選択します。

わかりやすさのために、データソース名などを以下のように変更しました。

2.2. simpleproxyをインストール
ローカルで起動しているCAPのODataにアクセスするには、ui5-middleware-simpleproxyというミドルウェアを使います。1.で生成したプロジェクトのディレクトリに移動し、simpleproxyをインストールします。
npm install ui5-middleware-simpleproxy --save-dev
package.jsonのui5.dependenciesにも追加します。

ui5.yamlに以下の設定を追加します。これで、/bookings/で始まるリクエストがhttp://localhost:4004/ordering/へ転送されます。

removeETag: trueのオプションについては、参考にしたGitHubのプロジェクトの設定に合わせています。このオプションをつけないと、データ取得時に以下のエラーになってしまいました。

2.3. 動作確認
まだ画面も何もない状態ですが、npm startでアプリを実行し、$metadataが取得できていれば疎通OKです。

3. 一覧表示用のビューを作成
3.1. ビューを生成
以下のコマンドで新規ビューを作成します。
yo easy-ui5 project new view


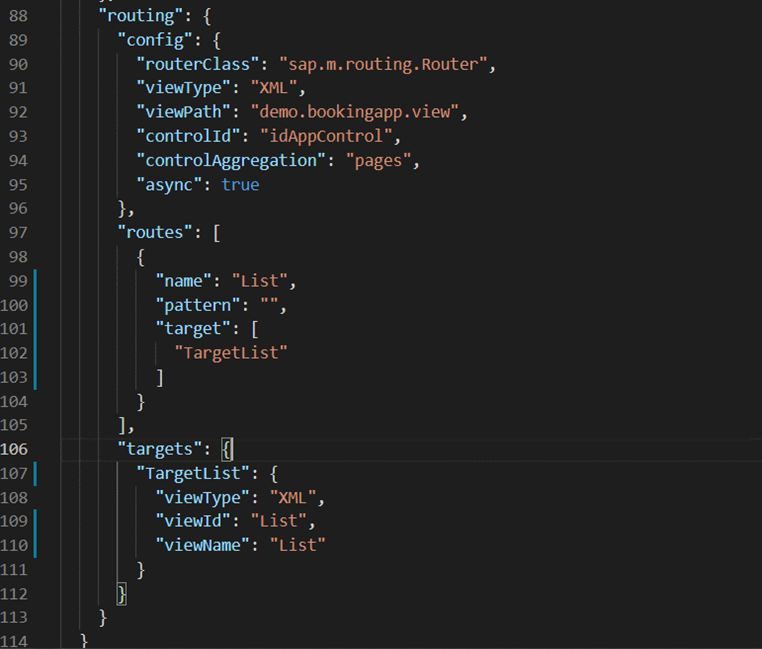
3.2. Routeを修正
manifest.jsonのroutesを修正し、List Viewがデフォルトで表示されるようにします。
3.3. ビューを実装
一覧を表示するビューを作成します。
 <mvc:View controllerName="demo.bookingapp.controller.List"
  displayBlock="true"
  xmlns="sap.m"
  xmlns:mvc="sap.ui.core.mvc">

  <Table id="table"
    items="{
      path: '/Orders',
      parameters: {
        $orderby: 'orderId'
      }}" mode="MultiSelect" selectionChange="onSelectionChange" busy="{viewModel>/busy}">
    <headerToolbar>
      <OverflowToolbar>
        <content>
          <Title text="Orders" />
          <ToolbarSpacer/>
          <Button icon="sap-icon://add" press="onAdd" />
          <Button text="Delete" press="onDelete" enabled="{viewModel>/deleteEnabled}" />
        </content>
      </OverflowToolbar>
    </headerToolbar>
    <columns>
      <Column>
        <Text text="Order ID"/>
      </Column>
      <Column>
        <Text text="Order Date"/>
      </Column>
      <Column>
        <Text text="Order Time"/>
      </Column>
      <Column>
        <Text text="Comment"/>
      </Column>
      <Column>
        <Text text="Created At"/>
      </Column>
      <Column>
        <Text text="Status"/>
      </Column>
      <Column>
        <Text text="Editing Status"/>
      </Column>
    </columns>
    <items>
			<ColumnListItem type="Navigation" press="onDetailPress">
				<Text text="{orderId}"/>
        <Text text="{date}"/>
        <Text text="{time}"/>
        <Text text="{comment}"/>
        <Text text="{createdAt}"/>
        <Text text="{to_status/name}"/>
        <Text text="{
            path: 'HasDraftEntity',
            formatter: '.editingStatus'}"/>
			</ColumnListItem>
    </items>
  </Table>
</mvc:View>
ODataへのバインドは以下の部分で行っています。parametersで$orderbyを指定し、orderIdの昇順にソートされるようにしています。
OData V2との違い
OData V2ではパラメータは$なしで指定しましたが、V4ではODataのクエリオプションと同じ形式で、$をつけて指定します。
  <Table id="table"
    items="{
      path: '/Orders',
      parameters: {
        $orderby: 'orderId'
      }}"
3.4. コントローラーを実装
onInitではビューで使用するモデルを定義します。
sap.ui.define([
    "demo/bookingapp/controller/BaseController",
    "sap/ui/model/json/JSONModel",
    "sap/m/MessageBox",
    "sap/m/MessageToast"
], function (Controller, JSONModel, MessageBox, MessageToast) {
    "use strict";

    return Controller.extend("demo.bookingapp.controller.List", {
        onInit: function () {
            var oModel = new JSONModel({
                deleteEnabled: false,
                busy: false
            });
            this.setModel(oModel, "viewModel");
        },
onSelectionChangeで、テーブルの行が選択されたときにDelteボタンを有効にします。
        onSelectionChange: function (oEvent) {
            var aContexts = oEvent.getSource().getSelectedContexts();
            if (aContexts.length > 0) {
                this.setProperty("viewModel", "deleteEnabled", true);
            } else {
                this.setProperty("viewModel", "deleteEnabled", false);
            }
        },
※setPropertyメソッドはBaseControllerで定義しています。
            setProperty: function (sModelName, sPropertyName, value) {
                this.getModel(sModelName).setProperty(`/${sPropertyName}`, value);
            },
以下はテーブル項目"Editing Status"用のフォーマッターです。ドラフトが存在するかどうかによって、Active(ドラフトなし)or Draft(ドラフトあり)を表示します。
        editingStatus: function (sHasDraftEntity) {
            var status = "";
            if (sHasDraftEntity === "Yes") {
                status = "Draft";
            } else {
                status = "Active";
            }
            return status;
        },
以上で、以下のような画面が表示されるようになります。

行を選択するとDeleteボタンが有効になります。

4. 削除処理
Deleteボタンを押したときの処理を実装します。ポイントは以下です。
- 複数行を選択してのDeleteが可能
- 選択行が単数か複数かによって削除確認のメッセージを変える(お好みで…)
4.1. 削除処理を実装
        //Deleteボタンが押されたら
        onDelete: function () {
            var oTable = this.byId("table");
            var aContexts = oTable.getSelectedContexts();
            this._orderId = aContexts[0].getProperty("orderId");
            var confirmMessage = this._getDeleteMessage(aContexts).confirmMessage

            MessageBox.confirm(confirmMessage, {
				actions: ["Delete", MessageBox.Action.CLOSE],
				emphasizedAction: "Delete",
                onClose: this._deleteOrders.bind(this)
            });
        },

        //削除確認のメッセージを取得
        _getDeleteMessage: function (aContexts) {
            var oMessage = {};
            if (aContexts.length > 1) {
                oMessage.confirmMessage = `Delete selected orders?`;
                oMessage.deleteMessage = `Orders has been deleted`;
            } else {
                oMessage.confirmMessage = `Delete order ${this._orderId}?`;
                oMessage.deleteMessage = `Order ${this._orderId} has been deleted`;
            }
            return oMessage;
        },

        //オーダー削除
        _deleteOrders: function (oAction) {
            if (oAction === MessageBox.Action.CLOSE) {
                return
            }

            var oTable = this.byId("table");
            var aContexts = oTable.getSelectedContexts();
            this.setProperty("viewModel", "busy", true);
            var aDeletePromises = aContexts.map(oContext => {
                return oContext.delete("$auto")
            });

            Promise.all(aDeletePromises)
            .then(() => {
                var deleteMessage = this._getDeleteMessage(aContexts).deleteMessage
                MessageToast.show(deleteMessage, {
                    closeOnBrowserNavigation: false
                });
                this._doRefresh();
                this.setProperty("viewModel", "busy", false);
            })
            .catch(error => {
                console.log(error);
                this.setProperty("viewModel", "busy", false);
            });

        },

        //削除結果をテーブルに反映
        _doRefresh: function () {
            var oTable = this.byId("table");
            oTable.getBinding("items").refresh();
        },
実際にオーダーを削除しているのは以下の部分です。テーブルから選択された行のコンテキストを取ってきて、各コンテキストに対してdelete()を実行しています。$autoというのは更新用のグループIDで、同じグループIDを持つ操作が1つの$batchリクエストにまとめられます。
        _deleteOrders: function (oAction) {
            ...
            var oTable = this.byId("table");
            var aContexts = oTable.getSelectedContexts();
            this.setProperty("viewModel", "busy", true);
            var aDeletePromises = aContexts.map(oContext => {
                return oContext.delete("$auto")
            });
OData V2との違い
OData V2の場合、CRUD処理はモデルのメソッドを使用して実行していました。これに対してOData V4では、コンテキストのメソッドを使用してCRUD処理を実施します。
4.2. 動作確認
- 1行のみ指定した場合
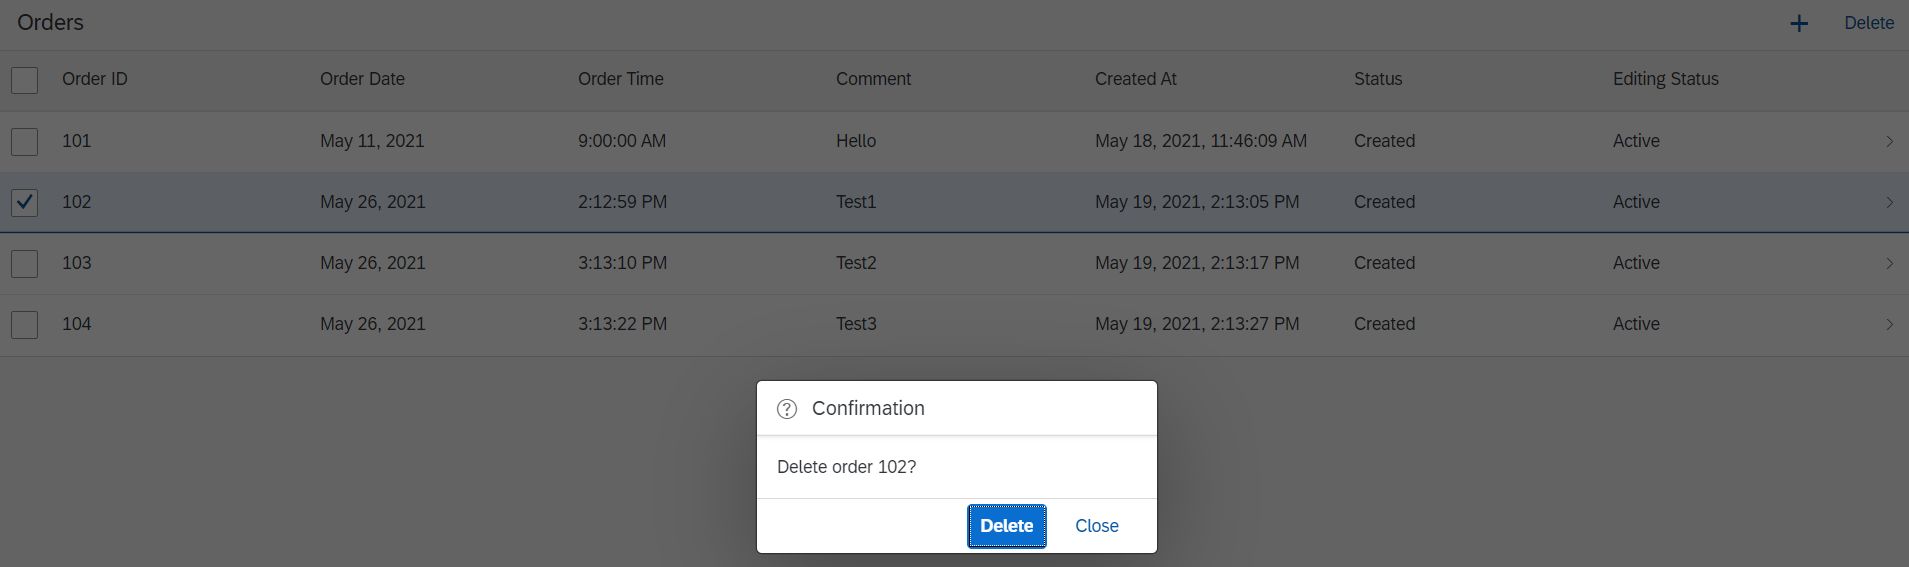

- 複数行指定した場合


開発者ツールでNetworkタブを見ると、1つの$batchリクエストに複数のリクエストが入っています。

まとめ
①OData V4では、バインド時のパラメータは$をつけて指定する
ドキュメントでは以下のように説明されています。
Change
Binding parameter names: The binding parameter name for an OData system query option is identical to the system query option name: $expand, $select, ... (V2 uses expand, select).
Reason
Simplification: The OData V4 model simplifies the binding parameter structure to just one map where all entries in the map are OData query options, with the exception of entries that have a key starting with "$$" (binding-specific parameters). In all cases, the names of the binding parameters are exactly the same as in the OData URL sent to the server.
②OData V4では、コンテキストのメソッドを使用してCRUDオペレーションを行う
Change
No CRUD methods on model: Model does not support the methods create, read, remove, update.
Reason
Simplification: read, update, create and remove operations are available implicitly via the bindings. Bindings can also be used without controls. It is not possible to trigger requests for specific OData URLs. For more information, see Accessing Data in Controller Code.