はじめに
SCP Neoのトライアル環境が今年11月に廃止されることになりました。WebIDEのトライアルも使えなくなってしまうので、引っ越し先を検討する必要があります。
#SAP is getting serious about @sapcp Neo environment. The trial for it will be closed on November 13th, 2020. https://t.co/hj1blYOjmz
— Gregor Wolf (@wolf_gregor) August 13, 2020
引っ越し先候補としては①ローカルIDE、②Business Application Studioがあります。今回は以下のブログを参考にBusiness Application Studioへの移行をしてみます。
Migrating SAP Fiori Applications from SAP Web IDE to SAP Business Application Studio
移行するもの
- Destination
- UI5アプリ
前提
- 移行対象のUI5アプリはGitで管理されている
- Cloud Foundryのトライアルアカウントを作成済
- Business Application Studioを有効化済
- Business Application StudioにFioriのDev Spaceを作成済

Destinationの移行
Neo環境でDestinationをエクスポートします。

Cloud Foundry環境でDestinationをインポートします。

インポートした後以下を変更します。
Name: 大文字が入っているとdeployでエラーになってしまうので小文字に変更
Additional Properties: 以下を追加します。プルダウンで出てこないので、直接入力します。
- HTML5.DynamicDestination = true
- HTML5.Timeout = 60000

Cloud Foundryのアカウントの有効期間は最大90日なので、次回アカウントを作り直したときのためにここで設定したDestinationをエクスポートして保存しておくのが良いと思います。
UI5アプリの移行
シンプルなフリースタイルアプリを使って移行の手順を確認します。

Gitからアプリをクローン
ターミナルを開き、Gitからプロジェクトをクローンします。

File>Open Workspaceから、クローンしたプロジェクトを選択して開きます。

xs-app.jsonファイルを作成
プロジェクト直下にxs-app.jsonファイルを作成します。Neo環境ではneo-app.jsonがDestinationへのルーティングを行っていましたが、Cloud Foundryではxs-app.jsonがその役割を担います。

内容は以下の通りです。
{
"authenticationMethod": "none",
"routes": [
    {
    "authenticationType": "none",
    "csrfProtection": false,
    "source": "^/sap/opu/odata/",
    "destination": "<YourDestination>"
    },
    {
    "source": "^(.*)$",
    "target": "$1",
    "service": "html5-apps-repo-rt"
    }
]}
package.jsonファイルの内容を置き換え
package.jsonの内容を以下に置き換えます。重要なのはapprouterを動かすために@sap/approuterがdevDependencyに追加されているところです。
{
  "name": "<yourAppName>",
  "version": "0.0.1",
  "devDependencies": {
    "@sapui5/ts-types": "1.71.x",
    "@sap/ui5-builder-webide-extension": "1.0.x",
    "@sap/approuter": "8.1.x",
    "@sap/html5-repo-mock": "1.5.x"
  },
  "scripts": {
    "build": "ui5 build --include-task=generateManifestBundle generateCachebusterInfo",
    "start-local": "node node_modules/@sap/html5-repo-mock/index.js"
  },
  "ui5": {
    "dependencies": [
      "@sap/ui5-builder-webide-extension"
    ]
  }
}
ui5.yamlの内容を置き換え
ui5.yamlの内容を以下に置き換えます。
specVersion: '1.0'
metadata:
  name: <yourAppName>
type: application
resources:
  configuration:
    propertiesFileSourceEncoding: UTF-8
builder:
  customTasks:
    - name: webide-extension-task-updateManifestJson
      beforeTask: generateManifestBundle
      configuration:
        appFolder: webapp
        destDir: dist
    - name: webide-extension-task-resources
      afterTask: webide-extension-task-updateManifestJson
      configuration:
        nameSpace: <yourNamespace>
WebIDEではwebide-extension-task-updateNeoApp、およびwebide-extension-task-lintというタスクが入っていましたが、それらが不要になるので削除した形です。
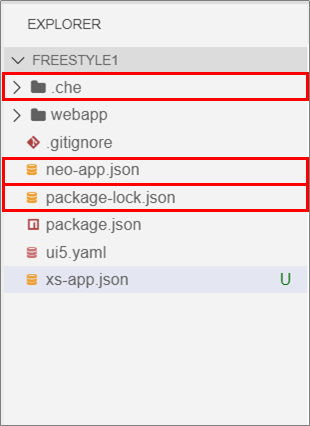
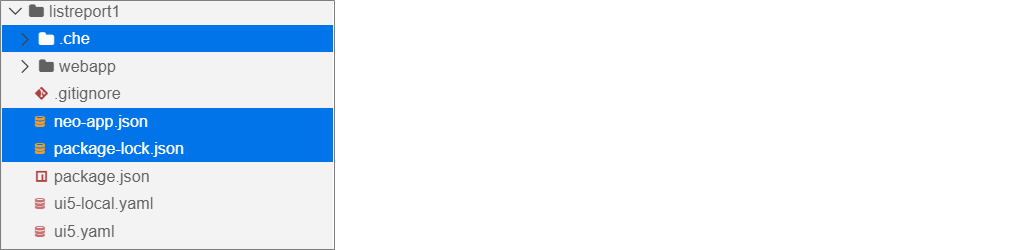
不要なファイルを削除
以下のファイルを削除します。
.che, neo-app.json, package-lock.json
ローカルでテスト
.gitignoreファイルにnode_modules/を追加したあとで、npm installを実行します。

次に、Run Configurationをクリックします。

+ボタンをクリック

実行対象のプロジェクトを選択

実行するファイルを選択

UI5のバージョンを選択

設定の名前を確認し、Enterを押下

Data Sourceにカーソルを合わせ、緑のアイコン(Bind)をクリック

Destinationを選択

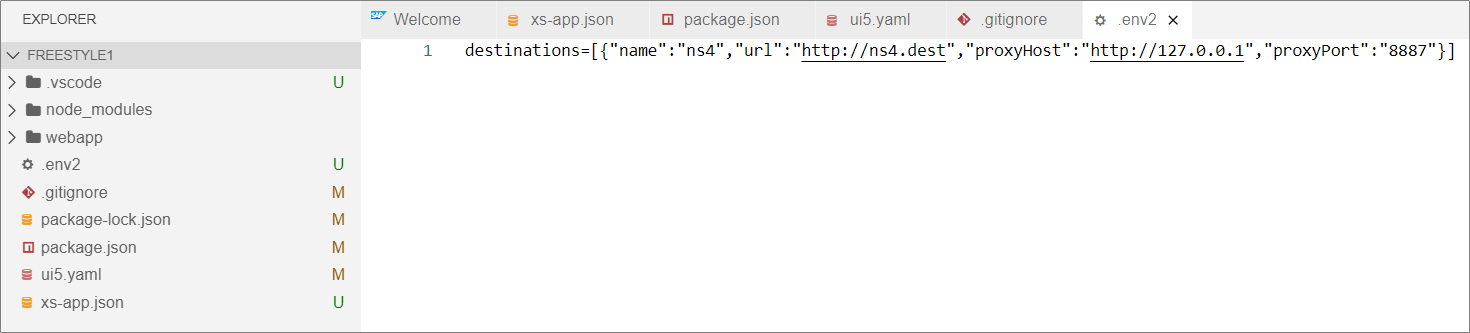
結果、以下の状態になります。

.env2というファイルが作成されています。(途中で設定をやり直したので空の.env1もできていたが、削除した)
緑の矢印を押して実行します。

ポップアップが出るので、Expose and Openをクリックします。

ポートの名前を入力するダイアログが出てくるので、適当な名前を入力します。

ブラウザが開きましたが、何も表示されません。

ネットワークタブを見ると、本来ロードされるはずのsap-ui-core.jsがロードされていませんでした。
そこで、index.htmlのbootstrapの部分を以下のように修正します。
		<script id="sap-ui-bootstrap"
			src="resources/sap-ui-core.js"
		<script id="sap-ui-bootstrap"
			src="./resources/sap-ui-core.js"
UI5のリソースはロードされましたが$metadataがロードされません。Internal Server Errorが起きています。

解決方法がわからなかったので、邪道ですが.envをいじることにします。直接サーバのURLを指定してしまいます。ここはローカル実行用の設定なので、動けばよしとします。

設定を変えたら一旦デバッガを停止して再度実行します。ようやく正常に実行できました。

ビルドとデプロイ
ビルド
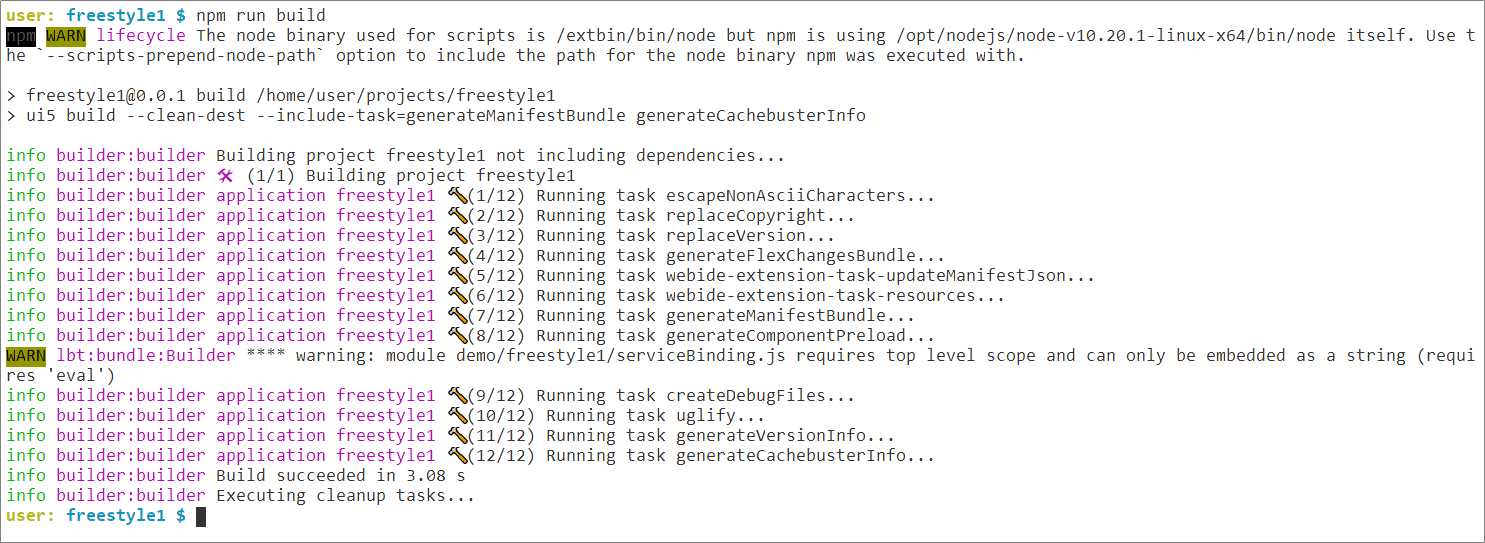
npm run buildでビルドします。
デプロイ
デプロイは色々とつまづいたところがあったので、最初に注意点を記載します。
- BSPアプリケーションの名前はZZ1_はじまりにする
- BPSアプリケーションの名前はpackage.jsonの"name"に設定する~~(デプロイ時に指定不可!)~~ →別の値を入力して上書きできます
- ABAPサーバ側でODataサービス"ABAP_REPOSITORY_SRV"を公開しておく
- Gatewayのウイルススキャンプロファイルの初期値が設定されていないとエラーになる(わからなければ Tr:/N/IWFND/VIRUS_SCANで一時的に無効化)
package.jsonのnameを以下のように変更します。

abap-deploy --log-level=errorでデプロイします。--log-level=errorオプションをつけるとエラーがあったときにログファイルが作成されます。

Bad Gatewayのエラーが出ているのでログファイルを見てみますが、あまり情報は得られません。

Tr:SE80で見てみると、BSPアプリケーションは登録されています。

動作確認
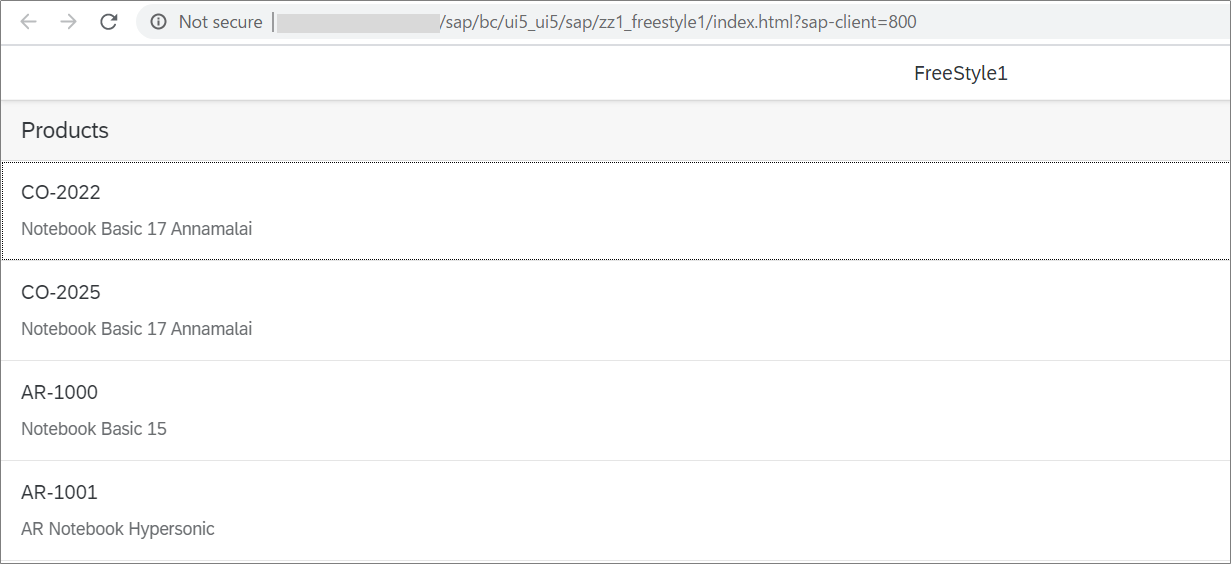
Tr:SICFでBSPアプリを検索し、右クリックして"Test Service"を実行します。

ブラウザでアプリが表示されました。BadGatewayエラーは謎ですが、とりあえずデプロイしてちゃんと動くところまでは確認できました。
ABAPサーバにデプロイ済の場合
上記の手順で気になったのは、「BSPアプリケーションの名前はZZ1_はじまりにする」という決まりです。すでにデプロイ済のアプリの場合はどうなるのでしょうか?
デプロイ済のアプリの場合、更新モードでのデプロイとなりBSPアプリケーションの名前の制約はありませんでした。

Fiori elementsの場合
Business Application StudioではFiori Toolsを使ってFiori elementsアプリを作成します。ということは、既存のプロジェクトもFiori Toolの形式に合わせたほうがよいでしょう。
コマンドエリアでFioriと打ってみたところ以下の機能を発見しました。

Fiori Toolsの説明によるとこのコマンドは、ワークスペースにある既存のプロジェクトでApplication Modelerを使えるように、package.json, ui5*.yaml, test*.htmlファイルを更新してくれるそうです。
喜んでMigrateを実行してみたのですが、何も起こらず・・・![]()
VS Codeで実行したときは以下のエラーが出ました。ツールまたは環境に問題があるようです。

マニュアルでの移行
Fiori Toolsで生成したプロジェクトを参考に、マニュアルで各ファイルを更新していきます。
package.json
"name"より下の部分を全て置き換えます。
{
    "name": "<yourAppName>",
	"private": true,
	"sapux": true,
	"description": "",
	"keywords": [
		"ui5",
		"openui5",
		"sapui5"
	],
	"main": "webapp/index.html",
	"scripts": {
		"postinstall": "npm i @sap/ux-ui5-tooling@\"^1.0.0\" @sap/ux-specification@\"^1.76.12\" --save-dev --save-exact=false",
		"start": "ui5 serve --open test/flpSandbox.html#masterDetail-display --",
		"start-mock": "ui5 serve --open test/flpSandboxMockServer.html#masterDetail-display --",
		"build": "rimraf dist && ui5 build -a --include-task=generateManifestBundle generateCachebusterInfo",
		"deploy": "fiori add deploy-config"
	},
	"remarkConfig": {
		"plugins": [
			"remark-preset-lint-consistent"
		]
	},
	"devDependencies": {
		"@sap/ux-specification": "^1.78.5",
		"@sap/ux-ui5-tooling": "^1.0.12",
		"@ui5/cli": "2.0.3",
		"@ui5/fs": "2.0.1",
		"@ui5/logger": "2.0.0",
		"rimraf": "3.0.0"
	},
	"optionalDependencies": {
		"fsevents": "1.2.9"
	},
	"ui5": {
		"dependencies": [
			"@sap/ux-ui5-tooling"
		]
	}
}
ui5.yaml
type: applicationより下を置き換えます。
specVersion: '1.0'
metadata:
  name: '<yourAppName>'
type: application
ui5Theme: sap_fiori_3
server:
  customMiddleware:
    - name: fiori-tools-proxy
      afterMiddleware: compression
      configuration:
        ignoreCertError: false # If set to true, certificate errors will be ignored. E.g. self-signed certificates will be accepted
        backend:
          - path: /sap
            destination: <destination>
            url: <ABAP server url>
        ui5:
          path:
            - /resources
            - /test-resources
          url: https://ui5.sap.com
          version:  # The UI5 version, for instance, 1.78.1. Empty means latest version
    - name: fiori-tools-appreload
      afterMiddleware: compression
      configuration:
        port: 35729
        path: webapp
ui5-local.yaml
プロジェクト直下にui5-local.yamlファイルを作成します。
specVersion: '2.0'
metadata:
  name: '<yourAppName>'
type: application
framework:
  name: SAPUI5
  version: "1.81.0"
  libraries:
    - name: sap.f
    - name: sap.m
    - name: sap.suite.ui.generic.template
    - name: sap.ui.comp
    - name: sap.ui.core
    - name: sap.ui.generic.app
    - name: sap.ui.table
    - name: sap.ui.unified
    - name: sap.ushell
    - name: themelib_sap_fiori_3
server:
  customMiddleware:
    - name: fiori-tools-proxy
      afterMiddleware: compression
      configuration:
        backend:
          - path: /sap
            url: <ABAP server url>
    - name: fiori-tools-appreload
      afterMiddleware: compression
      configuration:
        port: 35729
        path: webapp
test*.html
testフォルダ配下にあるflpSandbox.html, flpSandboxMockServer.htmlを修正します。
*resourcesへのパスを書き換えます。
	<script src="../test-resources/sap/ushell/bootstrap/sandbox.js" id="sap-ushell-bootstrap"></script>

	<!-- Bootstrap the UI5 core library -->
	<script id="sap-ui-bootstrap"
			src="../resources/sap-ui-core.js"
	<script src="/test-resources/sap/ushell/bootstrap/sandbox.js" id="sap-ushell-bootstrap"></script>

	<!-- Bootstrap the UI5 core library -->
	<script id="sap-ui-bootstrap"
			src="/resources/sap-ui-core.js"
※アプリケーションのインテントが"masterDetail-display"以外になっている場合、"masterDetail-display"に変更します。
			applications: {
				"masterDetail-display": {
					additionalInformation: "SAPUI5.Component=demo.listreport1",
					applicationType: "URL",
					url: "../",
					description: "List Report1"
				}
			}
不要なファイルを削除
以下のファイルを削除します。
.che, neo-app.json, package-lock.json
.gitignoreファイルにnode_modules/を追加したあとで、npm installを実行します。
ローカルで実行
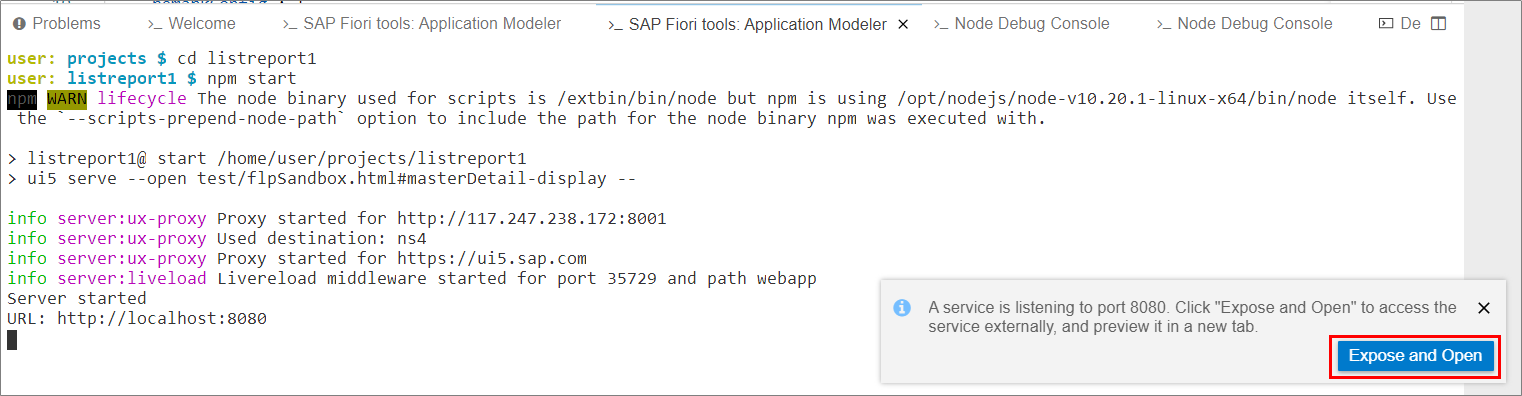
npm startで実行します。
ポップアップが出るので"Expose and Open"をクリック
ポート名を入力しEnter

ブラウザが立ち上がり、フォルダ階層が表示されます。testフォルダ配下のflpSandbox.htmlを開きます。

ラウンチパッドが開くので、タイルをクリック

List Reportが表示されました。

デプロイ
Fiori Toolsからのデプロイ方法については、以下のブログに紹介されています。
-SAP Fiori Tools: Deploy to ABAP server
移行してみて
以下は個人の感想です。
フリースタイル方式とFiori Tools方式どっちがいい?
Fiori Tools方式はコマンドラインで操作できるので、フリースタイル方式より使いやすいと感じました。VS Codeにも対応していることから、Business Application Studio独自の仕組みに依存していないところが気に入りました。
以下のブログで紹介されていますが、Fiori Tools方式でフリースタイルアプリを開発することも可能です。webappフォルダの中身をフリースタイルに変えれば動きます。
SAP Fiori Tools: SAPUI5 Freestyle App
よって、Business Application Studioへ移行する場合はFiori Tools方式に統一してもいいのではないかと思っています。今回はうまくいきませんでしたがマイグレーションツールもありますし。
Business Application Studioとローカル開発どっちがいい?
今回移行をやってみて、個人的にはローカル開発のほうがいいかなと思いました。Fioriアプリを作るにあたっては特段、Business Application Studioのほうが便利ということもありません。Business Application Studioは毎回起動までにしばらく時間がかかるのに対し、ローカルならすぐに立ち上げられます。
Gitのリモートリポジトリに保存するのを忘れても、ローカルなら手元にあるので大丈夫です。Business Application Studioはトライアルアカウントの期限が切れたら消えてしまいます。
よってFioriアプリ開発に関しては私はローカル開発で行こうかなと考えています。
ローカル開発については以下の記事を書いています。今はこの記事を書いた時よりyo easy-ui5で生成できるプロジェクトのタイプが増えて便利になっています。
【SAPUI5】UI5 Toolingを使ってみる
参考
ブログ
- Migrating SAP Fiori Applications from SAP Web IDE to SAP Business Application Studio
- SAP Fiori Tools: Deploy to ABAP server
ドキュメント