はじめに
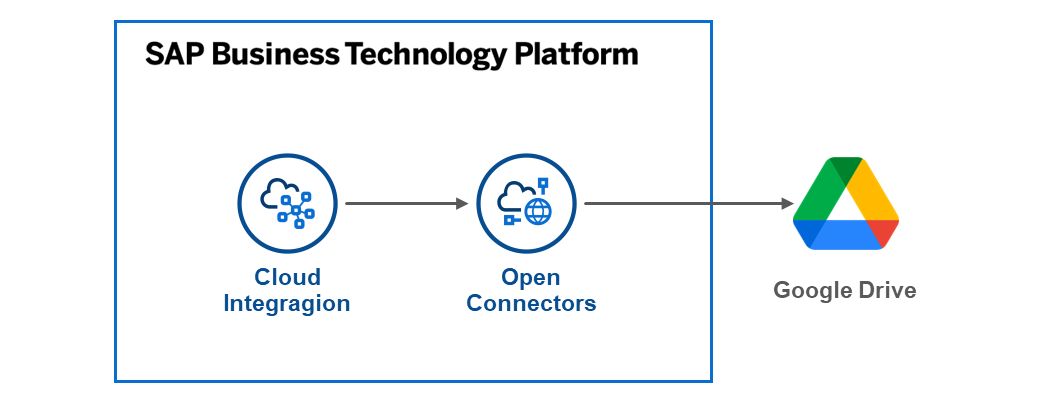
前回の記事で、Open ConnectorsからGoogle Driveへの連携を設定しました。この記事では、Cloud Integration (CPI)からOpen Connectorsを呼び、Google Driveにファイルを格納します。
「直接Open Connectorsを呼べばよくない?なぜCPIを挟む必要があるの?」と思う方もいるかもしれません。もちろん直接Open Connectorsを呼んでもいいのですが、私はCPIを使うと以下のメリットがあると考えています。
認証情報を安全に渡せる
Open Connectorsの認証情報は、User xxxx, Organization xxxx, Element xxxxの形式でヘッダに設定する必要があります。これはBasic認証やOAuth2.0などの一般的な認証方法と異なるため、BTPのDestinationで認証情報を設定することができません。このためアプリケーションからOpen Connectorsを呼ぼうとすると、ソースコードの中で認証情報を設定する必要がありますが、これは安全な方法ではありません。CPIはOAuth2.0による認証が可能なため、アプリケーションのコードで認証情報を設定する必要がありません。
アプリケーション側でFormDataを扱わなくてよい
Open ConnectorsからGoogle Driveへの連携では、ファイルをFormDataとして渡す必要があります。ロジックでFormDataを設定するのは、Bodyに直接ファイルをアップロードするのに比べて若干処理が複雑です。CPIでBodyに渡されたファイルをFormDataに変換してOpen Connectorsに渡すことで、アプリケーション側の処理を簡単にすることができます。
ステップ
- Open Connectors用の認証情報の登録
- iFlowの作成
- テスト
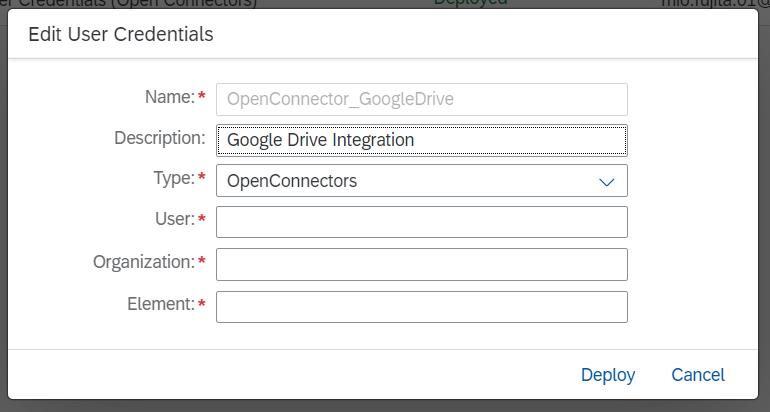
1. Open Connectors用の認証情報の登録
Security MaterialでOpen Connectors用の認証情報を登録します。

2. iFlowの作成
作成したiFlowはこちらです。以下で各ステップの説明をします。
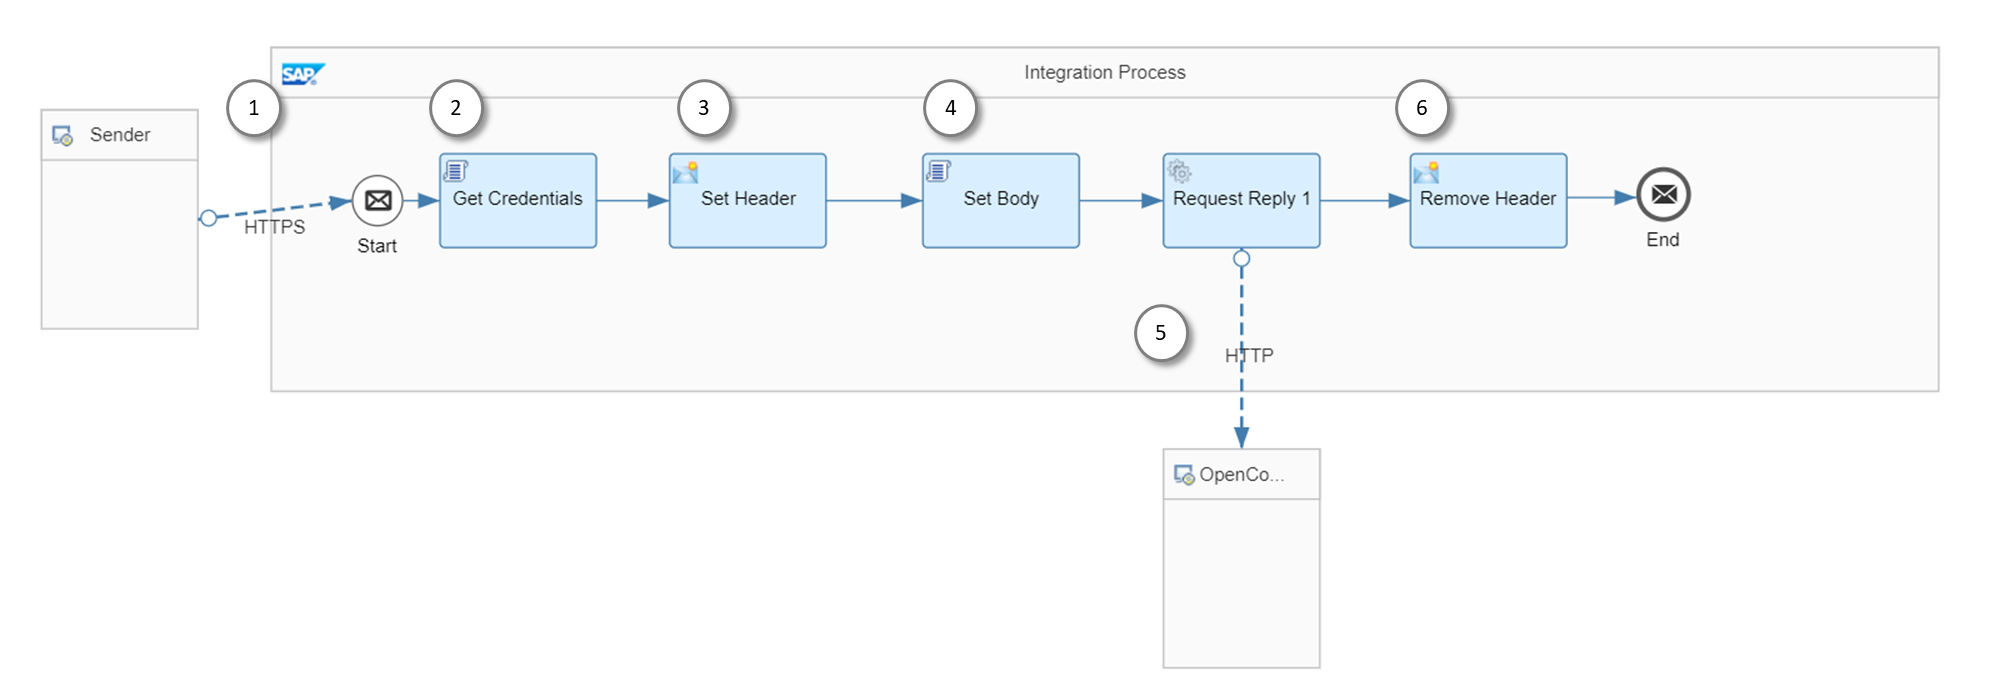
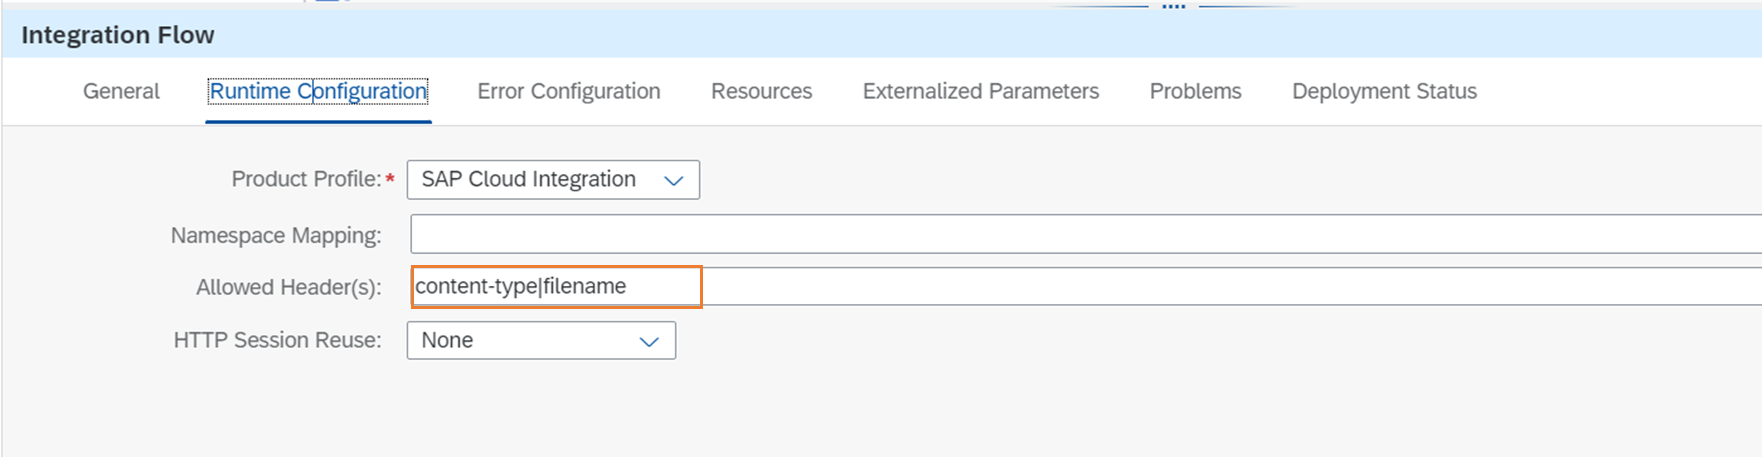
フローの設定として、ヘッダに"content-type"と"filename"を受け取れるようにしておきます。この設定がないと、呼び出し側でヘッダを指定してもフローの中に入ってきません。
①HTTPS Sender Adapter
Addressに任意のパスを指定します。呼び出しを簡単にするため、CSRF Protectedのチェックは外しておきます。

②認証情報の取得 [Groovy Script]
- で登録したOpen Connectors用の認証情報を取得し、Authorizationヘッダに設定します。
import com.sap.gateway.ip.core.customdev.util.Message;
import java.util.HashMap;

import com.sap.it.api.securestore.SecureStoreService;
import com.sap.it.api.securestore.UserCredential;
import com.sap.it.api.securestore.exception.SecureStoreException;
import com.sap.it.api.ITApiFactory;

def Message processData(Message message) {
    def secureStorageService =  ITApiFactory.getService(SecureStoreService.class, null)
    try{
        def secureParameter = secureStorageService.getUserCredential("OpenConnector_GoogleDrive")
        def credentials = secureParameter.getPassword()
        message.setHeader("Authorization", credentials)
    } catch(Exception e){
        throw new SecureStoreException("Secure Parameter not available")
    }
    return message;
}
③ヘッダの設定 [Content Modifier]
Open Connectorsに渡すためのヘッダを設定します。

④Bodyの設定 [Groovy Script]
CPIにはOpenConnectors用のアダプターが用意されていますが、残念ながらFormDataはサポートされていません。そこで、Groovy Scriptを使ってBodyに受け取ったファイルをFormDataとして設定し直します。スクリプトを書くにあたっては以下のQ&Aを参考にしました。
import com.sap.gateway.ip.core.customdev.util.Message;
import java.util.HashMap;

import javax.activation.DataHandler
import javax.mail.internet.ContentType
import javax.mail.internet.MimeBodyPart
import javax.mail.internet.MimeMultipart
import javax.mail.util.ByteArrayDataSource

def Message processData(Message message) {
    byte[] bytes = message.getBody(byte[])

    def map = message.getHeaders();
    def mimeType = map.get("content-type");
    def fileName = map.get("filename");

    //  Construct Multipart
    MimeBodyPart bodyPart = new MimeBodyPart()
    ByteArrayDataSource dataSource = new ByteArrayDataSource(bytes, mimeType)
    DataHandler byteDataHandler = new DataHandler(dataSource)
    bodyPart.setDataHandler(byteDataHandler)
    bodyPart.setFileName(fileName)
    bodyPart.setDisposition('form-data; name="file"')

    MimeMultipart multipart = new MimeMultipart()
    multipart.addBodyPart(bodyPart)

    // Set multipart into body
    ByteArrayOutputStream outputStream = new ByteArrayOutputStream()
    multipart.writeTo(outputStream)
    message.setBody(outputStream)

    // Set Content type with boundary
    String boundary = (new ContentType(multipart.contentType)).getParameter('boundary');
    message.setHeader('Content-Type', "multipart/form-data; boundary=${boundary}")

    return message
}
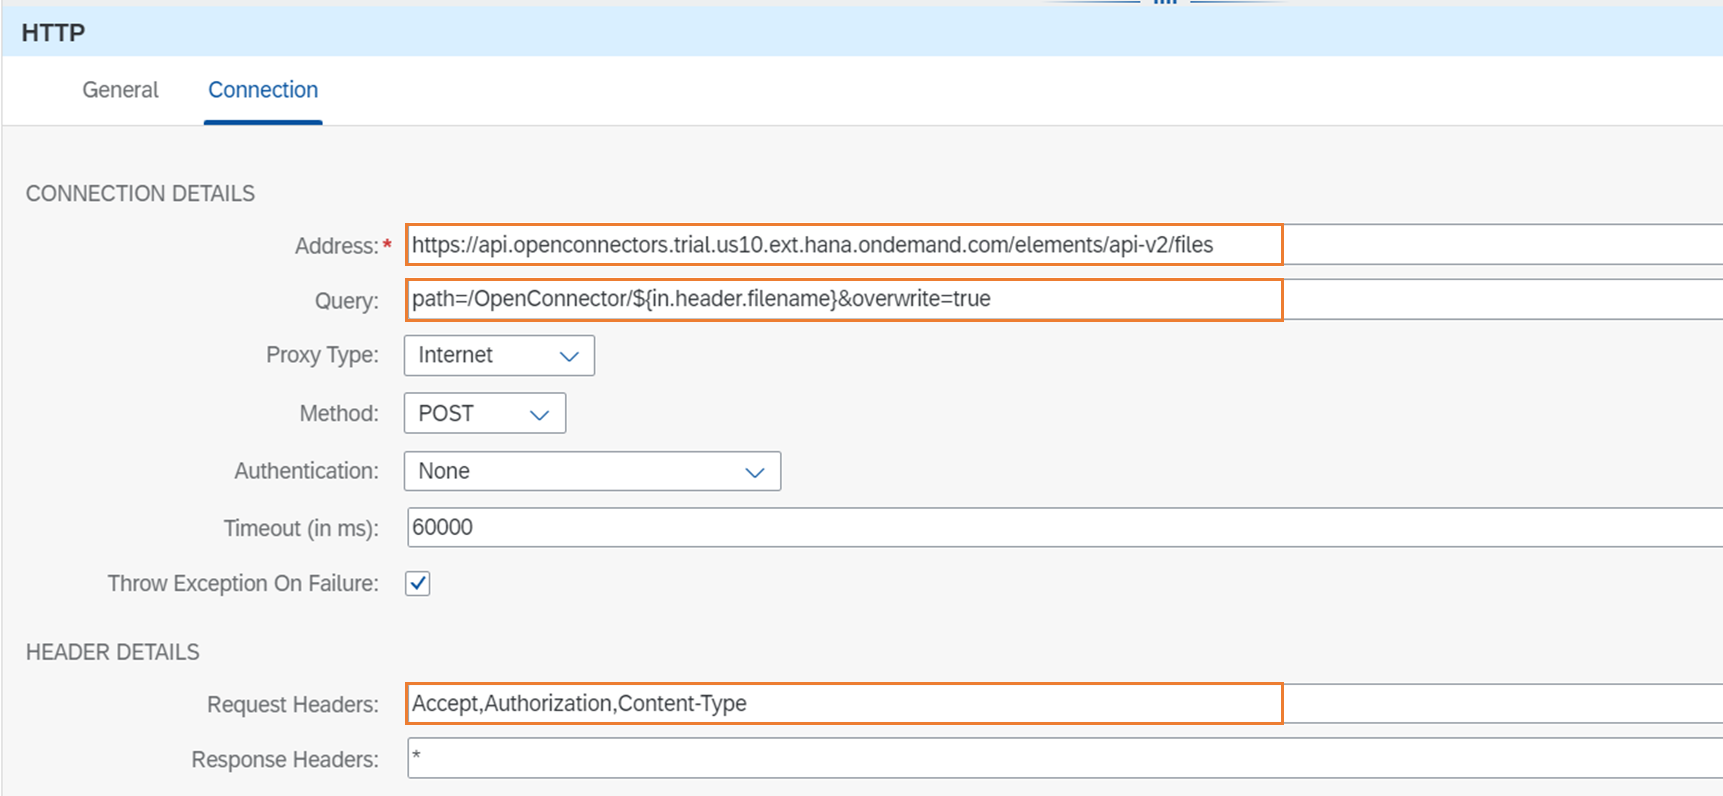
⑤Open Connectorsへ送信 [HTTPS Receiver Adapter]
Address、Query、Request Headersを指定します。Queryのpathには"Openonector"というGoogleDriveに作成したフォルダ名と、ヘッダで受け取ったファイル名を結合して設定しています。overwite=trueを指定することにより、同じファイルを繰り返しアップロードすることができます。
⑥ヘッダを削除 [Content Modifier]
ここでは、ヘッダの"Authorization"を削除しています。
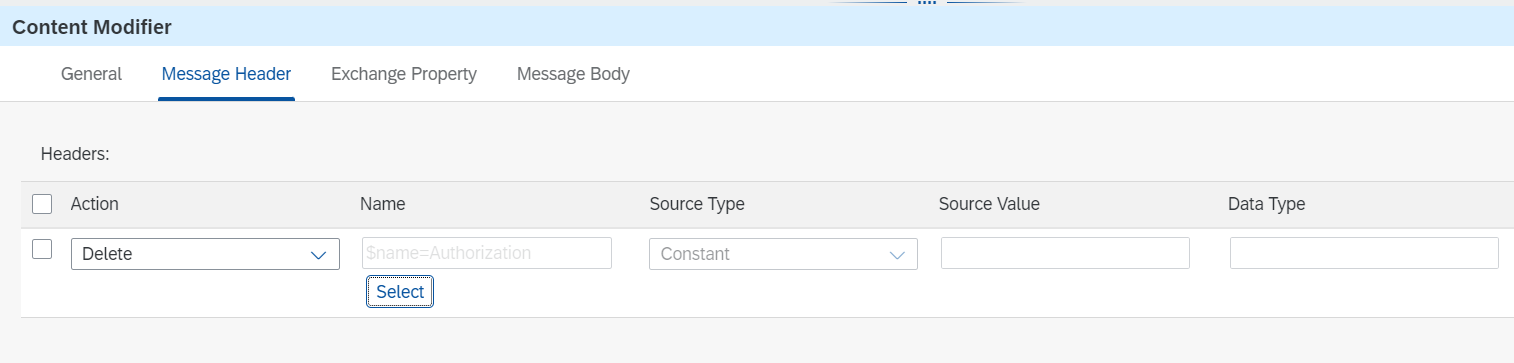
なぜかというと、②で認証情報をGroovy Scriptで取得してヘッダに設定しているのですが、このヘッダが残ったままだとPostmanから実行したときに以下のようにエラーが返ってきてしまうためです(フロー自体は正常終了)。認証情報をContent Modifierでベタ書きした場合は起きなかったので、Groovy Scriptで取ってきた値が何らかの悪さをしていると思われますが原因は不明です。そこでワークアラウンドとして、最後にヘッダを削除することにしました。
<html>

<body>
	<h1>502 Bad Gateway</h1>
	The server returned an invalid or incomplete response.
</body>

</html>
3. テスト
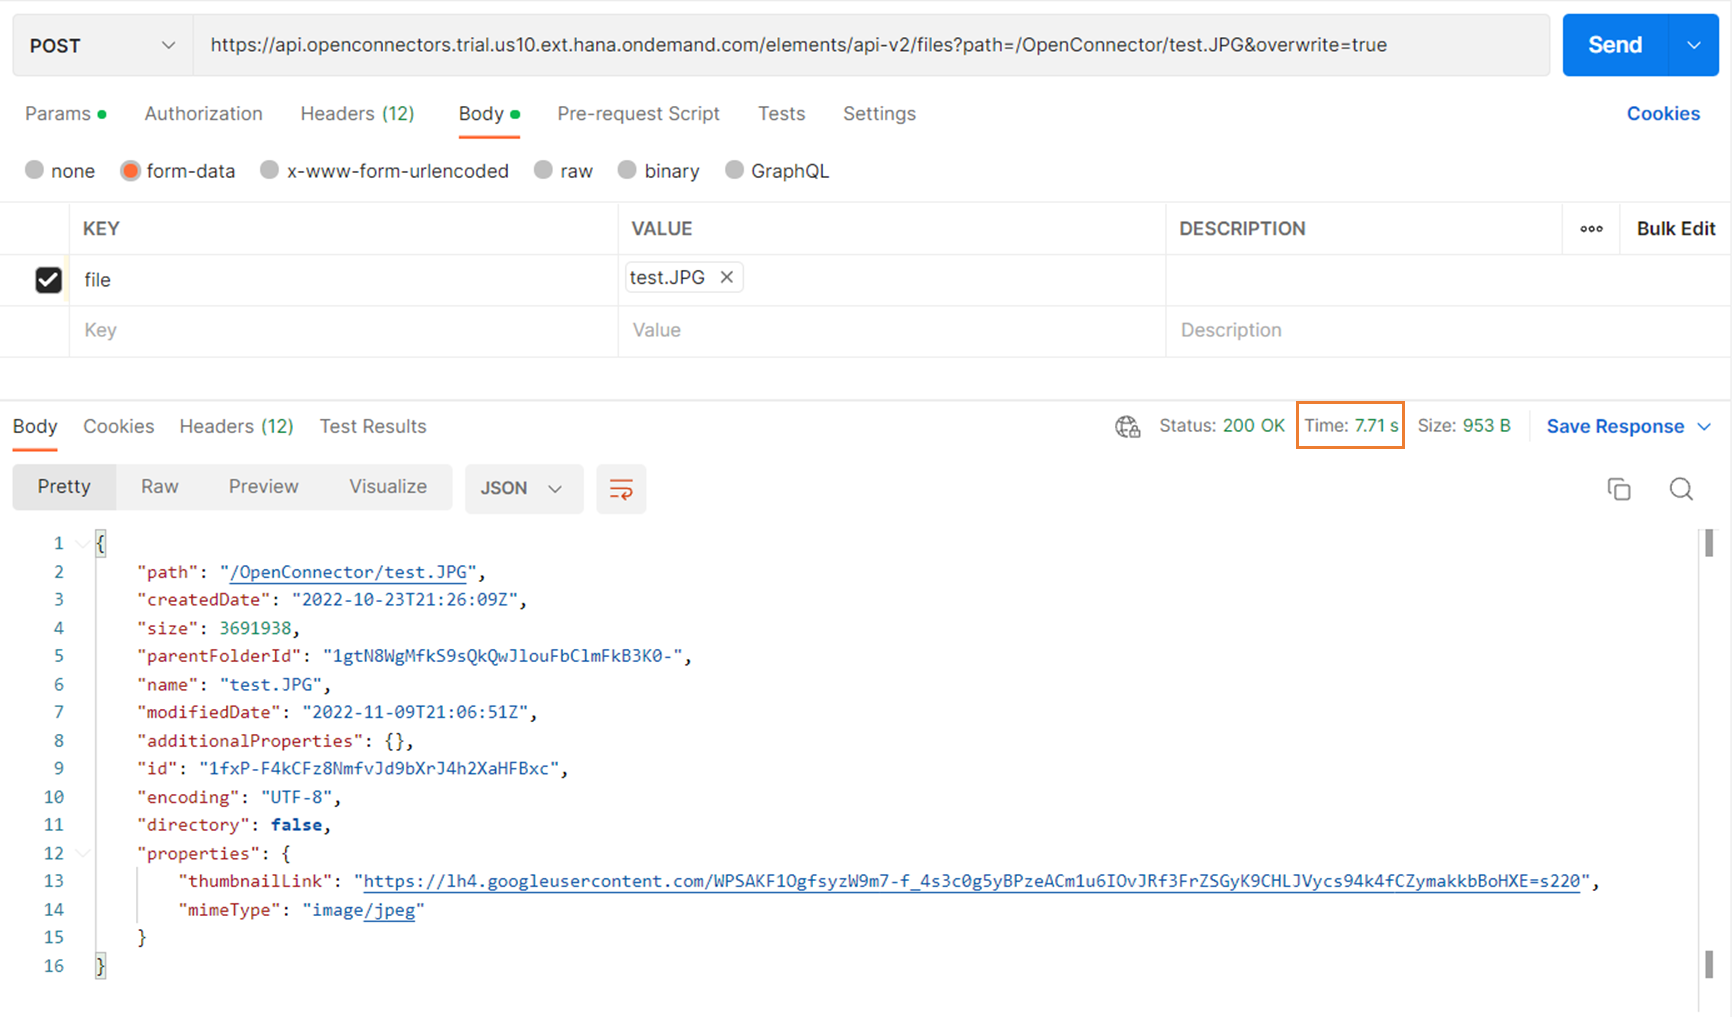
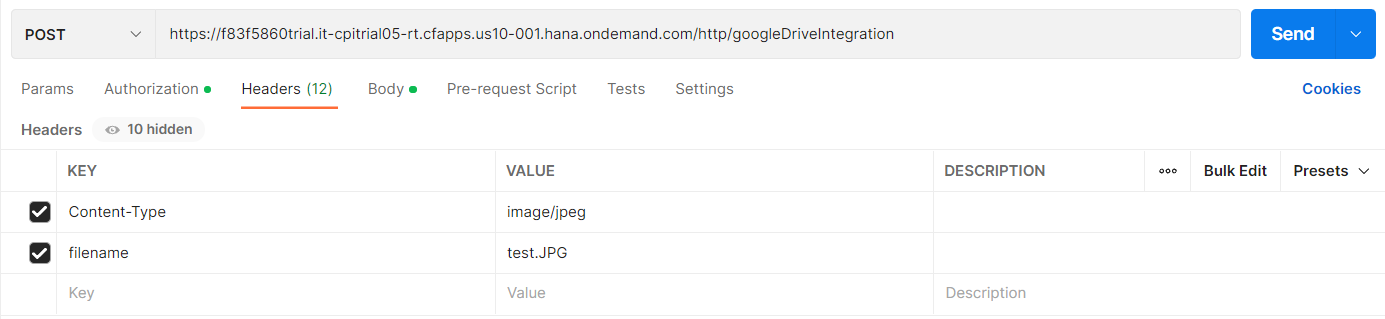
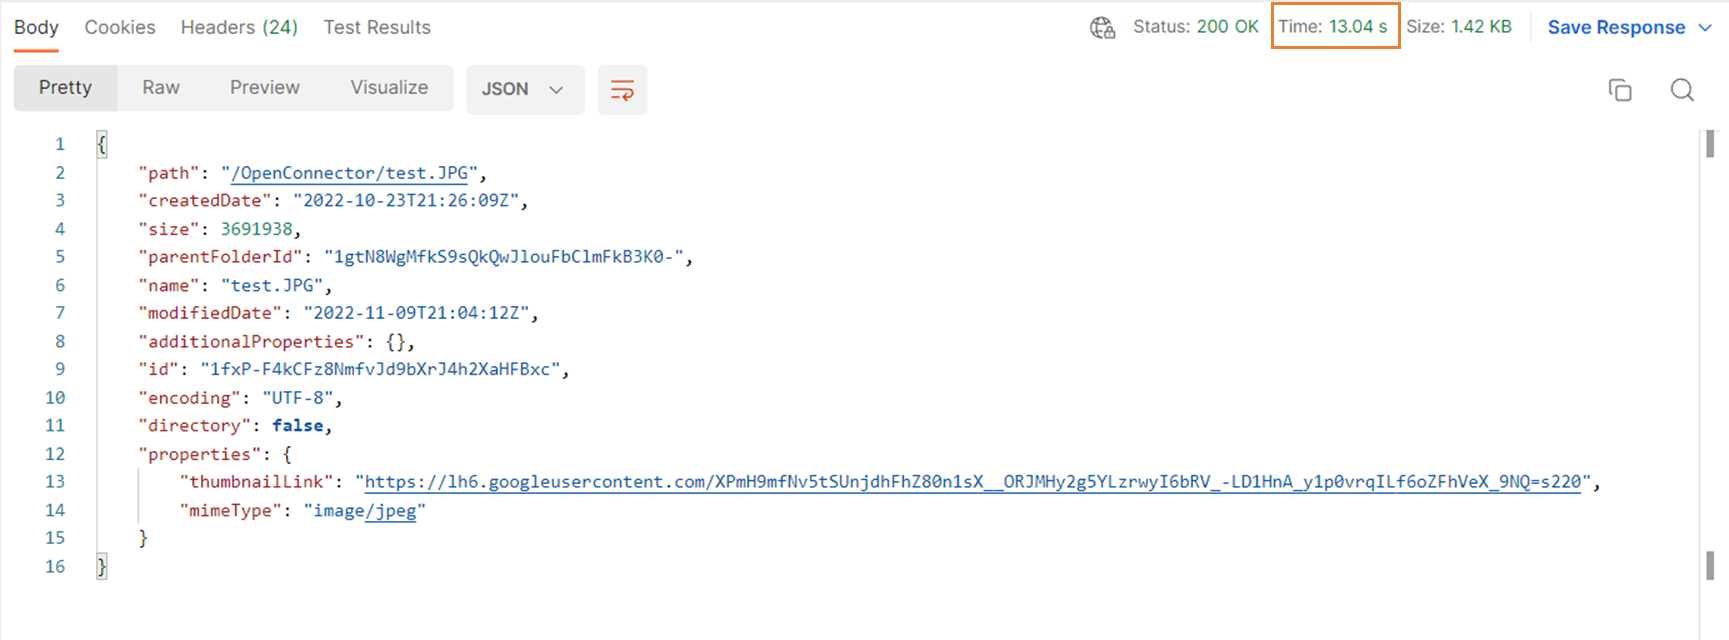
Postmanから以下のリクエストを実行します。

以下が返ってきた結果です。13秒ほどかかっています。
Google Driveにファイルが格納されました。

比較
同じリクエストをOpen Connectorに直接送ったときは7~8秒で返ってきました。CPIを挟むことにより、プラス5秒ほどかかったことになります。ユーザインターフェースから使う場合はパフォーマンスが重要になるので、CPIを挟まない方がいいかもしれません。