こちらの記事は Houdini Advent Calendar 2020 14日目の記事です。
はじめに
初めまして、Talkyと申します。普段は都内のCGスタジオでshotを作ったり、コードを書いたりする者です。
本記事の内容は私自身が10月にVEX練習のために作った物を今回のAdvent Calendarに向けて書き直した物です。12月の年末シーズンなのにヒガンバナをモデルにしたのは少し季節外れのことを大目に見てください。
今年の7月頃から堀川淳一郎先生(@jhorikawa_err)の動画投稿と著作からHoudiniのVEXを勉強し始めて、幾何学構造と論文ベースの内容をVEXで作るのは思った以上に私との相性がよくて、Houdiniを使って作業するのもワクワク感じます。「自分でゼロからVEXを使って何かを作りたい」を考え始めた頃、道端で生えたヒガンバナがちょうど目に入って、モデルとして決めました。
なお、**ヒガンバナの形に関して、研究論文の内容を引用しておりませんので、生物学の正確性がありません。**ご了承ください。
QiitaでHoudiniに関する記事を書くのは初めてですが、VEXを書く上の私自身の考えとやり方も本記事の中に書きましたので、お役に立てれば幸いです
作業環境
- Windows 10 Pro 64bit
- Houdini FX 17.5.460
会社での作業環境のため、Houdiniのバージョンは少し古いですが、主にAttribute Wrangle SOPを使う内容になりますので、特に支障がないと思います。
ヒガンバナの構造を分析
普段の仕事でも現実に存在する物をベースに作成することが多いので、リファレンス集めと物体や現象を観察ことがとても大事なことだと思います。
ヒガンバナのような植物も例外がなく、一定の規則性に沿って生長するが多いです。画像検索と実際に撮った写真を参考にスケッチを描いて、ヒガンバナの花の特徴をまとめました。
- 1本の花茎[scape]の先端に散形花序[umbel]となる花が5~7つ(通常は6つ)、花はやや水平で中心から放射状に生える
- 花1つにつき長いカーブ状の雌蕊[pistil]1本と雄蕊[stamen]5~7本(通常は6本)がある、雌蕊と雄蕊の形は先端の柱頭[stigma]と葯[anther]が違う以外に形と色はほぼ一致する
- 倒披針形(とうひしんけい/oblanceolate)の花弁[petal]は6枚で大きく反り返る、花弁の縁はシワ状になる
- 花梗[pedicel]の先端に子房[ovary]の膨らみがある
Houdiniで本番作業
画面作りやモデリングの時、通常は「全体構造→細部デザイン」の順番で作業を進みますが、Houdiniの特徴であるノードベース ネットワークは構造を変更しやすいため、私は「設計分解→細部デザイン→全体の組み立て」のような順番に進むことが多いです。
Custom Attributesを定義することが出来るHoudiniに於いて、「細部に必要なパラメータを全体設計時に事前に準備する」より、「細部デザインに一時的なパラメータを代用し、組み立て時にどうすればそのパラメータを渡せることを考える」方は効率がいいと思います。
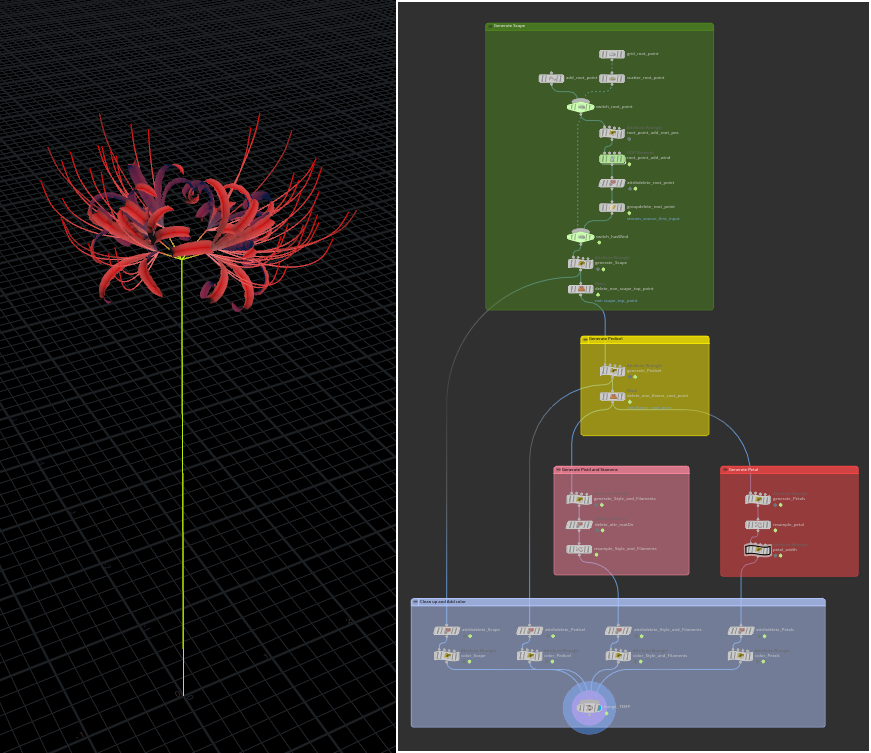
1.「骨組み」の構築
上述の私の作業順序と同じように、いきなり形のある立体物を作るより、PointとPolyline(edge)で「骨格」から作成して、後からPolyWire SOPなどで「肉付け」をする方が調整しやすいです。

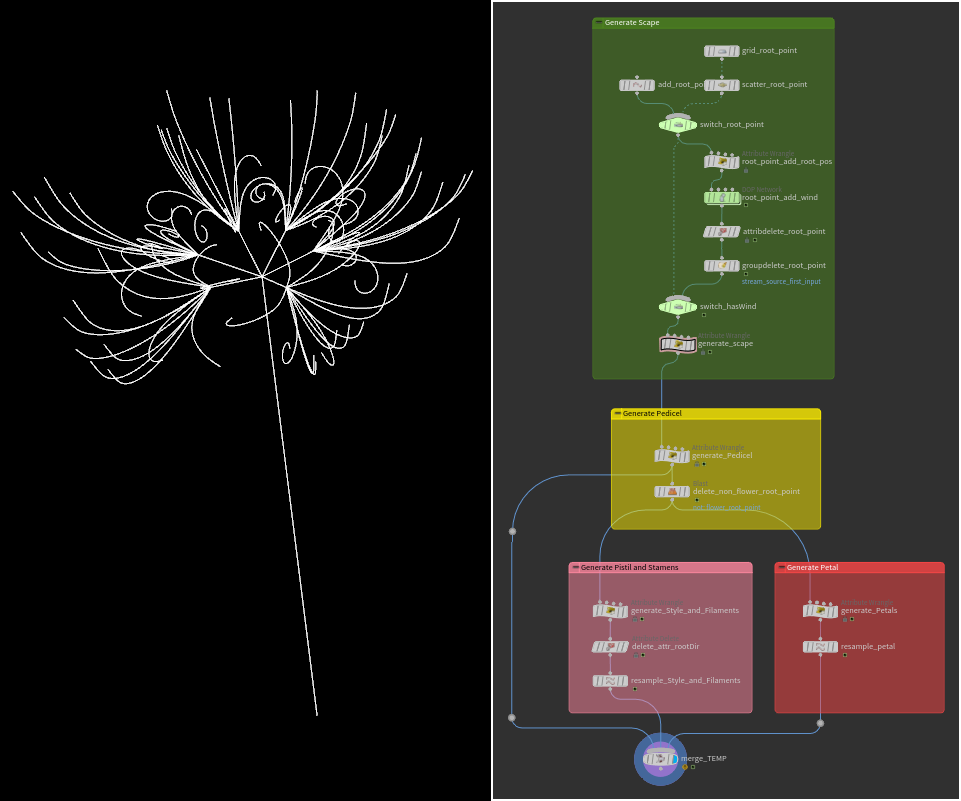
大まかな構築計画図です。これだけ見ても分かりにくいので、ここからはパーツごとに説明します。
1.1 花の生成用 flower_root_point を準備
全ての花は花梗[pedicel]の先端のflower_root_pointから生成するため、先ずはAttribute Wrangle SOP (Detail)を使って一時的なpointを作ります。

for (int count = 0; count < 6; count++) {
    vector point_pos;
    point_pos.x = sin((float(count) / 6) * 2.0 * $PI);
    point_pos.z = cos((float(count) / 6) * 2.0 * $PI);

    int point_num = addpoint(0, point_pos);

    vector point_direction = point_pos;
    setpointattrib(0, "flower_rootDir", point_num, point_direction);
}
このように、原点を中心にしたXZ平面上に6つのpointを作成して、それぞれのpointに花の生成方向を示すflower_rootDirというAttributeを持たせます。こちらのflower_rootDirの値は一時的な物になりますが、組み立て時には正しい値に置き換えます。
1.2 雌蕊[Pistil]と雄蕊[Stamens]の生成
ヒガンバナの雌蕊と雄蕊の形はほぼ同じなので、1本の生成方法を確定したら他のも同じ手順で生成できます。では、「最初はゆっくり下がって、最後は上を向けて伸ばす」形を記述できる曲線の式を探します。
1.2.1 曲線の選定と生成
このような単純な曲線の式を探す時、私はWikipediaのList of curvesからヒントを得ることが多いです。今回はLemniscate族のLemniscate of Geronoの第4象限が理想の形に近いので、この部分の曲線を使って調整しに行こうと思います。
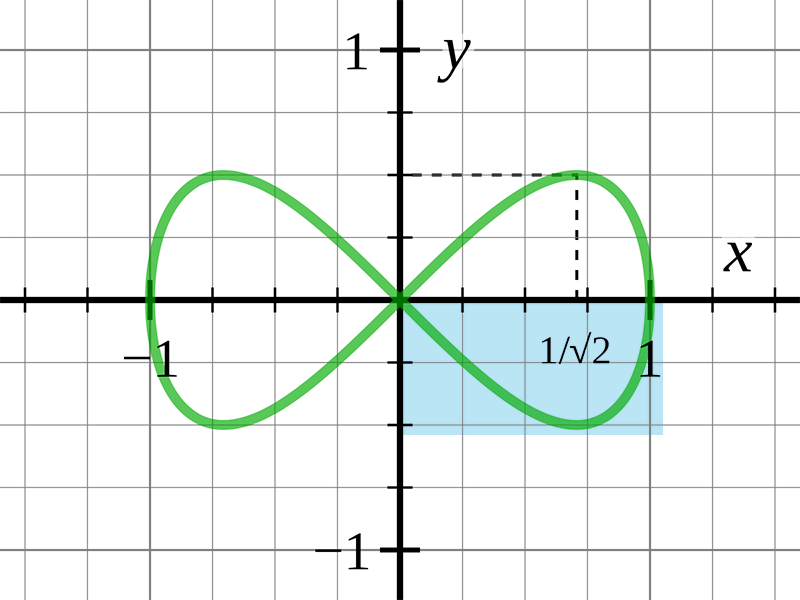
(Wikipedia: Lemniscate of Gerono より引用, 部分改変.)
Lemniscate of Geronoの方程式は $x^4-x^2+y^2=0$ でシンプルな式になりますので、関数式に書き換えると $f(x)=-\sqrt{x^2-x^4},0\leq{x}\leq{1}$ になります。先ずはAttribute Wrangle SOP (Detail)を使って1本の曲線を生成します。
なお、元の数式のままで曲線を生成すると、カーブの上がる部分が急すぎるのため、数式を $f(x)=-0.4\sqrt{x^2-x^{3.5}},0\leq{x}\leq{1}$ に調整します。
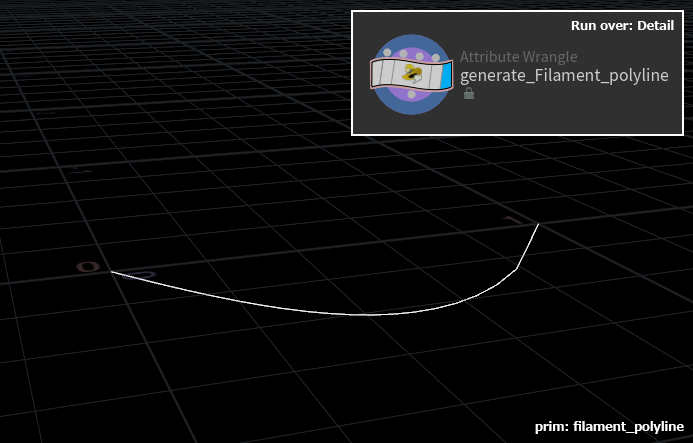
// Generate a Style(Filament) primitive
vector direction = {1, 0, 0};

int filamentPoints[] = array();
int segments = 20;
for (int step = 0; step < segments; step++) {
    vector point_pos;
    float proportion = float(step) / (segments - 1);
    point_pos.x = proportion * direction.x;
    point_pos.y = proportion * direction.y + (-0.4 * pow(pow(proportion, 2) - pow(proportion, 3.5), 0.5));
    point_pos.z = proportion * direction.z;

    int filamentPoint = addpoint(0, point_pos);
    push(filamentPoints, filamentPoint);
}

addprim(0, "polyline", filamentPoints);
コード中のdirectionは曲線の終点を示すvectorになります。directionにランダム値に与えることによって、曲線を色んな方向へ伸ばすことができます。
曲線の分割数segmentsを20に指定するのは特に理由がありませんが、試しにsegmentsを100にしても上図のような最後にガクンと上がる箇所が残ります。解決策として、全ての雌蕊と雄蕊を生成後にResample SOPで一括処理をかければきれいな曲線になります。
1.2.2 曲線生成をFunctionとして定義する
雌蕊と雄蕊を生成する時、雄蕊は本数分のforループで生成と別に雌蕊をループ外で生成するため、曲線生成部分のコードをgenerateFilamentFunctionとして定義します。同時に幾つかのパラメータを導入します。
| パラメータ | 説明 |
|---|---|
| _segments | 曲線の分割数 |
| _direction | 曲線終点の位置vector |
| _randomExponent | ランダムのべき指数 |
| _rootPosition | 曲線起点の位置vector |
| _filaments_scale | 曲線全体のスケール |
| 返り値 | 作成した曲線のPrim番号 |
// Function for generate Style and Filaments
int generateFilament (int _segments; vector _direction; vector _rootPosition; float _randomExponent; float _filaments_scale) {
    int _filamentPoints[] = array();
    for (int step = 0; step < _segments; step++) {
        vector point_pos;
        float proportion = float(step) / (_segments - 1);
        point_pos.x = proportion * _direction.x;
        point_pos.y = proportion * _direction.y + (-0.4 * pow(pow(proportion, 2) - pow(proportion, _randomExponent), 0.5));
        point_pos.z = proportion * _direction.z;

        point_pos *= _filaments_scale;
        point_pos += _rootPosition;

        int _filamentPoint = addpoint(0, point_pos);
        push(_filamentPoints, _filamentPoint);
    }
    int _filamentPrim = addprim(0, "polyline", _filamentPoints);
    return _filamentPrim;
}
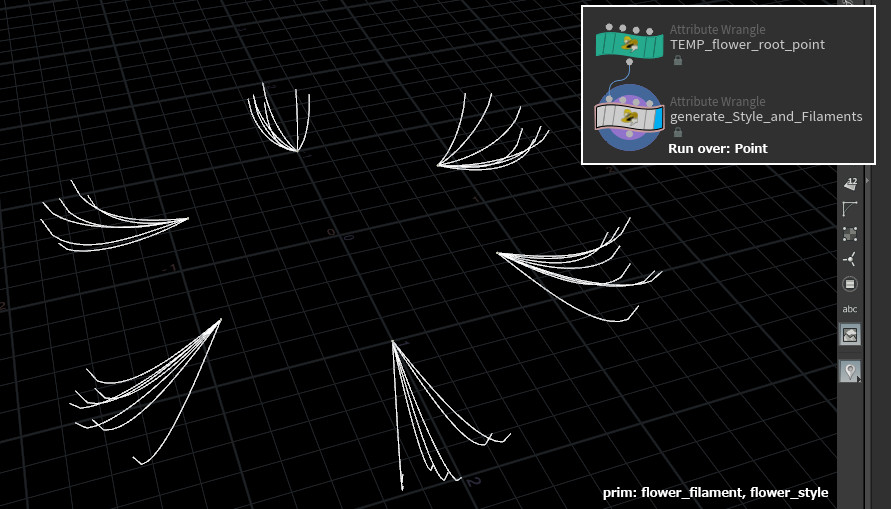
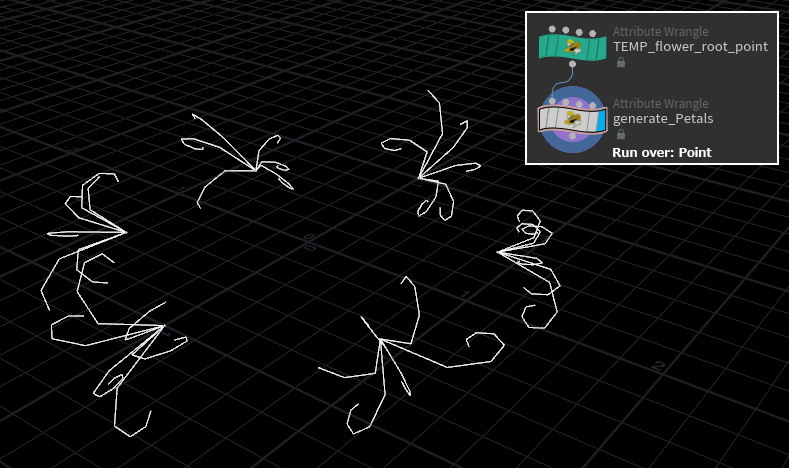
1.2.3 flower_root_point から雌蕊と雄蕊を生成
1.1にて作成したTEMP_flower_root_pointからPoint情報を取得して、各flower_root_pointに対して雌蕊と雄蕊を生成します。
// Function for generate Style and Filaments
int generateFilament (int _segments; vector _direction; vector _rootPosition; float _randomExponent; float _filaments_scale) {
    int _filamentPoints[] = array();
    for (int step = 0; step < _segments; step++) {
        vector point_pos;
        float proportion = float(step) / (_segments - 1);
        point_pos.x = proportion * _direction.x;
        point_pos.y = proportion * _direction.y + (-0.4 * pow(pow(proportion, 2) - pow(proportion, _randomExponent), 0.5));
        point_pos.z = proportion * _direction.z;

        point_pos *= _filaments_scale;
        point_pos += _rootPosition;

        int _filamentPoint = addpoint(0, point_pos);
        push(_filamentPoints, _filamentPoint);
    }
    int _filamentPrim = addprim(0, "polyline", _filamentPoints);
    return _filamentPrim;
}

// Calculate Filament direction
vector direction = {1, 0, 0};
vector flower_rootPos = point(0, "P", @ptnum);
vector flower_rootDir = normalize(point(0, "flower_rootDir", @ptnum));
matrix3 rotateMat = dihedral(direction, flower_rootDir);

// Generate Filament primitive
float filaments_scale = chf("filaments_scale");
int totalFilaments = floor(fit(rand(47.18 * chf("random_seed") + 51.49 * @ptnum + 14.86), 0.0, 1.0, 5.5, 7.5));
for (int count = 0; count < totalFilaments; count++){
    // Set base direction
    direction.x = 1.0;
    direction.y = fit(rand(16.24 * chf("random_seed") + 42.51 * count + 84.15 * @ptnum), 0.0, 1.0, -chf("range_y"), chf("range_y"));
    direction.z = fit(rand(54.89 * chf("random_seed") + 73.16 * count + 93.47 * @ptnum), 0.0, 1.0, -chf("range_z"), chf("range_z"));

    float randomLength = fit(rand(84.16 * chf("random_seed") + 21.45 * count + 12.47 * @ptnum), 0.0, 1.0, chf("length_min"), chf("length_max"));
    direction = normalize(direction) * randomLength;

    // Rotate direction to flower_rootDir
    direction *= rotateMat;

    float randomExponent = fit(rand(54.16 * chf("random_seed") + 24.15 * count + 94.57 * @ptnum), 0.0, 1.0, 2.5, 4.5);
    int filamentPrim = generateFilament(chi("segments"), direction, flower_rootPos, randomExponent, filaments_scale);

    setprimgroup(0, "flower_filament", filamentPrim, 1);
}

// Generate Style primitive
int stylePrim = generateFilament(chi("segments"), flower_rootDir * chf("length_max"), flower_rootPos, 3, filaments_scale);
setprimgroup(0, "flower_style", stylePrim, 1);
ここからランダム要素を設定するため、コードが一気に増えますが、行う処理自体が基本なものが多いので、少しずつ説明します。
・ // Function for generate Style and Filaments部分は1.2.2で定義したgenerateFilamentFunctionになります。このFunctionを利用して雌蕊と雄蕊を別々に生成します。
・ // Calculate Filament direction部分は曲線を生成する時にデフォルトで使ったdirectionvector {1, 0, 0}をflower_root_pointに定義した花の生成方向flower_rootDirへ回転するための回転行列を計算する。
・ // Generate Filament primitive部分は雄蕊を生成するためのforループ。
雄蕊の本数totalFilamentsはrand()から取得した[0.0, 1.0]範囲の数値をfit()で[5.5, 7.5]に変えて、floor()で整数部分を取ります。これによって雄蕊の本数が6本になる確率は50%になり、5または7本になる確率はそれぞれ25%になります。ここの確率は生物学の正確性がありませんので、ご注意ください。
ループ内の// Set base direction部分はdirectionvector {1, 0, 0}を指定した方向範囲と長さ範囲のランダム値を与えます。
回転行列で花の生成方向flower_rootDirへ回転させて、generateFilamentFunctionで生成します。
生成された雄蕊のPrimはflower_filamentのGroupに入れます。
・ // Generate Style primitive部分は雌蕊を1本だけ生成します。雌蕊の方向は常にflower_rootDirと一致します。
生成された雌蕊のPrimはflower_styleのGroupに入れます。
1.2.4 雌蕊と雄蕊「骨組み」の完成
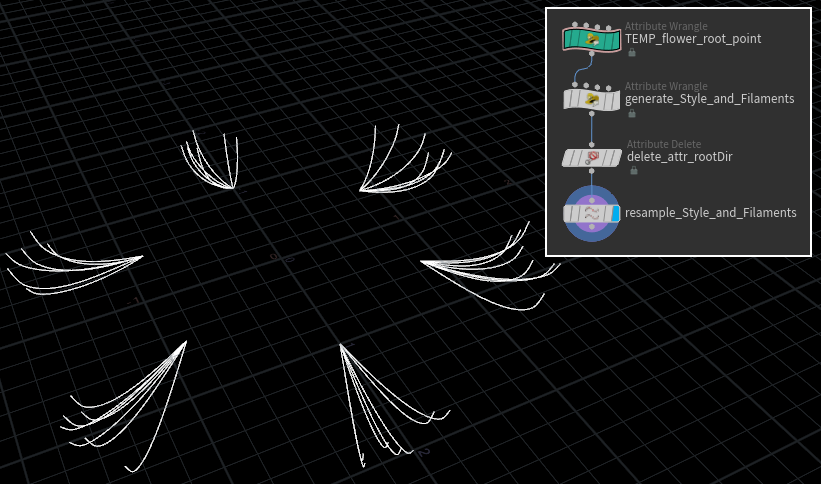
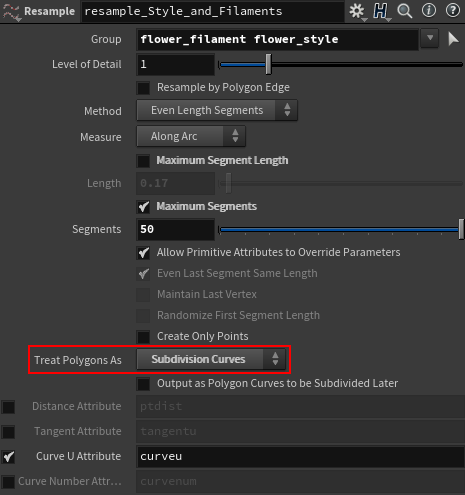
雌蕊と雄蕊を生成する時に使ったflower_rootDirAttributeはもう使わないので削除します。
Resample SOPのTreat Polygon AsをSubdivision Curvesに設定して、滑らかな曲線を得ることができます。後ほどの色付けのためにCurve U Attributeを作成します。
1.3 花弁[Petal]の生成
花弁の生成は雌蕊と雄蕊の生成とほぼ同じ流れになります。ヒガンバナの花弁の特徴である「反り返る」を再現するため、曲線(curve)ではなく螺線(spiral)から生成することになります。
1.3.1 螺線の選定と生成
今度はWikipediaのList of spiralsからヒントを探します。形としてEuler spiralは近いですがFresnel integralを使われて、HoudiniのVEXで計算するのは少し面倒なので、形の近いパラメトリック方程式(parametric equation)を使います。$x$等式右側の$-sin(1)$と$y$等式右側の$+cos(1)$は螺線を原点に移動するための定数です。
\begin{array}{ll}
x = \frac{sin(t)}{t}-sin(1)\\
y = -\frac{cos(t)}{t}+cos(1)
\end{array}
,(t\geq{1})
int points[] = array();
int totalStep = 9;
for (int step = 1; step < totalStep; step++) {
    float x = sin(step) / step - sin(1);
    float y = -1.0 * (cos(step) / step) + cos(1);
    int point_num = addpoint(0, set(x, y, 0));
    push(points, point_num);
}
addprim(0, "polyline", points);
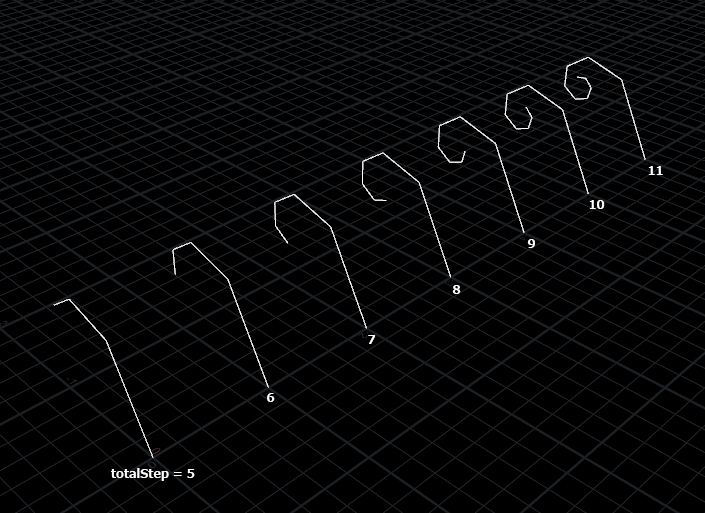
forループのパラメータであるtotalStepの数値を変えれば螺線の長さを変えるので、この性質を利用して花弁の形にランダム要素を与えます。
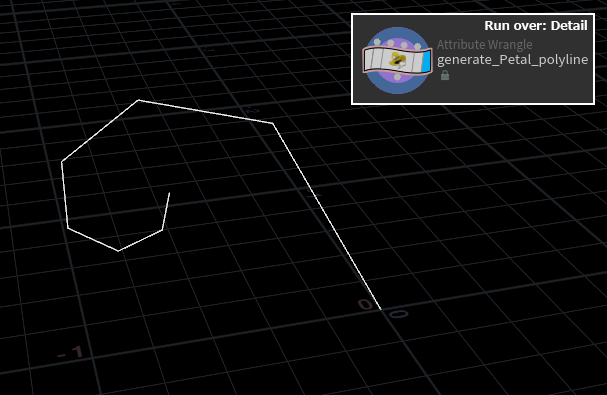
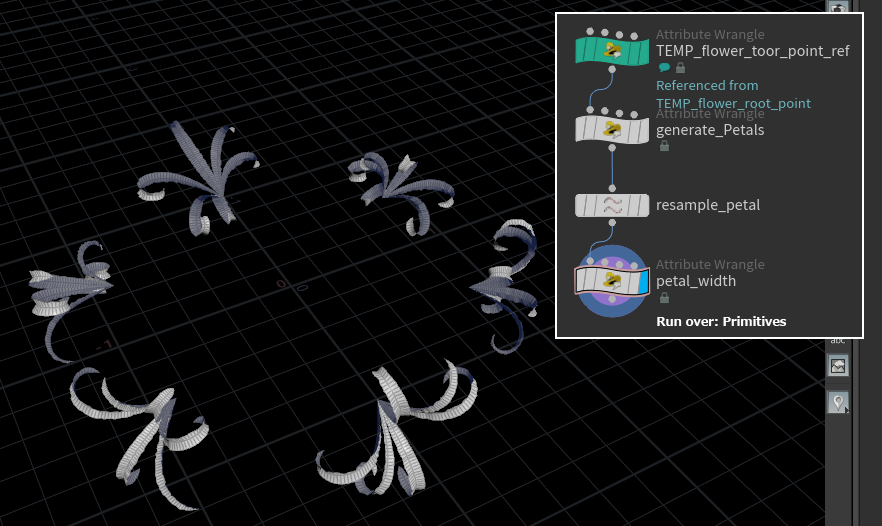
1.3.2 flower_root_pointから花弁を生成
花弁の生成は雌蕊と雄蕊を生成の時と違い、1つのforループ内で全て完結しますので、Functionを定義する必要がなく、そのままTEMP_flower_toor_pointからPoint情報を受けます。
// Calculate flower direction
vector direction = {0, 1, 0};
vector flower_rootPos = point(0, "P", @ptnum);
vector flower_rootDir = normalize(point(0, "flower_rootDir", @ptnum));
matrix3 flower_rotateMat = dihedral(direction, flower_rootDir);

int totalPetal = 6;
for (int count = 0; count < totalPetal; count++) {
    // Calculate rotate matrix of petal
    float randomAngle = (rand(89.64 * chf("random_seed") + 23.15 * count + 94.67 * @ptnum) * 2.0 - 1.0) * chf("angle_range") * $PI;
    float petal_rotateAngle = (float(count) / totalPetal) * 2.0 * $PI + randomAngle;
    matrix3 petal_rotateMat = ident();
    rotate(petal_rotateMat, petal_rotateAngle, set(0, 1, 0));

    // Generate Petal
    int totalStep = floor(fit(rand(71.64 * chf("random_seed") + 46.13 * count + 84.12 * @ptnum), 0.0, 1.0, 5.0, 11.0));
    int points[] = array();
    for (int step = 1; step < totalStep; step++) {
        vector point_pos;
        point_pos.x = sin(step) / step - sin(1);
        point_pos.y = -1.0 * (cos(step) / step - cos(1));
        point_pos.z = 0.0;

        point_pos *= chf("flower_scale") * fit(rand(54.16 * chf("random_seed") + 21.58 * count + 67.18 * @ptnum), 0.0, 1.0, 0.5, 1.0);
        point_pos *= petal_rotateMat;
        point_pos *= flower_rotateMat;
        point_pos += flower_rootPos;

        int point_num = addpoint(0, point_pos);
        push(points, point_num);
    }
    int petalPrim_num = addprim(0, "polyline", points);
}
・ // Calculate flower direction部分は花ごとの回転行列を計算します。雌蕊と雄蕊の時にデフォルトのdirectionvectorは{1, 0, 0}に設定しましたが、花弁の生成はdirectionvectorのデフォルト値は{0, 1, 0}です。
・ // Calculate rotate matrix of petal部分は花弁1枚ずつの回転角度を計算し、rotate()で回転行列を計算します。dihedral()は2つのvectorから計算することと違い、rotate()は回転角と回転軸から回転行列を得ることができます。
・ // Generate Petal部分はtotalStepと螺線を構成したPointごとにランダム値を与えことによって花弁の形に変化を付けます。
1.3.3 花弁のResample
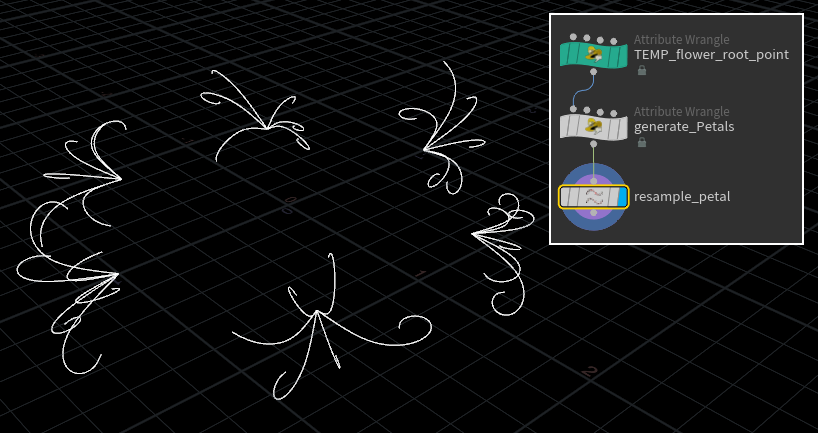
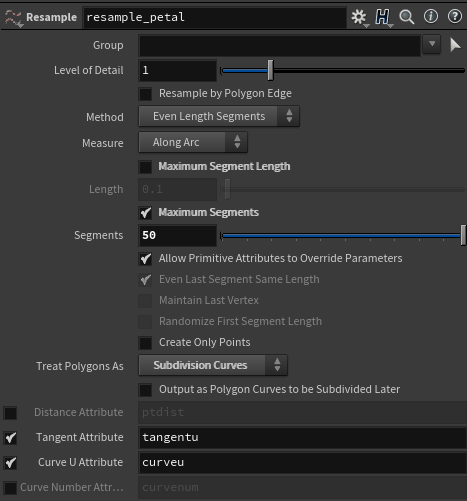
雌蕊と雄蕊の時と同じように、Subdivision Curvesで滑らかな形になります。後ほどの肉付けのために各PointにTangent AttributeとCurve U Attributeを与えます。
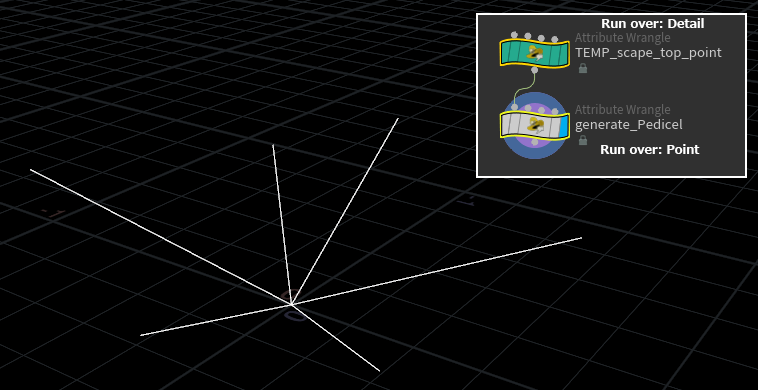
1.4 花軸[Pedicel]の生成
花を構成する部分の骨組みを完成したので、次に花茎と花を繋ぐ花軸の部分を生成します。花軸の先端に花を生成するためのflower_root_pointです。
int scape_top_point = addpoint(0, {0, 0, 0});
vector scape_topDir = {0, 1, 0};
setpointattrib(0, "scape_dir", scape_top_point, scape_topDir);
ここでは花軸を生成するため、一時的なscape_top_pointを生成します、花茎の先端の方向scape_topDirvectorも仮の値ですが、花茎を生成する時に正しい値を計算します。
// Flower count
int flower_total = floor(fit(random(64.57 * chf("random_seed") + 84.15 * @ptnum + 45.15), 0.0, 1.0, 5.95, 7.05));

// Pedicel rotate matrix
vector direction = {0, 1, 0};
vector scape_topDir = normalize(point(0, "scape_topDir", @ptnum));
matrix3 pedicel_rotateMat = dihedral(direction, scape_topDir);

// Generate Pedicel
vector scape_top_pos = @P;
for (int count = 0; count < flower_total ; count++) {
    vector pedicel_point_pos;
    float random_radius = chf("radius_scale") * fit(rand(84.54 * chf("random_seed") + 54.1 * count + 26.7 * @ptnum), 0.0, 1.0, chf("radius_min"), chf("radius_max"));
    float random_angle = fit(rand(88.19 * chf("random_seed") + 41.36 * count + 57.3 * @ptnum), 0.0, 1.0, -chf("angle_range"), chf("angle_range"));

    pedicel_point_pos.x = sin(float(count) / flower_total * 2.0 * $PI + random_angle) * random_radius;
    pedicel_point_pos.z = cos(float(count) / flower_total * 2.0 * $PI + random_angle) * random_radius;
    pedicel_point_pos.y = fit(rand(84.19 * chf("random_seed") + 16.49 * count + 34.28 * @ptnum), 0.0, 1.0, chf("pedicel_y_min"), chf("pedicel_y_max"));

    pedicel_point_pos *= pedicel_rotateMat;
    pedicel_point_pos += scape_top_pos;

    int pedicel_point = addpoint(0, pedicel_point_pos);
    int pedicel_prim = addprim(0, "polyline", @ptnum, pedicel_point);

    setpointgroup(0, "flower_root_point", pedicel_point, 1);
    setprimgroup(0, "pedicel_prim", pedicel_prim, 1);

    vector flower_rootDir = pedicel_point_pos - scape_top_pos;
    setpointattrib(0, "flower_rootDir", pedicel_point, flower_rootDir);
}
花軸は花茎の方向scape_dirvectorに垂直した平面上で放射状に生成する端点が2つしかないpolylineですので、コード先ほどの花の部分よりだいぶ短いです。
・ // Flower countの部分は1.2.3の雄蕊生成と同じ、花が5つまたは7つになる確率はそれぞれ4.5%になります。重ね重ね申し上げますが、こちらの確率も生物学の正確性がありますん。
・ // Pedicel rotate matrixの部分は花茎の方向から回転行列を計算します。基本花茎が真上に伸ばして、回転行列の計算はいらないですが、花茎が曲がる時に花軸もきちんと正しい平面上に並べるためにここの回転行列計算は不可欠です。
・ // Generate Pedicelの部分は花軸の頂点を平面の円周上に均等配置ではなく、角度、長さ、高さなどもランダム値を与えます。
花軸のprimをpedicel_primのGroupに入れて、花軸の頂点pointをflower_root_pointのGroupに入れます。ここで各flower_root_pointに正しいflower_rootDirの値を花茎の頂点位置から花軸の頂点位置方向のvectorに設定します。
1.5 花茎[Scape]の生成
1.5.1 「風」の効果を追加
花茎は基点となるroot_pointから+Y方向(真上)に生成しますが、これだけでは少し味気ないので、オプションとしてPOP Wind DOPとPOP Attract DOPでPointに動きを追加して風によるしなりの効果を追加します。
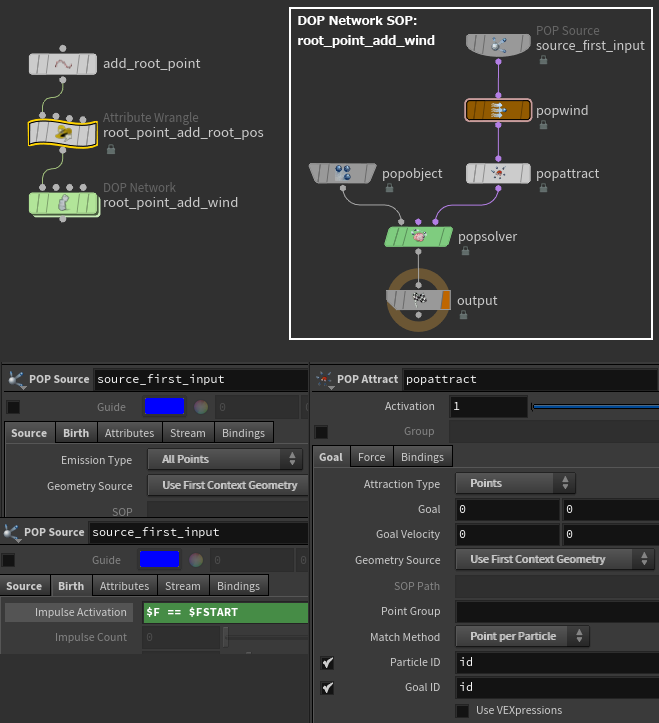
POP Attract DOPのGoal IDにチェックを入れて、sourceのPointに追尾するように設定します。
v@root_pos = @P;
Pointに元の位置を保存するため、DOP Network SOPの前にroot_posAttributeを追加します。
1.5.2 花茎の曲線の生成

vector root_point_pos;
int hasWind = chi("has_wind");
if (hasWind == 0) {
    root_point_pos = @P;
}else{
    root_point_pos = point(0, "root_pos", @ptnum);
}

// Generate Scape
vector scape_top_prev_pos;
float scape_length = fit(rand(46.19 * chf("random_seed") + 85.23 * @ptnum), 0.0, 1.0, chf("scape_length_min"), chf("scape_length_max"));
int segments = 10;
int scape_points[] = array();
for (int step = 0; step < segments; step++) {
    vector scape_point_pos;
    scape_point_pos.x = pow(float(step) / segments, 2) * (@P.x - root_point_pos.x);
    scape_point_pos.z = pow(float(step) / segments, 2) * (@P.z - root_point_pos.z);
    scape_point_pos.y = float(step) / segments * (scape_length + root_point_pos.y);

    scape_point_pos += root_point_pos;

    int scape_point = addpoint(0, scape_point_pos);
    push(scape_points, scape_point);

    if (step == segments - 2) {
        scape_top_prev_pos = scape_point_pos;
    }else if(step == segments - 1) {
        vector scape_topDir = scape_point_pos - scape_top_prev_pos;
        setpointattrib(0, "scape_topDir", scape_point, scape_topDir);
        setpointgroup(0, "scape_top_point", scape_point, 1);
    }
}

int scape_prim = addprim(0, "polyline", scape_points);
setprimgroup(0, "scape_prim", scape_prim, 1);

removepoint(0, @ptnum);
hasWindパラメータは上のswitch_hasWindと連動します。「風」がある時Pointが元の位置から離れるため、Pointに保存されたroot_posから元の位置を取得します。
// Generate Scape部分は普通の二次関数で各stepの位置を計算します。先端のPointとその1つ前のPointの位置からscape_topDirのvectorを計算し、先端のPointに保存します。同時に先端のPointをscape_top_pointのGroupに入れます。
最後に生成された花茎のPrimを"scape_prim"のGroupに入れて、Point自身を削除します。
1.6 骨組みの組み立て
これまで作った全てのノードを繋いで、ヒガンバナの骨組みを作成します。
なお、あくまで各パーツとAttributeが正しく接続したかを確認するための仮組みです。この後の「肉付け」のため、もう一度分解します。
2. 「肉付け」作業
ここからは骨組みをベースにしてヒガンバナに「体積」を持たせます。
2.1 花弁の幅とシワ形状の生成
H18からSweep SOPが2.0に進化して色々使いやすい機能が揃ってますが、残念ながら私はいまだにH17.5の環境で作業していて、且つ本記事はVEXを中心にした物なので、やはりAttribute Wrangle SOPでやり遂げたいです。
Attribute Wrangle SOPは花弁prim一つ一つに処理を行うので、Run OverはPrimitivesに指定します。
int primPoints[] = primpoints(0, @primnum);
int prev_rightPoint, prev_leftPoint;
float random_width_scale = chf("random_scale") * chi("isRandomize") * rand(91.28 * chf("random_seed") + 94.16 * @primnum);
for (int index = 0; index < len(primPoints); index++) {
    int curPoint, prevPoint;
    if (index == 0) {
        curPoint = primPoints[index];
        prevPoint = primPoints[index];
    }else{
        curPoint = primPoints[index];
        prevPoint = primPoints[index - 1];
    }
    vector curPoint_pos = point(0, "P", curPoint);
    vector prevPoint_pos = point(0, "P", prevPoint);
    vector curPoint_dir = normalize(curPoint_pos - prevPoint_pos);
    vector tangentu = point(0, "tangentu", curPoint);

    // Calculate width vector
    vector leftPoint_vec = normalize(cross(curPoint_dir, tangentu));
    vector rightPoint_vec = normalize(cross(-curPoint_dir, tangentu));

    // Rotate width vector
    matrix3 rotate_matrix_left = ident();
    float rotate_angle_left = radians(fit(rand(24.54 * chf("random_seed") + 84.51 * index + 92.17 * @primnum), 0, 1, chf("angle_min"), chf("angle_max")));
    rotate(rotate_matrix_left, rotate_angle_left, tangentu);

    matrix3 rotate_matrix_right = ident();
    float rotate_angle_right = radians(fit(rand(84.15 * chf("random_seed") + 97.16 * index + 54.16 * @primnum), 0, 1, chf("angle_min"), chf("angle_max")));
    rotate(rotate_matrix_right, -rotate_angle_right, tangentu);

    leftPoint_vec *= rotate_matrix_left;
    rightPoint_vec *= rotate_matrix_right;

    // Add width point
    float width_scale = chramp("width_ramp", point(0, "curveu", curPoint)) * chf("width_scale") * (1.0 + random_width_scale);
    vector leftPoint_pos = curPoint_pos + leftPoint_vec * width_scale;
    vector rightPoint_pos = curPoint_pos + rightPoint_vec * width_scale;

    int leftPoint = addpoint(0, leftPoint_pos);
    int rightPoint = addpoint(0, rightPoint_pos);

    setpointgroup(0, "petal_center_point", curPoint, 1);
    setpointgroup(0, "petal_edge_point", leftPoint, 1);
    setpointgroup(0, "petal_edge_point", rightPoint, 1);

    float curveu = point(0, "curveu", curPoint);
    setpointattrib(0, "curveu", leftPoint, curveu);
    setpointattrib(0, "curveu", rightPoint, curveu);

    // Add prim
    if (index == 0) {
        prev_leftPoint = leftPoint;
        prev_rightPoint = rightPoint;
    }else{
        addprim(0, "poly", prevPoint, curPoint, rightPoint, prev_rightPoint);
        addprim(0, "poly", curPoint, prevPoint, prev_leftPoint, leftPoint);
        prev_leftPoint = leftPoint;
        prev_rightPoint = rightPoint;
    }
}

removeprim(0, @primnum, 0);
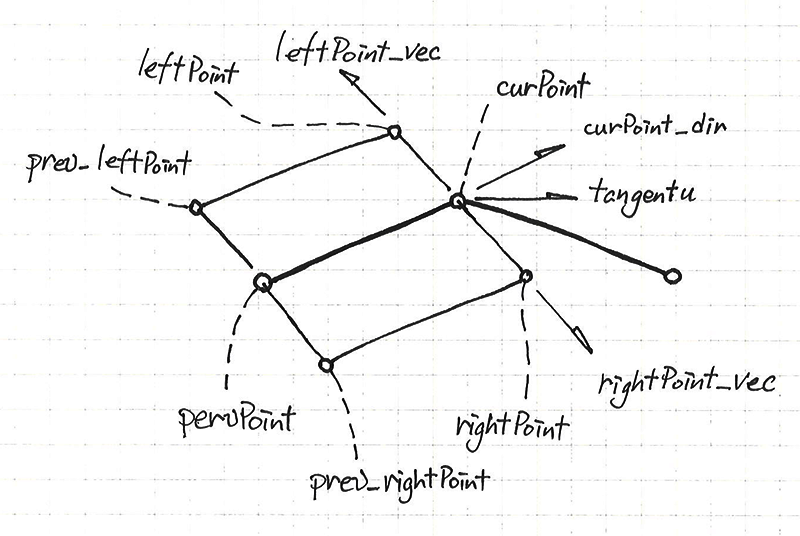
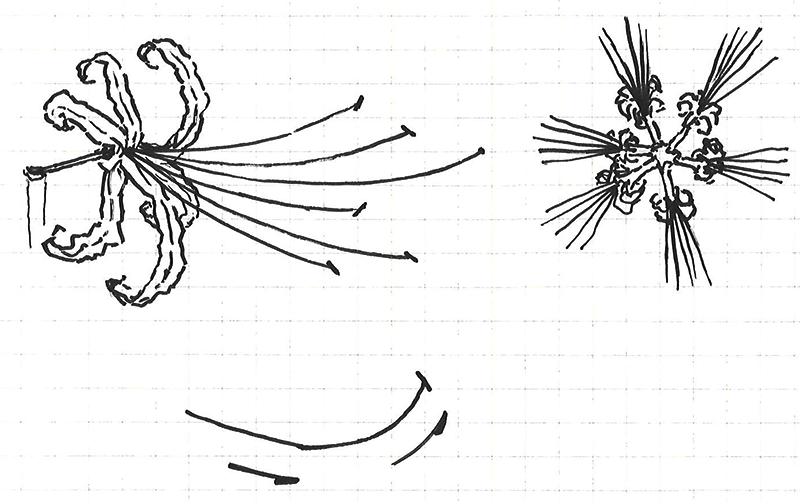
ここでは少し数学的なこと計算になるので、私の手書きの略図と合わせて説明します。
先ずは花弁Primの最初のPoint以外に全てPointとその1つ前のPointの位置からcurPoint_dirのvectorを計算します。Resample SOPで取得した接線のvectortangentuでcross product計算を行い、curPoint_dirとtangentuに垂直した2つのvectorleftPoint_vecとrightPoint_vecを得ることができます。
なお、この方法は花弁Primは曲線であって、curPoint_dirとtangentuが同値にならないことを前提として使いました。Primが完全な直線の場合、curPoint_dirとtangentuが同値になり、cross product計算結果は$\vec{0}$になるので、幅の生成には使えません。
それからtangentuを軸にして、それぞれ回転行列を計算してleftPoint_vecとrightPoint_vecにランダム角度を持たせて、シワの形状を生成します。
花弁の倒披針形の形はRampパラメータで指定して、更に花弁ごとにランダムの幅スケールを与えます。
上記の計算結果によって左右の幅となるPointの位置が確定し、Pointを生成します。後ほどの色付けのため中心Pointと左右の新しいPointをそれぞれpetal_center_pointとpetal_edge_pointのGroupに入れます。後ほどの色付けのため、Resample SOPで付与されたcurveuの値もそのまま左右のPointに保存します。
最後はforループの中で最初のPoint以外に両側のPrimを生成して、元の花弁PrimのPointを残してpolylineの部分だけ削除します。
2.2 色付け
これまでの工程の中で作成したGroupを利用してPointやPrimにCdArrtibuteの色情報を与えます。色があると、一気にヒガンバナらしくなりますね。

setpointattrib(0, "Cd", @ptnum, chv("color_scape_prim"));
if (inpointgroup(0, "scape_top_point", @ptnum) == 1) {
    setpointattrib(0, "Cd", @ptnum, chv("color_scape_top"));
}else if (inpointgroup(0, "flower_root_point", @ptnum) == 1) {
    setpointattrib(0, "Cd", @ptnum, chv("color_flower_root"));
}
int primPoints[] = primpoints(0, @primnum);
foreach (int primPoint; primPoints) {
    float curveu = point(0, "curveu", primPoint);
    vector filament_color;

    if (inprimgroup(0, "flower_filament", @primnum) == 1) {
        filament_color = chramp("color_flower_filament", curveu);
    }else if (inprimgroup(0, "flower_style", @primnum) == 1) {
        filament_color = chramp("color_flower_style", curveu);
    }

    setpointattrib(0, "Cd", primPoint, filament_color);
}
float curveu = point(0, "curveu", @ptnum);
vector color_petals;

if (inpointgroup(0, "petal_center_point", @ptnum) == 1) {
    color_petals = chramp("color_petal_center_point", curveu);
}else if (inpointgroup(0, "petal_edge_point", @ptnum) == 1) {
    color_petals = chramp("color_petal_edge_point", curveu);
}

setpointattrib(0, "Cd", @ptnum, color_petals);
花茎と花軸のPointはPAttribueの位置情報だけ残って、それぞれにCdAttributeの色情報を与えます。
花弁と雌蕊と雄蕊はグラデーションの色を付けたいので、P以外にcurveuAttributeも残します。curveuをベースにしてColor RampからCdAttributeの値を拾います。
2.3 立体化
ここまでに来たら作業が単純になりますので、PolyWire SOPやPolyExtrude SOPで厚みを与えて、flower_root_pointにSphereをコピーして、最終的に完成します。
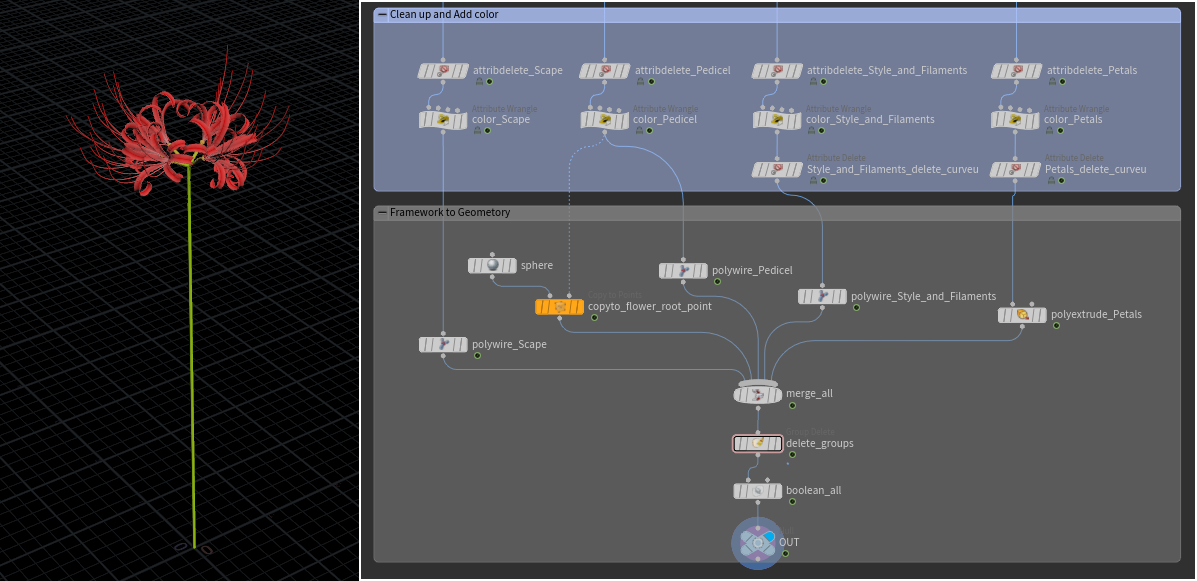
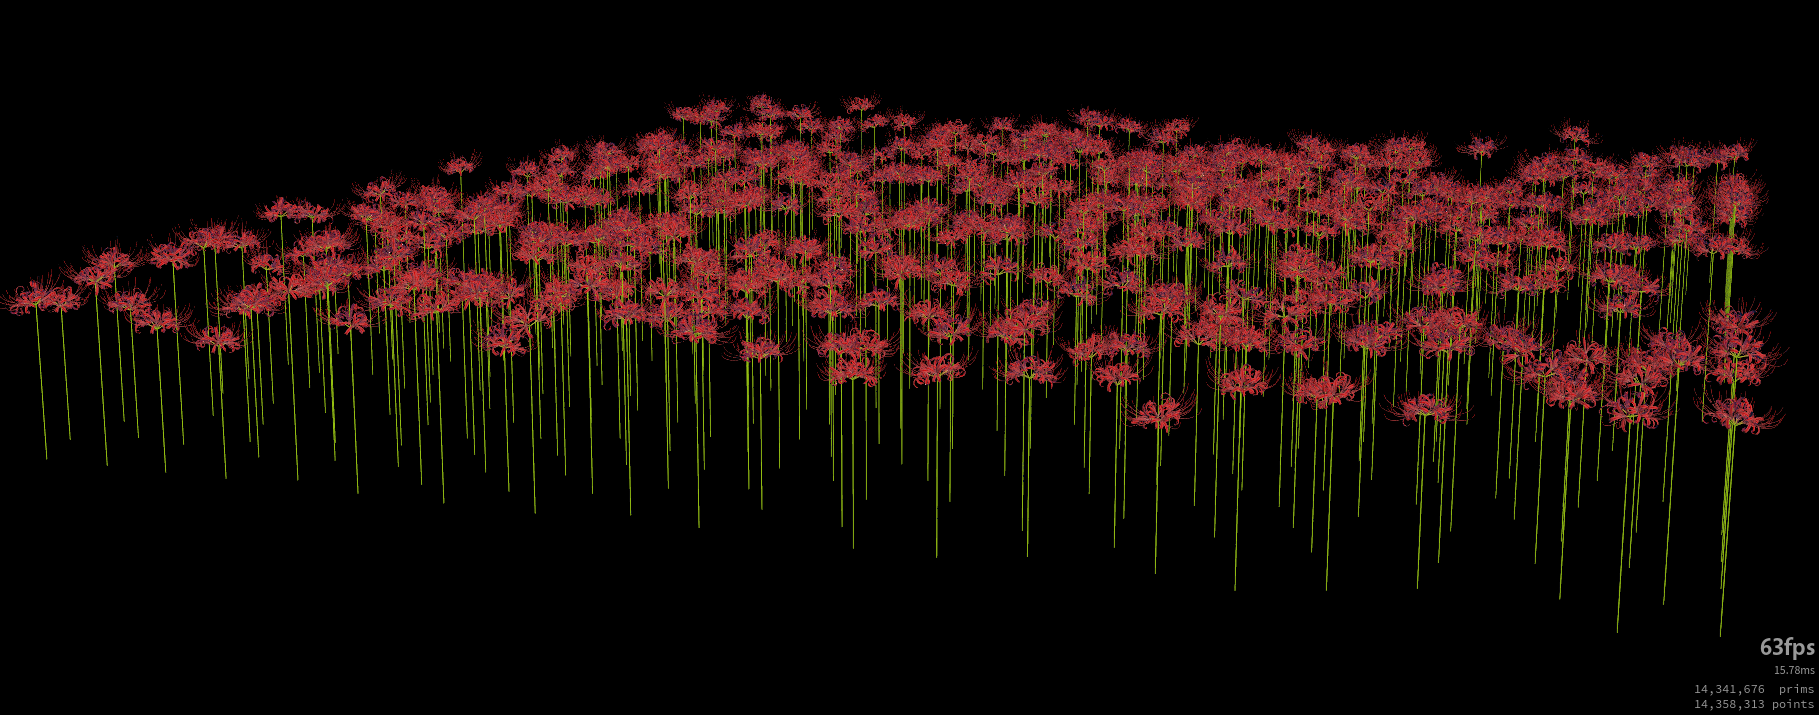
なお、最初の入力が1つのPointではなくScatter SOPでPointをたくさん作れば、1本1本全部違うヒガンバナの花畑も簡単に作れます。(ここまでの量を生成する時にはBoolean SOPをbypassした方が吉です。)
おわりに
制作時に3日間かかった物を説明するにはこんなに長い記事になるのは想定外ですが、一日遅れで投稿できるようになりました。
私もHoudiniをさわり初めて半年には経ってないのHoudiniの初心者ですが、VEXのような一見難しそうな物でも少しずつ克服すれば上達には出来ると感じます。本記事もやや長いコードが多いのですが、実際に使われた知識は基本中の基本な物がほぼ全てです。
もちろん本記事の中で不完全な点も多々ありますので、きれいに整理したら説明動画も作ろうと考えております。VEXにもかかわらず、文章でプログラミング言語系の内容を説明するもとても難しいことと感じました。来年にも記事を書く時間がありましたら、またHoudini Advent Calendarに参加したいと思います。
最後に、この場をお借り致して、VEX勉強中にたくさんの知識と刺激をいただいた堀川淳一郎先生に御礼を申し上げたいと存じます。
以上です。
ここまでお付き合いいただき、誠にありがとうございました!
Talky Ren 2020/12/15