GCPのサービスであるCloud Buildを活用してCI/CDパイプラインを作成する方法について、こちらのGCP公式のチュートリアルを参考に実際に動かしてみました。
記事の内容、コードは概ねリンクで貼った記事に書いてあることの切り貼りなので、興味を持たれた方は上記のリンクから飛んで直接読んで補完して頂ければと思います。
※ 日本語版の記事だと、英語版の記事の更新に翻訳が追いつかず動かないことが「よく」あるので、参照する際は英語版をみていただければと思います。
概要
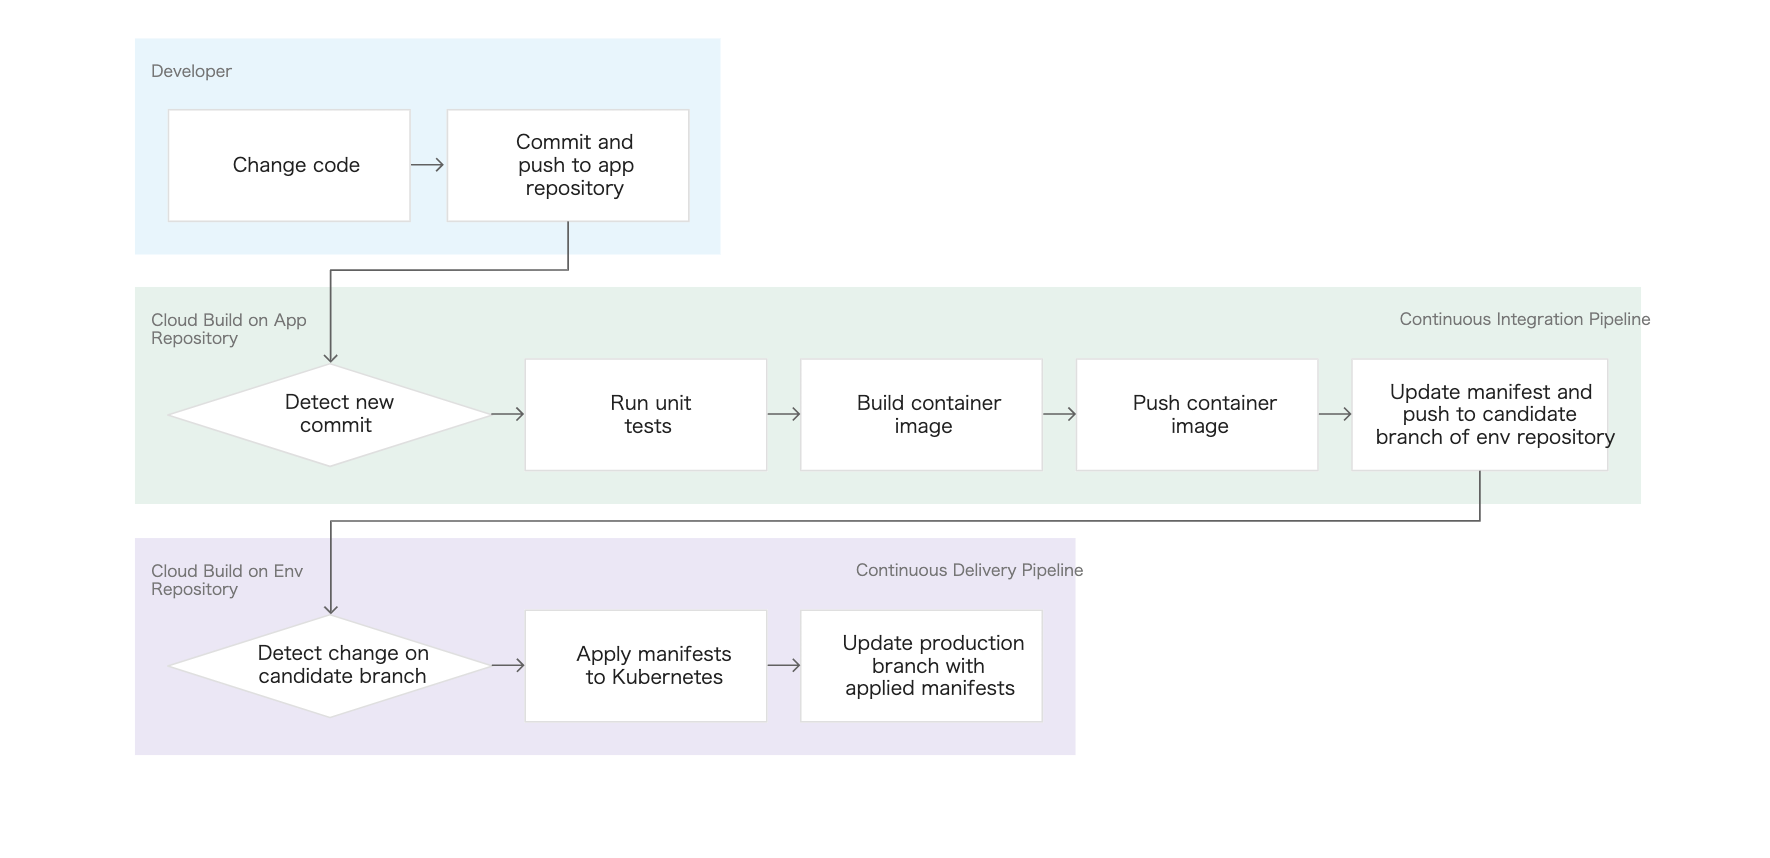
今回実装するCI/CDパイプラインの全体像は以下です。緑背景の部分がCI、紫背景の部分がCDに対応しています。
やっていることをざっくりと説明すれば、アプリのコードを変更すると、
変更が反映された新しいDockerイメージが作成され、
その新しいDockerイメージを参照するようKubernetesマニフェストが更新され、そのマニフェストを使用してアプリケーションをGKEにデプロイ
というところまで自動的に動くようになります。
もう少し具体的に行っていることとしては、
CI: appリポジトリ(アプリケーションのコードを管理するリポジトリ)へのpushをトリガーに、
- 単体テスト
- コンテナイメージの作成
- Artifact Registryへのコンテナイメージのpush
- マニフェストの更新とenvリポジトリ(Kubernetes Deploymentのマニフェストを管理するリポジトリ)のcandidateブランチへのpush
CD:candidateブランチへのpushをトリガーに、
- Kubernetesクラスタに新しいバージョンのマニフェストを適用
- productionブランチに新しく適用されたマニフェストをコピー
になります。
実装
実装の細かい部分はドキュメントを読んでいただければと思うので、ここでは要点をかいつまんで説明します。実装コードはこちらにあります。
Cloud Buildではトリガーを設定し、ビルドステップをyaml(またはjson)で記述してあげることで、そのトリガーが引かれた時に記述されたビルドステップを順に実行していきます。
CI
CI部分では以下のようなyamlファイル(cloudbuild.yaml)を用意します。
やっていることは6つで、
- 単体テスト実行
- コンテナイメージのビルド
- Artifact Registryにビルド済みのコンテナイメージをpush
- envリポジトリをclone
- 新しいマニフェストを作成
- envリポジトリに新しいマニフェストの変更をpush
です。
重要な点としては、41行目にあるように新しいコンテナイメージのtagにショートハッシュをつけていて、63, 64行目でkubernetes.yaml.tplというマニフェストのテンプレートファイルのCOMMIT_SHAをそのショートハッシュで置換してあげる(kubernetes.yaml.tplの33行目のimageのところが置換される)ことで、新しいコンテナイメージを参照するマニフェストを作成できます。
# Copyright 2018 Google LLC
#
# Licensed under the Apache License, Version 2.0 (the "License");
# you may not use this file except in compliance with the License.
# You may obtain a copy of the License at
#
#     https://www.apache.org/licenses/LICENSE-2.0
#
# Unless required by applicable law or agreed to in writing, software
# distributed under the License is distributed on an "AS IS" BASIS,
# WITHOUT WARRANTIES OR CONDITIONS OF ANY KIND, either express or implied.
# See the License for the specific language governing permissions and
# limitations under the License.

# [START cloudbuild]
steps:
# This step runs the unit tests on the app
- name: 'python:3.7-slim'
  id: Test
  entrypoint: /bin/sh
  args:
  - -c
  - 'pip install flask && python test_app.py -v'

# This step builds the container image.
- name: 'gcr.io/cloud-builders/docker'
  id: Build
  args:
  - 'build'
  - '-t'
  - 'us-central1-docker.pkg.dev/$PROJECT_ID/my-repository/hello-cloudbuild:$SHORT_SHA'
  - '.'

# This step pushes the image to Artifact Registry
# The PROJECT_ID and SHORT_SHA variables are automatically
# replaced by Cloud Build.
- name: 'gcr.io/cloud-builders/docker'
  id: Push
  args:
  - 'push'
  - 'us-central1-docker.pkg.dev/$PROJECT_ID/my-repository/hello-cloudbuild:$SHORT_SHA'
# [END cloudbuild]

# [START cloudbuild-trigger-cd]
# This step clones the hello-cloudbuild-env repository
- name: 'gcr.io/cloud-builders/gcloud'
  id: Clone env repository
  entrypoint: /bin/sh
  args:
  - '-c'
  - |
    gcloud source repos clone hello-cloudbuild-env && \
    cd hello-cloudbuild-env && \
    git checkout candidate && \
    git config user.email $(gcloud auth list --filter=status:ACTIVE --format='value(account)')
# This step generates the new manifest
- name: 'gcr.io/cloud-builders/gcloud'
  id: Generate manifest
  entrypoint: /bin/sh
  args:
  - '-c'
  - |
     sed "s/GOOGLE_CLOUD_PROJECT/${PROJECT_ID}/g" kubernetes.yaml.tpl | \
     sed "s/COMMIT_SHA/${SHORT_SHA}/g" > hello-cloudbuild-env/kubernetes.yaml
# This step pushes the manifest back to hello-cloudbuild-env
- name: 'gcr.io/cloud-builders/gcloud'
  id: Push manifest
  entrypoint: /bin/sh
  args:
  - '-c'
  - |
    set -x && \
    cd hello-cloudbuild-env && \
    git add kubernetes.yaml && \
    git commit -m "Deploying image us-central1-docker.pkg.dev/$PROJECT_ID/my-repository/hello-cloudbuild:${SHORT_SHA}
    Built from commit ${COMMIT_SHA} of repository hello-cloudbuild-app
    Author: $(git log --format='%an <%ae>' -n 1 HEAD)" && \
    git push origin candidate
# [END cloudbuild-trigger-cd]
# Copyright 2018 Google LLC
#
# Licensed under the Apache License, Version 2.0 (the "License");
# you may not use this file except in compliance with the License.
# You may obtain a copy of the License at
#
#     https://www.apache.org/licenses/LICENSE-2.0
#
# Unless required by applicable law or agreed to in writing, software
# distributed under the License is distributed on an "AS IS" BASIS,
# WITHOUT WARRANTIES OR CONDITIONS OF ANY KIND, either express or implied.
# See the License for the specific language governing permissions and
# limitations under the License.

apiVersion: apps/v1
kind: Deployment
metadata:
  name: hello-cloudbuild
  labels:
    app: hello-cloudbuild
spec:
  replicas: 1
  selector:
    matchLabels:
      app: hello-cloudbuild
  template:
    metadata:
      labels:
        app: hello-cloudbuild
    spec:
      containers:
      - name: hello-cloudbuild
        image: us-central1-docker.pkg.dev/GOOGLE_CLOUD_PROJECT/my-repository/hello-cloudbuild:COMMIT_SHA
        ports:
        - containerPort: 8080
---
kind: Service
apiVersion: v1
metadata:
  name: hello-cloudbuild
spec:
  selector:
    app: hello-cloudbuild
  ports:
  - protocol: TCP
    port: 80
    targetPort: 8080
  type: LoadBalancer
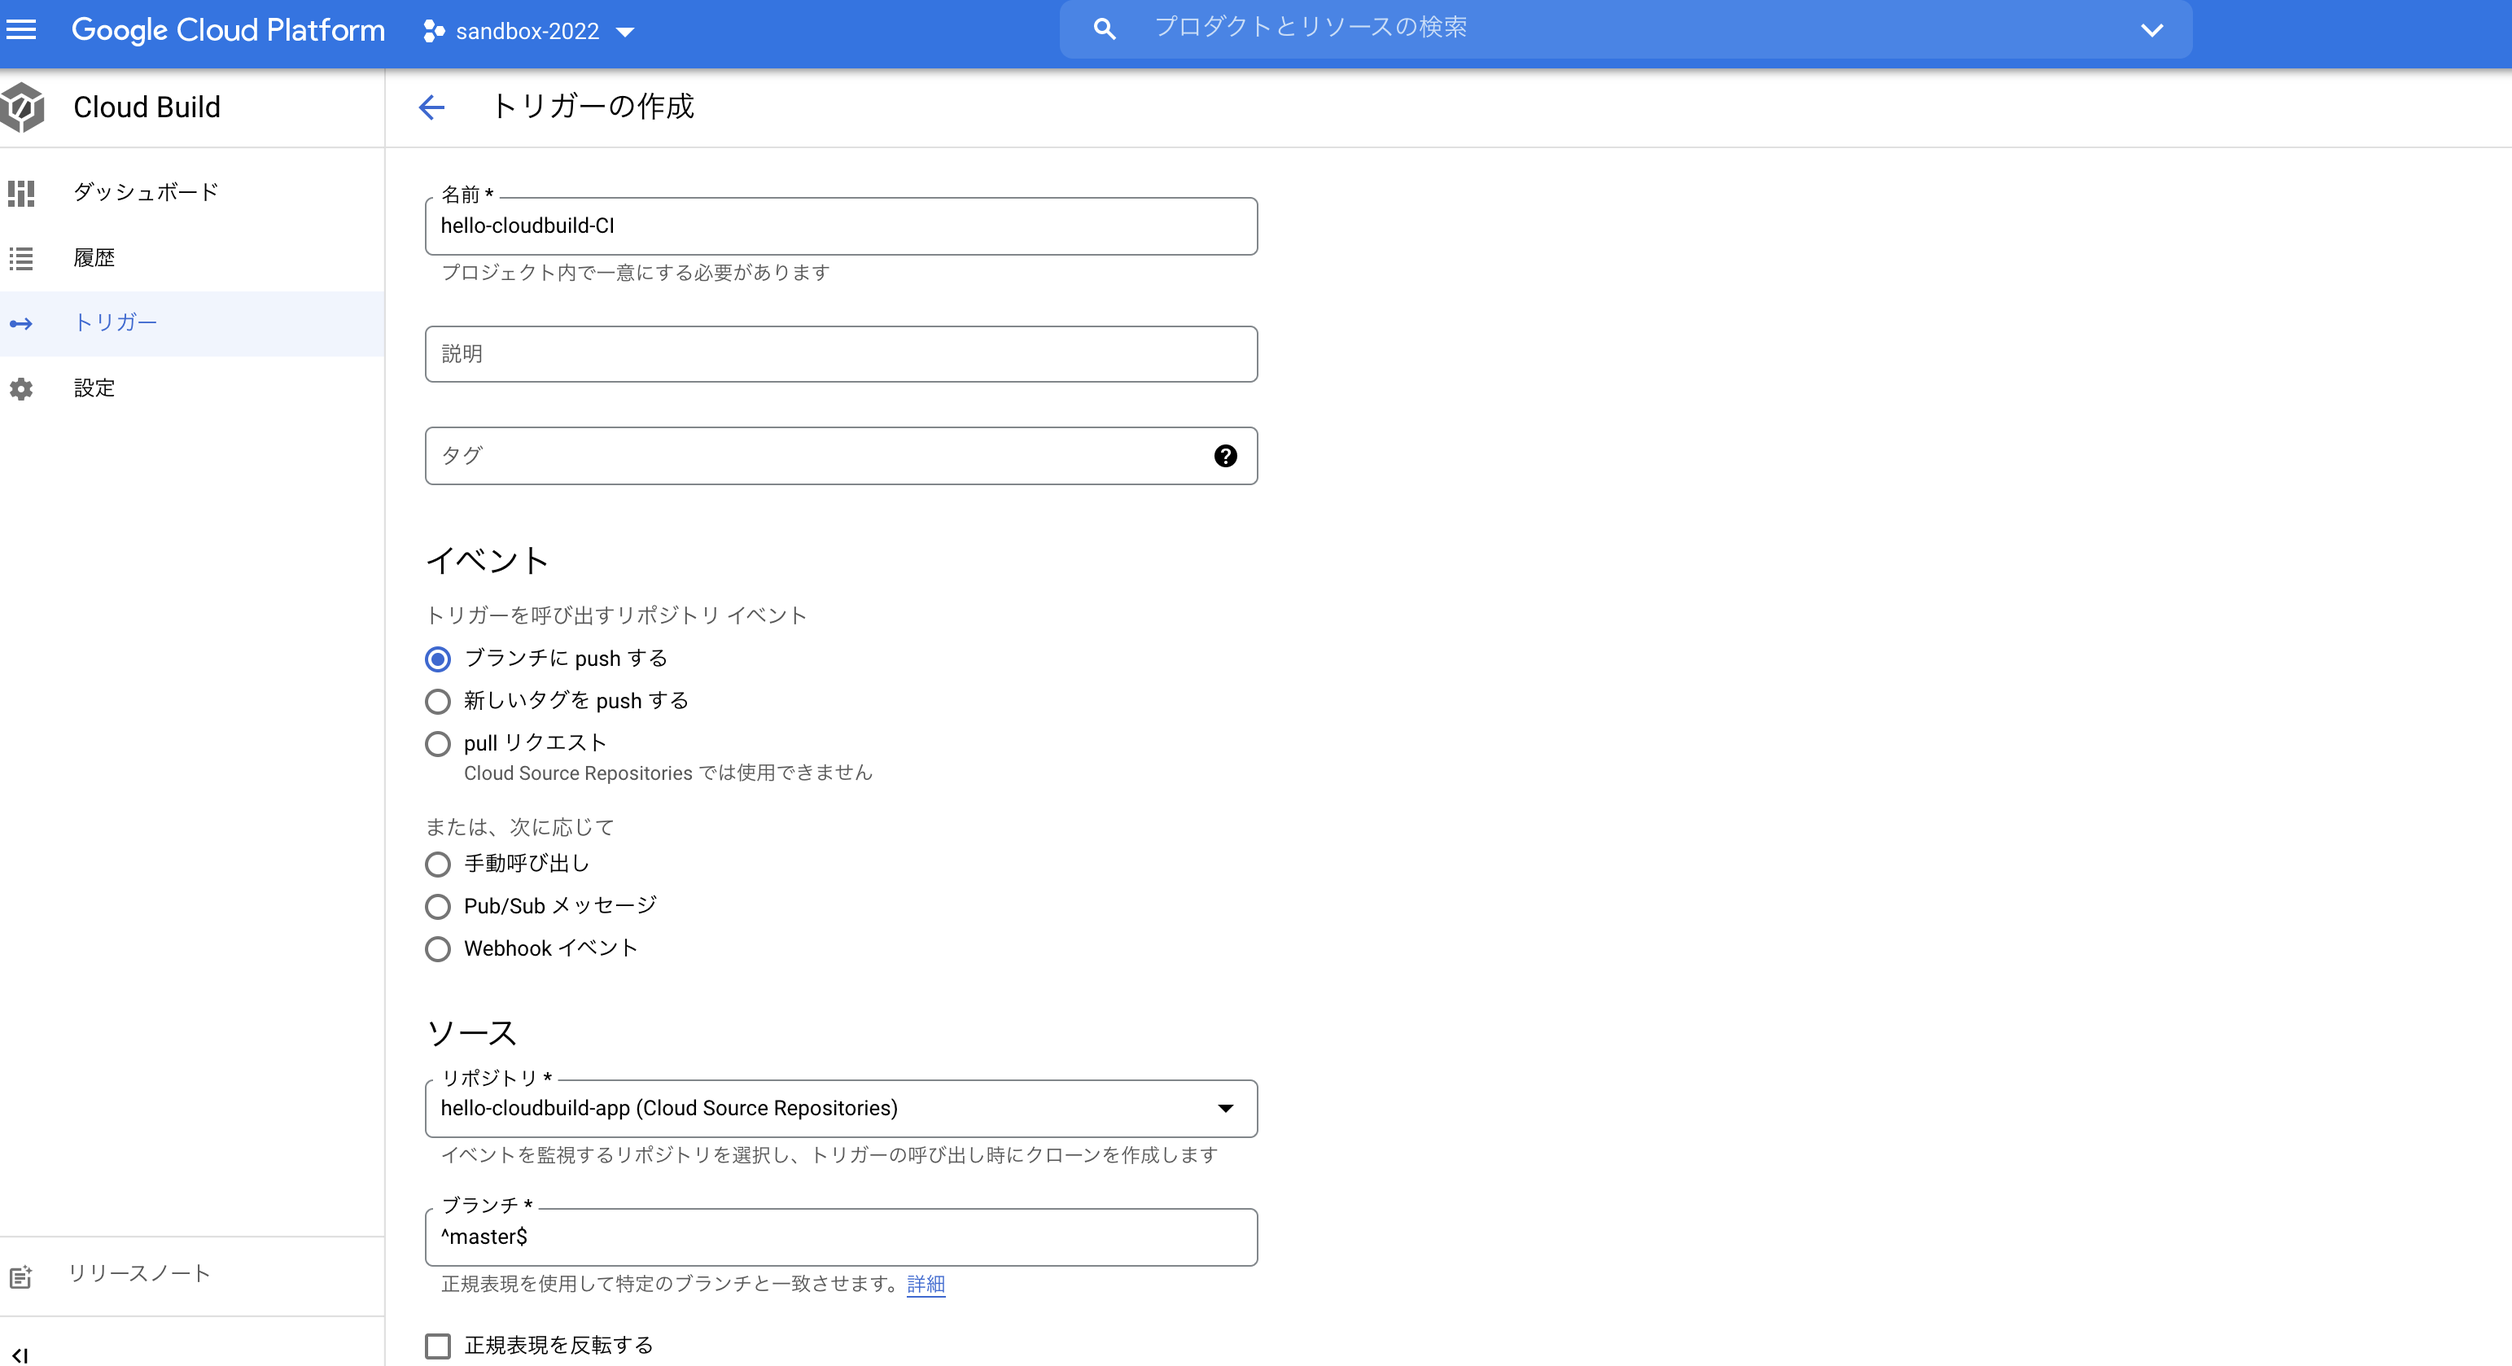
cloudbuild.yaml, kubernetes.yaml.tplをappリポジトリにpushした上で、以下のようにcloud buildを設定します。
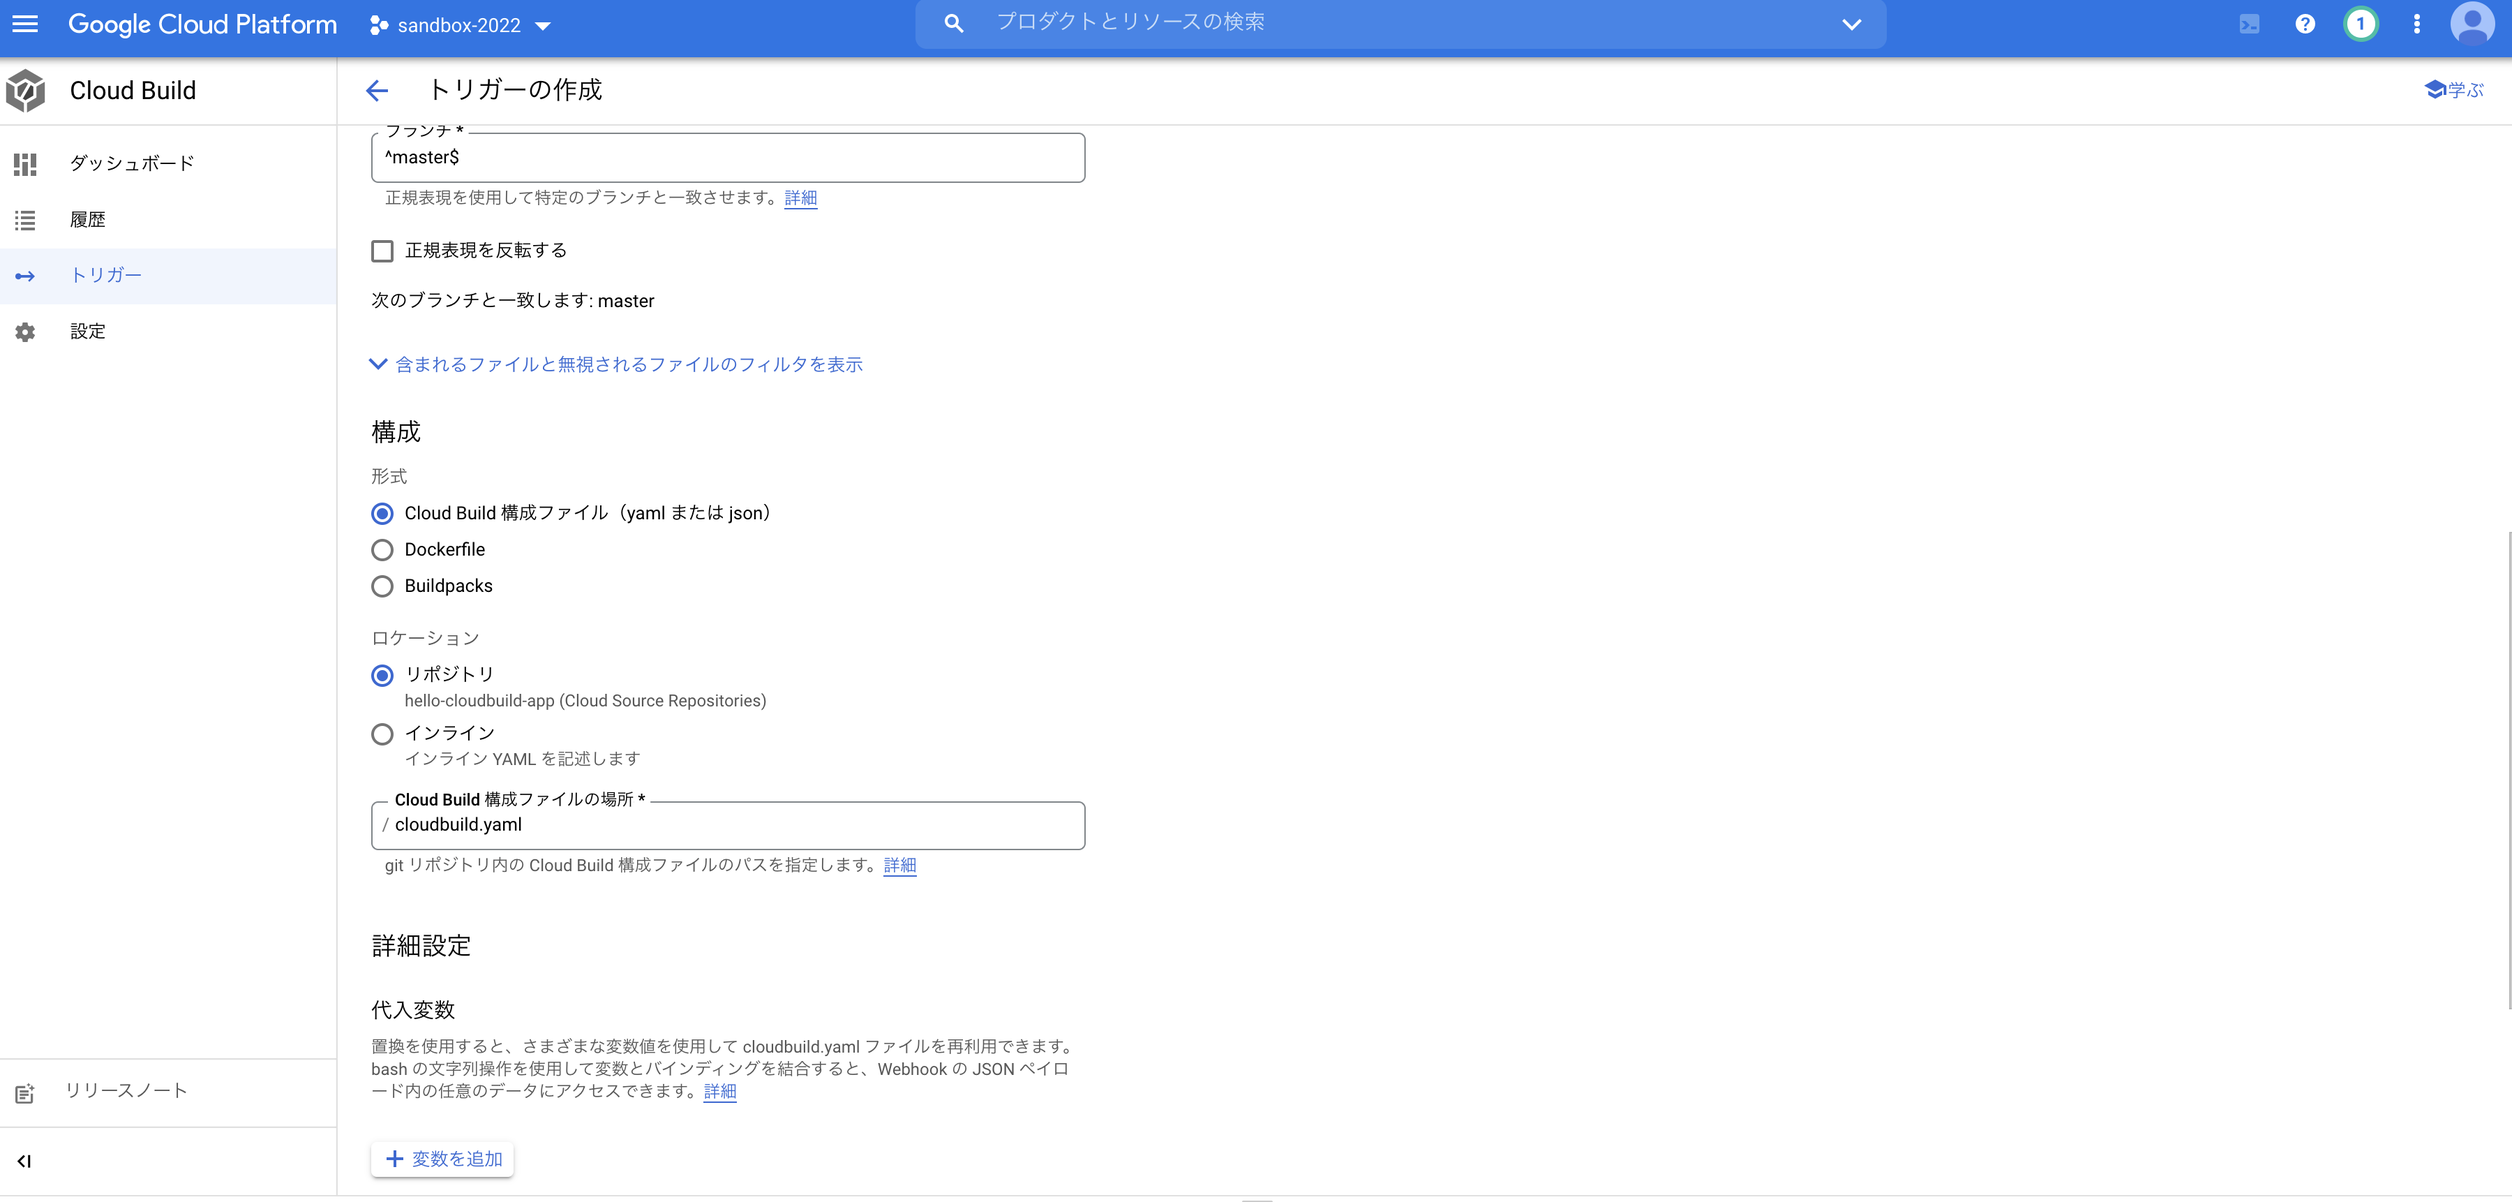
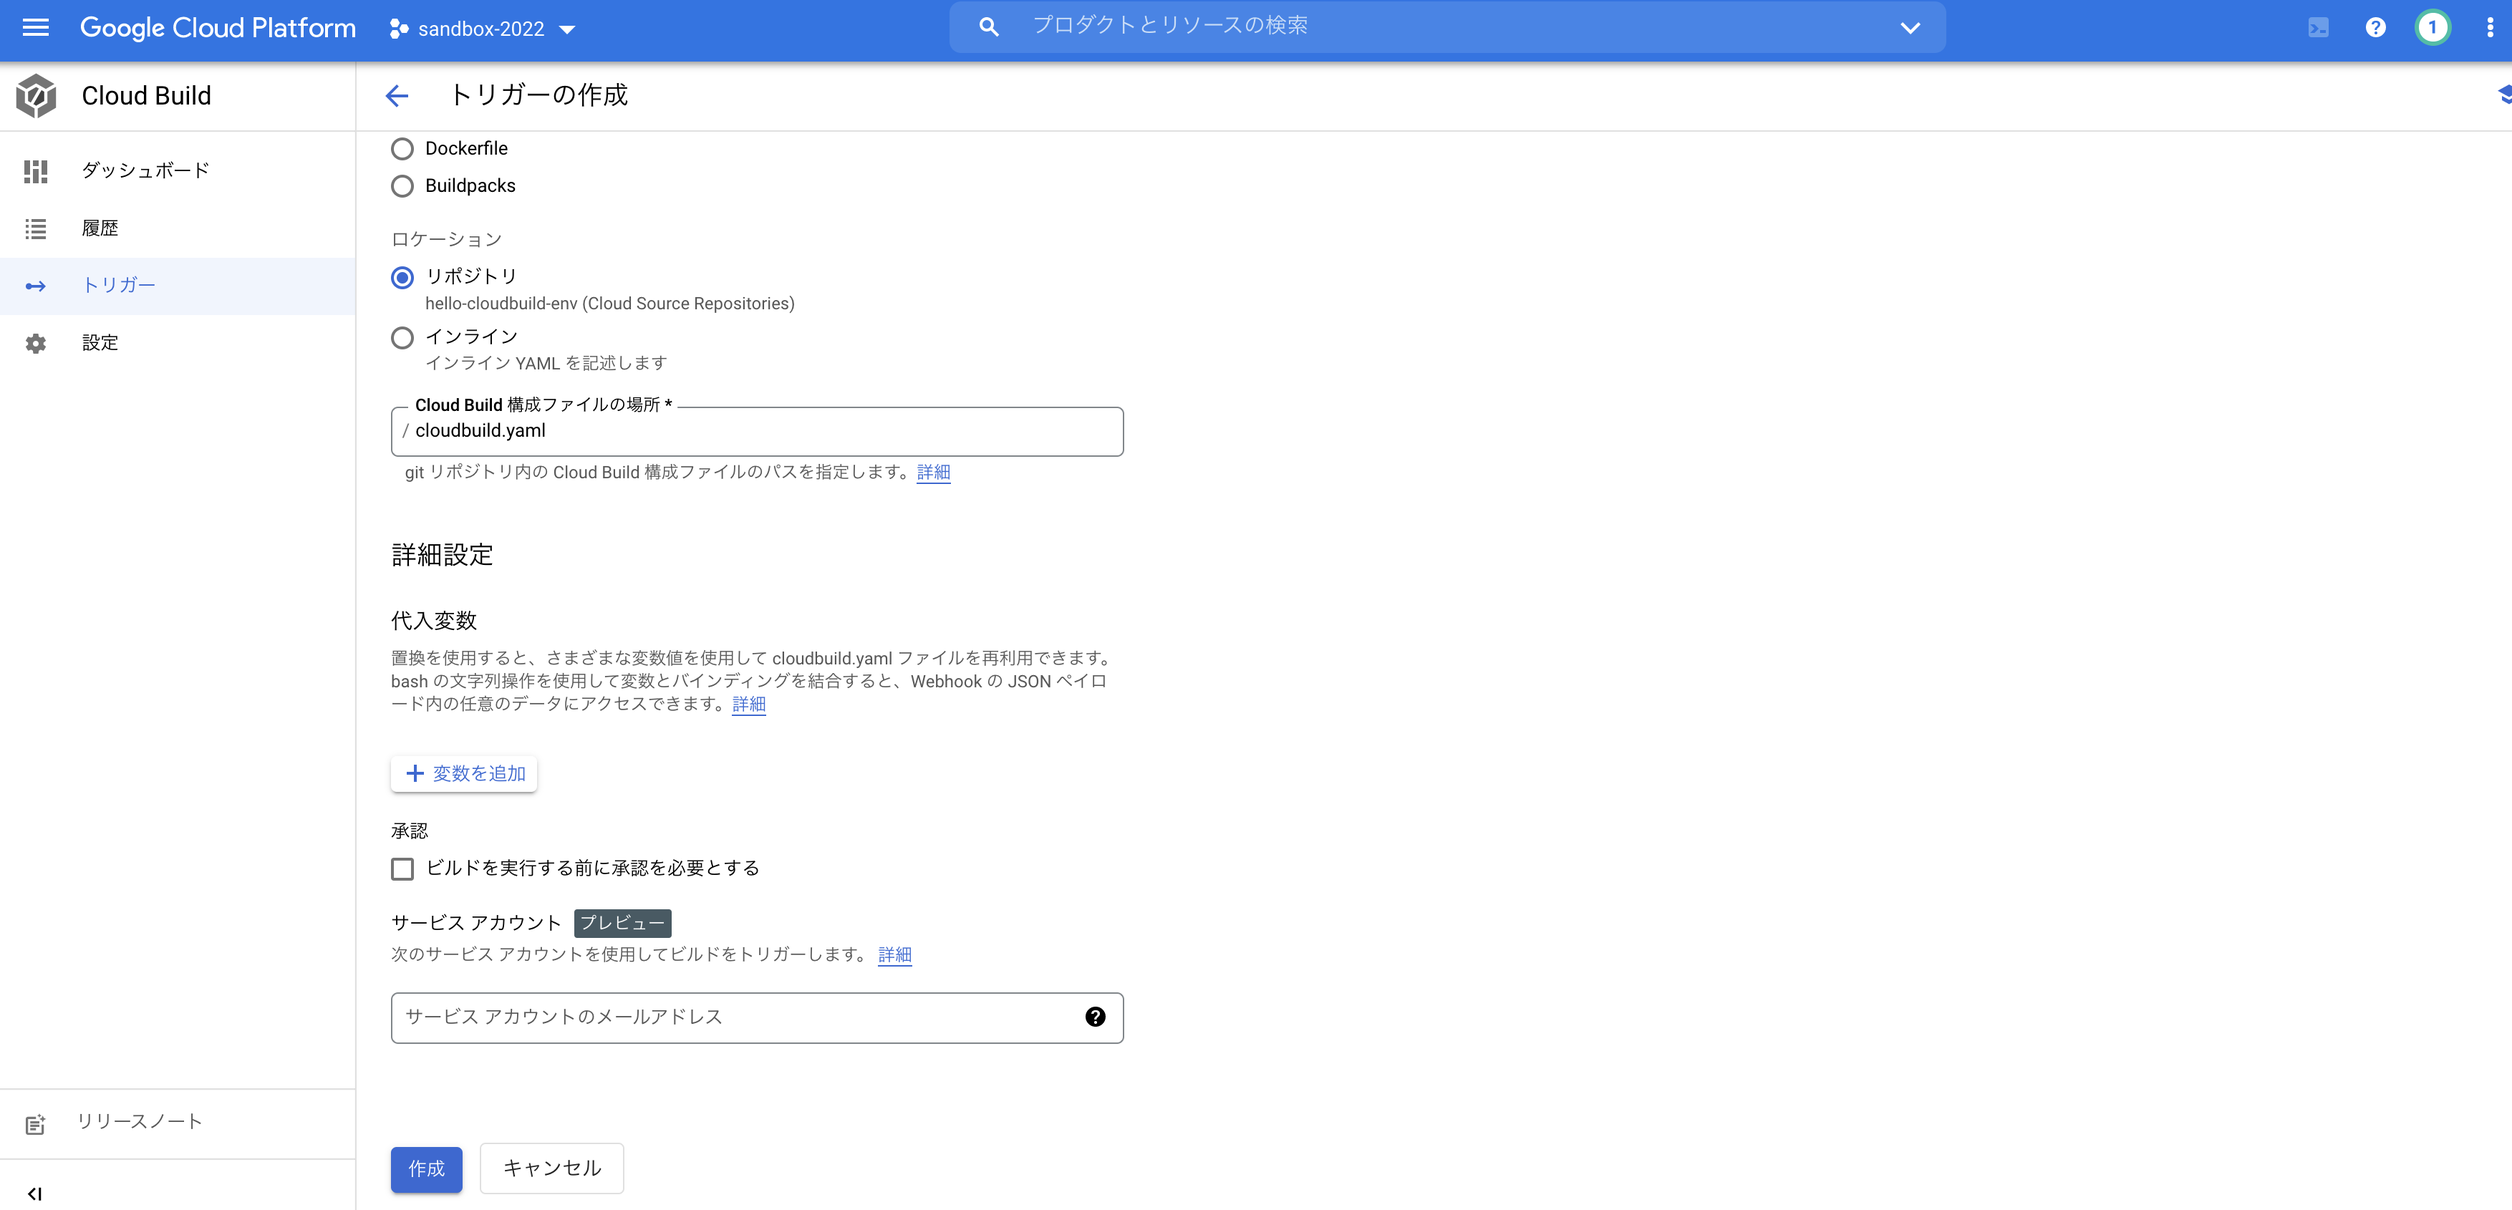
cloud buildの「トリガーを作成」から、イベントを「ブランチにpushする」に設定、ソースをappリポジトリのmasterブランチに設定してあげます。その上で、Cloud Build構成ファイルの場所を「/cloudbuild.yaml」とすることで、appリポジトリのmasterブランチへのpushをトリガーに、cloudbuild.yamlで記述されたビルドが実行されるようになります。
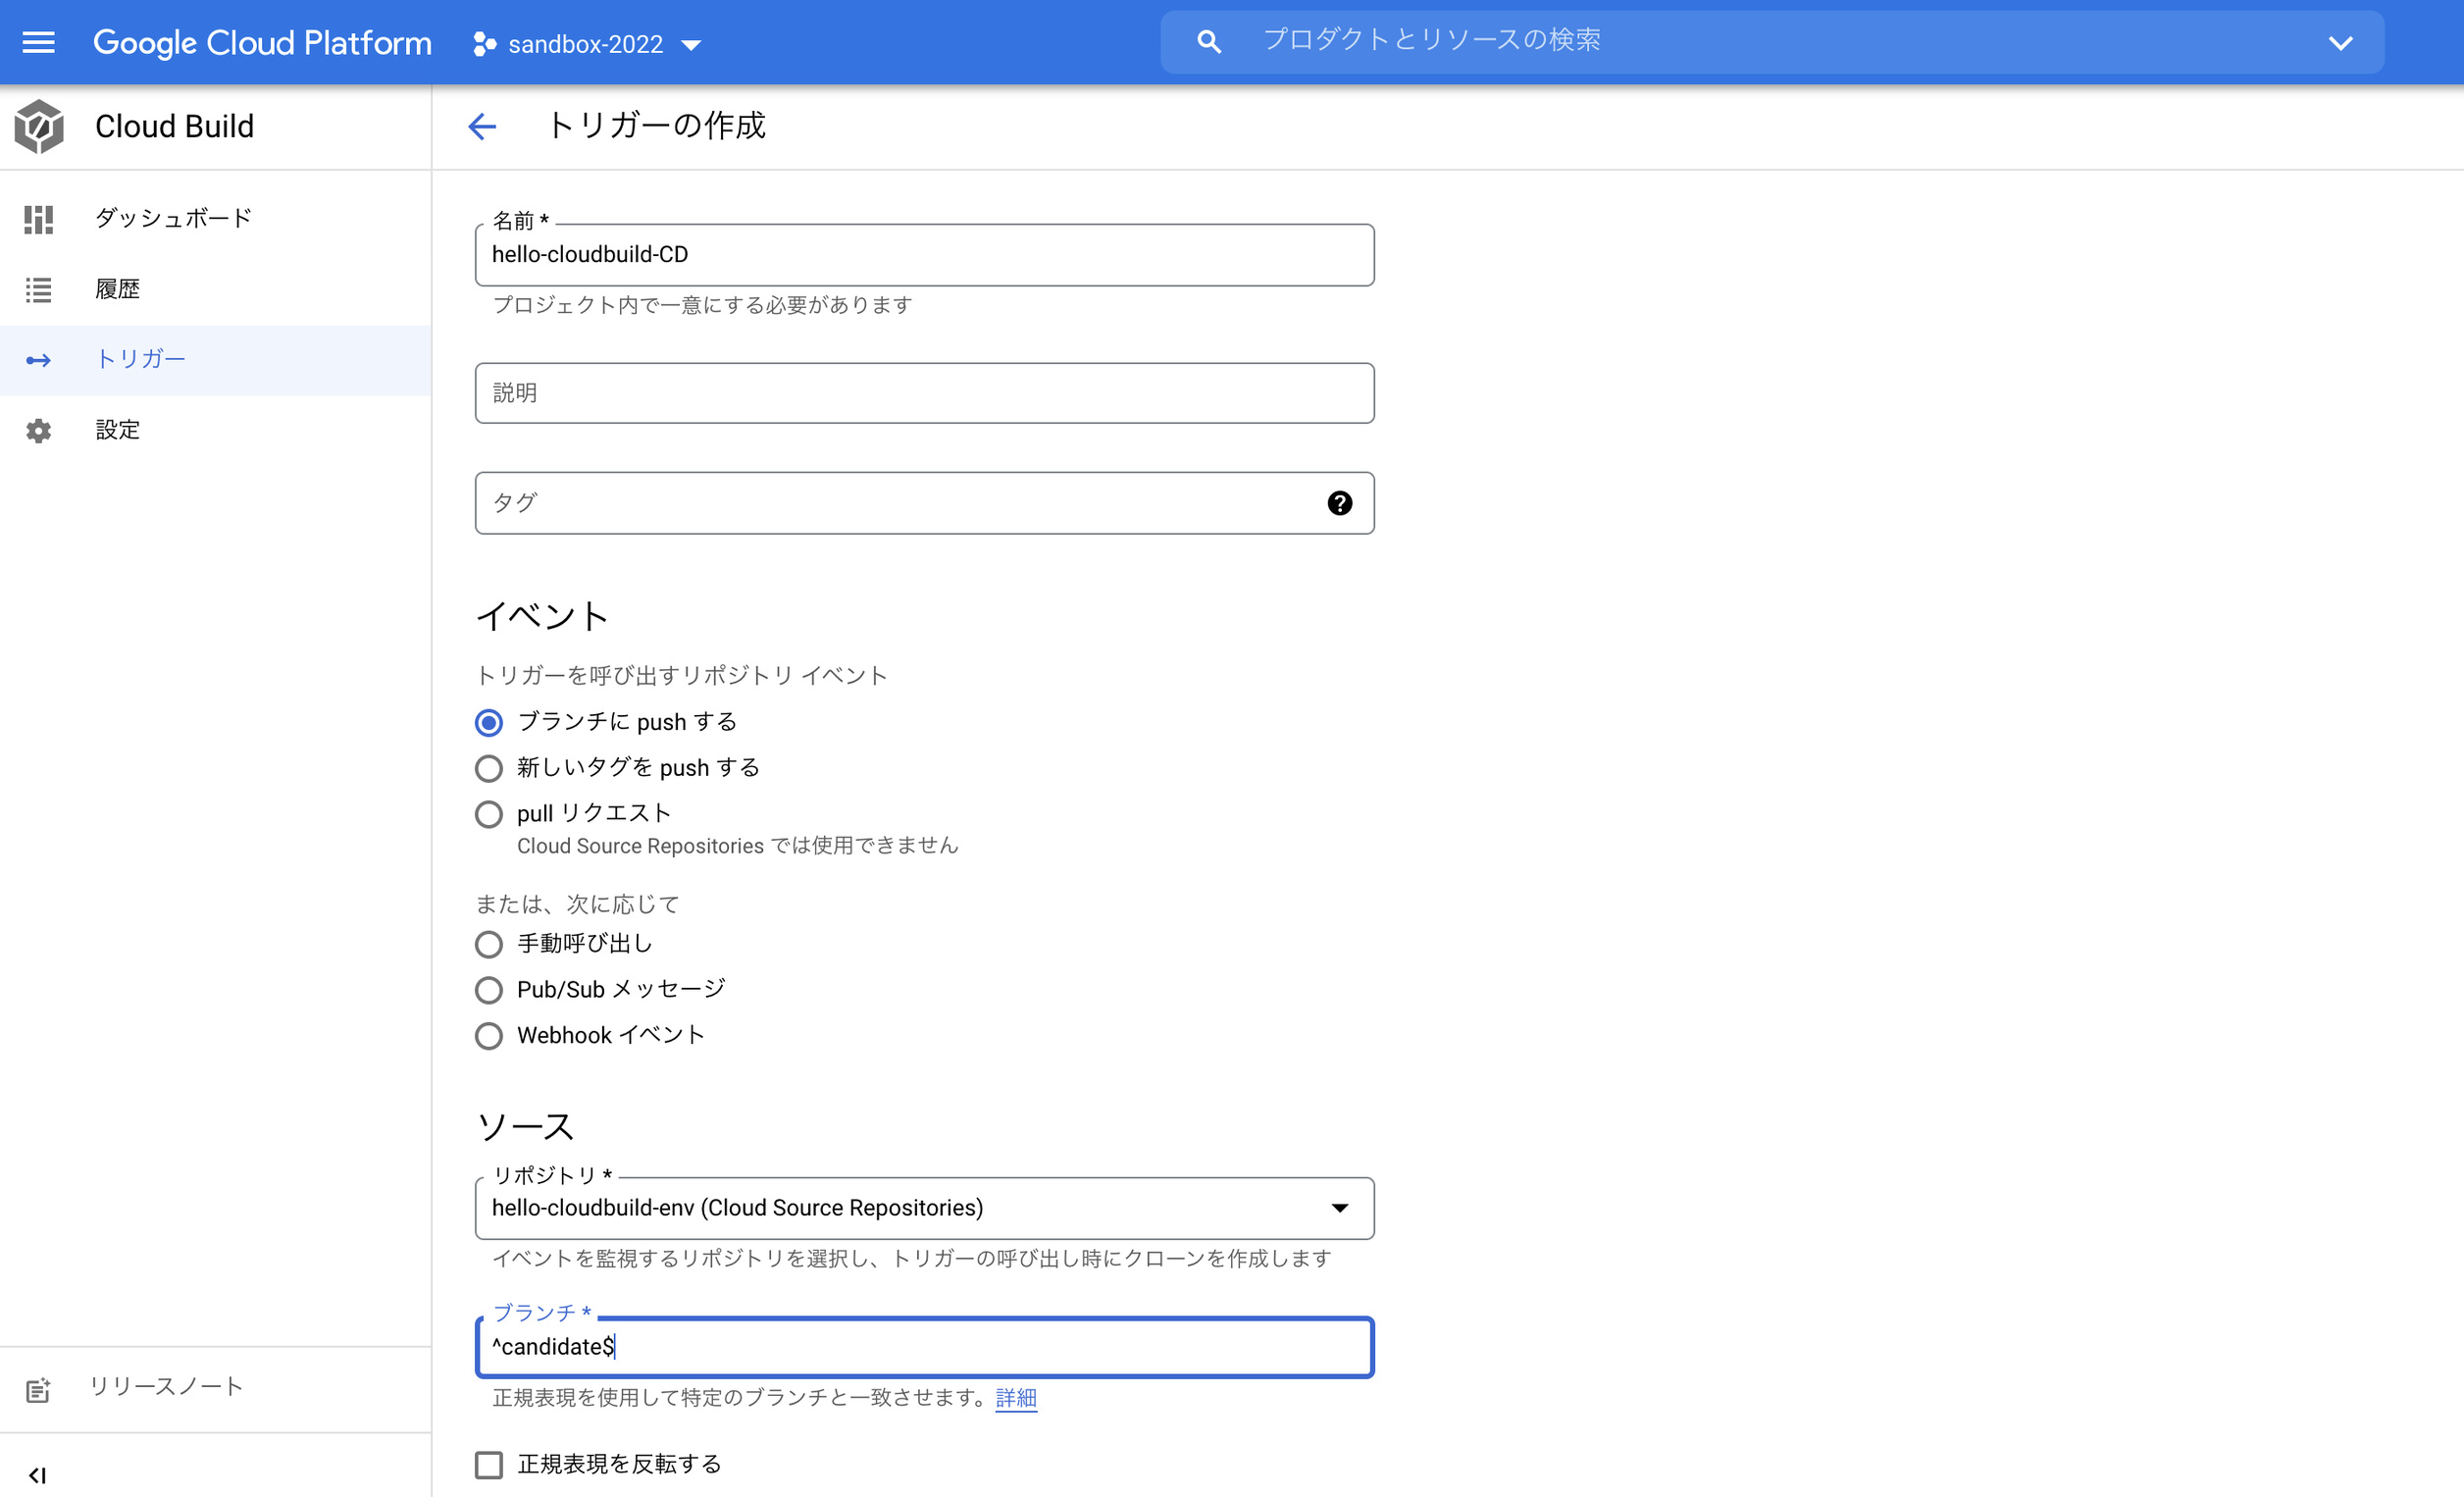
これでcandidateブランチに変更を加えるところまで自動的に動くようになるので、CDの部分で、candidateブランチへの変更をトリガーにデプロイまで動かす部分を書いてあげれば、CI/CDパイプラインが出来ることになります。
CD
CD部分は比較的単純で、CI部分と同様、以下のようにcloudbuild.yamlを記述します
やっていることは2つで、
- 新しいマニフェストを使用してkubenetesクラスタに適用
- productionブランチ(本番環境のブランチ)にも変更を反映
です。
# Copyright 2018 Google LLC
#
# Licensed under the Apache License, Version 2.0 (the "License");
# you may not use this file except in compliance with the License.
# You may obtain a copy of the License at
#
#     https://www.apache.org/licenses/LICENSE-2.0
#
# Unless required by applicable law or agreed to in writing, software
# distributed under the License is distributed on an "AS IS" BASIS,
# WITHOUT WARRANTIES OR CONDITIONS OF ANY KIND, either express or implied.
# See the License for the specific language governing permissions and
# limitations under the License.

# [START cloudbuild-delivery]
steps:
# This step deploys the new version of our container image
# in the hello-cloudbuild Kubernetes Engine cluster.
- name: 'gcr.io/cloud-builders/kubectl'
  id: Deploy
  args:
  - 'apply'
  - '-f'
  - 'kubernetes.yaml'
  env:
  - 'CLOUDSDK_COMPUTE_REGION=us-central1'
  - 'CLOUDSDK_CONTAINER_CLUSTER=hello-cloudbuild'

# This step copies the applied manifest to the production branch
# The COMMIT_SHA variable is automatically
# replaced by Cloud Build.
- name: 'gcr.io/cloud-builders/git'
  id: Copy to production branch
  entrypoint: /bin/sh
  args:
  - '-c'
  - |
    set -x && \
    # Configure Git to create commits with Cloud Build's service account
    git config user.email $(gcloud auth list --filter=status:ACTIVE --format='value(account)') && \
    # Switch to the production branch and copy the kubernetes.yaml file from the candidate branch
    git fetch origin production && git checkout production && \
    git checkout $COMMIT_SHA kubernetes.yaml && \
    # Commit the kubernetes.yaml file with a descriptive commit message
    git commit -m "Manifest from commit $COMMIT_SHA
    $(git log --format=%B -n 1 $COMMIT_SHA)" && \
    # Push the changes back to Cloud Source Repository
    git push origin production
# [END cloudbuild-delivery]
CI部分と同様、こちらはcandidateブランチへのpushをトリガーにcloudbuild.yamlに記述したビルドが動くように設定してあげます。
動かしてみる
CI/CDパイプラインができたので、ちゃんとGKE上にデプロイされているか確かめてみます。
ちなみにアプリケーションのコードは以下で、hello worldを出すだけです
# Copyright 2018 Google LLC
#
# Licensed under the Apache License, Version 2.0 (the "License");
# you may not use this file except in compliance with the License.
# You may obtain a copy of the License at
#
#     https://www.apache.org/licenses/LICENSE-2.0
#
# Unless required by applicable law or agreed to in writing, software
# distributed under the License is distributed on an "AS IS" BASIS,
# WITHOUT WARRANTIES OR CONDITIONS OF ANY KIND, either express or implied.
# See the License for the specific language governing permissions and
# limitations under the License.

# [START hello-app]
from flask import Flask
app = Flask('hello-cloudbuild')

@app.route('/')
def hello():
  return "Hello World!\n"

if __name__ == '__main__':
  app.run(host = '0.0.0.0', port = 8080)
# [END hello-app]
適当にappリポジトリ内のファイルのソースコードに変更を加えてmasterブランチに変更を加えてみると…
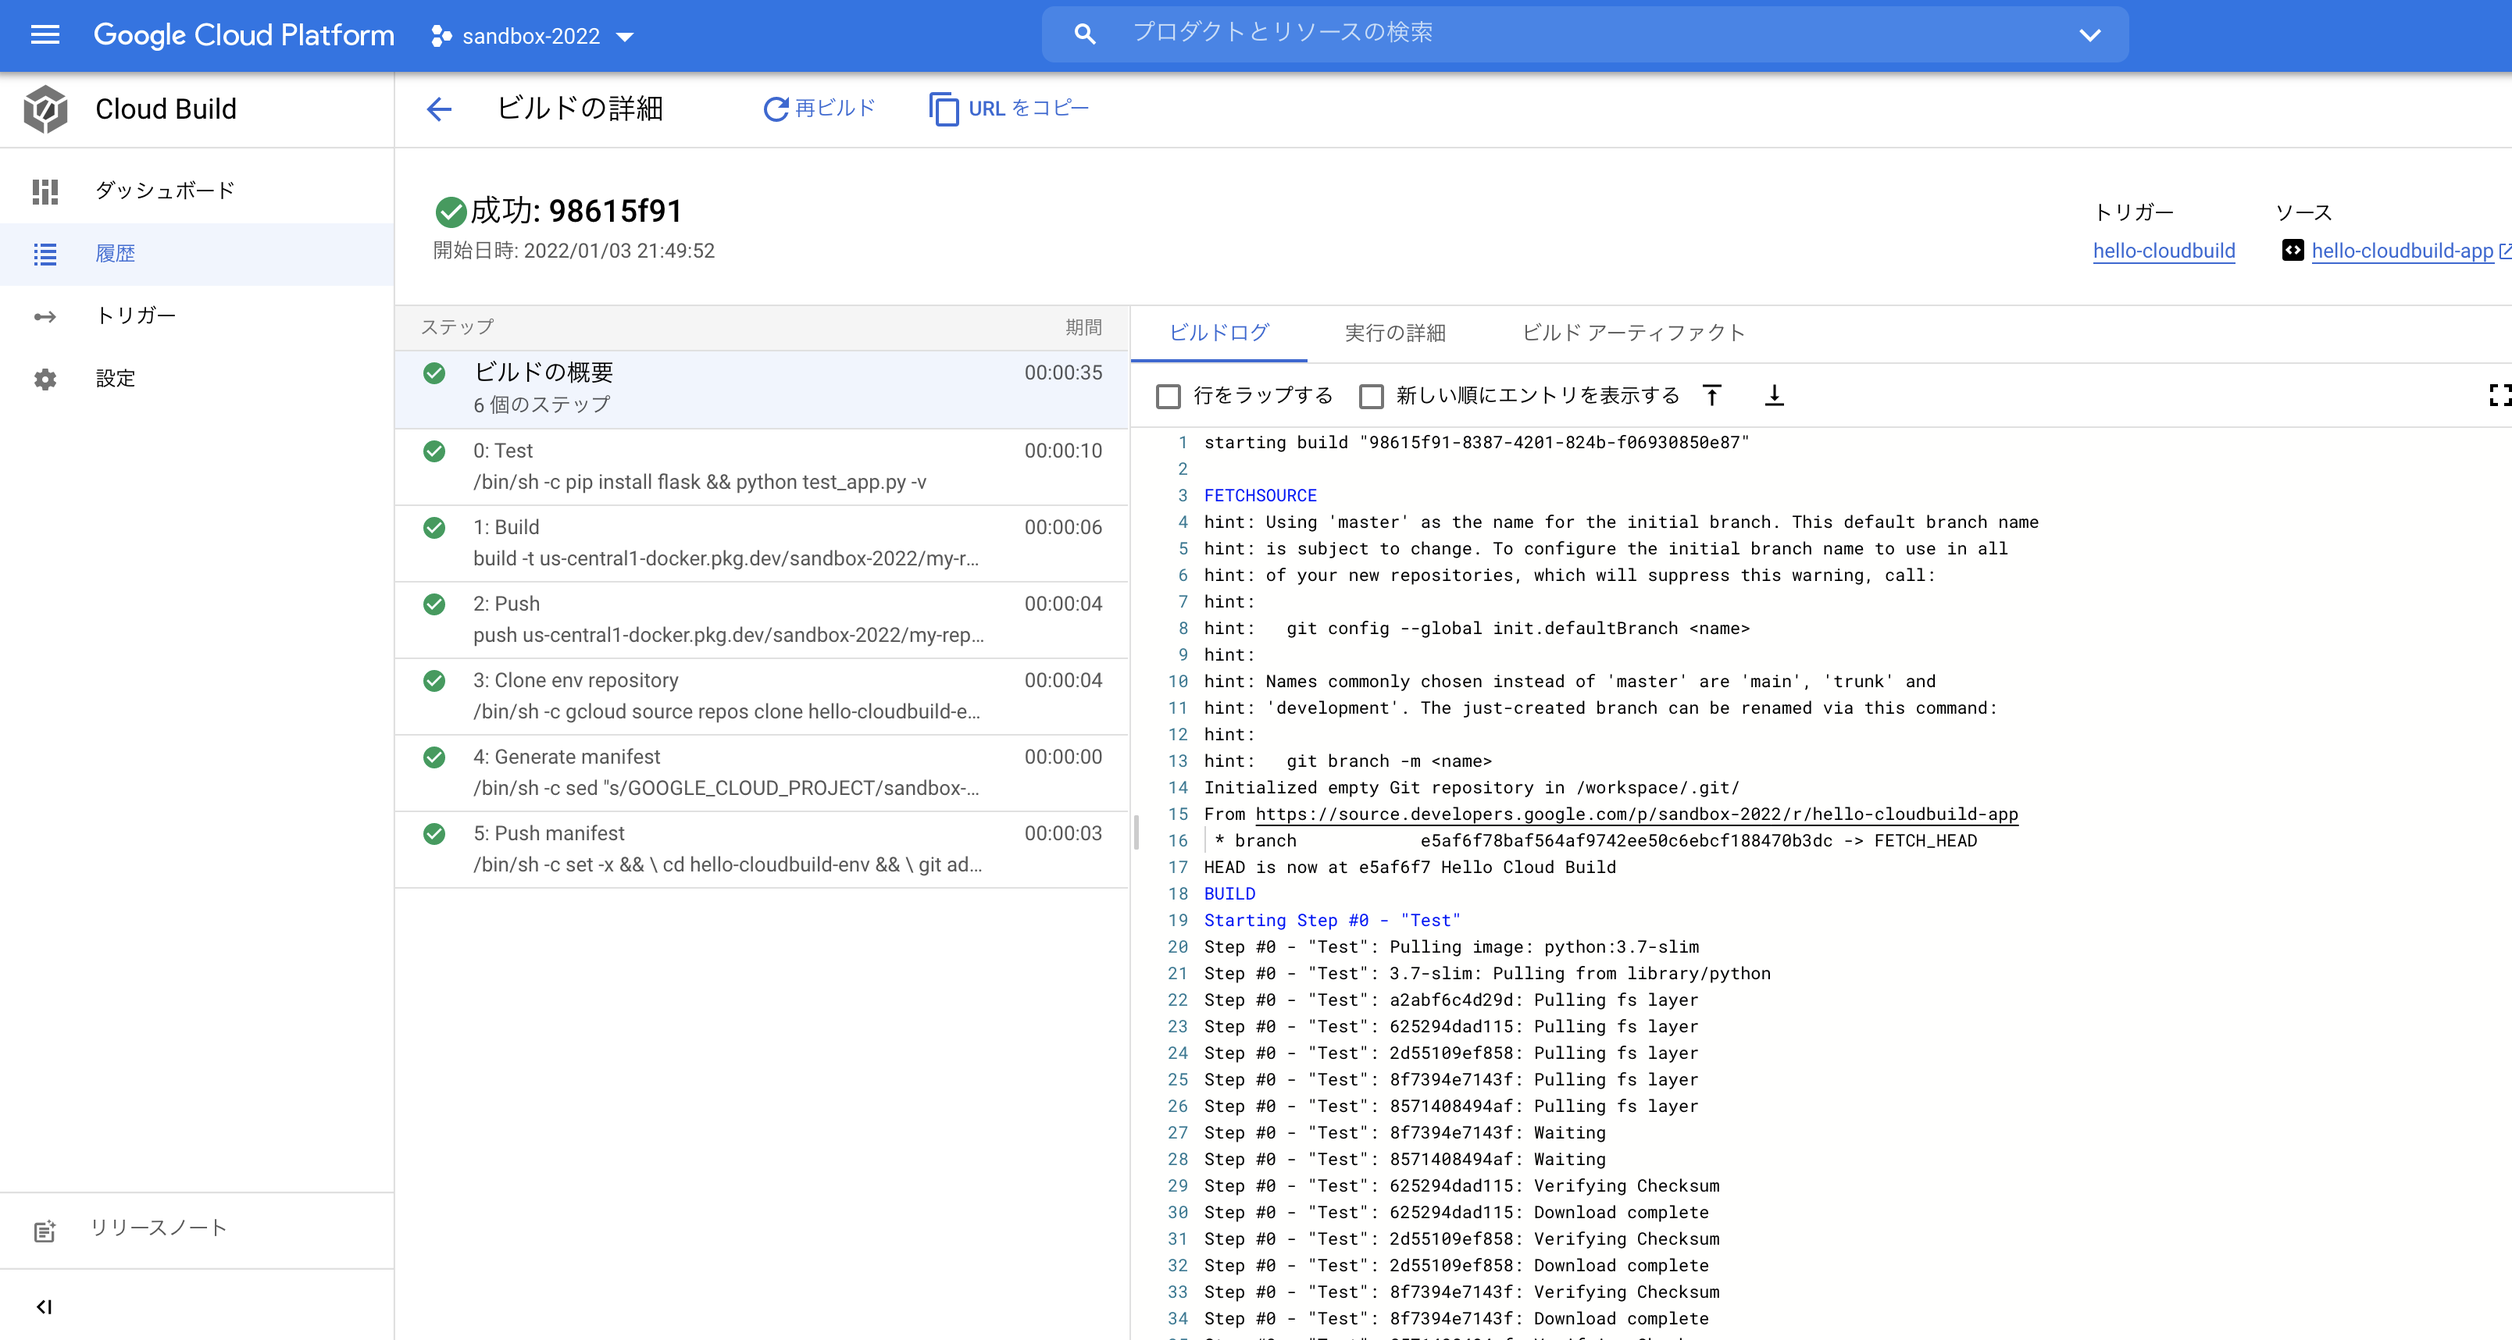
何やらビルドがされて成功しているっぽい
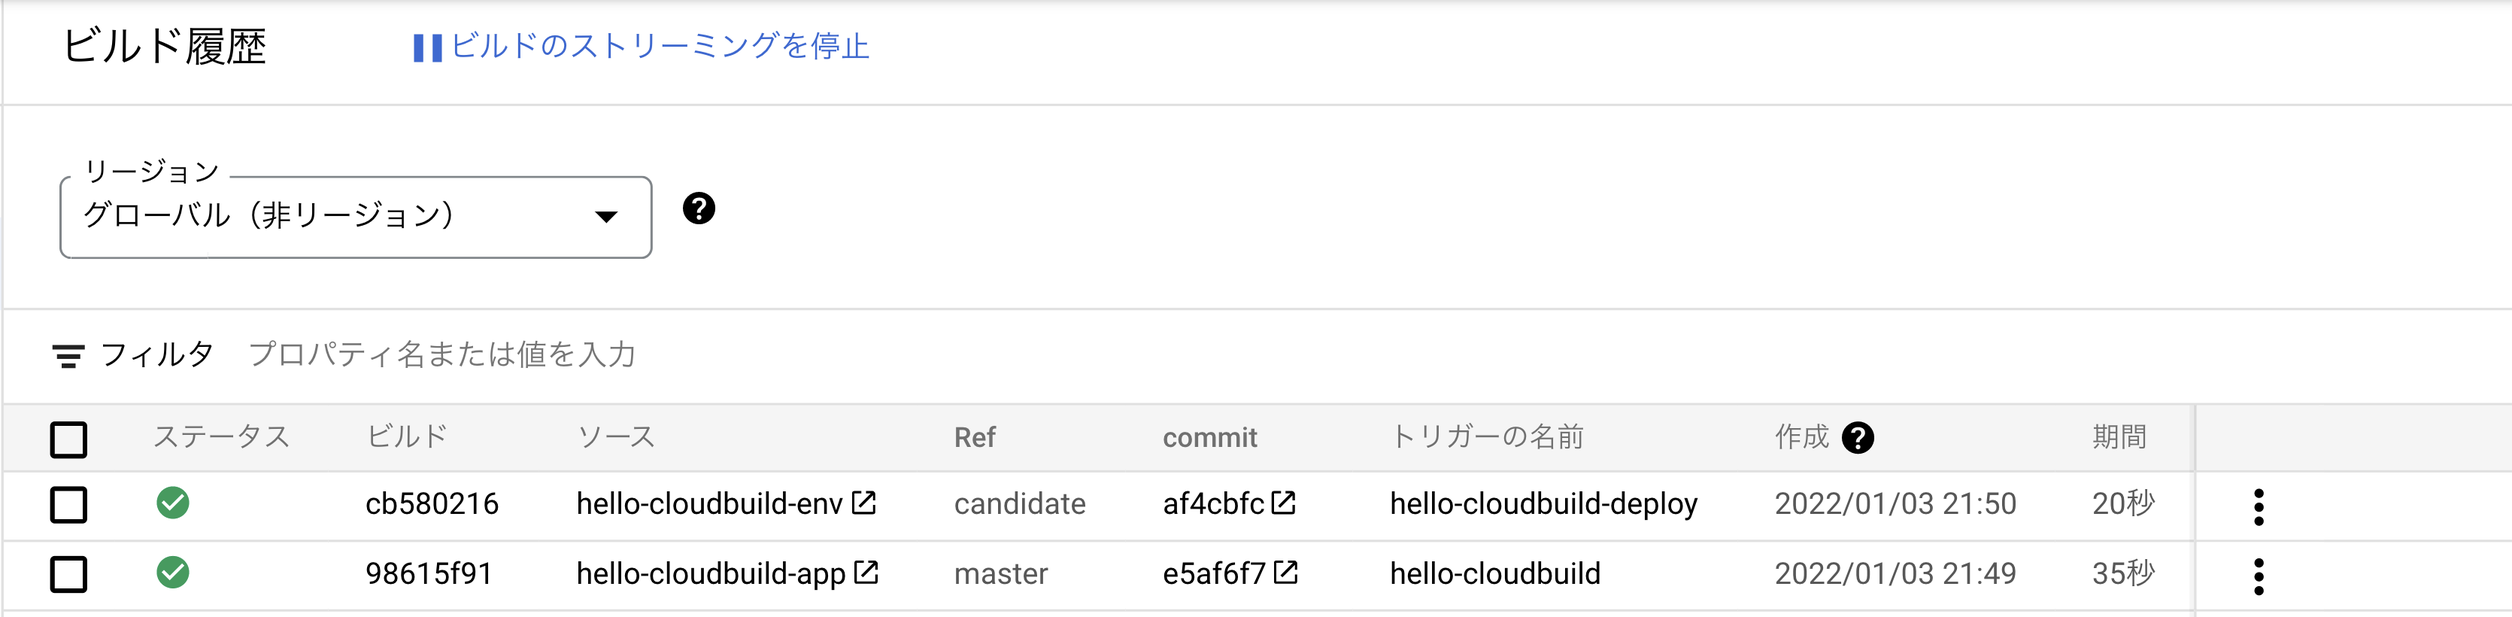
各ステップごとにログも吐き出されているので、実行が問題ないか確認しやすい
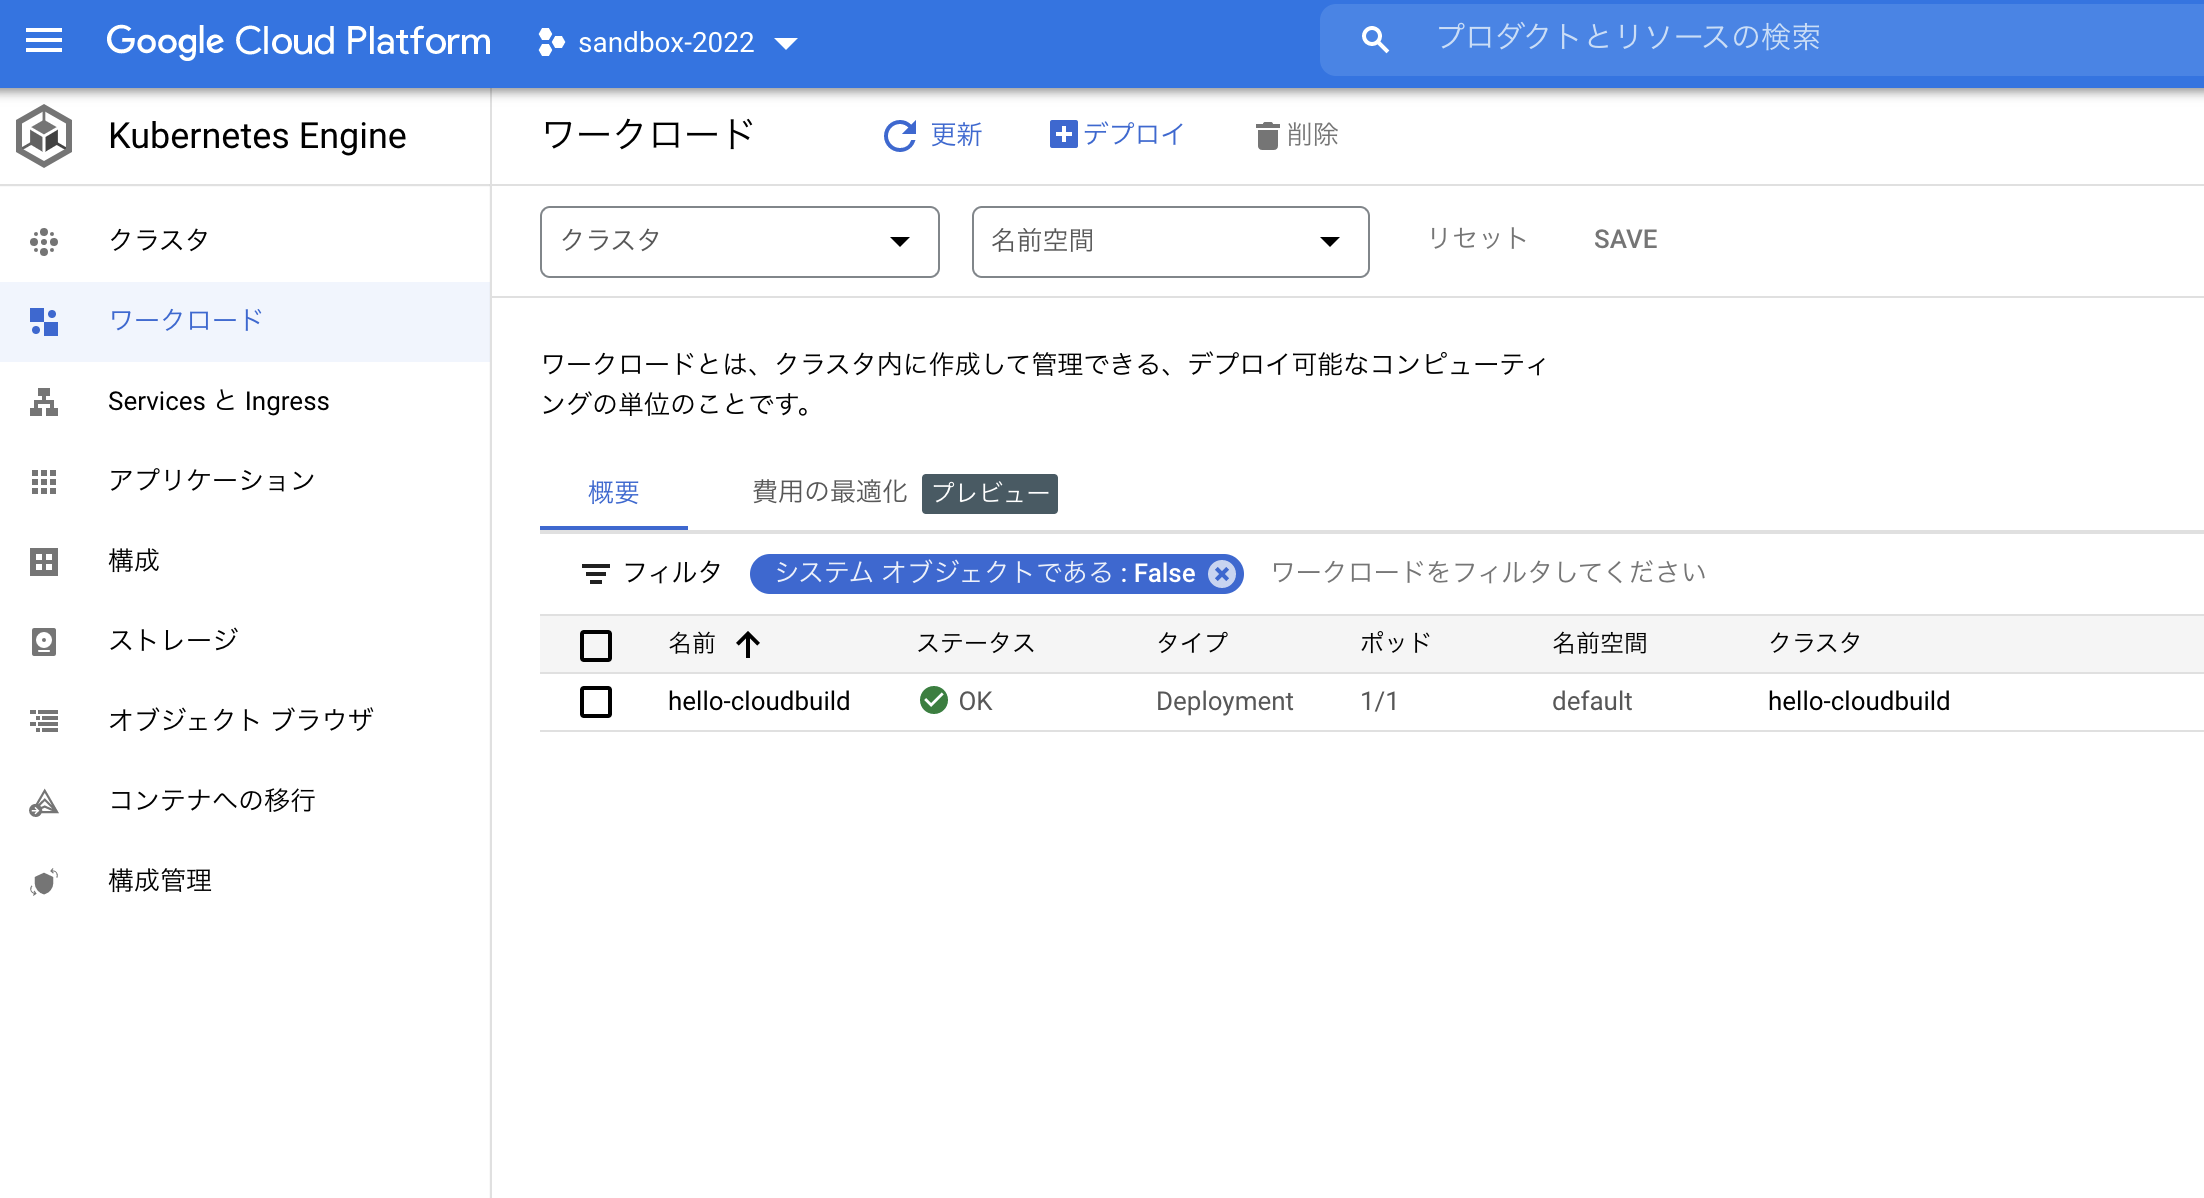
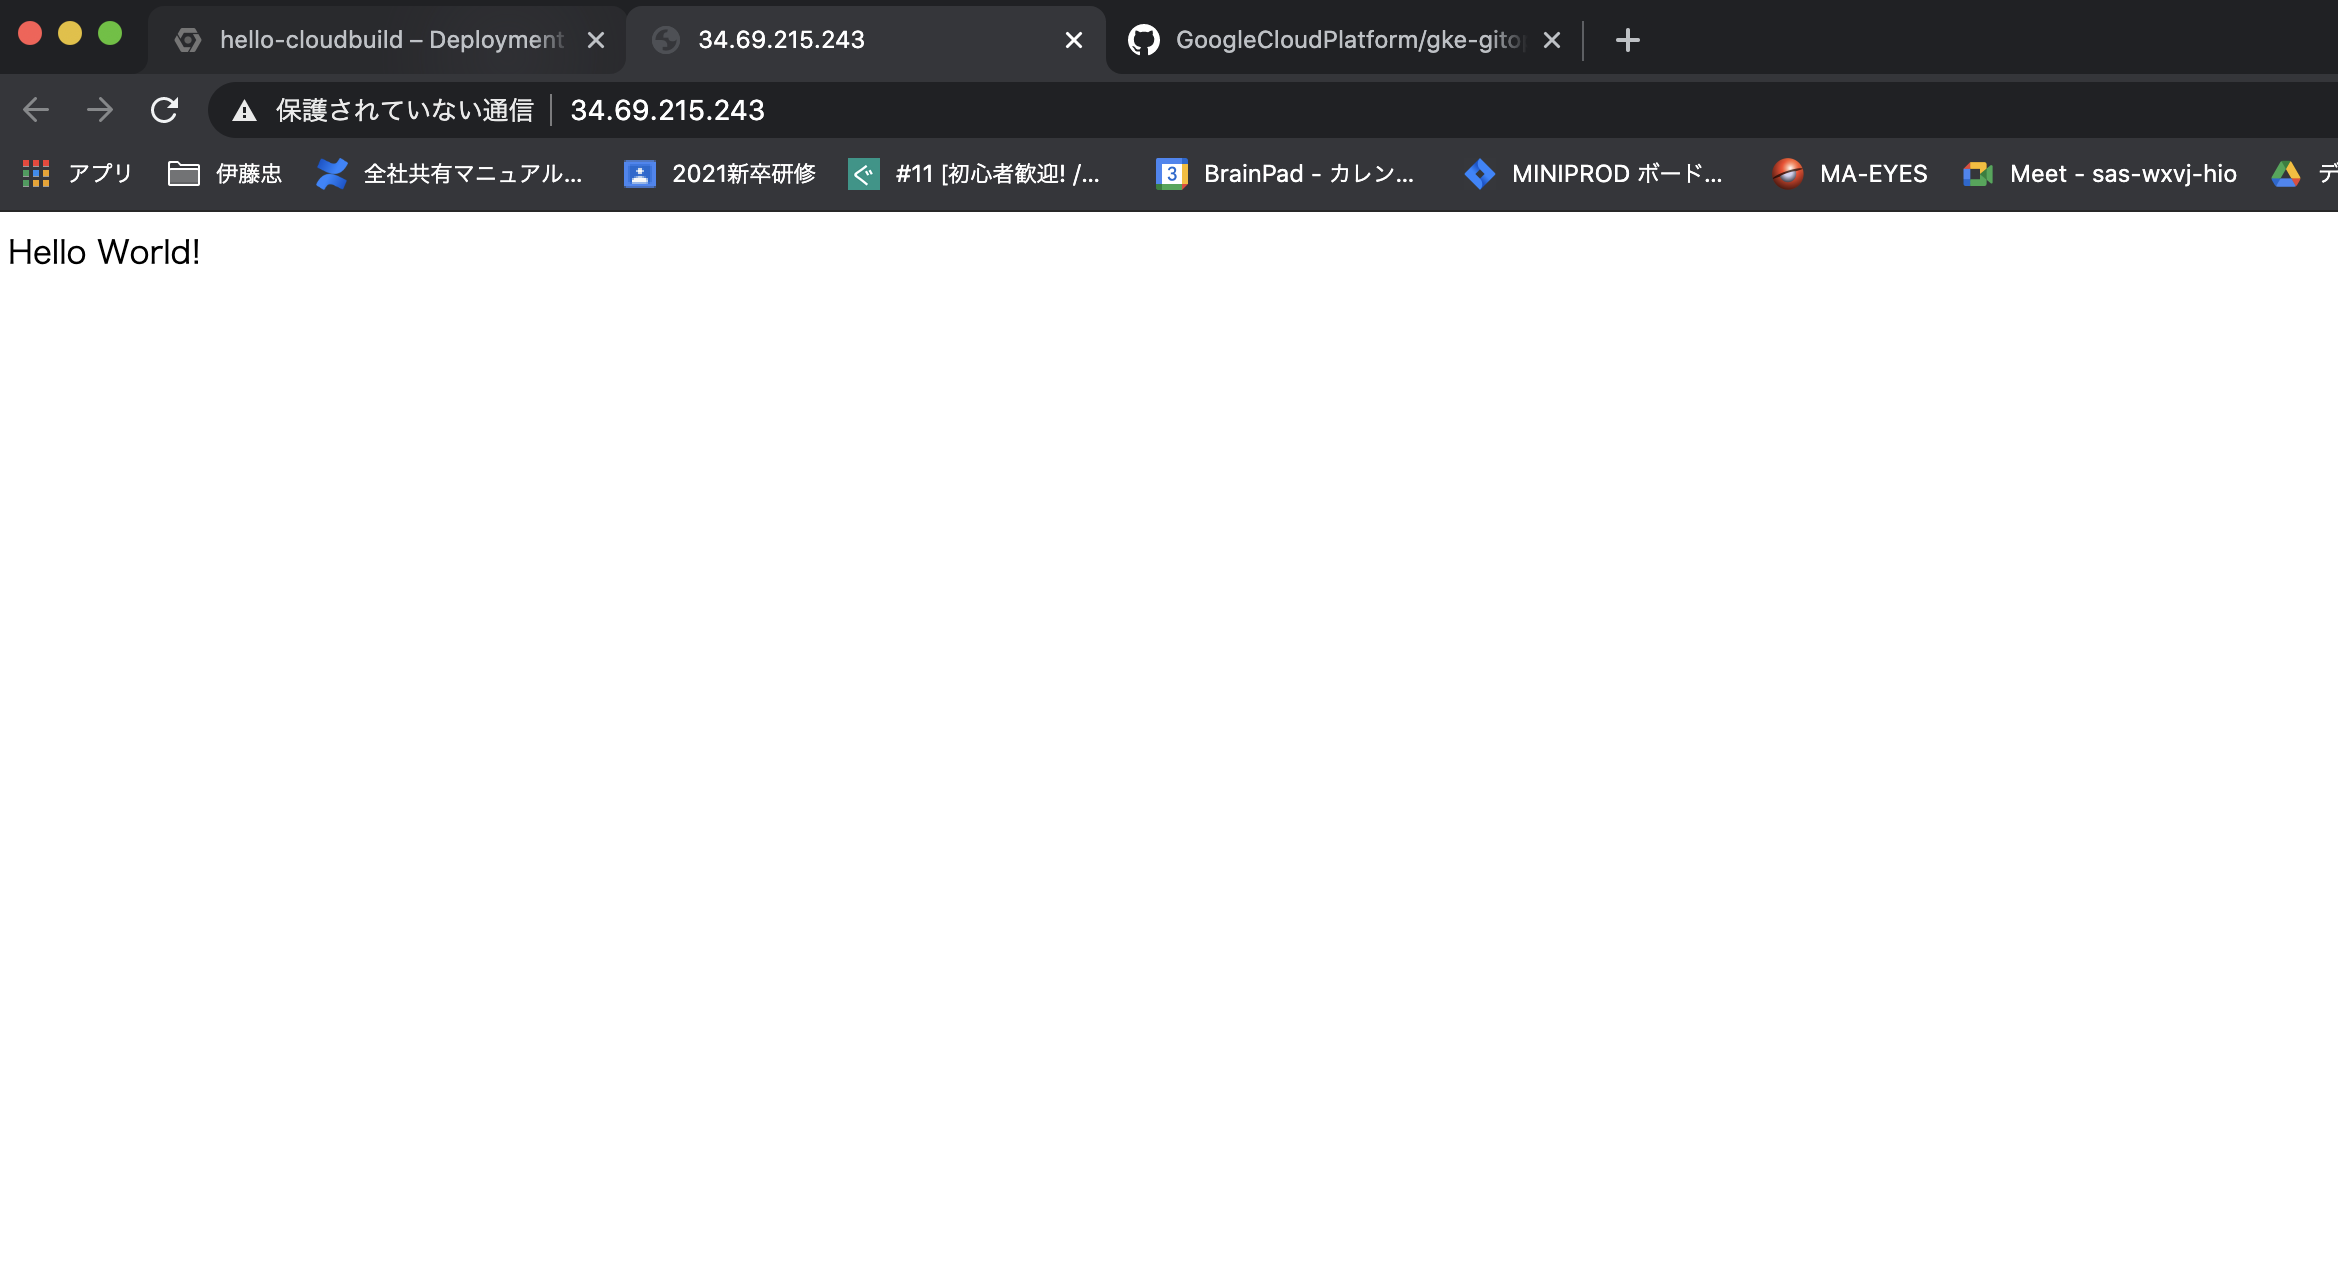
cloud buildが成功しているのでGKEをみてみると、こちらもいけてそう
エンドポイントにアクセスしてみるとHello World!の文字が! どうやらデプロイまでうまく行っているようです
試しにソースコードを変更して、その変更が自動的に反映されるのか実験してみます。
元々「Hello world」と記述していたところを「Hello Cloud Build」に変更します(単体テスト側のコードも変更しないとテストで落ちてしまうのでこちらも変更)
cd ~/hello-cloudbuild-app
sed -i 's/Hello World/Hello Cloud Build/g' app.py
sed -i 's/Hello World/Hello Cloud Build/g' test_app.py
変更をmasterブランチに反映すると…
git add app.py test_app.py
git commit -m "Hello Cloud Build"
git push google master
表示が「Hello World!」から「Hello Cloud Build!」に変わっていました!
テスト、ビルドを経てデプロイまで自動的に行われていることを確認できました。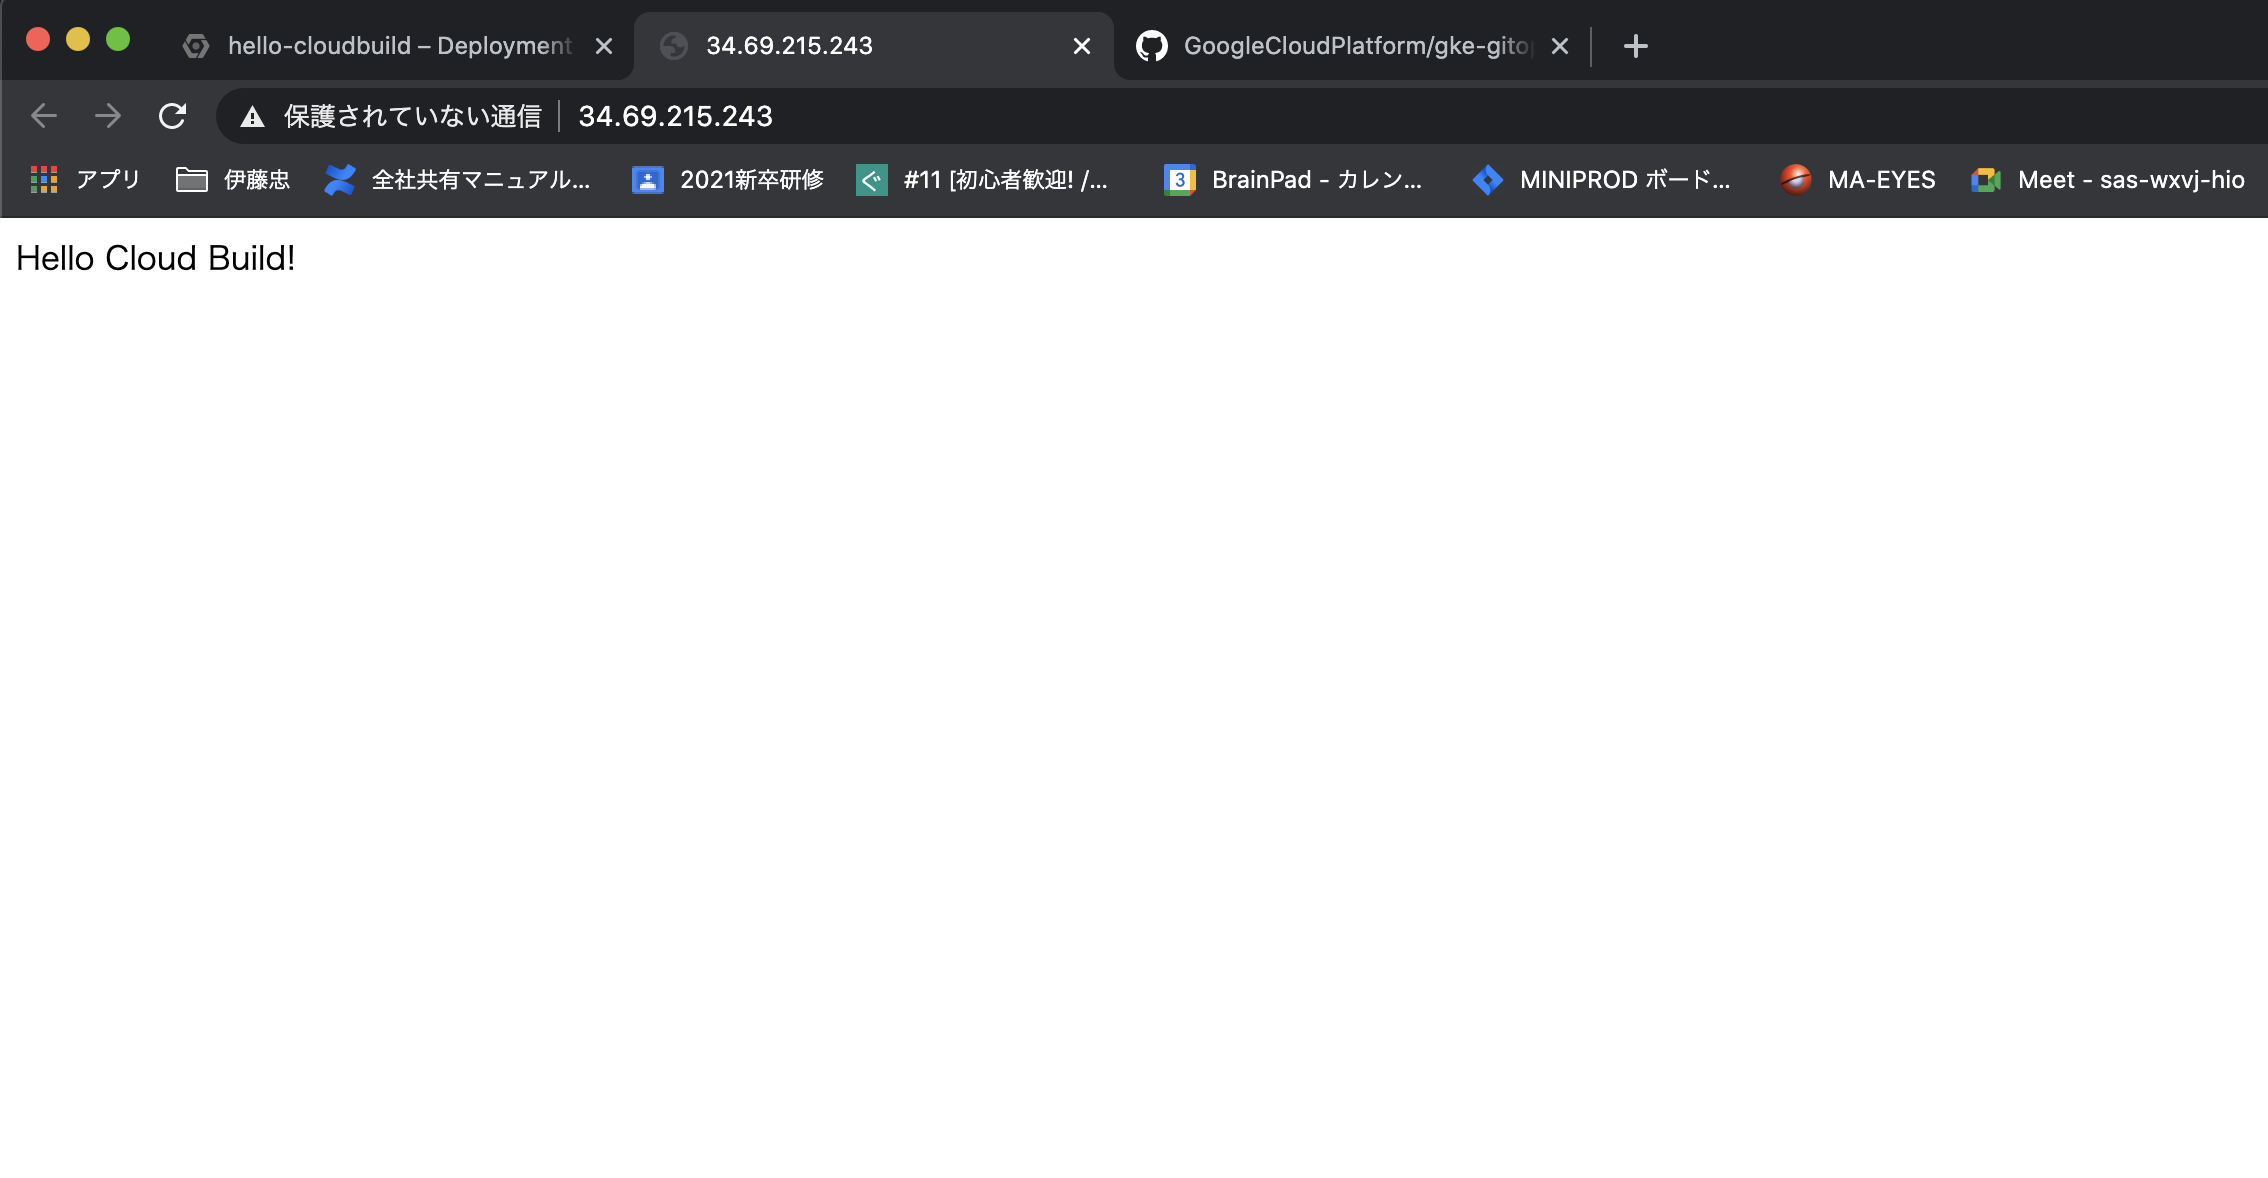
おわりに
今回はCloud Buildを活用したCI/CDパイプラインの構築のチュートリアルを試してみました。
案件で使うなら、panderaなどのデータバリデーションツールを活用して、ソースコードの変更によってdataframeに変な値が入るようになっていないか検知する、等といったことを行ってみたいと思います。