背景
社内のコミュニケーションツールをMattermostに移行することになった。
既存のBotをMattermostに移行できたらいいなーと思ったので、
自分自身の勉強も兼ねてPythonでMattermost用にBotを再実装1してみた。
Botを実装するに当たって色々と調べまわったので、自分のためにも情報をまとめておく。
環境
- CentOS 7.7 (Mattermostサーバ)
- Ubuntu 18.04 LTS (Botサーバ)
- Mattermost 5.14.0
- Python 3.6.8
なんとなくCentOSとUbuntuの両方が触りたい気分だったのと、
Ubuntu 18.04はデフォルトでPython3が入っているので使ってみた。
要するに特に意味はないです。
環境構築
Mattermostの導入
MattermostはDockerで簡単に導入できるので、まずDockerを導入する。
# Dockerをインストール
$ yum install -y yum-utils device-mapper-persistent-data lvm2
$ yum-config-manager --add-repo https://download.docker.com/linux/centos/docker-ce.repo
$ yum install docker-ce docker-ce-cli containerd.io

# インストール確認
$ docker --version
Docker version 19.03.5, build 633a0ea
$

# Docker起動
$ systemctl status docker
$ systemctl enable docker
$ systemctl start docker
$ systemctl status docker

# 動作確認
$ docker run hello-world
Unable to find image 'hello-world:latest' locally
latest: Pulling from library/hello-world
1b930d010525: Pull complete
Digest: sha256:4df8ca8a7e309c256d60d7971ea14c27672fc0d10c5f303856d7bc48f8cc17ff
Status: Downloaded newer image for hello-world:latest

Hello from Docker!
This message shows that your installation appears to be working correctly.

To generate this message, Docker took the following steps:
 1. The Docker client contacted the Docker daemon.
 2. The Docker daemon pulled the "hello-world" image from the Docker Hub.
    (amd64)
 3. The Docker daemon created a new container from that image which runs the
    executable that produces the output you are currently reading.
 4. The Docker daemon streamed that output to the Docker client, which sent it
    to your terminal.

To try something more ambitious, you can run an Ubuntu container with:
 $ docker run -it ubuntu bash

Share images, automate workflows, and more with a free Docker ID:
 https://hub.docker.com/

For more examples and ideas, visit:
 https://docs.docker.com/get-started/

$
Dockerが導入できたら、以下でMattermostを導入、起動できる。
$ docker run --name mattermost-preview -d --publish 8065:8065 --add-host dockerhost:127.0.0.1 mattermost/mattermost-preview
一旦導入した後は以下で起動/停止が可能。
# 起動
$ docker start mattermost-preview

# 停止
$ docker stop mattermost-preview

# プロセス確認
$ docker ps
■参考
・Qiita : CentOS7にDockerをインストールする
・docker docs : Get Docker Engine - Community for CentOS
Mattermostの設定
Mattermostが起動できたら、ブラウザからアクセスできるようになる。
アクセスできたら管理者アカウントを作成。
メールアドレスは適当なものでOK。

適当にチームを作成。


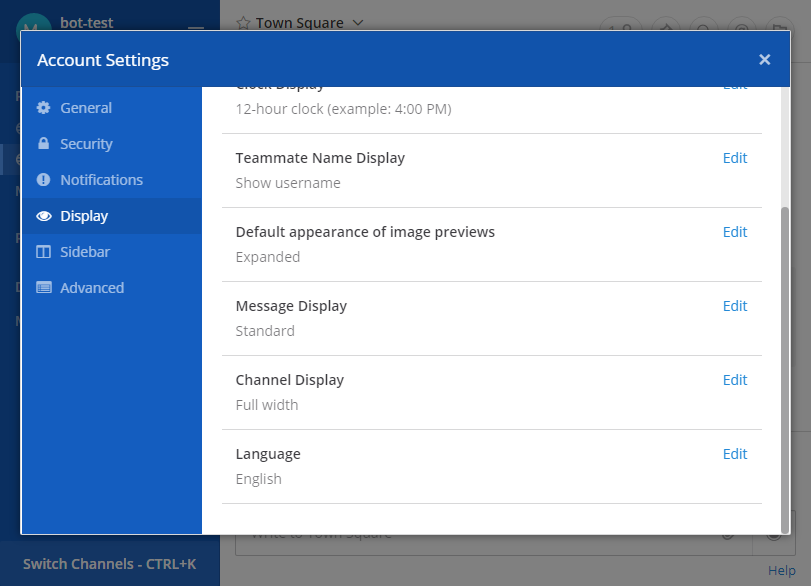
日本語化する。
Main Menu -> Account Settings -> Display -> Language
デフォルトだとプライベートネットワークに対して接続制限が掛かっている。
Webhookの通信先のサーバが同一セグメントの場合は通信許可の設定をしておく必要がある。
(自分はここで結構ハマった。。)
メインメニュー -> システムコンソール -> 開発者 -> 信頼されていない内部接続を許可する

デフォルトではBotアカウントが作成できないようになっているので、有効化する。
メインメニュー -> システムコンソール -> ボットアカウント -> ボットアカウントの作成を有効にする

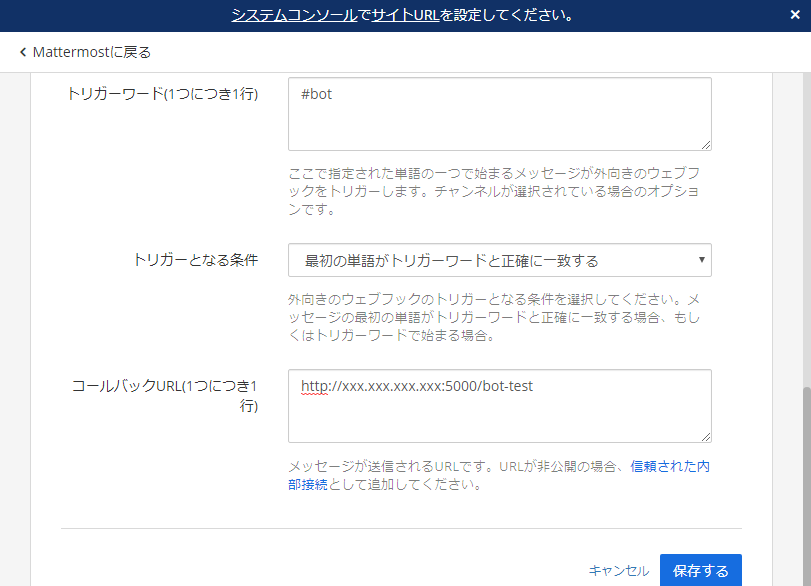
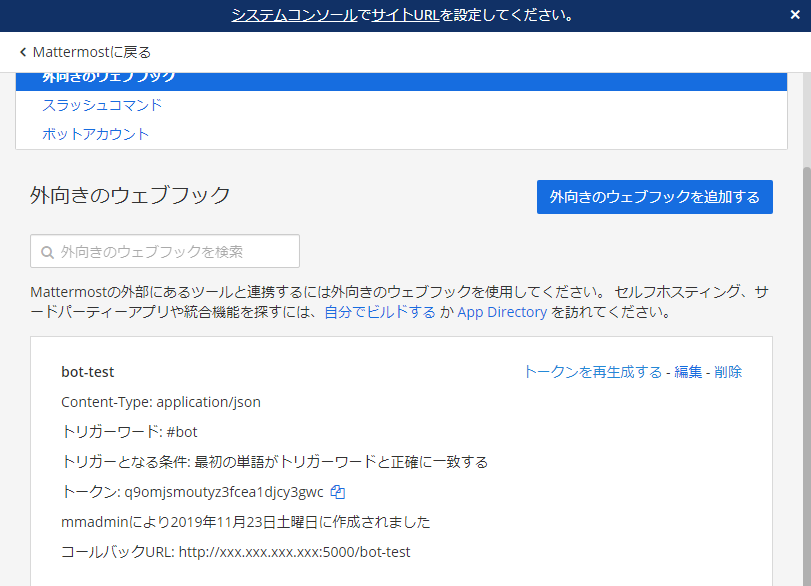
外向きのWebhookを作成する。
メインメニュー -> 統合機能 -> 外向きのウェブフック
コンテントタイプ : application/json (今回はJSONを選択してみた)
チャンネル : トリガーを監視するチャンネル
トリガーワード : Webhookの起動トリガーとなるワード
コールバックURL : メッセージ送信先(Botサーバ)のURL(今回はFlaskを使うので、デフォルトのポート5000を指定している)

Botアカウントを作成する。
メインメニュー -> 統合機能 -> ボットアカウント

Botの投稿権限はここで設定する。

Botアカウントのトークンは後からメニュー画面で確認する術がないので、必ず控えておく。
ただ、万が一控え忘れたとしても以下コマンドで確認することは可能。
$ docker exec -t -e MYSQL_PWD=mostest mattermost-preview mysql -u mmuser mattermost_test -e "select * from UserAccessTokens;"
+----------------------------+----------------------------+----------------------------+-------------+----------+
| Id                         | Token                      | UserId                     | Description | IsActive |
+----------------------------+----------------------------+----------------------------+-------------+----------+
| xxxxxxxxxxxxxxxxxxxxxxxxxx | xxxxxxxxxxxxxxxxxxxxxxxxxx | xxxxxxxxxxxxxxxxxxxxxxxxxx | ?????????   |        1 |
+----------------------------+----------------------------+----------------------------+-------------+----------+
$
curlコマンドでBotアカウントから投稿できるか確認する。
まずは投稿先のチャンネルIDを確認する。
チャンネル -> 情報を表示する


以下コマンドでも確認可能。
$ docker exec -t -e MYSQL_PWD=mostest mattermost-preview mysql -u mmuser mattermost_test -e "select * from Channels;"
+----------------------------+---------------+---------------+----------+----------------------------+------+-------------+--------------------------------------------------------+--------+---------+---------------+---------------+---------------+-----------+----------+------------------+
| Id                         | CreateAt      | UpdateAt      | DeleteAt | TeamId                     | Type | DisplayName | Name                                                   | Header | Purpose | LastPostAt    | TotalMsgCount | ExtraUpdateAt | CreatorId | SchemeId | GroupConstrained |
+----------------------------+---------------+---------------+----------+----------------------------+------+-------------+--------------------------------------------------------+--------+---------+---------------+---------------+---------------+-----------+----------+------------------+
| xxxxxxxxxxxxxxxxxxxxxxxxxx | 1574487544576 | 1574487544576 |        0 | xxxxxxxxxxxxxxxxxxxxxxxxxx | O    | Off-Topic   | off-topic                                              |        |         | 1574487544652 |             0 |             0 |           | NULL     |             NULL |
| xxxxxxxxxxxxxxxxxxxxxxxxxx | 1574489265292 | 1574489265292 |        0 |                            | D    |             | xxxxxxxxxxxxxxxxxxxxxxxxxxxxxxxxxxxxxxxxxxxxxxxxxxxxxx |        |         | 1574489265315 |             1 |             0 |           | NULL     |             NULL |
| xxxxxxxxxxxxxxxxxxxxxxxxxx | 1574487544570 | 1574487544570 |        0 | xxxxxxxxxxxxxxxxxxxxxxxxxx | O    | Town Square | town-square                                            |        |         | 1574487544611 |             0 |             0 |           | NULL     |             NULL |
+----------------------------+---------------+---------------+----------+----------------------------+------+-------------+--------------------------------------------------------+--------+---------+---------------+---------------+---------------+-----------+----------+------------------+
$
チャンネルID、Botトークンを指定して、APIに対してcurlコマンドでPOSTリクエスト。
$ curl -i -X POST -H 'Content-Type: application/json' -d '{"channel_id":"[Channel ID]", "message":"This is a message from a bot"}' -H 'Authorization: Bearer [Bot Token]' http://xxx.xxx.xxx.xxx:8065/api/v4/posts
Botアカウントで投稿できているのが確認できた。
■参考
・Usual Software Engineer : Mattermost で Bot Account を作る方法
Webhookへの応答
PythonでやるにはFlaskでやるのが簡単そうだったので、Flaskで実装してみた。
curlでやっているようにJSONをAPIに対してPOSTしているだけ。
$ sudo apt install python3-pip
$ pip3 -V
pip 9.0.1 from /usr/lib/python3/dist-packages (python 3.6)
$
$ pip3 install flask
$ pip3 install requests
import json

import requests
from flask import Flask, request

BOT_TOKEN = '[Bot Token]'
CHANNEL_ID = '[Channel ID]'
MM_API_ADDRESS = 'http://xxx.xxx.xxx.xxx:8065/api/v4/posts'

app = Flask(__name__)

@app.route('/bot-test', methods=['POST'])  # 外向きのWebhookのコールバックURL
def bot_reply():
    posted_user = request.json['user_name']
    posted_msg  = request.json['text']

    reply_headers = {
        'Content-Type': 'application/json',
        'Authorization': 'Bearer ' + BOT_TOKEN,
    }

    reply_data = {
        "channel_id": CHANNEL_ID,
        "message": f"@{posted_user} Bot reply message.",
        "props": {
            "attachments": [
                    {
                "author_name": posted_user,
                "text": posted_msg,
                }
            ]
        },
    }

    reply_request = requests.post(
        MM_API_ADDRESS,
        headers = reply_headers,
        data = json.dumps(reply_data)
    )

    return reply_request

if __name__ == '__main__':
    app.debug = True
    app.run(host='0.0.0.0')
応答が返せるかテストしてみる。
Flaskのテストサーバを起動。
$ python3 bottest.py
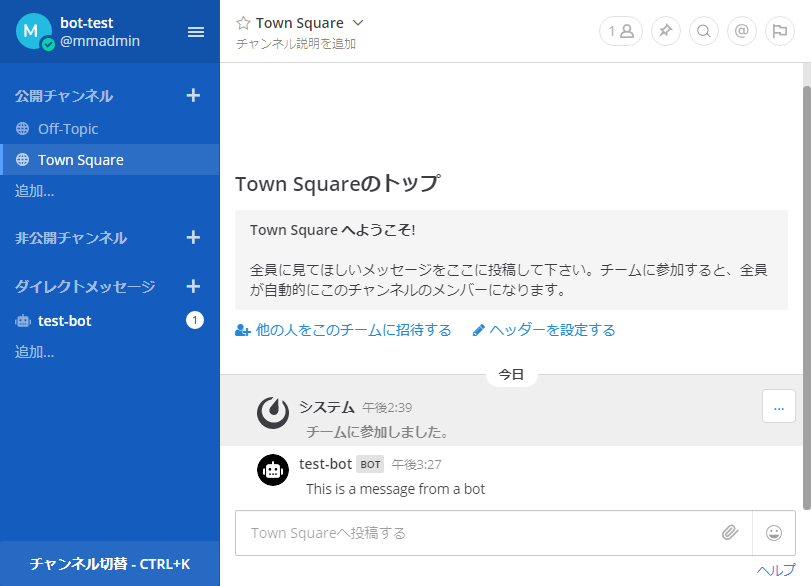
Mattermostでトリガーワードを含むメッセージを投稿。
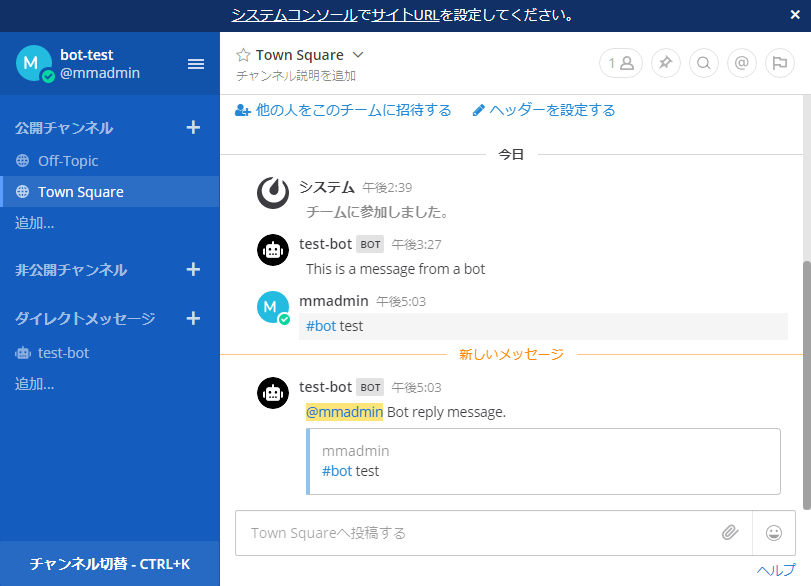
Webhookをトリガーにして、Botアカウントから投稿できているのが確認できた。
あとはBotのロジックを実装していくだけ。
ちなみにMattermostのWebhookから飛んでくるJSONはこんな感じ。
{
    'token': 'xxxxxxxxxxxxxxxxxxxxxxxxxx',
    'team_id': 'xxxxxxxxxxxxxxxxxxxxxxxxxx',
    'team_domain': 'bot-test',
    'channel_id': 'xxxxxxxxxxxxxxxxxxxxxxxxxx',
    'channel_name': 'town-square',
    'timestamp': 1234567890123,
    'user_id': 'xxxxxxxxxxxxxxxxxxxxxxxxxx',
    'user_name': 'mmadmin',
    'post_id': 'xxxxxxxxxxxxxxxxxxxxxxxxxx',
    'text': '#bot test',
    'trigger_word': '#bot',
    'file_ids': ''
}
■参考
・NOBWAK'S LAIR : SLACK/MATTERMOSTのBOTをPYTHONのFLASKで作ろう
・Qiita : MattermostとPython+Flaskでシンプルなbotを作る
おまけ
Botが完成したら、Webアプリケーションとして動かすためにWebサーバとWSGIサーバが必要になる。
色々調べた結果、自分はNginx + Gunicornを選択した。(一番シンプルで簡単そうな気がしたから)
この辺はまだまだ理解もあやふやなので、適当に駆け足でメモ程度に記載しておく。。
Gunicornはpipでインストール。
$ sudo pip3 install gunicorn
gunicorn [Pythonスクリプト名]:[Flaskインスタンス名] で起動。(デフォルトのポートは8000)
(以下は bottest.py 内の app インスタンスを起動)
# Pythonスクリプトを配置しているディレクトリで実行
$ cd /path/bot
$ sudo gunicorn bottest:app
[YYYY-MM-DD hh:mm:ss +0900] [1699] [INFO] Starting gunicorn 20.0.2
[YYYY-MM-DD hh:mm:ss +0900] [1699] [INFO] Listening at: http://127.0.0.1:8000 (1699)
[YYYY-MM-DD hh:mm:ss +0900] [1699] [INFO] Using worker: sync
[YYYY-MM-DD hh:mm:ss +0900] [1703] [INFO] Booting worker with pid: 1703
Flaskのテストサーバと同じポートを使用したい場合は以下でOK
(Mattermost側のWebhook設定を変えるのが面倒なときとか)
$ sudo gunicorn bottest:app -b 0.0.0.0:5000
Pythonスクリプトのある場所まで移動しなくても chdir オプションでいける。
$ sudo gunicorn --chdir /path/bot bottest:app -b 0.0.0.0:5000
停止時は Ctrl + C でプロセスをkillする。
Gunicorn単体で動かすならこれでいいが、このままではNginxと連携できない。
まずはNginxをインストール。
$ sudo apt install nginx
$ nginx -v
nginx version: nginx/1.14.0 (Ubuntu)
$
Nginxの設定をしていく。
Gunicornとの通信のためにSocketが必要になる。(以下では /tmp に作る)
upstream bot-test {
    server unix:/tmp/bot-test.sock;
}

server {
    listen 5000;

    root path/bot;
    server_name localhost;

    access_log /var/log/nginx/access.log;
    error_log /var/log/nginx/error.log;

    location /bot-test {
        try_files $uri @flask;
    }

    location @flask {
        proxy_pass http://bot-test;
    }
}
Nginxの稼働確認。
$ sudo nginx -t
nginx: the configuration file /etc/nginx/nginx.conf syntax is ok
nginx: configuration file /etc/nginx/nginx.conf test is successful
$
$ sudo systemctl status nginx
$ sudo systemctl restart nginx
$ sudo systemctl status nginx
Nginxの設定が問題なければ、Gunicornの設定ファイルを作成する。
設定ファイルの場所、名前は任意のものでOK
先ほどNginxの設定ファイルに記載したSocketを記載する。
$ vim gunicorn_conf.py
bind = 'unix:/tmp/bot-test.sock'
daemon = True
reload = True
-c オプションで設定ファイルを指定し、起動できればOK
$ sudo gunicorn bottest:app -c gunicorn_conf.py
停止時はプロセスをkillする。
$ sudo pkill gunicorn
正直なところ、おまけの部分はとりあえず動けばいいやの精神でやっているので、
絶対もっといいやり方があるはず。。
■参考
・Qiita : gunicorn + Flask + nginx + Systemdで動かしてみた
・『入る学科間違えた高専生』の日記 : Ubuntu + Nginx + Gunicornを手動デプロイする手順
・Qiita : pythonをデーモン化するメモ