Thymeleaf
ここでは、事前に用意したデータを取得し、画面に表示する部分まで進めていきます。
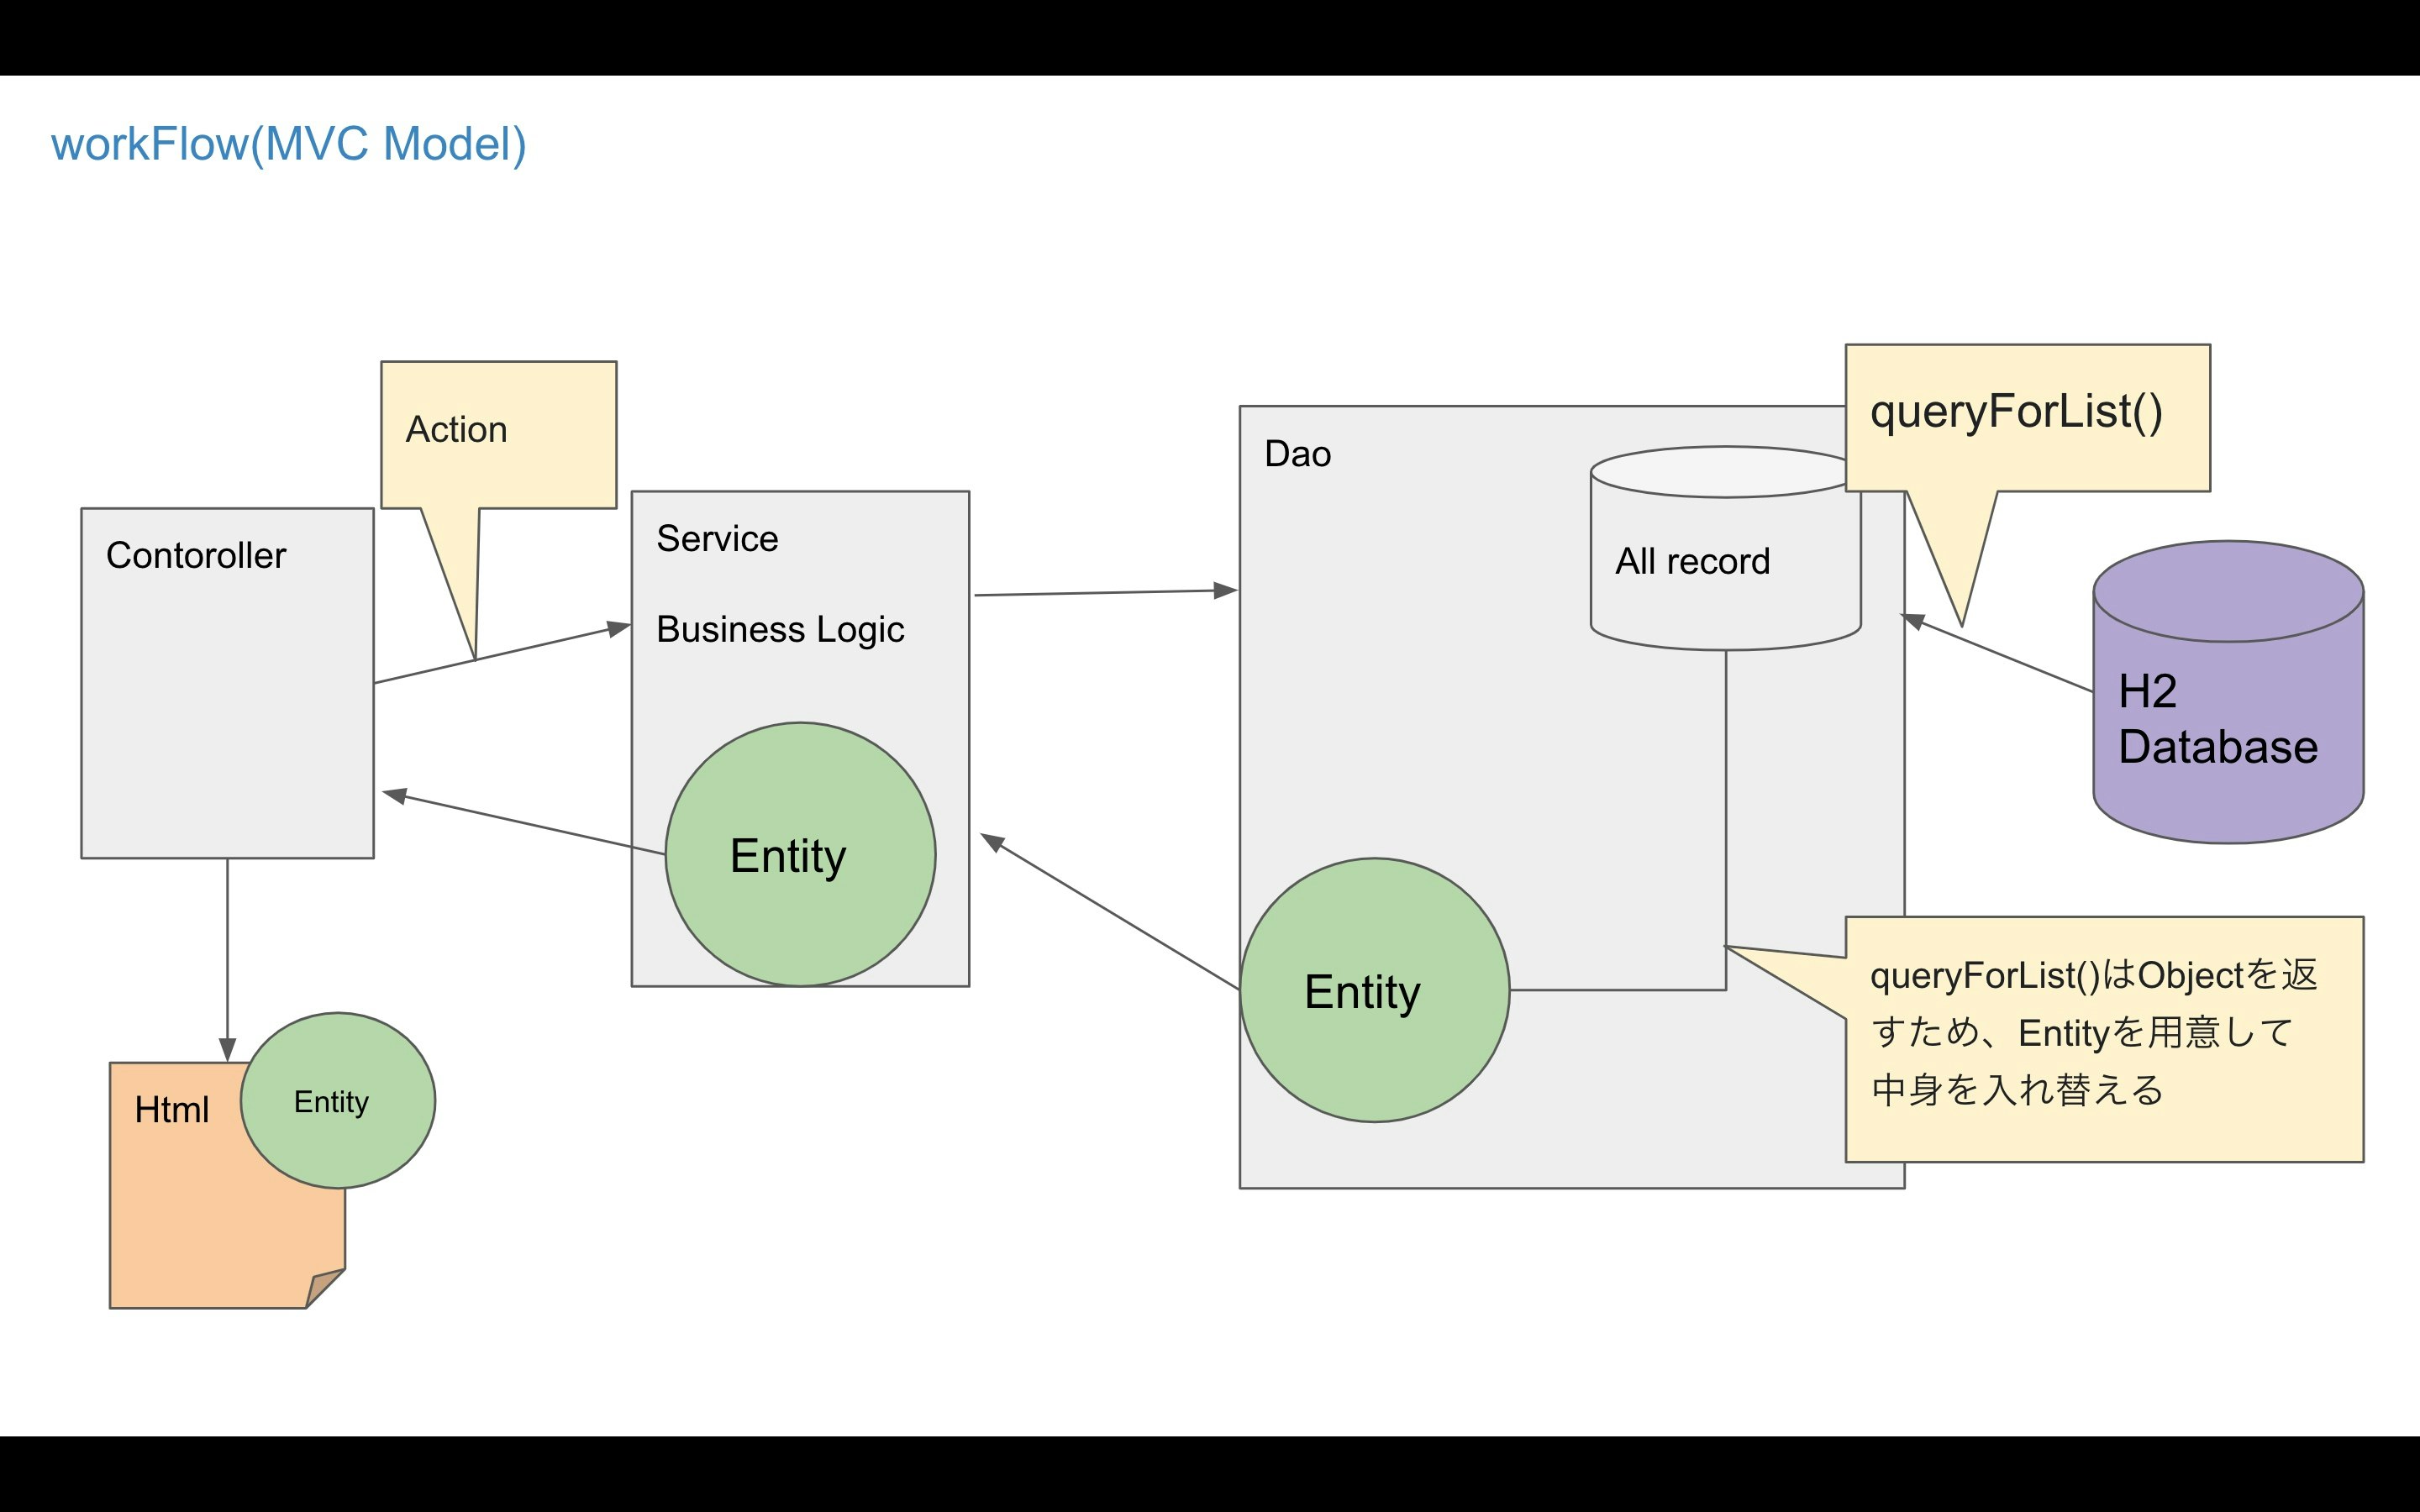
構成は、以下の通りとします。

- controller から Service へロジックの導入。
- Service から Dao を経由して H2 Database からデータを取得します。
- 取得したデータは、オブジェクト型となるため、テーブル定義に合致するように Entity を作成し、変換した上で返却していきます。
- Contoroller では、受け取ったデータを Thymeleaf を利用して HTML を出力するという形です。
必要なもの Contorller からざっと作っていきます。
// src/demo/app/view
// ViewContoroller.java
package com.example.demo.app.view;

import java.util.List;

import org.springframework.beans.factory.annotation.Autowired;
import org.springframework.stereotype.Controller;
import org.springframework.ui.Model;
import org.springframework.web.bind.annotation.GetMapping;
import org.springframework.web.bind.annotation.RequestMapping;

import com.example.demo.app.entity.view.View;
import com.example.demo.app.service.view.ViewService;

@Controller
@RequestMapping("/view")
public class ViewController {
	private ViewService viewService;

    // Serviceをインスタンス化(DI)
	@Autowired
	public ViewController(ViewService viewService) {
		this.viewService = viewService;
	}


	@GetMapping
    // GetMappingにパスを指定しないことで、RequestMappingで指定したviewにアクセスすると呼び出される
    // Serviceを経由して取得した、一覧データをHTMLにviewListという名前で受け渡し。→HTMLがレンダリングされる
	public String init(Model model) {
		List<View> view = viewService.getAll();
		model.addAttribute("title", "View title");
		model.addAttribute("viewList", view);
		return "view/index";
	}
}
// src/demo/app/service/view
// ViewServiceImpl.java

/**
Interfaceのコードはこれだけ
package com.example.demo.app.service.view;

import java.util.List;

import com.example.demo.app.entity.view.View;

public interface ViewService {
	List<View> getAll();
}
**/

package com.example.demo.app.service.view;

import java.util.List;

import org.springframework.beans.factory.annotation.Autowired;
import org.springframework.stereotype.Service;

import com.example.demo.app.entity.view.View;
import com.example.demo.app.repository.view.ViewDao;

@Service
public class ViewServiceImpl implements ViewService {

	private ViewDao viewDao;

    // Daoをインスタンス化(DI)
	@Autowired
	public ViewServiceImpl(ViewDao viewDao) {
		this.viewDao = viewDao;
	}

    // Daoを経由して、取得したデータをControllerに返却するのみ
	@Override
	public List<View> getAll() {
		return viewDao.getAll();
	}

}
// Interfaceは、Serviceと同じ感じで記載してください

// src/demo/app/repository/view
// ViewDaoImpl.java
package com.example.demo.app.repository.view;

import java.sql.Timestamp;
import java.util.ArrayList;
import java.util.List;
import java.util.Map;

import org.springframework.beans.factory.annotation.Autowired;
import org.springframework.jdbc.core.JdbcTemplate;
import org.springframework.stereotype.Repository;

import com.example.demo.app.entity.view.View;

@Repository
public class ViewDaoImpl implements ViewDao {

	private JdbcTemplate jdbcTemplate;

    // H2よりデータを取得するために、JdbcTemplateを使用しています。
	@Autowired
	public ViewDaoImpl(JdbcTemplate jdbcTemplate) {
		this.jdbcTemplate = jdbcTemplate;
	}

	@Override
	public List<View> getAll() {
        // 作成したSQLを利用してqueryForListでデータObjectを取得します。
		String sql = "select * from band;";
		List<Map<String , Object>> map = jdbcTemplate.queryForList(sql);
		List<View> list = new ArrayList<>();
        // Object型だと、とにかく使いづらいので、データベース定義に該当するEntityに移管する。
		map.stream().forEach(
				target-> {
					View instance = new View();
					instance.setId((int)target.get("id"));
					instance.setBandName((String)target.get("bandName"));
					instance.setBestSong((String)target.get("bestSong"));
					instance.setCreated(((Timestamp)target.get("created")).toLocalDateTime());
					list.add(instance);
					});
		return list;
	}

	@Override
	public void insert(View view) {
		// TODO Auto-generated method stub

	}

	@Override
	public int update(View view) {
		// TODO Auto-generated method stub
		return 0;
	}

}
<!--
    src/main/resource/template
    index.html
    Contollerから"title","viewList"という形でパラメータを受け取る
-->
<!DOCTYPE html>
<!--
    ここのオマジナイが無いとThymeleafは使用できないので、注意
-->
<html xmlns="http://www.w3.org/1999/xhtml" xmlns:th="http://www.thymeleaf.org">
  <head>
    <meta charset="UTF-8" />
    <title>View</title>
  </head>
  <body>
    <h1 th:text="${title}">View</h1>
    <table>
      <tr>
        <th>id</th>
        <th>Bandname</th>
        <th>BestSong</th>
        <th>datetime</th>
      </tr>
      <tr th:each="view : ${viewList}">
        <td th:text="${view.id}"></td>
        <td th:text="${view.bandName}"></td>
        <td th:text="${view.bestSong}"></td>
        <td th:text="${view.created}"></td>
      </tr>
    </table>
  </body>
</html>
ここまでで、localhost:8080/viewにアクセスすると DB へ登録した値が一覧表示されてると思います。