1980年代のパズルを2025年のテクノロジーで力技で解く
むかしむかし、だいたい今年の暑い夏の頃、実家にバラバラの青い棒のパズルが落ちていました。
3歳がバラバラにしたらしい。
このパズルおじさんが3歳の時からあったやつだぞ。
なおしたいなー。
これはなに?
いまは2025年、YouTubeで解き方動画あるやろ。。。
棒が6本、向きが8パターン、配置が、、、これは、、、、。
検索すると、Burr Puzzleというらしい。

https://burrtools.sourceforge.net/
https://www.puzzle-place.com/wiki/Solving_Burrs
https://www.robspuzzlepage.com/interlocking.htm
https://www.cs.brandeis.edu/~storer/JimPuzzles/BURR/000BURR/READING/IbmPage.pdf
数学的なお楽しみの歴史があるみたいでした。
データ構造
いや、でも、数学は無理ですので、力技で解きます。
先輩たちのWeb情報によると、パズルの構造は以下のようになっています。
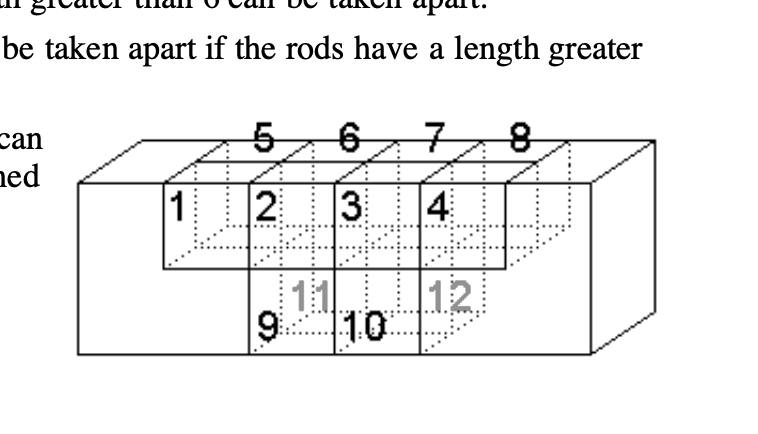
- 棒が6本
- 棒中央の欠けてる部分のルール
- 上2x4
- 下2x2(両端は欠けない)
よって、青いパズルのデータは以下のようになりました。
----
0001
0110
1001
1111
----
0011
0011
1111
1101
----
0000
0001
1111
1101
----
1110
1100
1111
1001
----
1000
0000
1001
1111
----
0001
0011
1101
1111
----
バー1本が占める範囲は2x2x4で、6本がうまくハマると4x4x4の範囲になります。
総当り、の前に
総当りで組み上がるパターンを見つけるだけ!
- 初期位置での回転 4方向
- 初期位置での向き 2パターン
- 配置6箇所の組み合わせ 6 * 5 * 4 * 3 * 2
((4 * 2) ** 6) * (6 * 5 * 4 * 3 * 2) = 1.8億
どうだ?いけるのか?
data.py
marimoノートブックになっています。
marimo edit data.py
- 初期位置での回転+向き → ローカル回転
- 配置6箇所 → グローバル回転
になっていて、
- パズル定義ファイルの読み込み
- 回転と配置をした後のボクセル座標の計算
などがあります。
bits_to_voxels
バーの形状データ → ローカル回転 → グローバル回転 → 配置後の座標に変換する関数です。
回転は90度単位なので、sin/cosのテーブルをつくってnumpyで計算しています。
実際はこれを更にキャッシュを挟んで使っています。
def bits_to_voxels(
    bits: np.ndarray,
    local_rotation: Rotation,
    global_rotation: Rotation,
    position: Position,
):
    # bits: np.ndarray
    assert bits.shape == (4, 4)
    voxels = []
    for i, bbbb in enumerate(bits):
        y = -1 - (i // 2)
        z = i % 2 - 1
        for x, b in enumerate(bbbb):
            if b:
                voxels.append([x - 2, y, z])
    for x in [-3, 2]:
        for y in [-2, -1]:
            for z in [-1, 0]:
                voxels.append([x, y, z])

    # 90度単位の sin/cos 値の事前定義(整数値)
    # cos(0°)=1, cos(90°)=0, cos(180°)=-1, cos(270°)=0
    # sin(0°)=0, sin(90°)=1, sin(180°)=0, sin(270°)=-1
    cos_values = [1, 0, -1, 0]
    sin_values = [0, 1, 0, -1]

    # ローカル回転の中心点
    local_center = [-0.5, -1.5, -0.5]

    # 1. ローカル回転を適用
    # 回転角度を0-3の範囲に正規化
    lrx = local_rotation.x % 4
    lry = local_rotation.y % 4
    lrz = local_rotation.z % 4

    # ローカル回転行列を作成(事前定義された値を使用)
    # X軸回転
    LRx = np.array(
        [
            [1, 0, 0],
            [0, cos_values[lrx], -sin_values[lrx]],
            [0, sin_values[lrx], cos_values[lrx]],
        ]
    )

    # Y軸回転
    LRy = np.array(
        [
            [cos_values[lry], 0, sin_values[lry]],
            [0, 1, 0],
            [-sin_values[lry], 0, cos_values[lry]],
        ]
    )

    # Z軸回転
    LRz = np.array(
        [
            [cos_values[lrz], -sin_values[lrz], 0],
            [sin_values[lrz], cos_values[lrz], 0],
            [0, 0, 1],
        ]
    )

    # 合成ローカル回転行列
    LR = LRz @ LRy @ LRx

    # ローカル回転を適用
    local_rotated_voxels = []
    for v in voxels:
        # 中心点を原点に移動
        translated = np.array(
            [
                v[0] - local_center[0],
                v[1] - local_center[1],
                v[2] - local_center[2],
            ]
        )

        # ローカル回転を適用
        rotated = LR @ translated

        # 中心点を元に戻す
        final = [
            rotated[0] + local_center[0],
            rotated[1] + local_center[1],
            rotated[2] + local_center[2],
        ]
        local_rotated_voxels.append(final)

    # 2. グローバル回転を適用
    # グローバル回転の中心点
    global_center = [-0.5, -0.5, -0.5]

    # 回転角度を0-3の範囲に正規化
    grx = global_rotation.x % 4
    gry = global_rotation.y % 4
    grz = global_rotation.z % 4

    # グローバル回転行列を作成(事前定義された値を使用)

    # X軸回転
    GRx = np.array(
        [
            [1, 0, 0],
            [0, cos_values[grx], -sin_values[grx]],
            [0, sin_values[grx], cos_values[grx]],
        ]
    )

    # Y軸回転
    GRy = np.array(
        [
            [cos_values[gry], 0, sin_values[gry]],
            [0, 1, 0],
            [-sin_values[gry], 0, cos_values[gry]],
        ]
    )

    # Z軸回転
    GRz = np.array(
        [
            [cos_values[grz], -sin_values[grz], 0],
            [sin_values[grz], cos_values[grz], 0],
            [0, 0, 1],
        ]
    )

    # 合成グローバル回転行列
    # GR = GRz @ GRy @ GRx
    GR = GRx @ GRy @ GRz

    # グローバル回転を適用
    global_rotated_voxels = []
    for v in local_rotated_voxels:
        # 中心点を原点に移動
        translated = np.array(
            [
                v[0] - global_center[0],
                v[1] - global_center[1],
                v[2] - global_center[2],
            ]
        )

        # グローバル回転を適用
        rotated = GR @ translated

        # 中心点を元に戻して、最も近い整数座標に丸める
        final = np.round(
            [
                rotated[0] + global_center[0],
                rotated[1] + global_center[1],
                rotated[2] + global_center[2],
            ]
        ).astype(int)

        global_rotated_voxels.append(final.tolist())

    # 3. 位置を適用
    final_voxels = []
    for v in global_rotated_voxels:
        final_voxels.append(
            [v[0] + position.x, v[1] + position.y, v[2] + position.z]
        )

    return np.array(final_voxels)
あっているのか?
- 書いたコードがあっているのか?
- データ化したけど実際のパズルと一致してるのか?
- プラスは右回り?左回り?XYZ軸?
見た目で確認できないと確信できませんので、Three.jsで可視化しました。
marimoノートブック内にThree.jsを埋め込んで表示できるようにしました。
marimo edit threejs.py
JSで書いたWidgetをmarimoノートブック内に埋め込める仕組みで、MarimoのUIで変数を変えると、リアクティブにJSの世界に反映させることができます。
with app.setup:
    # Initialization code that runs before all other cells
    import anywidget
    import traitlets

    CounterESM = """
    function render({ model, el }) {

      let button = document.createElement("button");

      button.addEventListener("click", () => {
        model.set("value", model.get("value") + 1);
        model.save_changes();
      });

      const updateInnerHTML = ()=>{
        button.innerHTML = `count=${model.get("value")} data=${model.get("data")}`;
      }
      updateInnerHTML();

      model.on("change:value", () => {
        updateInnerHTML();
      });

      model.on("change:data", () => {
        updateInnerHTML();
      });

      el.appendChild(button);
    }
    export default { render };
    """


@app.class_definition
class CounterWidget(anywidget.AnyWidget):
    _esm = CounterESM
    # Stateful property that can be accessed by JavaScript & Python
    value = traitlets.Int(0).tag(sync=True)
    data = traitlets.List([1, 2, 3]).tag(sync=True)


@app.cell
def _(mo):
    count_slider = mo.ui.slider(start=0, stop=100)
    return (count_slider,)


@app.cell
def _():
    counter_widget = CounterWidget()
    return (counter_widget,)


@app.cell
def _(count_slider, counter_widget):
    counter_widget.value = count_slider.value
    return
総当り
- 初期位置にバーを配置(4パターン)
- 2番目の位置にバーを配置(8パターン)
  - ぶつかってるなら次パターン、全パターン終わったら戻る
  - ぶつかってないなら
    - 3番目の位置にバーを配置(8パターン)
      - ぶつかってるなら次パターン、全パターン終わったら戻る
      - ぶつかってないなら
        - 4番目の位置にバーを配置(8パターン)
          - ぶつかってるなら次パターン、全パターン終わったら戻る
          - ぶつかってないなら
            - 5番目の位置にバーを配置(8パターン)
              - ぶつかってるなら次パターン、全パターン終わったら戻る
              - ぶつかってないなら
                - 6番目の位置にバーを配置(8パターン)
                  - ぶつかってるなら次パターン、全パターン終わったら戻る
                  - ぶつかってないなら
                    - 完成!
総当りとは言っても、ぶつかったパターンの先を計算するのは無駄なので省略します(バックトラック)。
@app.function
def solve(
    ctx, bars, placed_bar_and_patterns, bar_indices_to_placement, patterns
):
    # print(f"solve {placed_bar_and_patterns} {bar_indices_to_placement}")
    solutions = []
    bars_temp = []
    for placement, (bar_index, pattern) in enumerate(placed_bar_and_patterns):
        bar = bars[bar_index]
        bar.set_placement(placement)
        bar.set_pattern(pattern)
        bars_temp.append(bar)
    placed_voxcels = bars_to_voxels(bars_temp)

    for bar_index in bar_indices_to_placement:
        # print(f"bar_index={bar_index}")
        new_bar_indices_to_placement = [
            bi for bi in bar_indices_to_placement if bi != bar_index
        ]
        for pattern in patterns:
            new_bar = bars[bar_index]
            new_bar.set_placement(len(placed_bar_and_patterns))
            new_bar.set_pattern(pattern)
            new_bar_voxels = new_bar.voxels()
            has_collision = has_common_fast_numpy(
                placed_voxcels, new_bar_voxels
            )
            new_placed_bar_and_patterns = placed_bar_and_patterns + [
                (bar_index, pattern)
            ]
            if has_collision:
                pass
            else:
                if len(new_bar_indices_to_placement) == 0:
                    solution = new_placed_bar_and_patterns
                    ctx["callback"]({"solution": solution})
                    solutions.append(solution)
                else:
                    solutions += solve(
                        ctx,
                        bars,
                        new_placed_bar_and_patterns,
                        new_bar_indices_to_placement,
                        patterns,
                    )
    return solutions
完成!
これが2025年のおじさんが力技で解いた青いパズルの192パターンの解だ!
でも、どのバーも動かないんですけど!!デッドロック的な!
(つづく)