Abstract
GASとVue.jsを使って社内アプリケーションを作成しようとしたとき、Vue.js側にTypeScriptを導入している記事はほとんど見なかった。筆者はかつてフルスクラッチでHTML+JS+GASで簡易的なアプリケーションを開発してそれを今でも運用しているが、型の確認が弱いことやそもそもGASはJSファイルとして独立したファイルを許してくれないの(htmlファイルとして書く)で、割と地獄を見た。
そこで本記事では、まずGAS側はclaspを導入してTypeScriptで書き、webpack viteを導入して複数のフォルダ構造での開発を可能にする。次にVue.js側ではvue-cliでTypeScriptのひな形を作成したのちに、vue.config.jsを編集することでGASに使える単一ファイルにまとめる手順を紹介する。以上を以て、GASもVue.jsも全てをTypeScriptで型安全に開発する環境を整える。
続いて、GAS側で定義した関数の型情報(*.d.tsファイル)を自動生成するgoogle-script-dts-generatorなどを紹介し、型情報をVue.js側のTypeScriptに認識させる方法を述べる。
また付録では、更に快適な開発環境構築を支援するTipsを提供する。
序論
GASがTypeScriptで書けるの非常にありがたい。なぜならば型を書ける上にテストも書くことができる。
またフロントエンドのフレームワークとして有名なVue.jsは、近年正式にTypeScriptをサポートしており、特に<script setup>による記法はpropsにもemitsにも型を導入を可能にした。
となるとGAS×Vue.jsの開発も全てTypeScriptで書くのが当たり前である。しかしGASは若干特殊な環境であり、制約としてフロントエンド側は.htmlのみで、バックエンド側(GAS)は*.ts, *.jsのみ(*.gsに変換される)しかpushできないという問題がある。実際、Googleが用意したclaspはTypeScriptで書かれた*.tsを*.gs(GASのコードファイル)に変換して, htmlファイルをそのままpushするという機能は持つが、フォルダ構造を考慮して変換できない。これはwebpackを導入することで比較的簡単に解決可能である。しかしフロントエンド部分にVue.jsを導入するとなると話はそう簡単ではない。index.htmlにCDNで導入したVue.jsのコードを直接書けばよいが、この方法だと次に述べる問題が発生する。
- シングルファイルコンポーネント(SFC, *.vueファイル)が使えない
- Vue.jsを支える形式を捨てるとそもそも使う意味はあるのか?
- インラインスクリプトであり、JavaScriptである。
- Vue.jsがTypeScriptをサポートしているのに使わないとは?
- デザインの確認にいちいち
clasp push && clasp open --webappしないといけない- ホットリロードで即座に確認したい。
clasp push --watchでもいいかもしれないが、それでもdoGetなどGASを経由するため遅い。
- ホットリロードで即座に確認したい。
従って本記事ではGAS側(backend)とVue.js側(frontend)で環境を分離する。
projectDir/
  ├ backend/    # GAS側
  ├ frontend/   # Vue.js側
分離することで、デザインの確認・フロントエンド側の動作をVue.js側だけで行い、GAS側はテストによって動作を確認することが可能となる。
対象読者
- GAS, claspを知っている
- Vue.jsをTypeScriptで開発して、GASで動かすアプリケーションを作りたい人
環境
Vue.jsは現在でも更新が頻繁に行われているので、仕様が変更される可能性があるので注意。
また、この環境で同じ手順でもGASを開くとエラーなしで真っ白な画面になりました(原因不明)。もうGASにVue.jsがダメなのか…?ってなってます。
※以下、口調が変わりますが気にしないでください。
node.js, vue-cliの導入は割愛。ただし特にvue-cliのバージョンは注意してください。4.x及びそれ以下での動作は保証できません。またパッケージマネージャにはこの記事ではyarnを用います。(ワークスペース機能を使うので、npmではダメかも?)
node --version
# v14.17.5
vue --version
# @vue/cli 5.0.1
yarn --version
# 1.22.17
OSはWindows 10です。他のOSでもあまり差異はないと思いますが一応記載をしておきます。
Vue3で、Vue.jsの*.vueでは<script setup>記法を用います。
公式 -> SFC<script setup>
GASへのVue-Routerの導入はできていません。方法が分かったら追記します。
この記事ではVuexなどは導入していませんので注意。こちらは恐らくまだ簡単かと思われます。とはいえ、Vuexが必要なレベルのものをGASで作るのが間違っている...?
開発環境構築
適当なプロジェクトディレクトリを作成して、ディレクトリ移動してください。
最初にフォルダをいくつか作っておきましょう。
C:\projectDir> mkdir dist
C:\projectDir> mkdir backend
GASのプロジェクトを作成してください。今回はOnlyTypeScriptという名前で作成しました。またwebアプリケーションを作りたいので、webappを選択します。
C:\projectDir> clasp create OnlyTypeScript
? Create which script? webapp
Created new webapp script: https://script.google.com/d/(project-id)/edit
Warning: files in subfolder are not accounted for unless you set a 'C:\projectDir\.claspignore' file.
Cloned 1 file.
└─ C:\projectDir/appsscript.json
appscript.json(GASプロジェクトの設定ファイル)はタイムゾーンの設定とか、アクセスの方法を編集してから、先ほど作成したbackendへ移動させる。
{
- "timeZone": "America/New_York",
+ "timeZone": "Asia/Tokyo",
  "dependencies": {
  },
+ "webapp": {
+   "access": "ANYONE",
+   "executeAs": "USER_ACCESSING"
+ },
  "exceptionLogging": "STACKDRIVER",
  "runtimeVersion": "V8"
}
mv appscript.json backend
生成された.clasp.jsonを確認して、"rootDir": "./dist"としましょう。
{
    "scriptId": "id_for_project",
    "rootDir": "./dist"
}
Gitを使う場合は、.gitignoreにしっかり.clasp.jsonを無視するように書き込みましょう。.clasp.jsonにはスクリプトIDが入っており、外部の人間に知られてはならないので。
dist/
node_modules/
.clasp.json
続いて、clasp pushで不要なファイルがpushされないように、.claspignoreを作成して編集しましょう(任意)。
**/**
static/**
static/css/**
!appsscript.json
!Code.js
!index.html
!setting.js
謎のsetting.jsは後述します。
続いて本記事では環境を分離するために、yarnのワークスペース機能を用います。
なにはともあれpackage.jsonを作成しましょう。
C:\projectDir> yarn init -y
package.jsonを編集して、ワークスペースを追加します。frontendフォルダは後で作成します。
{
  "name": "projectDir",
  "version": "1.0.0",
-  "main": "index.js",
+  "workspaces": [
+   "./backend",
+   "./frontend"
+ ],
+ "private": true,  // 任意
  "license": "MIT"
}
これでセットアップは完了です。ここからbackendフォルダとfrontendフォルダで作業を行います。
GAS側(backend)
フォルダに入ります。
C:\projectDir> cd backend
C:\projectDir\backend>
以下、特に断らない限りはカレントディレクトリはbackendです。
とりあえずここでもpackage.jsonを作成します。
yarn init -y
"main": "index.jsは不要なので消しときます。
{
  "name": "backend",
  "version": "1.0.0",
- "main": "index.js",
+ "private": true,
  "license": "MIT"
}
TypeScriptの導入
yarn add -D typescript
yarn tsc --init  # tsconfig.jsonの生成
今回は以下のように書き換えました。正直どこまでが必須でどこまでが不要か理解できていないが、 この設定だと単体テストとかもうまく動いた。
{
    "compilerOptions": {
        "target": "ES2019",
        "module": "ESNext",
        "strict": true,
        "importHelpers": true,
        "moduleResolution": "node",
        "esModuleInterop": true,
        "allowSyntheticDefaultImports": true,
        "removeComments": true,
        "sourceMap": true,
        "baseUrl": ".",
        "paths": {},
        "lib": [
            "esnext"
        ]
    },
    "include": [
        "**/*.ts",
        "../types/**/*.ts"
    ],
    "exclude": [
        "node_modules"
    ]
}
次に、GASの型定義を導入する。(公式が提供しているのですよこれ。神??)
yarn add -D @types/google-apps-script
この時点で既にコーディングの準備はほぼ完了。
後述のgas-webpack-pluginは恐らく、globalオブジェクトにくっつけて定義しないと公開してくれないので、globalオブジェクトを定義。
declare var global: any;
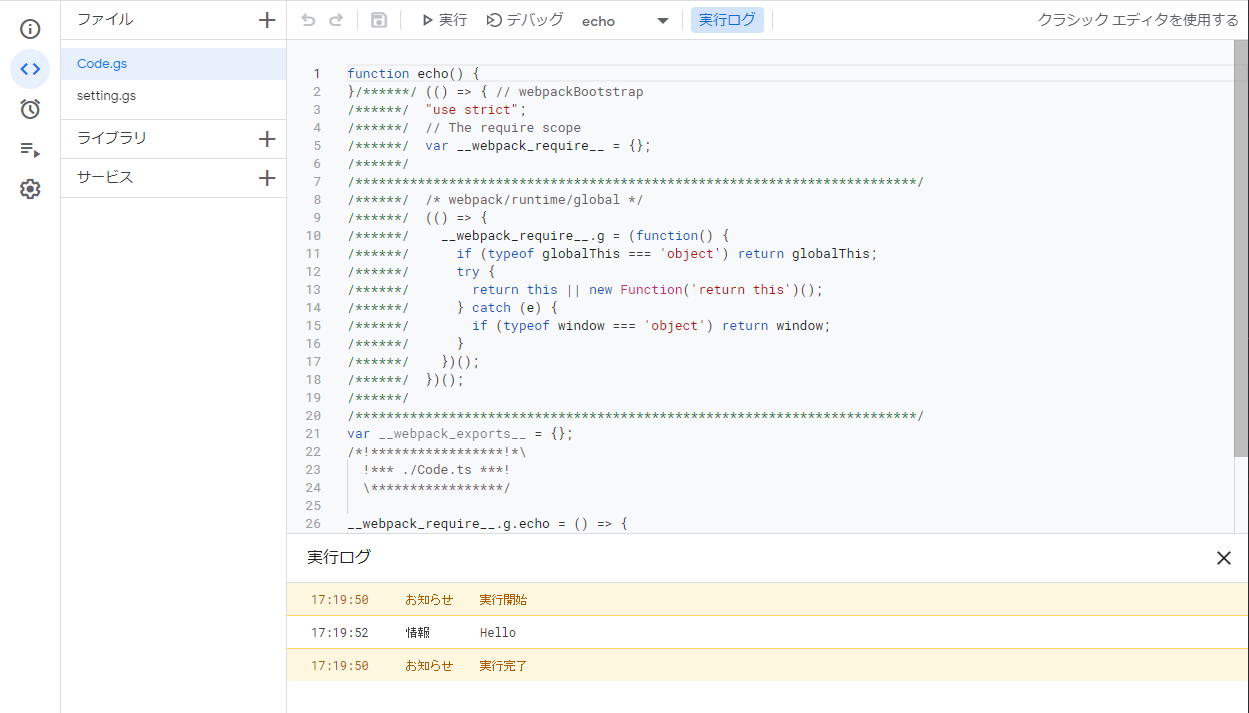
GASのエントリーポイントになるCode.tsを作成し、適当にテスト用の関数を定義してみる。正しく型定義が導入されていればLoggerが認識されているはず。また、doGet関数がないとWebAppにならないのでしっかりと定義しておく。index.htmlはフロントエンド側のビルドで生成する。
global.echo = () => {
    Logger.log("Hello")
}

global.doGet = () => {
    return HtmlService.createTemplateFromFile('index').evaluate()
        .setTitle('vue-gas-app')
        .addMetaTag('viewport', 'width=device-width, initial-scale=1')
}
後、なぜかスクリプトプロパティなどがGASの新しいエディターでは設定できないので、それ用の関数をまとめたsetting.jsを定義しておく(任意)。 2022/4/13のアップデートでエディタの設定から変更ができるようになったのでこれは不要です。
setting.js
/**
 * スクリプトプロパティを設定するための関数。
 */
function setProperty() {
    const property = PropertiesService.getScriptProperties();
    const props = {

    };
    property.setProperties(props);
}

/**
 * スクリプトプロパティを確認するための関数。
 */
function showProperty() {
    const property = PropertiesService.getScriptProperties();
    const str = JSON.stringify(property.getProperties());
    Logger.log(str);
}
Q. どうしてjsファイルなのですか?
A. GASのプロジェクト上から操作するので、下手にminifyされたりすると関数がどこに行ったか分からんからです。
続いてwebpackを導入していきます。
webpackの導入
webpackとは? 俺も知りたい。
モジュールとか色々作ったままだとGASが認識してくれるのかというと怪しい。そこでwebpackは必要な部分を(今回は)単一ファイルにまとめてくれるようなツールなのである。導入は簡単で、yarn addするだけ。
yarn add -D webpack webpack-cli
webpackはそれ単体だとほとんど無力であるが、プラグイン・ローダーによってありとあらゆる状況で使えるように設計されたツールである。まずTypeScritpで使うには以下のようにローダーとプラグインを導入する。説明は完全に理解したら追記しようと思う...
yarn add -D ts-loader fork-ts-checker-webpack-plugin
続いてGASのために二つのプラグインを導入する。
yarn add -D copy-webpack-plugin  # appscript.jsonをdistにコピーする
yarn add -D gas-webpack-plugin   # GASのためのプラグイン!!
gas-webpack-pluginは2022/03/28現在、2.2.0が最新ですが、不思議なことに2.2.0だとglobal.echoとかで宣言したものがグローバルに公開されませんでした。
v2.2.1で修正されました。
webpackの設定はwebpack.config.jsで管理する。webpack.config.jsを作成して、以下のようにする。
const CopyWebpackPlugin = require("copy-webpack-plugin");
const ForkTsCheckerWebpackPlugin = require('fork-ts-checker-webpack-plugin');
const GasPlugin = require('gas-webpack-plugin');

const tsconfigFile = __dirname + '/tsconfig.json'

module.exports = {
    mode: 'development',
    devtool: false,
    entry: {
        Code: "./Code.ts"
    },
    output: {
        path: __dirname + '/../dist',
        filename: '[name].js'
    },
    resolve: {
        extensions: ['.js', '.json', '.ts'],
    },
    module: {
        rules: [
            {
                test: /\.ts$/,
                loader: 'ts-loader',
                exclude: /node_modules/,
                options: {
                    // disable type checker - we will use it in fork plugin
                    transpileOnly: true
                }

            }
        ]
    },
    plugins: [
        new ForkTsCheckerWebpackPlugin({
            typescript: {
                configFile: tsconfigFile,
            }
        }),
        new GasPlugin(),
        // copy appsscript.json to dist dir
        new CopyWebpackPlugin({
            patterns: [
                { from: './appsscript.json' },
//              { from: './setting.js' }  // 不要です (2024/03/01加筆修正)
            ],
        }),
    ],
    optimization: {
        minimize: false,
    },
};
clasp + webpackでGASを書く時のハマりどころによれば、あまりにもminifyし過ぎるとダメらしいので、これを参考に設定しました。
これでyarn webpackとすればdistにファイルが生成されます。scriptに追加しときます。
  "scripts": {
+   "build": "yarn webpack"
  }
yarn run build
distフォルダにファイルが生成されます。

試しにclasp pushして確認してみます。
C:\projectDir\backend> cd ../
C:\projectDir> clasp push
C:\projectDir> clasp open
Code.gs, setting.gsが確かにpushされていて、またechoを実行するとHelloがログ出力されました。
これにてGAS側はほぼ完成です。次にフロントエンド側に行きます。
Vue.js側
まず、プロジェクトディレクトリでvueプロジェクトを作成します。
vite使うと滅茶苦茶簡単です。なのでここではvite使う方を紹介します。(2024/03/01加筆)
webpack使う版 (2022年版)
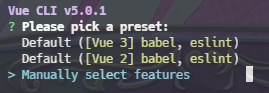
C:\projectDir> vue create frontend
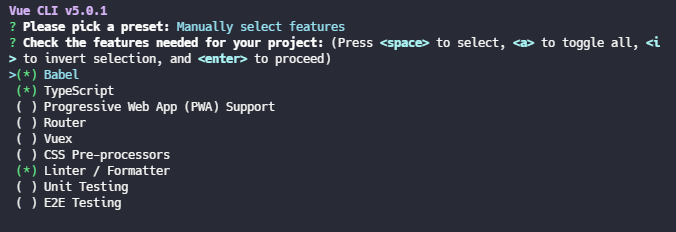
色々聞かれます。本記事はTypeScriptを導入していくので、マニュアルで。
TypeScriptにスペースキーでチェックを入れてエンターを押します。
勿論3.x

本記事ではComptison APIで記述するので、class-style componentはNにし、babel云々はとりあえずYesにしています。Linterは一番上の標準的な奴にしました。

設定ファイルは独立した形式に。
設定は保存しません(任意)。

例によって確認してみてもよいですね。
C:\projectDir> cd frontend
C:\projectDir\frontend> yarn run serve
以下、特に断らない限りfrontendをカレントディレクトリとします。
vue.config.jsはビルドする際の設定をまとめたものです。buildコマンドで使われるのですが、実はwebpackを内部で既に導入しています。そのため別でwebpackを導入する必要はありません。というかwebpackをラップしているのです。
(どのバージョンからラップしているのかとかは知りませんが、恐らくかなり最近だと思われます。)
さて、GASで使うためにはindex.html一つに必要なものをすべてパックする必要があります。そのための設定を述べていきます。
まずデフォルト設定を確認しておきます。
yarn vue-cli-service inspect > temp.config.js
とすると、temp.config.jsに全ての設定が出力されます。
ただし開くとわかりますが、jsファイルにとって余計な文が含まれるので、それを除去することでjsファイルとして眺めることができます。冒頭の
yarn run v1.22.17
$ path/to/node_modules\.bin\vue-cli-service inspect
{
  ...
を以下で置き換える。
export default {
  ...
最後の行の何秒みたいな情報を消すとjsの形式になります。
滅茶苦茶沢山の設定があり、かなり多くのプラグインがすでに導入されていることが確認できます。(勿論このプラグイン達は見つからないとエラーになっていますが。)
その中でも特筆すべきなのは、Vue.jsをインライン化をする記事で見かけるts-loaderなどのTypeScript関係のプラグインは勿論、HtmlWebpackPluginなども既に導入されているということです。またresolve: {alias: ...}といった記述も既にされており、多くの記事で見かける設定(webpack.config.js)は既にデフォルトとなっていることが確認できます。
以上より、本当に必要なのはVue.jsをCDNにするためのプラグイン、またJSコード, CSSをインライン化プラグインとなる。
CDN化するプラグインはwebpack-cdn-pluginを使用。
これは指定したモジュールをCDNに変えることができるつよつよプラグイン。
JSについてはhtml-inline-script-webpack-pluginを使用。
様々な記事でhtml-webpack-inline-source-pluginを使ってインライン化をしている場合を確認した。しかしこのプラグインは既にメンテナンスを終了しているのに加えて、そもそも筆者の環境(最新のVue.js?)ではエラーが出て動かなかった。
Yuuniworks Notesには、css: { extract: false }を指定することでインライン化ができるという記述を発見。
yarn add -D webpack-cdn-plugin
yarn add -D html-inline-script-webpack-plugin
後はそれぞれの説明を確認して、vue.config.jsへ書き込むだけ。
こうして出来上がったのが、GAS対応の最新のインライン化の設定ファイルである。
const { defineConfig } = require('@vue/cli-service')

const HtmlInlineScriptPlugin = require('html-inline-script-webpack-plugin')

module.exports = defineConfig({
  transpileDependencies: true,
  publicPath: './',
  outputDir: __dirname + "/../dist",
  chainWebpack: (config) => {
    //* HTMLの設定 *//
    config
      .plugin('html')
      .tap(args => {
        // inde.htmlの`htmlWebpackPlugin.options.title`で置き換わる値
        args[0].title = "page title"
        args[0].inlineSource = '^(/css/.+\\.css|/js/.+\\.js)'
        // bodyに埋め込む。headerだとdiv#appが読み込まれる前にスクリプトが読まれてしまい、mountに失敗する。
        args[0].inject = 'body'
        // deferだとCDNよりも先にインラインスクリプトを読み込んでしまう。
        // その為多少遅くなるけどdeferやasyncは無指定にする。
        // なお、onloadとかで指定しても、webpackがVueという変数をインラインscriptで定義しようとするため、やはりダメ。
        args[0].scriptLoading = ''
        // `...args[0].minify`によってデフォルトの設定を引き継ぐイメージ?
        args[0].minify = {
          ...args[0].minify,
          removeAttributeQuotes: false,
          removeScriptTypeAttributes: false
        }
        return args
      })

    //* CDNの設定 *//
    config.plugin('webpack-cdn').use(require('webpack-cdn-plugin'), [
      {
        modules: [
          {
            name: 'vue',
            var: 'Vue',
            path: 'dist/vue.runtime.global.js'
          }
        ]
      }
    ])
  },
  configureWebpack: {
    // リリース時にはproductionにする
    mode: 'development',
    devtool: false,
    // HtmlInlineScriptPluginのみ追加。HtmlWebpackPluginは内部で導入済みなので不要。
    plugins: [
      new HtmlInlineScriptPlugin()
    ]
  },
  // CSSをインライン化
  css: {
    extract: false
  }
})
しかしこのままyarn run buildするとdistフォルダを全消ししてビルドする。バックエンド側で生成したコードファイルも消しちゃうので--no-cleanオプションを追加する。
  "scripts": {
    "serve": "vue-cli-service serve",
-   "build": "vue-cli-service build",
+   "build": "vue-cli-service build --no-clean",  //← --no-clean を追加
    "lint": "vue-cli-service lint"
  },
viteでVue.js (with TypeScript)のプロジェクトを作成。
C:\projectDir> yarn create vite frontend --template vue-ts
動作確認してもよいかも。
cd frontend
yarn run dev
次に、バンドル用のパッケージを追加。
yarn add -D vite-plugin-singlefile
// エイリアスインポートするなら下記も追加
yarn add -D vite-tsconfig-paths
vite.config.tsを編集して、次のようにプラグインを追加しましょう。
import { defineConfig } from 'vite'
import vue from '@vitejs/plugin-vue'
import { viteSingleFile } from 'vite-plugin-singlefile'
// ref: https://chaika.hatenablog.com/entry/2022/05/14/083000 ('@/'とか、エイリアスimportを有効にする)
import tsconfigPaths from 'vite-tsconfig-paths'

// https://vitejs.dev/config/
export default defineConfig({
  plugins: [
    vue(),
    viteSingleFile(),
    tsconfigPaths({loose: true}),   // ref: https://github.com/aleclarson/vite-tsconfig-paths/issues/60 {loose: true}を追加してエイリアスを設定する
  ],
  build: {
    outDir: "../dist",
    emptyOutDir: true
  },
})
これだけで基本設定は終わりです。 (webpack版の苦労は何だったんだ...)
なお、viteのテンプレートをReactに変えるだけで、Reactで画面を作ることも可能です。
index.html について
lang=""となっているので、lang="ja"は最低限追加しておくと良いでしょう。
後、GASではfaviconの設定はindex.htmlからだとできないので、消しておきましょう。そのままpublic/favicon.icoも消しましょう。
GASのfaviconの設定方法例 → GASで作成したWebページにファビコンを設定する方法
<!DOCTYPE html>
- <html lang="">
+ <html lang="ja">
  <head>
    <meta charset="utf-8">
    <meta http-equiv="X-UA-Compatible" content="IE=edge">
    <meta name="viewport" content="width=device-width,initial-scale=1.0">
-   <link rel="icon" href="<%= BASE_URL %>favicon.ico">
    <title><%= htmlWebpackPlugin.options.title %></title>
  </head>
  <body>
    <noscript>
      <strong>We're sorry but <%= htmlWebpackPlugin.options.title %> doesn't work properly without JavaScript enabled. Please enable it to continue.</strong>
    </noscript>
    <div id="app"></div>
    <!-- built files will be auto injected -->
  </body>
</html>
.eslintrc.jsへの追記
.eslintrc.jsにコンパイラーマクロ(definePropsなど)を追加しないと、新しいscript setup記法でエラーが出るので注意。
module.exports = {
  root: true,
  env: {
    node: true,
+   'vue/setup-compiler-macros': true
  },
  'extends': [
    'plugin:vue/vue3-essential',
    'eslint:recommended',
    '@vue/typescript/recommended'
  ],
  parserOptions: {
    ecmaVersion: 2020,
    // JSXを使うなら加筆。
+   "ecmaFeatures": {
+     "jsx": true
+   }
  },
  rules: {
    'no-console': process.env.NODE_ENV === 'production' ? 'warn' : 'off',
    'no-debugger': process.env.NODE_ENV === 'production' ? 'warn' : 'off'
  },
  // `'google' is not defined.eslintno-undef`を抑制する
+ "overrides": [
+   {
+     "files": ["*.ts", "*.vue"],
+     "rules": {
+       "no-undef": "off"
+     }
+   }
+ ]
}
<script setup>記法に変更(任意)
App.vueとcomponets/HelloWorld.vueのscript部分をsetup記法に変更します。emitsでも型定義しっかり書けるので。
<script setup lang="ts">
import HelloWorld from './components/HelloWorld.vue';

</script>
<script setup lang="ts">
interface Props {
  msg: string
}
defineProps<Props>()
</script>
これでVue.js側も環境構築完了です。カレントディレクトリをプロジェクトディレクトリにしておきましょう。
cd ../
projectDirでスクリプトを追加
最後に、プロジェクトディレクトリからビルドとかできるようにしておきましょう。
  "scripts": {
+   "build:backend": "yarn workspace backend run build",
+   "build:frontend": "yarn workspace frontend run build",
+   "build": "yarn run build:frontend && yarn run build:backend",
+   "push": "clasp push",
+   "open": "clasp open --webapp"
  }
yarn run build
yarn run push  # Manifest file has been updated. ...? → Yes でおk。
yarn run open  # @HRAD(pushした状態)を選択。デプロイが複数ある場合選ぶことになる。
GAS特有のヘッダーとともに、Vue.jsのおなじみの画面が出れば勝利。
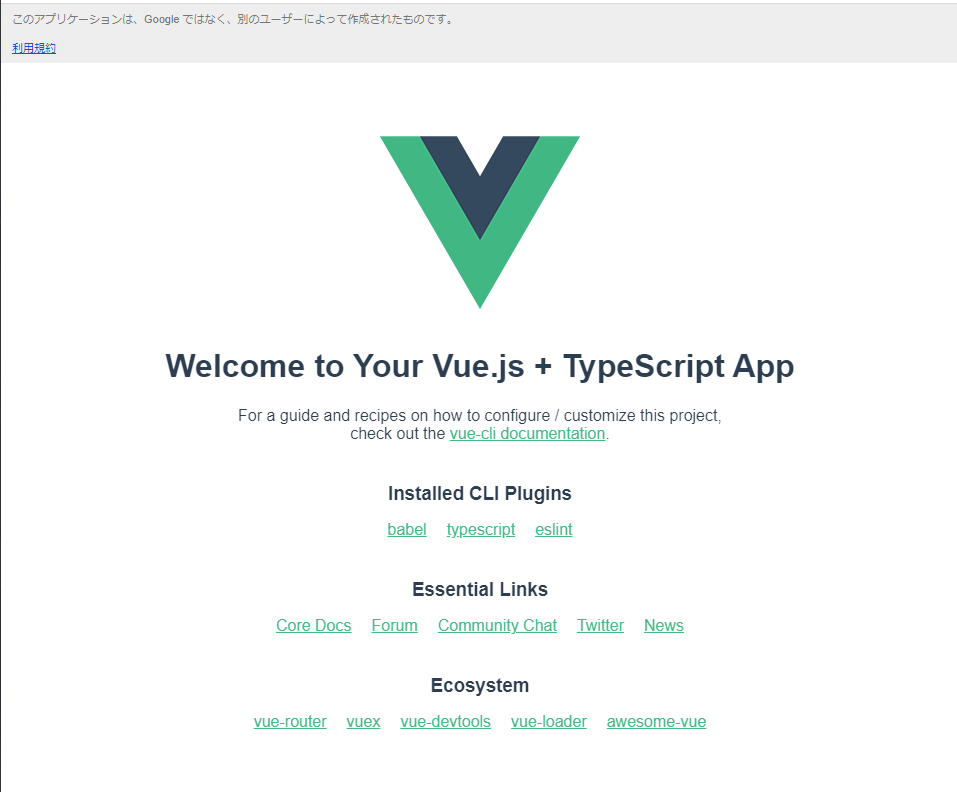
これで最新の<script setup>記法を使って、TypeScriptのみでロジックを記述できるので安心安全です。しかしこのままでは、GASのクライアントサイドAPIのgoogle.script.runなどがコンパイルに通りません。そこで型情報を生成する神パッケージを次節では紹介し、実際にコンパイルを通して動かしてみよう。
バックエンド側の型情報を自動生成する
backendで書いた関数の型を自動生成してくれる神がいた。
それがgoogle-script-dts-generatorである。
# 型情報を置く場所を作成
C:\projectDir> mkdir .\frontend\src\@types
C:\projectDir> cd backend
# google-script-dts-generatorを追加
C:\projectDir\backend> yarn add -D google-script-dts-generator
2023/02/06現在、最新版(1.2.1)だと筆者の環境では正しく型が生成されなかった。
もしうまく動作しなければ、yarn add -D google-script-dts-generator@1.2.0のように前のバージョンをいんすしてみてほしい。
生成するコマンドをbackend/package.jsonで定義しておく。
    "scripts": {
+       "gen-dts": "google-script-dts-generator --sourcesDir . --outputDir ../frontend/src/@types"
    }
なおこの相対パスは、backendフォルダからの相対パスである。
READMEに明記されてないし、地味に15分ほど溶かした
後はプロジェクトディレクトリからでも呼べるようにのpackage.jsonにコマンドを定義しておけばおk。
  "scripts": {
+   "gen-dts": "yarn workspace backend run gen-dts"
  }
実行例
backend/Code.tsに型情報のある関数を追加してみる。
global.echo = () => {
    Logger.log("Hello")
}

global.doGet = () => {
    return HtmlService.createTemplateFromFile('index').evaluate()
        .setTitle('vue-gas-app')
        .addMetaTag('viewport', 'width=device-width, initial-scale=1')
}

+ interface Person {
+    name: string,
+   age: number
+ }

+ global.someFunction = (msg: string, person: Person) => {
+   // do something ...
+ }
いざ実行。
yarn run gen-dts
以下のようなfrontend/src/@types/google.script.d.tsが生成されます。
めっちゃ長いのは、クライアントサイドのAPIの型情報をすべて生成してくれているからで、つまり凄い。
declare namespace google {
    /**
     * Methods available to Google Apps Script
     */
    namespace script {
        interface IRun {
            echo(): void;
            doGet(): void;
            someFunction(msg: string, person: Person): void;
            echo(message: string): void;
            /**
             * Sets a callback function to run if the server-side function throws an exception. Without a failure handler, failures are logged to the JavaScript console. To override this, call withFailureHandler(null) or supply a failure handler that does nothing.
             * @param callback a client-side callback function to run if the server-side function throws an exception; the Error object is passed to the function as the first argument, and the user object (if any) is passed as a second argument
             */
            withFailureHandler(callback: (error: Error, object?: any)=>void): IRun;
            /**
             * Sets a callback function to run if the server-side function returns successfully.
             * @param callback a client-side callback function to run if the server-side function returns successfully; the server's return value is passed to the function as the first argument, and the user object (if any) is passed as a second argument
             */
            withSuccessHandler(callback: (value: any, object?: any)=>void): IRun;
            /**
             * Sets an object to pass as a second parameter to the success and failure handlers.
             * @param {Object} object an object to pass as a second parameter to the success and failure handlers; because user objects are not sent to the server, they are not subject to the restrictions on parameters and return values for server calls. User objects cannot, however, be objects constructed with the new operator
             */
            withUserObject(object: object): IRun;
        }


        interface Person {
            name: string;
            age: number;
        }


        interface IUrlLocation {
            /**
             * The string value of URL fragment after the # character, or an emptry string if no URL fragment is present
             */
            hash: string;
            /**
             * An object of key/value pairs that correspond to the URL request parameters. Only the first value will be returned for parameters that have multiple values. If no parameters are present, this will be an empty object.
             */
            parameter: { [key: string]: any; };
            /**
             * An object similar to location.parameter, but with an array of values for each key. If no parameters are present, this will be an empty object.
             */
            parameters: { [key: string]: any[]; };
        }

        /**
        * google.script.run is an asynchronous client-side JavaScript API available in HTML-service pages that can call server-side Apps Script functions.
        */
        const run: IRun;

        /**
         * google.script.history is an asynchronous client-side JavaScript API that can interact with the browser history stack. It can only be used in the context of a web app that uses IFRAME.
         */
        namespace history {
            /**
             * Pushes the provided state object, URL parameters and URL fragment onto the browser history stack.
             * @param stateObject An developer-defined object to be associated with a browser history event, and which resurfaces when the state is popped. Typically used to store application state information (such as page data) for future retrieval.
             * @param params An object containing URL parameters to associate with this state. For example, {foo: “bar”, fiz: “baz”} equates to "?foo=bar&fiz=baz". Alternatively, arrays can be used: {foo: [“bar”, “cat”], fiz: “baz”} equates to "?foo=bar&foo=cat&fiz=baz". If null or undefined, the current URL parameters are not changed. If empty, the URL parameters are cleared.
             * @param hash The string URL fragment appearing after the '#' character. If null or undefined, the current URL fragment is not changed. If empty, the URL fragment is cleared.
             */
            function push(stateObject?: any, params?: { [key: string]: any; }, hash?: string): void;
            /**
             * Replaces the top event on the browser history stack with the provided (developer-defined) state object, URL parameters and URL fragment. This is otherwise identical to push().
             * @param stateObject An developer-defined object to be associated with a browser history event, and which resurfaces when the state is popped. Typically used to store application state information (such as page data) for future retrieval.
             * @param params An object containing URL parameters to associate with this state. For example, {foo: “bar”, fiz: “baz”} equates to "?foo=bar&fiz=baz". Alternatively, arrays can be used: {foo: [“bar”, “cat”], fiz: “baz”} equates to "?foo=bar&foo=cat&fiz=baz". If null or undefined, the current URL parameters are not changed. If empty, the URL parameters are cleared.
             * @param hash The string URL fragment appearing after the '#' character. If null or undefined, the current URL fragment is not changed. If empty, the URL fragment is cleared.
             */
            function replace(stateObject?: any, params?: { [key: string]: any; }, hash?: string): void;
            /**
             * Sets a callback function to respond to changes in the browser history. The callback function should take only a single event object as an argument.
             * @param callback a client-side callback function to run upon a history change event, using the event object as the only argument.
             */
            function setChangeHandler(callback: (event: { state: any, location: IUrlLocation }) => void): void;
        }

        namespace host {
            /**
             * Closes the current dialog or sidebar.
             */
            function close(): void;
            /**
             * Sets the height of the current dialog.
             * @param {number} height the new height, in pixels
             */
            function setHeight(height: number): void;
            /**
             * Sets the width of the current dialog.
             * @param {number} width the new width, in pixels
             */
            function setWidth(width: number): void;
            namespace editor {
                /**
                 * Switches browser focus from the dialog or sidebar to the Google Docs, Sheets, or Forms editor.
                 */
                function focus(): void;
            }
        }
        /**
         * google.script.url is an asynchronous client-side JavaScript API that can query URLs to obtain the current URL parameters and fragment. This API supports the google.script.history API. It can only be used in the context of a web app that uses IFRAME.
         */
        namespace url {
            /**
             * Gets a URL location object and passes it to the specified callback function (as the only argument).
             * @param callback a client-side callback function to run, using the location object as the only argument.
             */
            function getLocation(callback: (location: IUrlLocation) => void): void;
        }
    }
}
なぜか定義していないecho(string): voidがありますね。これは恐らくバグです。まぁ1行消せば済むので。
色々時間できたらパッチ当ててコントリビューションしたいです。
特筆すべきはsomeFunction(msg: string, person: Person): void;のように、Personがしっかりと明記されていることで、google.script.Personでアクセスできます。
なお、string[]などはanyとされてしまうみたいです。まぁ関数は生成されるので、手動で修正すれば良いでしょう。これもコントリビューションしたいですね。
付録
GASで実行している時のみ定義されるgoogle
型情報を生成できても、Vue単体でデザインや動作を確認して開発している際にはgoogle.scriptなどと呼び出せば当然エラーを吐きます。googleはGASのWebアプリケーションとして実行している時にのみ存在するからです。
そこでVue.js単体でも動作するように、処理を分岐しましょう。
<script setup lang="ts">
if (typeof google !== 'undefined') {
  google.script.run.withSuccessHandler(() => {
    // 正常に動作したとき
  }).withFailureHandler((err: Error) => {
    // error処理
  }).someFunction('Hello', {name: 'Bob', age: 20})
} else {
  // Vue.js単体で動作している時の処理
}
</script>
claspのappscriptなどのスキーマ
VSCodeの場合、settings.jsonに以下のような設定を追加することで、claspの設定ファイルに補間が効くようになる。神?
    "json.schemas": [
        {
            "fileMatch": [
                "appsscript.json"
            ],
            "url": "http://json.schemastore.org/appsscript"
        },
        {
            "fileMatch": [
                ".clasp.json"
            ],
            "url": "http://json.schemastore.org/clasp"
        }
    ]
デプロイしたアプリケーションのURLの固定
clasp pushしてclasp deployすると、デプロイの度にIDが生成され、アプリケーションのURLも新しく変更されます。社内アプリケーション等で利用する場合は、バージョンを更新する度に利用者にURLを変更してもらうのも面倒なので、claspだけで完結する、デプロイを上書きしてURLを固定する方法を紹介します。
とりあえず初回は普通にデプロイしてください。
clasp deploy
その後、clasp deploymentsでデプロイ一覧を確認します。
clasp deployments
# 2 Deployments.
# - <deploy id 1> @HEAD
# - <deploy id 2> @1
@ HEAD はpushした状態の、最新の状態を表しています。
<deploy id 2>(実際には何か文字の羅列)をコピーしてください。
そしてデプロイを更新したいときは、以下のようにデプロイしてください。
clasp deploy -i <deploy id 2> -d 'version 1.0.1'
必須なのは-i <deploy id 2>の部分で、これによりデプロイIDを固定して更新【上書き】することができます。上書きされたデプロイはアーカイブになっているみたいなので、多分復旧も可能かと。
なお、-dオプションでは詳細・コメントを付け足すことができます。必須ではありませんが、つけておく方が良いでしょう。
なお、通常clasp open --webappとするとpushした状態、つまり@ HEADで開きますが、こちらも先ほどのデプロイIDを使えば指定したデプロイを開くことができます。
clasp open --webapp --deploymentId <deploy id 2>
開発用のデプロイとリリースデプロイの二つを用意して、ID込みで、package.jsonのScriptsに追加しておくと便利でしょう。
    "scripts": {
        "build:backend": "yarn workspace backend run build",
        "build:frontend": "yarn workspace frontend run build",
        "build": "yarn run build:frontend && yarn run build:backend",
        "push": "clasp push",
        "open": "clasp open --webapp"
+       "open:dev": "clasp open --webapp --deploymentId <deploy id for dev>"
+       "deploy": "clasp deploy"
+       "deploy:dev": "clasp deploy -i <deploy id for dev>"
+       "deploy:prod": "clasp deploy -i <deploy id for prod>"
    }