Railsチュートリアルを完全SPA化してみた
今回は、自分なりにRails tutorialをRails APIとnextを用いてSPA化してみたので、それを振り返って見ようと思います。
基本的にバックエンド側の内容は、Rails tutorialのrenderをjbuilderやjson:に変更してる程度なので、詳しくはRails tutorialをご購入ください。
ですので今回の記事では、フロントエンドの内容をメインに振り返りたいと思います。
サイト概要
Rails Tutorial(rails ver 6.0)用のアプリケーションをRails APIとnext --typescriptを用いて完全SPA化しました。
プロダクトページはこちら
自分が見本としたチュートリアルである、Rails tutorialのページはこちら(有料です)
Next.jsによるフロントエンド側のAppレポジトリーはこちら
Rails APIを用いたバックエンド側のレポジトリーはこちら
対象読者
- Rails Tutorialを終了した後に、SPA開発に挑戦してみたい方
-
Rails APIとReactを用いたSPA開発に興味がある方 - バックエンドAPIも含んだ、SPAを開発してみたい方
オリジナルのポートフォリオをRails APIとReactを用いたSPAで作成しようと考えている方がいれば、予行演習としてRails TutorialをSPA化してみることは非常にオススメです!
作成理由
Rails Tutorialは初めてRailsを触れる人にとっては非常に優れた教材だと思います。現在Railsを勉強中で、まだ購入していない人はぜひ購入してみてください。
ただ、現在はSPA(Single Page Application)が非常に流行っているので、Rails tutorialのバックエンドを用いてSPA作成の勉強のために作成しました。
各章ごとにブランチを残しているので、もし興味がある人はぜひチェックしてみてください。
フロントエンドレポジトリーはこちら
バックエンドレポジトリーはこちら
使用技術 一覧
- Ruby 2.7.2
- Rails 6.1.1
- Next 10.0.9
- Typescript
- React
- react-bootstrap
- Docker, Docker-compose (開発環境)
- Postgresql(DB)
- Google Cloud Storage(画像保存用)
- Send Grid(Email配信用)
- Vercel (フロントエンドレポジトリーのデプロイ先)
- Heroku (バックエンドレポジトリーのデプロイ先)
機能一覧
◆ ユーザー機能
- 新規登録、ログイン、ログアウト、emailによるユーザー有効化、パスワードリセット
- マイページ、登録情報を変更
◆ マイクロポスト機能
- マイクロポスト作成、編集、消去
- マイクロポストに画像を追加(
Google Cloud Storageに保存)
◆ ユーザー機能
- 他のユーザーをフォロー
- フォローしたユーザーのフォローを解除
- フォローしたユーザー、フォローされているユーザーを確認
◆ フィード機能
- フォローしたユーザーのマイクロポストを表示
いいね機能を新たに実装しました(2021年10月)
◆ いいね機能
- 投稿をお気に入りできる
- 各投稿毎にいいね数といいねしたユーザーを確認できる
- いいねした投稿を一覧で確認できる(実装予定)
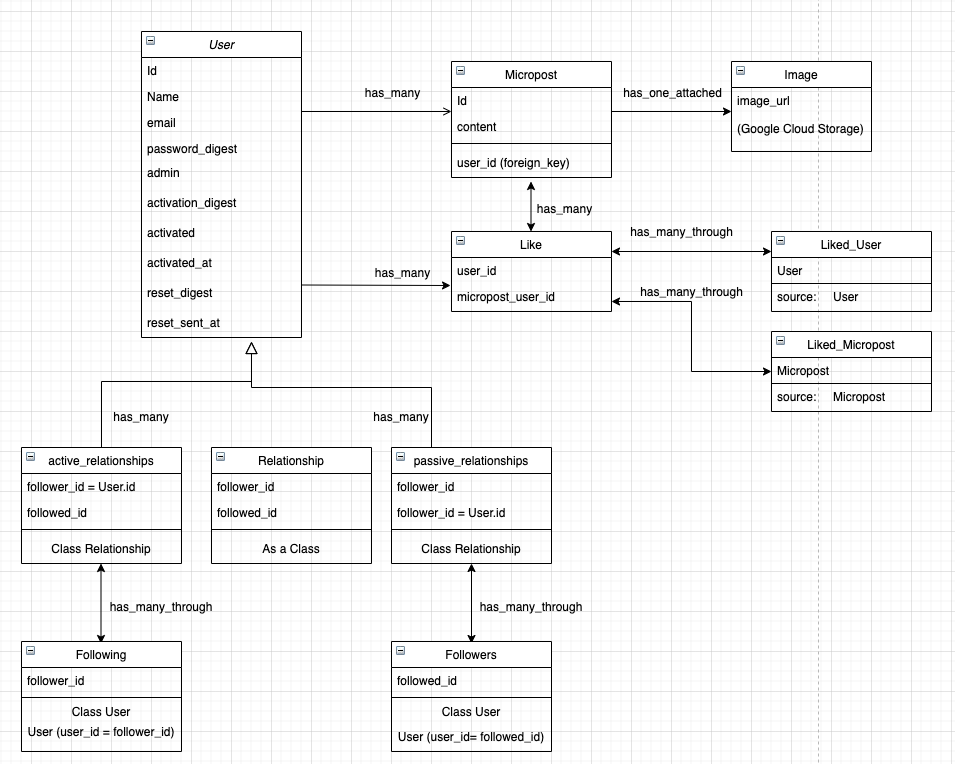
ERD図
開発環境について
開発環境は開発者の好みでDockerを用いて開発しています。
backend,frontendそれぞれにレポジトリーを作成して、管理しました。
├── backend
│   ├── Dockerfile
│   ├── Gemfile
│   ├── Gemfile.lock
│   ├── Guardfile
│   ├── README.md
│   ├── Rakefile
│   ├── app
│   ├── bin
│   ├── config
│   ├── config.ru
│   ├── db
│   ├── entrypoint.sh
│   ├── lib
│   ├── log
│   ├── public
│   ├── storage
│   ├── test
│   ├── tmp
│   └── vendor
├── docker-compose.yml
└── frontend
    ├── Dockerfile
    ├── README.md
    └── app
Docker-composeの内容はこちらになります。
自分が開発環境を作成するための手順もコメントとして残してあります。
version: "3"
services:

  #typescript用フロントエンド
  #step1 docker-compose build
  #step2 docker-compose run --rm frontend sh -c "npx create-next-app"
  #step3 workingdirは"create-next-app"を実行してからコメントを外す
  #step4 tsconfig.jsonを作成する
  #step5 docker-compose run --rm frontend sh -c "yarn add --dev typescript @types/react @types/node"
  frontend:
    container_name: ts_frontend
    build:
      context: frontend/
      dockerfile: Dockerfile
    volumes:
      - ./frontend/app:/usr/src/app
    tty: true
    # working_dir: "/usr/src/app"
    command: 'npm run dev'
    ports:
      - "8080:3000"

  #step1 docker-compose run --rm backend bash -c "rails new . --force --database=postgresql --api"
  #step2 config databaseを 設定する
  #自分がハマったミス rails new --appしてから、docker-compose build
  #イメージを先に作ってはいけない
  #step3 docker-compose build
  #step4 docker-compose up
  #step5 docker-compose exec {service name} bach or docker-compose run --rm {service name} rails db:create
  #step6 rails db:create

  backend:
    # container_name: backend
    build:
      context: backend/
      dockerfile: Dockerfile
    # 起動前にbundle installをしないとエラーがでるようになった
    command: /bin/sh -c "rm -f tmp/pids/server.pid && bundle install && bundle exec rails s -p 3000 -b '0.0.0.0'"
    # command: /bin/sh -c "rm -f tmp/pids/server.pid  && bundle exec rails s -p 3000 -b '0.0.0.0'"
    tty: true
    stdin_open: true
    depends_on:
      - db
    ports:
      - "3000:3000"
    volumes:
      - ./backend:/api

  db:
    # container_name: psql_server
    image: postgres
    volumes:
      - psgl_data:/var/lib/postgresql/data
    environment:
      POSTGRES_USER: root
      POSTGRES_PASSWORD: password
    ports:
      - 3308:3306


volumes:
  psgl_data:
SPAにする際に難しかった点
- ログイン認証、ログイン情報の保持
- ページネーションの作成
- 画像の表示
- Flashメッセージの表示
ログイン認証、ログイン情報の保持について
ログイン認証について
今回のログインはJWT(Json Web Token)を用いて実装しました。
まず、client側からserver側にログインに必要な情報を送信し、ユーザーが認識されたらuser_idをJWT化させ、tokenをlocal storageに保存しています。
そして、client側からログイン情報を必要とする処理を行う場合は、headerにtokenを追加して、送信することでserver側にログインユーザーを伝えています。
ログイン情報の保持について
client側でのログイン情報は広範囲のcomponentで共通して利用する必要がある情報なので、swrを用いてcustom Hook化し、全てのcomponentで簡単に情報を共有できるように設定しました。
コード例は以下の通りです。
import useSWR from 'swr';
// SWR用のfetcher
async function UserFetcher(): Promise<UserDataType | null> {
  const response = await fetch(AutoLoginUrl, {
    method: 'GET',
    headers: {
      'Authorization': `Bearer ${Auth.getToken()}`,
      'Content-Type': 'application/json'
    }
  });
  return response.json()
}
export function useUserSWR(): useUserType {
  const { data: user_data, error: user_error } = useSWR(AutoLoginUrl, UserFetcher)

  const has_user_key = (): boolean => {
    return user_data.hasOwnProperty('user')
  }
  return { user_data, user_error, has_user_key }
}
投稿のリストのデザインについて
今回の投稿の表示には、react-bootstrapのCardコンポーネントを用いています。
Cardコンポーネント内で、レイアウトを調整し、また投稿に画像が付属されている場合、画像を一緒に表示させています。
投稿日時の表記は、react-timeagoを利用して実装しました。
created_atをpropsとして渡すだけなので、非常に簡単に実装できると思います。
import TimeAgo from 'react-timeago'
<footer className="blockquote-footer py-2 my-0 mx-auto" style={{ width: "80%" }}>
          Posted <TimeAgo date={new Date(post.created_at)} />
          <br className="sp-only" />
          <span className="float-center mx-3"><MicropostEdit id={post.id} user_id={post.user_id} isEdit={isEdit} setIsEdit={setIsEdit} /></span>
          <span className="float-right"><MicropostDelete id={post.id} user_id={post.user_id} /></span>
</footer>
ページネーションの作成について
ページネーションは、rails tutorialではgemを導入するだけで作成できていましたが、reactでは当然そうは行きません。 (笑)
自分は、ページネーションのstateを作成するためのCustom Hookと、ページネーションの番号部分を表示するComponentに分けて作成しました。
Custom Hook
usePaginationについて
ページネーションを利用するcomponentには以下のstateが必要です。
type PageStateType = {
  currentPage: number,
  totalPage: number,
  maxPerPage: number
}
ですので予め、これらを簡単に設定できるようにCustom Hookを作成しました。
maxperpageのみpropsとして設定できるようにしてあります。
import { useState, Dispatch, SetStateAction } from 'react'

export type PageStateType = {
  currentPage: number,
  totalPage: number,
  maxPerPage: number
}

export type usePaginationType = {
  pageState: PageStateType,
  setPageState: Dispatch<SetStateAction<PageStateType>>
}

export function usePagination({ maxPerPage }: { maxPerPage: number }): usePaginationType {
  //Pagination用のstate管理
  const [pageState, setPageState] = useState<PageStateType>({
    currentPage: 1,
    totalPage: 0,
    maxPerPage: maxPerPage
  });

  return { pageState, setPageState }
}
Componentについて
ページネーションの番号を表示するコンポーネントでは、usepaginationのstate関数を、そのままpropsとして受け取れるようにでように設定しました。
import { PageStateType } from '../hooks/usePagination'
//Bootstrap
import Pagination from 'react-bootstrap/Pagination'

export const Pagination_Bar: React.FC<PaginationPropType> = ({ pageState, setPageState }) => {
 return (
  <Pagination className="justify-content-center">
      <Pagination.First key={"First"} onClick={() => setPageState(Object.assign({ ...pageState }, { currentPage: 1 }))} />
      <Pagination.Prev key={"Prev"} onClick={() => ClickPrev(currentPage)} />
      {Pagination_Numbers({ totalPage: totalPage, currentPage: currentPage })}
      <Pagination.Next key={"Next"} onClick={() => ClickNext(currentPage, totalPage)} />
      <Pagination.Last key={"Last"} onClick={() => setPageState(Object.assign({ ...pageState }, { currentPage: totalPage }))} />
  </Pagination>
 )
}
画像の表示について
今回の画像は、ほとんどが外部のサイトからurlを通して読み込んで表示しています。(User iconはgravator、**ポストの画像はGCS)
ですので、普通のnext/imageでは読み込むことができないので、予め外部の画像を読み込む用のコンポーネントをExternal_Imageとして設定しました。
import Image from 'next/image'
import React from 'react'
type Gravatar_Props = {
  src: string,
  height: number,
  width: number,
  alt?: string,
  className?: string
}

//外部Image用のComponent
export const External_Image: React.FC<Gravatar_Props> = ({ src, alt, height, width, className }) => {
  const myLoader = ({ src, width }) => {
    return `${src}?w=${width}`
  }
  return (
    <Image loader={myLoader} className={className}
      src={src} alt={alt} width={width} height={height}
    />
  )
}
Flashメッセージの表示方法
railsでは、デフォルトでFlashメッセージを表示することができますが、nextで表示するには当然自分で作成する必要があります。
今回は、Flashメッセージを、userReducer、Alert/react-bootstrapを用いて作成して、useContextによって共有しました。
//types
import { FlashStateType, FlashActionType } from '../types/FlashType'
export function FlashReducer(state: FlashStateType, action: FlashActionType): FlashStateType {
  switch (action.type) {
    case "DANGER":
      return { ...state, show: true, variant: "danger", message: action.message };
    case "INFO":
      return { ...state, show: true, variant: "info", message: action.message };
    case "PRIMARY":
      return { ...state, show: true, variant: "primary", message: action.message };
    case "SUCCESS":
      return { ...state, show: true, variant: "success", message: action.message };
    // これはflash messageの表示をやめるコマンド
    case "HIDDEN":
      return { ...state, show: false };
    default:
      return state;
  }
}
//FlashMessageをContext化
  import React, { useReducer, createContext } from 'react';
//reducers
  import { FlashReducer } from '../reducers/FlashReducer'
  const initialflashstate: FlashStateType = { show: false, variant: "primary", message: "message" }
  const [FlashState, FlashDispatch] = useReducer(FlashReducer, initialflashstate);
  const FlashValue: { FlashState: FlashStateType, FlashDispatch: React.Dispatch<FlashActionType> } = { FlashState, FlashDispatch }
  return (
    <FlashMessageContext.Provider value={FlashValue}>
      <Component {...pageProps} />
    </FlashMessageContext.Provider>
  )
Flashメッセージは画面がある程度下にスクロールされると、position:fixedが適用されるように設定しました。
{
          scrollY >= 130 ? (
            <div className="fixed-top m-3">
              <Alert show={FlashState.show} variant={FlashState.variant} onClose={() => FlashDispatch({ type: "HIDDEN" })} transition={true} bsPrefix="alert" dismissible>
                <div className={`${styles.flash_message}`}>
                  {FlashState.message}
                </div>
              </Alert>
            </div>) : (
            <div className="shadow">
              <Alert show={FlashState.show} variant={FlashState.variant} onClose={() => FlashDispatch({ type: "HIDDEN" })} transition={true} bsPrefix="alert" dismissible>
                <div className={`${styles.flash_message}`}>
                  {FlashState.message}
                </div>
              </Alert>
            </div>
          )
}
まとめ
もともとrails tutorial自体は一度やったことがあって、今回のSPA化に挑戦してみましたが、3月末から初めて約2ヶ月かかりました。
パフォーマンス性の向上は、SPA化することで格段に上がりますが、完成するまでの期間の差を考えると、本当にSPAで作るべきものなのかどうかを考慮する必要性を強く実感できますね。
