概要
-
手書き数字(1 ~ 9)を認識するアプリケーションの開発
-
GitHubURL
1. 開発環境
- Xcode (13.2.1)
- GoogleColaboratory
2. 構築
STEP1:手書き数字の認識のCoreMLモデルを作成
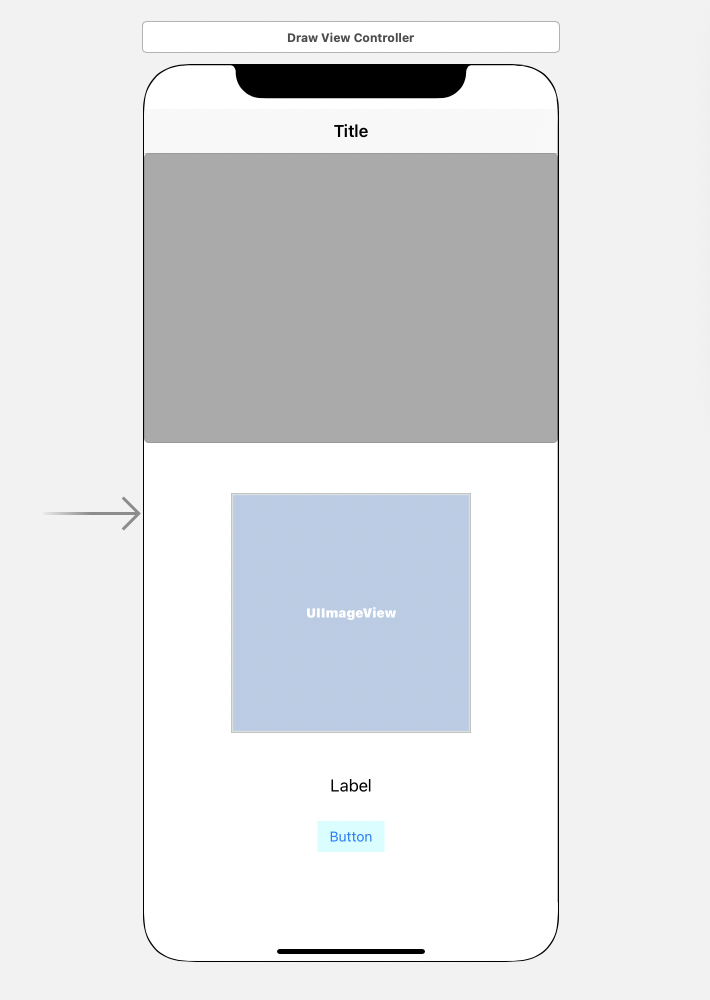
STEP2:StoryboardでUIを作成
STEP3:手書き文字を画像として保存する
STEP4:保存した手書き文字画像をCoreMLモデルで認識出力
3. CoreMLモデルの作成
FrameworkとLibraryのインストール
pip install keras==2.2.4 tensorflow==2.3.0 coremltools==5.1.0 pillow==7.0.0 h5py==2.10.0
必要なモジュールのインポート
import tensorflow as tf
from tensorflow import keras
from tensorflow.keras.datasets import mnist
import numpy as np
import matplotlib.pyplot as plt
from tensorflow.keras.utils import to_categorical
%matplotlib inline
import sys
from tensorflow.keras.models import Sequential
from tensorflow.keras.layers import Dense, Activation, Dropout, Flatten, Conv2D, MaxPooling2D
import coremltools
import coremltools as ct
手書き数字画像データセットMNISTを用いたモデルの学習
x_train = x_train.reshape(60000, 28, 28, 1).astype("float32") / 255
x_test = x_test.reshape(10000, 28, 28, 1).astype("float32") / 255

y_train = to_categorical(y_train.astype("float32"), 10)
y_test = to_categorical(y_test.astype("float32"), 10)

model = Sequential()
model.add(Conv2D(32, kernel_size=(3, 3), activation='relu', input_shape=(28, 28, 1)))
model.add(Conv2D(64, (3, 3), activation='relu'))
model.add(MaxPooling2D(pool_size=(2, 2)))
model.add(Dropout(0.25))
model.add(Flatten())
model.add(Dense(128, activation='relu'))
model.add(Dropout(0.5))
model.add(Dense(10, activation='softmax'))

model.compile(loss='categorical_crossentropy', optimizer='sgd', metrics=['acc'])
1段落目:データセットの手書き数字画像を28×28のグレースケール1に変換し、各画像の各ピクセルを最小値0、最大値1で正規化している。
2段落目:各画像の正解ラベルを0または1の10要素で表される配列に変換している。
(例: 4の場合は[0, 0, 0, 0, 1, 0, 0, 0, 0, 0])
3段落目:kerasモデルのニューラルネットワーク(畳み込み層、隠れ層、出力層)を構築。
model.fit(x_train, y_train, batch_size=128, epochs=30)
バッチサイズ128、エポック30の条件下でモデルを学習。
モデルの変換 (kerasモデル→CoreMLモデル)
model.save('./image_classification.h5')
kerasモデルをCoreMLモデルに直接変換する方法がなかったため、一度H5ファイルに一度変換する。
image_labels = ['0','1','2','3','4','5','6','7','8','9']

classifier_config = ct.ClassifierConfig(image_labels)
image_input = ct.ImageType(shape=(1, 28, 28, 1,), scale=1/255)

mlmodel = ct.convert("image_classification.h5",
                     inputs=[image_input],
                     classifier_config=classifier_config
                     )

mlmodel.save('h5_model.mlmodel')
1段落目:出力されるラベルを定義。今回は0〜9の手書き数字を配列として渡した。
2段落目:モデルの入力タイプに合わせてCoreMLモデルの画像タイプを定義。ここでは入力画像を28×28のグレースケール1で定義。作成したモデルにおいて正規化を行なっているので、scale=1/255を実施している。
3段落目:定義した内容でH5ファイルをCoreMLモデルに変換している。
4段落目:変換してモデルを保存。
4. StoryboardでUI設定

実際に作成したUIを上記写真に示す。アプリ起動後、上部灰色部分に手書き用の白キャンバスが表示され、数字を手書きした後、下部ボタンを押すことで数字の認識が開始され、Label部分に画像認識の結果が表示される。
UIImageViewには自分が手書きした画像のピクセルが白黒反転した状態で表示される。手書き数字を白黒反転させるのは、MNISTデータセットの数字が白で描かれているため。
5. 手書き数字用のキャンバスを作成
class Canvas: UIView {

    var lines = [[CGPoint]]()
    func clear() {

        lines.removeAll()
        setNeedsDisplay()
    }

    override func draw(_ rect: CGRect) {
        super.draw(rect)

        guard let context = UIGraphicsGetCurrentContext() else { return }

        context.setStrokeColor(UIColor.black.cgColor)
        context.setLineWidth(10)
        context.setLineCap(.butt)

        lines.forEach { (line) in

            for (i, p) in line.enumerated() {

                if i == 0 {
                    context.move(to: p)
                } else {
                    context.addLine(to: p)
                }
            }
        }

        context.strokePath()
    }

    override func touchesBegan(_ touches: Set<UITouch>, with event: UIEvent?) {
        lines.append([CGPoint]())
    }

    override func touchesMoved(_ touches: Set<UITouch>, with event: UIEvent?) {

        guard let point = touches.first?.location(in: nil) else { return }
        let cgpoint = CGPoint(x: Int(point.x) - 40, y: Int(point.y - 50))

        guard var lastLine = lines.popLast() else { return }
        lastLine.append(cgpoint)
        lines.append(lastLine)

        setNeedsDisplay()
    }
}
ここではUIView上のタッチした座標をCGPointで配列に格納し、黒の点として表示している。
今回の場合、タッチした点と実際に黒い点が表示される箇所に誤差があったため、touchMoved関数の中で、格納される座標のポイントを調整している。
6. 画像認識のバックエンドを実装
@IBAction func exchangeButton(_ sender: Any) {

        let myImage = canvas.GetImage() as UIImage
        let imgSize: Int = 28
        let imageShape: CGSize = CGSize(width: imgSize, height: imgSize)
        let imagePixel = myImage.resize(to: imageShape).getPixelBuffer()
        let reverseimage = imageFromARGB32Bitmap(pixels: imagePixel, width: 28, height: 28)

        guard let reversedimage = CIImage(image: reverseimage ?? myImage) else {
            fatalError("Could not Convert")
        }

        drawImage.image = reverseimage
        preCount = imagePrediction(image: reversedimage)
        predictionLabel.text = preCount
    }
ここでの流れは、まずCanvasに描いたUIViewをUIImageに変換した後、28×28の画像サイズにリサイズし、リサイズした画像をピクセルデータ化した後、各ピクセルの数値を255から引くことでピクセルデータの反転を実施している。
反転したピクセルデータから28×28の画像を生成し、画像認識モデルに渡している。
7. 画像認識モデル
func imagePrediction(image: CIImage) -> String {

        guard let coreMLModel = try? VNCoreMLModel(for: h5_model().model) else {
            fatalError("Loading CoreML Model Failed")
        }

        let request = VNCoreMLRequest(model: coreMLModel) { request, error in
            guard let results = request.results as? [VNClassificationObservation] else { return }

            if let classification = results.first {
                self.preCount = classification.identifier
            }
        }

        let handler = VNImageRequestHandler(ciImage: image)
        do {
            try handler.perform([request])
        } catch {
            print(error)
        }

        return preCount
    }
ここでは、事前に作成していたCoreMLモデルをVNCoreMLModelの引数に渡し、結果を受け取った後の処理をハンドラーに記述している。
ハンドラーにCIImageに変換した手書き数字画像をわたし、ハンドラー処理を実行、VNCoreMLRequestで画像の認識を実行している。
可能性の一番高い数字の結果を、classification.identifierの部分で返している。
8. アプリ実装した結果

上記写真に実際したアプリの画像を示す。結果、手書き数字を認識し、正しい数字が表示された。
9. 今後の展開
- 今回作成した認識アプリは手書き数字の書き方によっては正しい数字が表示されない場合があったため、どんな書き方をしても正しい数字が表示されるよう、手書き数字の画像生成部分の見直し、kerasモデルのモデル構造の見直しを実施していきたい。
- 今回実装した手書き数字の認識技術を導入したアプリ開発に挑みたい。