これは CyberAgent Developers Advent Calendar 2018 16日目の記事です。
普段アドテク関連のプロダクトにおいてGoでバックエンドを書いています。今回はプロダクト内で使用していたメインDBをオンラインで置き換えた話と、その導入としてClean Architectureを用いた事例について紹介します。
またこれは2017年末〜2018年始め頃に行った話で、実際にClean Architectureを導入して1年ほど経った所感も記述します。
モチベーション
元々メインDBはアドテク界隈でよく使われる Aerospike を使っていました。Aerospike自体の紹介は日本語でもググれば記事があるのでそちらに譲りますが、今回問題となったのはデータ量の増加に対して運用が耐えられなくなってきたからです。
GCE上にAerospikeクラスタを立てて運用していましたが、当時サービスの成長に伴うトラフィック増によりメモリが不足し、1週間にノード追加を何度か行う程度には運用負荷がかかっていました。もちろんスケールアップするなどの対応も考えられましたが、チーム内で専属のインフラエンジニアがいなかったこともありマネージドDB移行への機運が高まっていました。
データ量の支配的なものは主にセッションデータで、ユーザが広告をリクエストしたときに生成され、それに紐づくクリックやインストールなどのステータスが更新される類のデータでした。複雑なクエリは必要なくKVSでただ高速に処理できればよかったため、Bigtableを採用することとしました。
オンライン移行の戦略
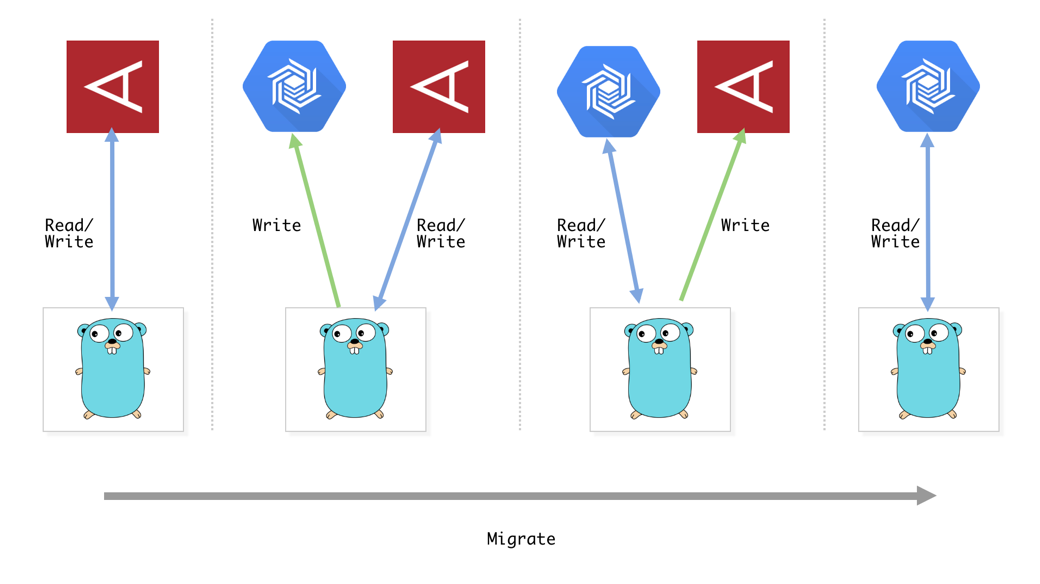
異なるデータストア間で移行を行うため、よくあるreplicationを用いたオンライン移行は厳しいです。そこで取った戦略がDual writingです。内容は単純なもので、移行先のDBに二重に書き込みしながら、徐々に移行先DBから読み込み、最終的に移行先DBだけで読み書きするようにするというものです。
Clean Architectureの導入
各種APIサーバはフラットパッケージで実装されていました。Go way的に悪くない選択ですが、interfaceをあまり使わずに直接structを使っていたりと、変更箇所が多くなりすぎてシュッとDual writeを行うには厳しい感じでした。
ちょうどこの頃(2017年末)、世間的にGoが普及期に入り界隈でパッケージ構成のベストプラクティス的な話題が散見されるようになりました。特に以下の資料は何度も見返して参考にさせていただきました。
- https://speakerdeck.com/mercari/ja-golang-package-composition-for-web-application-the-case-of-mercari-kauru
- https://www.pospome.work/entry/2017/10/11/023848
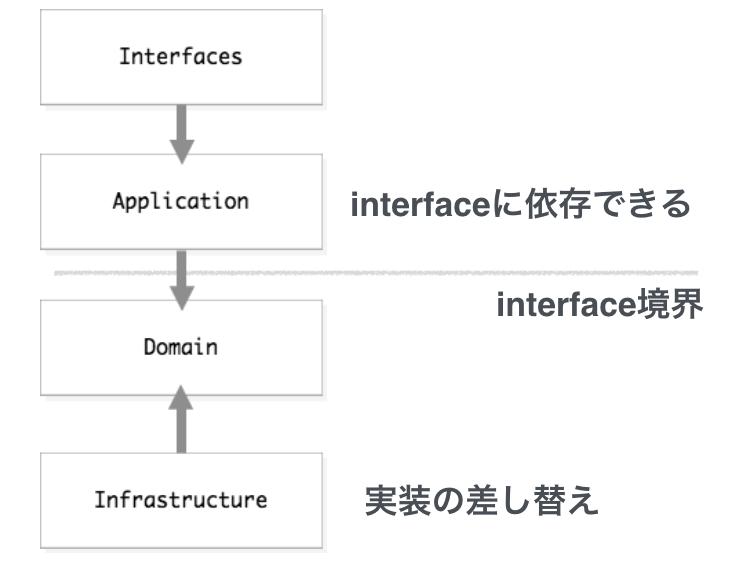
Clean Architectureについては特に最近流行ってるので詳しい説明は省略しますが、RepositoryパターンによってDB依存のコードを仕組み的に分離出来るのが気に入り採用しました。
簡単にどんな感じでパッケージを分けたかだけ紹介します:
- interfaces
- HTTP終端、WAFはここだけに依存する
- application
- domainをまとめてusecaseを組み立てる
- 直接ビジネスロジックを書くこともある
- domain
- Entityの構造体定義
- repositoryのinterfaceを定義
- infrastructure
- domainで定義したinterfaceの実装
- AerospikeやBigtableなどの実装がそれぞれ存在する
Dual writing実装
Repositoryパターンの実装が終わった段階で以下のような構造になっています。
domain/session.go にはRepositoryのinterface定義を、 infrastructure/ 以下にはinterfaceを満たしたDB依存のコードが置いてあります。
domain
└── session.go
infrastructure/
├── aerospike
│   └── session_repository.go
├── bigtable
│   └── session_repository.go
実装は簡単化してありますが大体以下のような感じです。
package domain

type Session struct{}

type SessionRepository interface {
  Get(id string) (*Session, error)
  Set(id string, s *Session) error
}
package bigtable

import (
  "github.com/GoogleCloudPlatform/google-cloud-go/bigtable"
  "github.com/takashabe/sandbox/go/ddd_example/domain"
)

type sessionRepository struct {
  client bigtable.Client
}

func (r *sessionRepository) Get(id string) (*domain.Session, error) {
  return nil, nil
}

func (r *sessionRepository) Set(id string, s *domain.Session) error {
  return nil
}
proxy repository
ここまででAerospike, Bigtableそれぞれに依存したRepository実装が手に入りました。あとはこれらをDual writeするためのproxy層を用意します。これも同じくRepository実装の一つとすることで統一的なインタフェースでアクセスすることが可能です。
proxy repositoryはprimary, secondaryのRepositoryを持ち、書き込み時のみsecondaryに二重に書き込む挙動としています。
package proxy

import (
  "github.com/takashabe/sandbox/go/ddd_example/domain"
)

func NewSessionRepository(p, s domain.SessionRepository) sessionRepository {
  return sessionRepository{
    primary:   p,
    secondary: s,
  }
}

type sessionRepository struct {
  primary   domain.SessionRepository
  secondary domain.SessionRepository
}

func (r *sessionRepository) Get(id string) (*domain.Session, error) {
  return r.primary.Get(id)
}

func (r *sessionRepository) Set(id string, s *domain.Session) error {
  if err := r.primary.Set(id, s); err != nil {
    return err
  }
  go func() {
    if err := r.secondary.Set(id, s); err != nil {
      // logging
    }
  }()
  return nil
}
移行
移行自体は先ほど紹介したproxy repositoryの引数を変えるだけで完結します。更に移行元と移行先のデータで整合性が取れているかを確認するためのスクリプトを書いて、適宜確認すると良いでしょう。
- 移行フェーズ1(RW:Aerospike, W:Bigtable)
repository := proxy.NewSessionRepository(
  aerospike.NewSessionRepository(),
  bigtable.NewSessionRepository(),
)
- 移行フェーズ2(RW:Bigtable, W:Aerospike)
repository := proxy.NewSessionRepository(
  bigtable.NewSessionRepository(),
  aerospike.NewSessionRepository(),
)
- 移行フェーズ3(RW:Bigtable)
repository := bigtable.NewSessionRepository()
移行後の所感
Bigtable
- Aerospikeに比べてAPIサーバで2ms程度遅くなったが、十分高速
- メモリやストレージ容量を気にすることも無くなり、スケールアウトも非常に簡単になった
- 現在は移行時の20倍程度のトラフィックがあるが、それでもAerospikeのピーク台数よりも少ないノード数で捌けている(1ノードあたりの性能が異なるので単純な比較はできないが)
- カラム型DBに慣れていなかったので、設計の勘所的なところは公式ドキュメントを読んでよく抑える必要がある
- 特にフェッチ時の世代管理やKey設計など
- データは全てbyte配列として格納されるため、ORM的なライブラリを自前で書いて使っている
- Bigtable側で用意されたincrement関数を使うためにはbig-endianエンコードした値を入れる必要があるが、cbt(公式のCLIツール)で非常に読みづらくなる
- 拙作ですが https://github.com/takashabe/btcli を使うことで良い感じにdecodeして読むことが出来ます
Clean Architecture
- 構造的にmock化しやすいので便利
- 先に述べたproxy repositoryのような感じでcache層を追加することも容易
- 新たな課題もある
- application層以降でHTTPリクエストの情報を含んだロギングをしようとするとinterfaces層の関心事が漏れる
-
context.Valueを使ってロギング用の環境情報を引き回すと便利
-
- application層でtransaction境界を担保しようとするとinfrastructure層の関心事が漏れる
- 妥協して
*sql.DBを引き回すようにしている
- 妥協して
- application層以降でHTTPリクエストの情報を含んだロギングをしようとするとinterfaces層の関心事が漏れる
- コード量がどうしても多くなり、構造を理解していないとレイヤーごとの関心事をうまく分離して書けない
- ある程度の規模のサーバを書くようなら前述の構造的にinterfaceで分離出来る点など、Clean Architectureを採用するメリットはあると思う
- ツールなど簡単なものならフラットパッケージなもので全然構わないと思っているし、特にOSSではGo wayに従ったほうが総合的に良いと思う
まとめ
Dual writingを用いてAerospikeからBigtableへのオンライン移行を行いました。合わせてDual writingの実装に最適なClean Architectureへの移行も行いました。
Dual writingはmonolithをMicroserviceに分割するときにも非常に有効な手法だと思います。

