TL;DR
- い◯のー!関数型言語ElixirでIoT開発しようぜ〜!!
- NervesはElixirのIoTでナウでヤングなクールなすごいやつです
- SeeedさんがBeagleBone互換のGreenボードを販売している!これはつまりNerves動かさねば!!
このノリで読むのがめんどい方は,GitHubのREADMEなりログを追ってください.
https://github.com/takasehideki/nerves_bbg
注記
本稿の初版は2019年12月でしたが,Nervesのアップデートに伴ってお作法などがずいぶん変わってきたので,2020年5月に書き直しました.
Nervesってなに??
どうもこんにちわ.
唐突にElixirとかNervesとかなんやねん??って感じですが,コレだけで長くなりますんで,,,過去記事をご参照くださいませ〜
Elixir/Nervesをもっと知りたい方,Nervesでなんか作ってみたい方,Nerves Projectに貢献したい方,そんなユーザコミュニティ『NervesJP』というコミュニティをやっとります.

このコミュニティのAdvent Calendarや,Elixirのもの✕2も賑わってますんで,併せてどうぞ!!
- #NervesJP Advent Calendar 2019
- Elixir Advent Calendar 2019
- fukuoka.ex Elixir/Phoenix Advent Calendar 2019
はじめに
前提技術の紹介a.k.a宣伝はココまで,ようやく本題です.
Seeedさんの出しているBeagleBone互換なボードであるBeagleBone Green,いいっすよね〜!!
言うてIoTモジュールならディスプレイ出力要らんしょ,じゃあHDMIコネクタの代わりにGrove付いてたほうが便利っしょっ!てなノリが大好きです.

オンボードeMMCからそのままDebian起動できる!ってのも良いですが,ここはせっかくならNerves動かしてみましょう!という(ニッチな)トライアルです.
# でも某ナカノヒト氏には楽しんでもらえるはずっ^^;
なおBeagleBoneファミリはSW層から見えるHW仕様にそれぞれ互換性があるのが,Nerves的には良いトコロです.
Nervesのターゲットを指定するための環境変数として$MIX_TARGETを設定しますが,これをbbbにするだけで,同じファーム・アプリのSDカードを全てのBeagleBoneボードで使い回せるようになります.なおNervesのコアターゲットである某ラズパイではそうはいきません.
なにが言いたいかというと,この記事と同じ手順でPocketBeagleなりBeagleBone Blueなり,bbbならなんでもNerves開発がお手のものです!!
前提準備・開発環境
Elixir/Nervesの開発環境の構築方法は,下記にまとめています.
母艦PCにはMacかLinux(できればUbuntu)をご用意ください.筆者はmacOSでやっております.
Windowsは公式サポートしていません,,,VirtualBoxとかWSLで頑張っているNervesJP同志に期待しています!!
→ Nerves v1.6.1以降からWindowsユーザでもWSL 2でNerves開発がネイティブにできるようになりました!!
Hello, World!!
まずはNervesのファームをビルドしてみます.
プロジェクトの作成
mix nerves.newというコマンドを使います.
引数--targetはNervesファームのビルド対象のTagを指定しています.
途中の "Fetch and install dependencies? [Yn] " では遠慮なくYとしちゃってください.
$ mix nerves.new nerves_bbg --target bbb
* creating nerves_bbg/config/config.exs
* creating nerves_bbg/config/target.exs
* creating nerves_bbg/lib/nerves_bbg.ex
* creating nerves_bbg/lib/nerves_bbg/application.ex
* creating nerves_bbg/test/test_helper.exs
* creating nerves_bbg/test/nerves_bbg_test.exs
* creating nerves_bbg/rel/vm.args.eex
* creating nerves_bbg/rootfs_overlay/etc/iex.exs
* creating nerves_bbg/.gitignore
nerves_bbg/.gitignore already exists, overwrite? [Yn] Y
* creating nerves_bbg/.formatter.exs
* creating nerves_bbg/mix.exs
* creating nerves_bbg/README.md

Fetch and install dependencies? [Yn] Y
* running mix deps.get
Your Nerves project was created successfully.

You should now pick a target. See https://hexdocs.pm/nerves/targets.html#content
for supported targets. If your target is on the list, set `MIX_TARGET`
to its tag name:

For example, for the Raspberry Pi 3 you can either
  $ export MIX_TARGET=rpi3
Or prefix `mix` commands like the following:
  $ MIX_TARGET=rpi3 mix firmware

If you will be using a custom system, update the `mix.exs`
dependencies to point to desired system's package.

Now download the dependencies and build a firmware archive:
  $ cd nerves_bbg
  $ mix deps.get
  $ mix firmware

If your target boots up using an SDCard (like the Raspberry Pi 3),
then insert an SDCard into a reader on your computer and run:
  $ mix firmware.burn

Plug the SDCard into the target and power it up. See target documentation
above for more information and other targets.
ターゲットの指定
環境変数$MIX_TARGETにてターゲットを指定します.びーびーびー.
$ export MIX_TARGET=bbb
シェルを開き直したら再度指定する必要があります.これテストに出ます.
依存パッケージの管理
mix deps.getというコマンドで,プロジェクトが依存するパッケージやライブラリを取得します.
$ mix deps.get
Resolving Hex dependencies...
Dependency resolution completed:
Unchanged:
  dns 2.1.2
  elixir_make 0.6.0
  gen_state_machine 2.1.0
  mdns_lite 0.6.3
  muontrap 0.6.0
  nerves 1.6.1
  nerves_firmware_ssh 0.4.5
  nerves_pack 0.3.0
  nerves_runtime 0.11.0
  nerves_system_bbb 2.6.1
  nerves_system_br 1.11.2
  nerves_system_linter 0.3.0
  nerves_time 0.4.1
  nerves_toolchain_arm_unknown_linux_gnueabihf 1.3.2
  nerves_toolchain_ctng 1.7.2
  one_dhcpd 0.2.4
  ring_logger 0.8.0
  shoehorn 0.6.0
  socket 0.3.13
  system_registry 0.8.2
  toolshed 0.2.13
  uboot_env 0.1.1
  vintage_net 0.7.9
  vintage_net_direct 0.7.0
  vintage_net_ethernet 0.7.0
  vintage_net_wifi 0.7.0
All dependencies are up to date

Nerves environment
  MIX_TARGET:   bbb
  MIX_ENV:      dev

==> nerves
Compiling 41 files (.ex)
Generated nerves app
==> nerves_bbg
Resolving Nerves artifacts...
  Resolving nerves_system_bbb
  => Trying https://github.com/nerves-project/nerves_system_bbb/releases/download/v2.6.1/nerves_system_bbb-portable-2.6.1-1D9C966.tar.gz
|==================================================| 100% (102 / 102) MB
  => Success
  Cached nerves_toolchain_arm_unknown_linux_gnueabihf
プロジェクトのビルド
mix firmwareでビルドします.
組込み技術者でしたら楽しいログが観測できることでしょう.
$ mix firmware
==> nerves_system_br
Generated nerves_system_br app
==> nerves_toolchain_ctng
Compiling 1 file (.ex)
Generated nerves_toolchain_ctng app
==> nerves_system_linter
Compiling 14 files (.ex)
Generated nerves_system_linter app
==> nerves_toolchain_arm_unknown_linux_gnueabihf
Generated nerves_toolchain_arm_unknown_linux_gnueabihf app
==> nerves_system_bbb
Generated nerves_system_bbb app
==> nerves_bbg

Nerves environment
  MIX_TARGET:   bbb
  MIX_ENV:      dev

(長いから省略〜w)

Building /Users/takase/nerves_bbg/_build/bbb_dev/nerves/images/nerves_bbg.fw...
microSDへのファーム書き込み
nerves_bbg.fwがファームウェアの実体です.
母艦PCにmicroSDカードを差し込んでmix burnによって書き込みます.
$ mix burn

Nerves environment
  MIX_TARGET:   bbb
  MIX_ENV:      dev

Use 14.65 GiB memory card found at /dev/rdisk2? [Yn] Y
|====================================| 100% (27.48 / 27.48) MB
Success!
Elapsed time: 2.235 s
いよいよNervesを起動!
母艦PCから電力供給/シリアル接続しているBeagleBoneのmicroUSBポートは,NervesではVirtualEthernetとして認識できる機能を持っています.usb0のインタフェース名としてIPアドレスが振られて,さらにmDNSによって名前解決する(デフォルトだとnerves.local)こともできます.
つまり早い話しが,USBケーブルだけでsshログインできたりするのです!
# 説明分かりにくくてスミマセン
# なおラズパイで同機能が使えるのは,Gadget Portを持つゼロと3Aだけです
BeagleBone Greenに上記のmicroSDを差し込みます.
そして,ボード裏側のmicroUSBコネクタでホストPCに接続します!!
っとその前に,BeagleBoneは普通に電源供給するとeMMC上のDebianイメージを起動してしまうので,BOOT/USERボタンを押しながら電源投下するようにしてください.manualの4.4.8辺りに書いてあります(要するにハマった^^;
Insert SD card into your (powered-down) board, hold down the USER/BOOT button (if using Black) and apply power, either by the USB cable or 5V adapter.
microSDをBeagleBone Greenに刺し直して(BOOT/USERボタンを押しながら)USB接続し,30秒ほどお待ちください.usb0が立ち上がるのにけっこう時間が掛かります.
その後,sshでNervesシステムにログインできるようになります!
ElixirのREPLであるIExが立ち上がるので,あとは遊んでみましょう!
$ ssh nerves.local
Warning: Permanently added 'nerves.local,172.31.123.1' (RSA) to the list of known hosts.
Interactive Elixir (1.10.2) - press Ctrl+C to exit (type h() ENTER for help)
Toolshed imported. Run h(Toolshed) for more info.
RingLogger is collecting log messages from Elixir and Linux. To see the
messages, either attach the current IEx session to the logger:

  RingLogger.attach

or print the next messages in the log:

  RingLogger.next

iex(1)> NervesBbg.hello
:world
iex(2)> uname
Nerves nerves-1509 nerves_bbg 0.1.0 (a6418d17-a4e0-52e9-3825-b380a2c297df) arm
iex(3)> exit
Connection to nerves.local closed.
ちなみに少し種明かししておくと,上記のHello, Worldは,lib/nerves_bbg.exに記載されているモノです.
defmodule NervesBbg do
  @moduledoc """
  Documentation for NervesBbg.
  """

  @doc """
  Hello world.

  ## Examples

      iex> NervesBbg.hello
      :world

  """
  def hello do
    :world
  end
end
ssh越しにファームを更新!
ここからが特に面白いのです.
ビルドのたびにいちいちmicroSDを抜き差しして焼いて,メンドくないですか??
Nerves Ecosystemでは,ネットワーク越しにファーム・アプリを更新する機能があるのです!
まずmix firmware.gen.scriptにて,更新用のスクリプトを作成します.
$ mix firmware.gen.script

Nerves environment
  MIX_TARGET:   bbb
  MIX_ENV:      dev

Writing upload.sh...
upload.shは,ざっと読んでもらったらなにしてるか分かると思うのですが,1つめの引数でIPアドレスorホスト名,2つめの引数でファームを指定します.いずれも省略可能です.
Path: ./_build/bbb_dev/nerves/images/nerves_bbg.fw
Product: nerves_bbg 0.1.0
UUID: a6418d17-a4e0-52e9-3825-b380a2c297df
Platform: bbb

Uploading to nerves.local...
Warning: Permanently added '[nerves.local]:8989,[172.31.123.1]:8989' (RSA) to the list of known hosts.
Running fwup...
fwup: Upgrading partition B
100% [====================================] 26.52 MB in / 26.75 MB out
Success!
Elapsed time: 12.533 s
Rebooting...
なんと!microSDを抜き差しせずにファーム更新ができました!!
(このへんの感動は,やってもらわないと伝わりにくいっww
LEDを点滅させる
BeagleBoneにはオンボードにUSER LEDが4個付いているので,これを点滅制御させましょう.
nerves_ledsというライブラリを使用することにします.
あまり気にしなくて良いのですが,Nerves/Linuxからは/sys/class/leds/beaglebone:green:userXにUSER LEDがマウントされています.
(なんでココはBeagleBone共通でぜんぶgreenなんでしょか??
iex(1)> ls "/sys/class/leds"
beaglebone:green:usr0     beaglebone:green:usr1     beaglebone:green:usr2     beaglebone:green:usr3
プロジェクトの編集
mix.exsにnerves_ledsを依存パッケージとして追加してやります.
diff --git a/mix.exs b/mix.exs
index 62ace16..326b2e7 100644
--- a/mix.exs
+++ b/mix.exs
@@ -47,6 +47,7 @@ defmodule NervesBbg.MixProject do
       # Dependencies for all targets except :host
       {:nerves_runtime, "~> 0.6", targets: @all_targets},
       {:nerves_pack, "~> 0.2", targets: @all_targets},
+      {:nerves_leds, "~> 0.8", targets: @all_targets},

       # Dependencies for specific targets
       {:nerves_system_bbb, "~> 2.6", runtime: false, targets: :bbb},
config/target.exsにて,先ほどのLEDのデバイス名を分かりやすいものに名前変更します.
# Edit config/target.exs
$ git diff config/target.exs
diff --git a/config/target.exs b/config/target.exs
index be595ce..db0749f 100644
--- a/config/target.exs
+++ b/config/target.exs
@@ -83,6 +83,16 @@ config :mdns_lite,
     }
   ]

+# configuration for PocketBeagle on-board LEDs (target bbb)
+config :blinky, led_list: [:led0, :led1, :led2, :led3]
+config :nerves_leds,
+  names: [
+    led0: "beaglebone:green:usr0",
+    led1: "beaglebone:green:usr1",
+    led2: "beaglebone:green:usr2",
+    led3: "beaglebone:green:usr3"
+  ]
+
 # Import target specific config. This must remain at the bottom
 # of this file so it overrides the configuration defined above.
 # Uncomment to use target specific configurations
ビルド&ファーム更新
ホントにコレだけでElixir/Nerves開発できるのがお手軽なんですよね〜
$ mix deps.get
$ mix firmware
$ ./upload.sh
点滅制御!
ssh nerves.localで接続して,IEx上でLEDの点滅制御ができることを確認してみてください.
iex(3)> alias Nerves.Leds
Nerves.Leds
iex(4)> Leds.set led3: true
true
iex(5)> Leds.set led2: :slowblink
true
iex(6)> Leds.set led1: :heartbeat
true
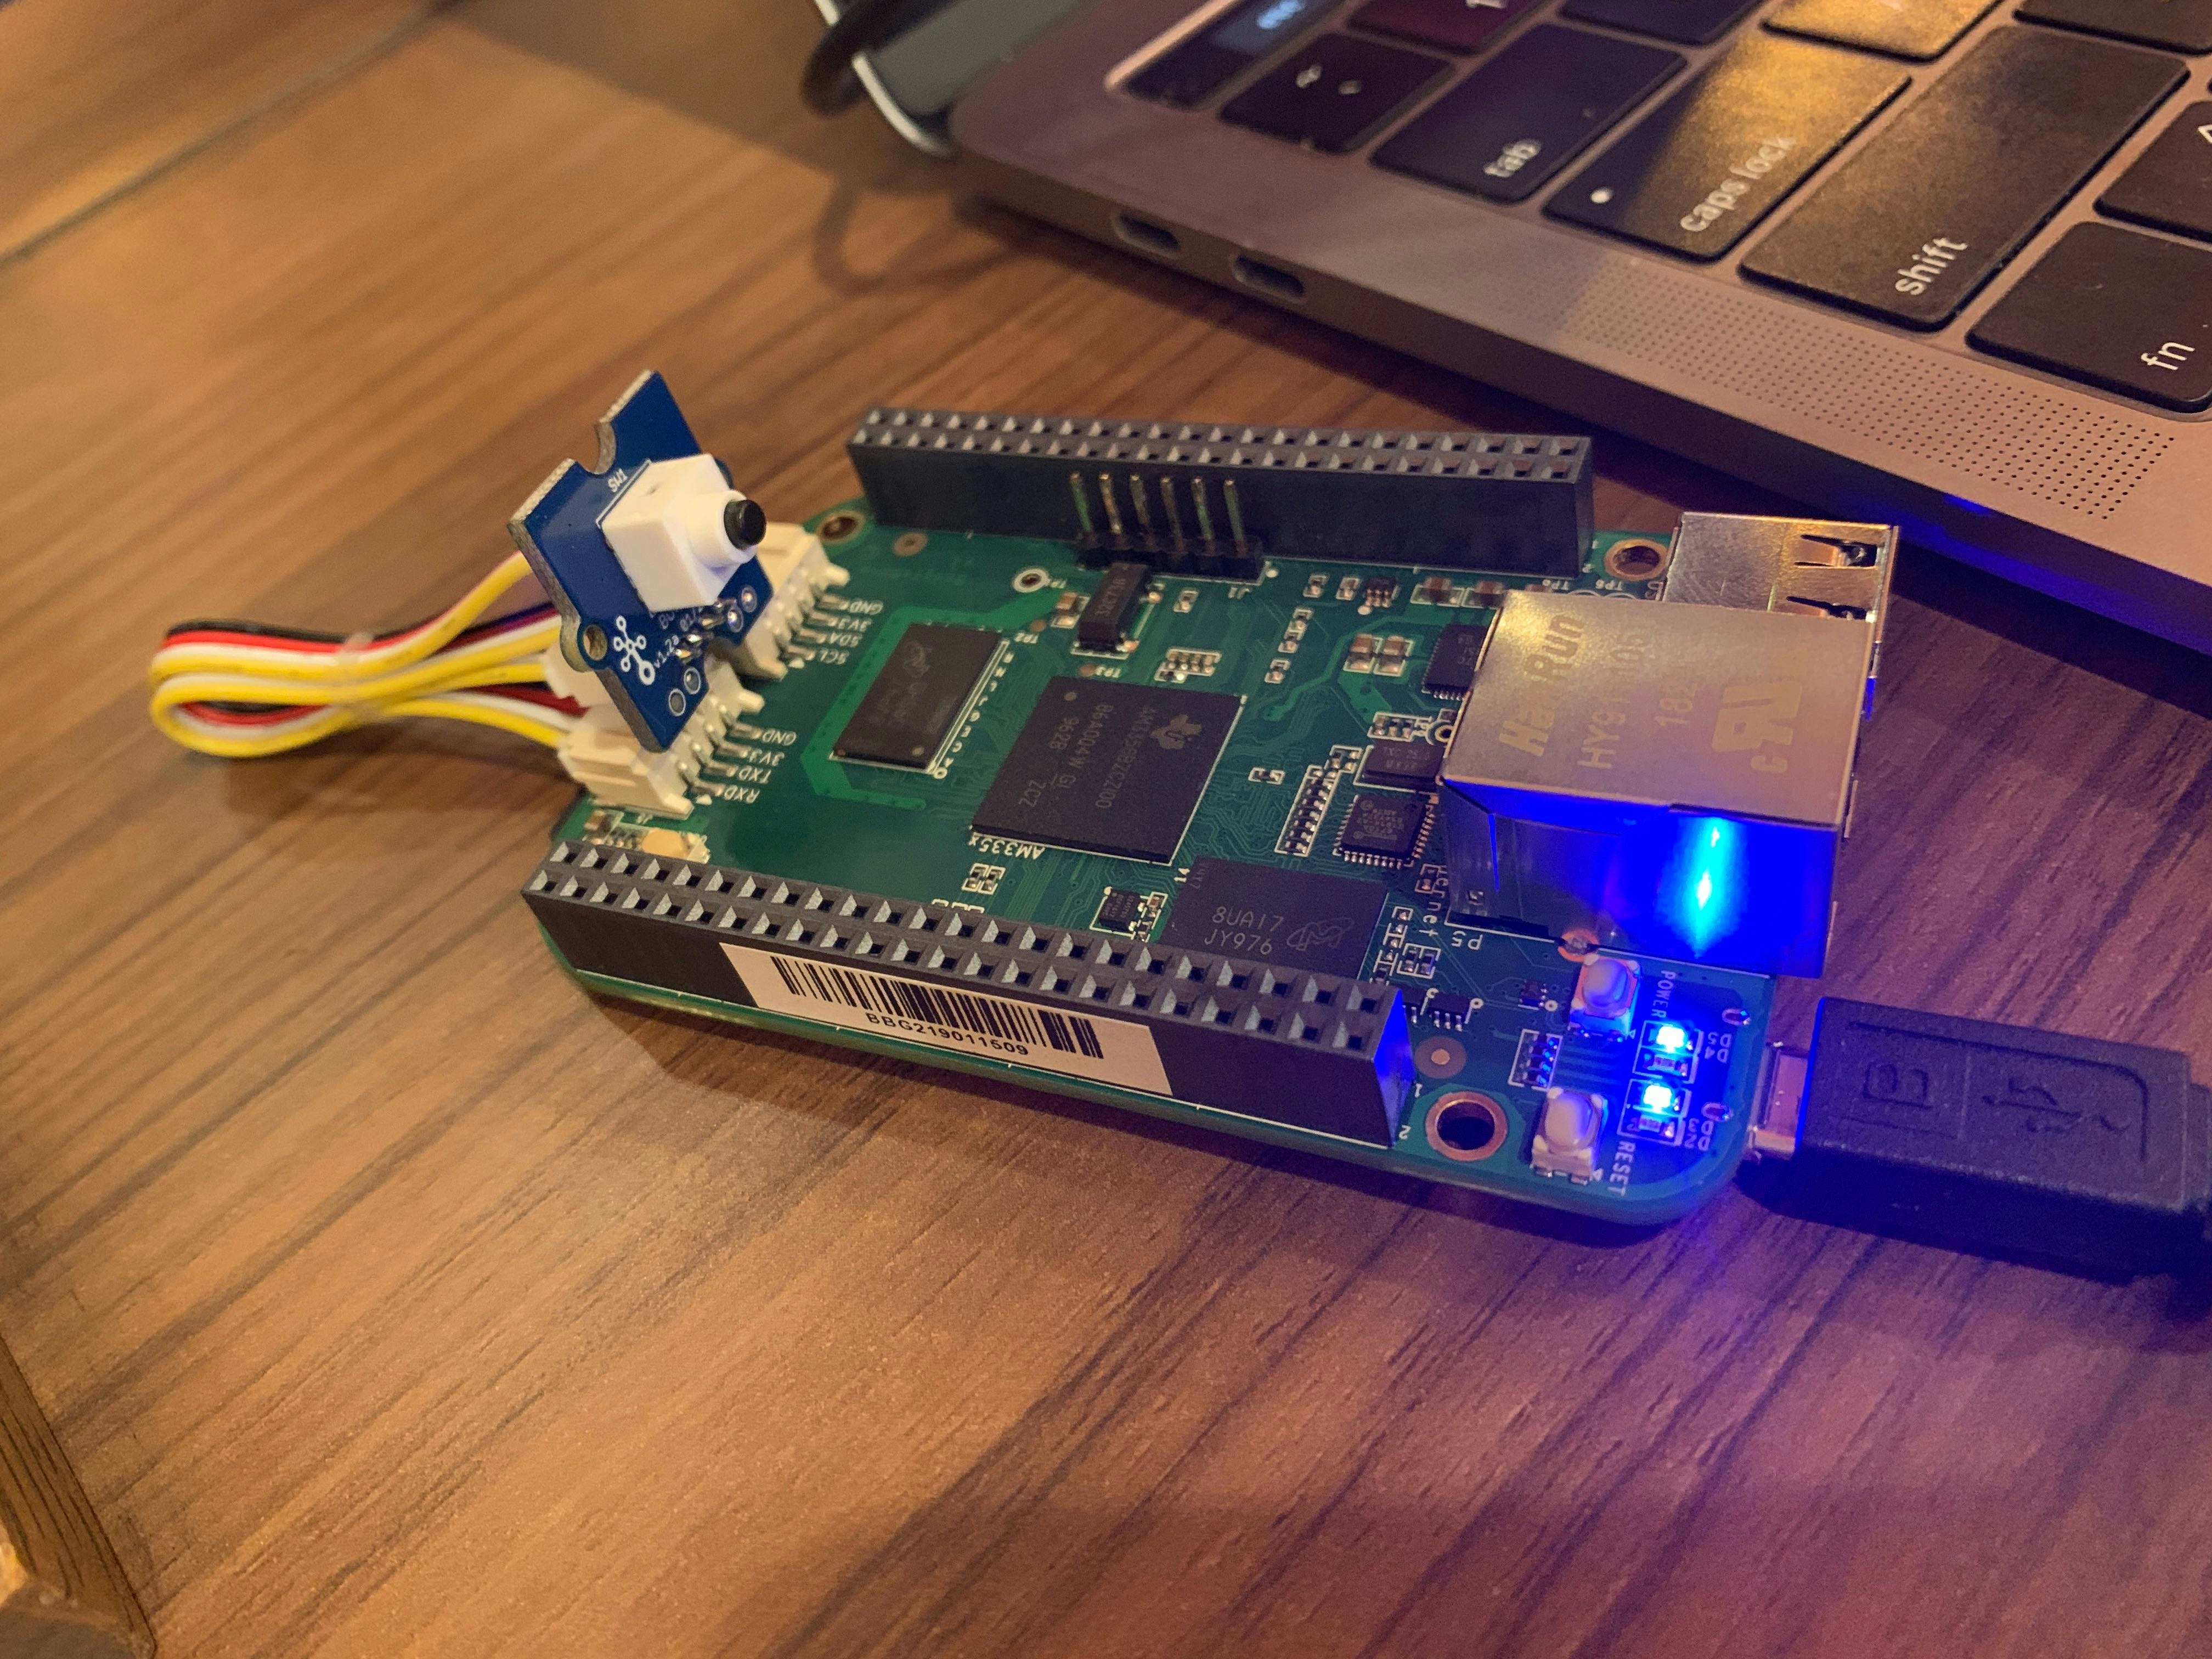
Groveを接続する!
せっかくGreen使ってるのだから,Grove使いたいっすよね〜!
単純で申し訳ないのですが,Grove ButtonをUART側のGroveコネクタに接続してみました.
プロジェクトの編集
Nerves Ecosystemでは,Elixir Circuitsというプロジェクトも進行しています.Elixir/Nervesアプリから色んなデバイスを制御できるライブラリを揃えちゃおうぜっ!というものです.
そのなかで代表的なcircuits_gpioを使用することにします.
プロジェクトの編集
mix.exsにcircuits_gpioを依存パッケージとして追加してやります.
$ git diff mix.exs
diff --git a/mix.exs b/mix.exs
index 326b2e7..cef2365 100644
--- a/mix.exs
+++ b/mix.exs
@@ -43,6 +43,7 @@ defmodule NervesBbg.MixProject do
       {:shoehorn, "~> 0.6"},
       {:ring_logger, "~> 0.6"},
       {:toolshed, "~> 0.2"},
+      {:circuits_gpio, "~> 0.4"},

       # Dependencies for all targets except :host
       {:nerves_runtime, "~> 0.6", targets: @all_targets},
ビルド&ファーム更新
ホントにコレだけで(ry
$ mix deps.get
$ mix firmware
$ ./upload.sh
IEx上で動作確認
Green上のUART2 Groveは,GPIOの2番ピンと共用されています.
Buttonの現在値を取得したり,割込み設定したりできています!
iex(3)> pin = 2
2
iex(4)> {:ok, gpio} = Circuits.GPIO.open(pin, :input)
{:ok, #Reference<0.2554534396.269090819.51719>}
iex(5)> Circuits.GPIO.read(gpio)
0
iex(6)> Circuits.GPIO.read(gpio)
1
iex(7)> Circuits.GPIO.read(gpio)
0
iex(9)> Circuits.GPIO.set_interrupts(gpio, :both)
:ok
iex(10)> flush
{:circuits_gpio, 2, 487389975849, 1}
{:circuits_gpio, 2, 487647983807, 0}
{:circuits_gpio, 2, 487982780474, 1}
{:circuits_gpio, 2, 488137615308, 0}
:ok
せっかくなので他のGroveモジュールでも遊んでみたいですね〜
まとめ
ちょっと濃いいっすね.調子に乗りましたスンマセン.
Elixir使いにもBeagleBone好きにもどっちにも分かりにくい!??記事になってしまった気がします.
っと言うことで,Nervesもっと深く知りたい!という方は『NervesJP』に,れっつじょいなす!!
(大事なコトなので二度書きました^^;