Rowma-KotlinでスマホアプリからROSのプログラム遠隔実行する
ROSロボット上で実行できるROSプログラム(rosrun,roslaunch)をスマホアプリから遠隔実行する方法です。
ロボットとスマホアプリの通信には、Rowmaというものを用いています。RowmaについてはRowma:ROSロボットネットワーク化システムをご覧ください。
準備
Rowma-Kotlinを用いたスマホアプリ開発としてをRowma-Kotlin開発を参考に行います。
ですので、事前準備としてRowma-Kotlin開発 の動作確認を行ってください。
動作がうまくいっていると以下のようになります。
ROSノードでのSubscribe(割愛してもよい)
前の章の動作確認では、スマホアプリからのテキストメッセージをrowma_rosで受け取っています。
しかし、トピック(/chatter)を受け取るROSノードがないためrowma_rosでエラーメッセージが出ています。
実際に、ROSノードで受け取れるかどうかを確認しましょう。
確認のため以下のようなROSノードを作成します。
import rospy
from std_msgs.msg import String

def callback(data):
    rospy.loginfo(rospy.get_caller_id() + "I heard %s", data.data)

def listener():
    rospy.init_node('listener', anonymous=True)
    rospy.Subscriber("chatter", String, callback)
    rospy.spin()

if __name__ == '__main__':
    listener()
このノードは、単純にROSトピック(/chatter)をSubscribeし、ターミナル上に表示するだけです。
このノードを実行することでスマホアプリからのROSトピックをROSノードで受け取れていることがわかります。
遠隔実行アプリ
ここからが本題です。
スマホアプリから任意のROSロボットのプログラムを実行します。今回は、roslaunchコマンドを実行します。
まず完成形を見ていただきましょう。Android端末はGoogle Pixel 4aを使用しています。(Android 10)
(操作手順)
① スマホアプリの画面上から遠隔操作したいロボットを選択します。
② 「LAUNCH COMMANDS LIST」ボタンを押すと、①で選択したロボット上で実行できるlaunchコマンド一覧を取得。
③ 実行するかどうかを確認するアラートが流れるので「上のLAUNCHコマンドを実行」を選択。
④ ロボットのrowma_rosを起動しているターミナルにて③で実行したlaunchコマンドの実行結果が表示される。
選択したロボット上で実行できるlaunchコマンドを一覧表示する。
Rowma-Kotlin開発では、Rowmaに接続しているロボットの一覧をIDで表示し、一覧から選択するとIDが表示され、rowma_rosにテキストメッセージが送られるというものでした。
これを、変更していきます。
まず、ここではPublishはしないのでclass RobotActivity内の下の3行は削除します。
class RobotActivity : AppCompatActivity() {
    private var robot : JSONObject = JSONObject()
    val rowma = Rowma("https://rowma.moriokalab.com")

    override fun onCreate(savedInstanceState: Bundle?) {
        super.onCreate(savedInstanceState)
        setContentView(R.layout.activity_robot)

        val robotString = intent.getStringExtra("ROBOT")
        robot = JSONObject(robotString)
        val robotUuidTextView : TextView = findViewById(R.id.robotUuid)
        robotUuidTextView.append(robot.getString("uuid"))

        rowma.connect()

        val msg = JSONObject()//削除
        msg.put("data", "test message") // 削除
        rowma.publish(robot.getString("uuid"), "/chatter", msg) // 削除

    }
}
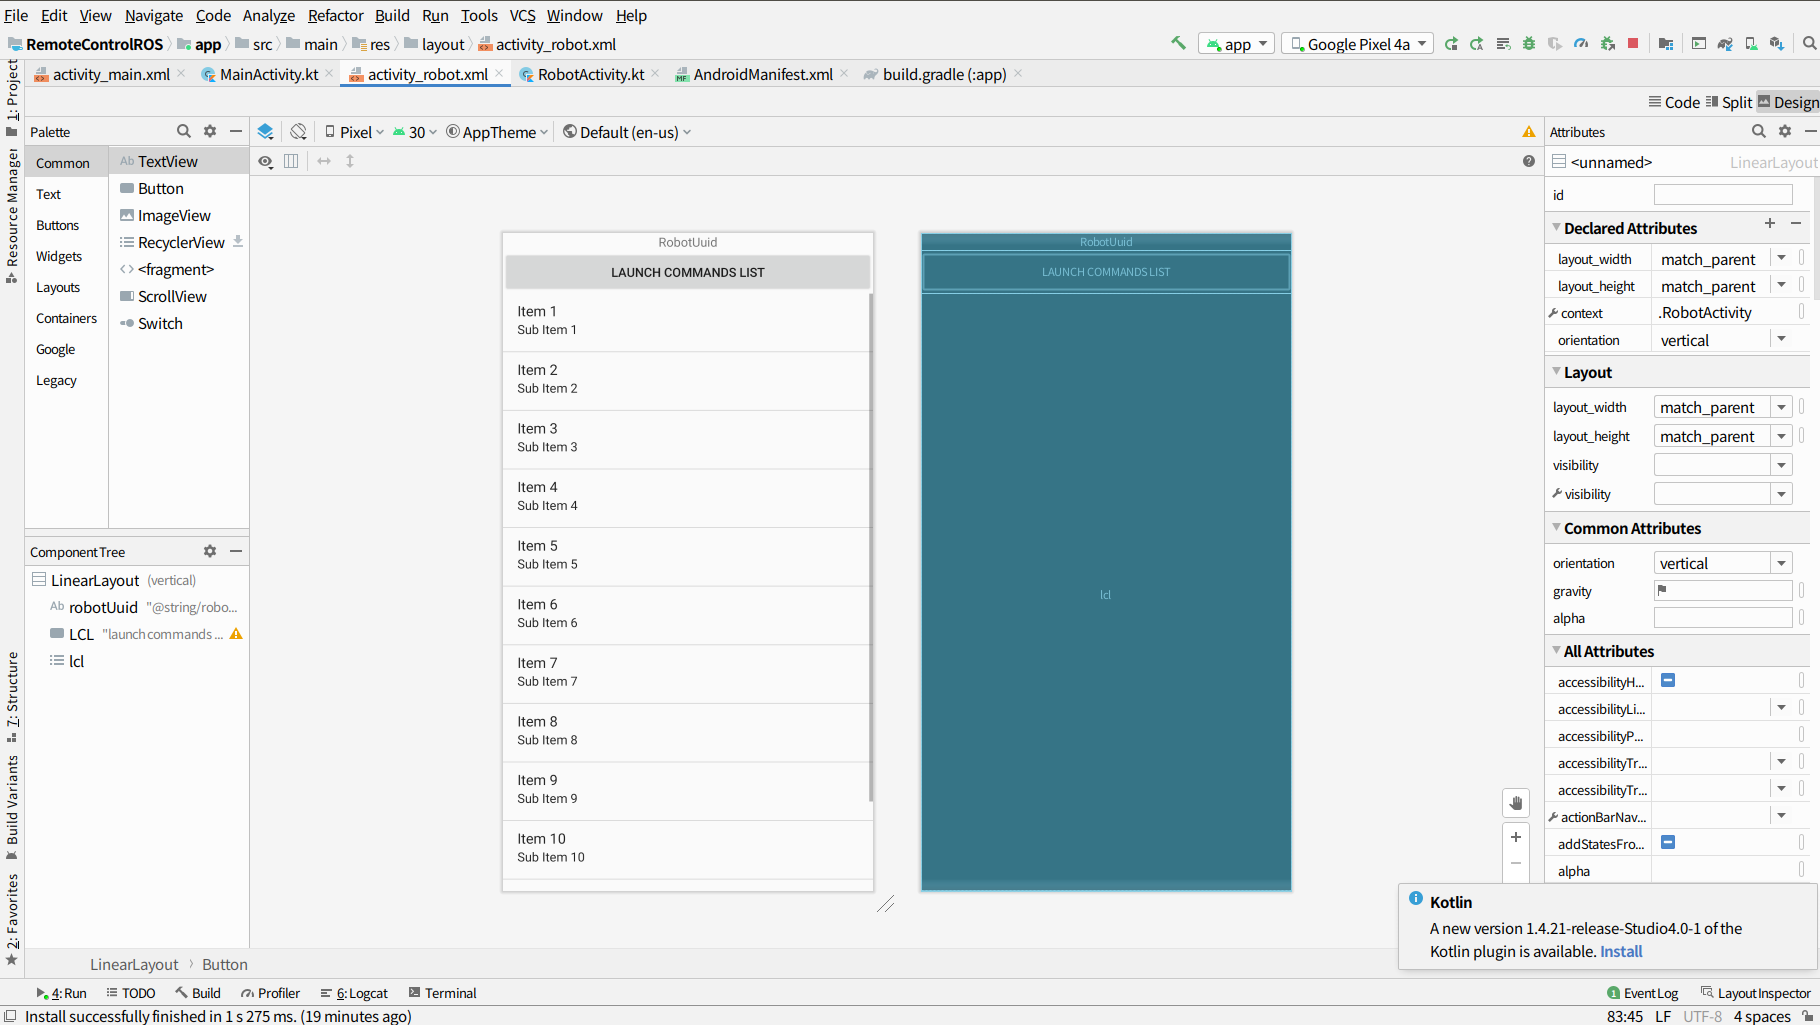
次にlaunchコマンドの一覧を表示するきっかけとなるボタンを配置します。activity_robot.xmlを開き、PaletteペーンからButtonを選択してすでにあるLinearLayout内にドラッグ&ドロップします。
Attribute内のidを適当に設定し、(今回は「LCL」にしました。※Launch Commands Listの頭文字です。)textを「LAUNCH COMMANDS LIST」にします。
また、後にlaunchコマンドの一覧を表示するため、PaletteペーンからListviewを選択してすでにあるLinearLayout内にドラッグ&ドロップし,Attribute内のidを適当に設定します。(今回は「lcl」にしました)
すると、以下のような感じになると思います。

次に、選択したロボットで実行できるlaunchコマンドを取得します。
  class RobotActivity : AppCompatActivity() {
    private var robot : JSONObject = JSONObject()
    val rowma = Rowma("https://rowma.moriokalab.com")

    override fun onCreate(savedInstanceState: Bundle?) {
        super.onCreate(savedInstanceState)
        setContentView(R.layout.activity_robot)

        val robotString = intent.getStringExtra("ROBOT")
        robot = JSONObject(robotString)
        val robotUuidTextView : TextView = findViewById(R.id.robotUuid)
        robotUuidTextView.append(robot.getString("uuid"))

        rowma.connect()


        //追加
        //ROS launchで実行できるコマンドの一覧を取得
        var commandList: JSONArray = JSONArray()
        commandList = robot.getJSONArray("launchCommands")

        var launchcommandslist: ArrayList<String> = ArrayList();
        if (commandList != null) {
            for (i in 0 until commandList.length()) {
                launchcommandslist.add(commandList.getString(i))
            }
        }
        val robot_cmd: Button = findViewById(R.id.LCL)
        robot_cmd.setOnClickListener {
            val arrayAdapter: ArrayAdapter<String> = ArrayAdapter(
                applicationContext,
                android.R.layout.simple_list_item_1,
                launchcommandslist
            )
            val listView = findViewById(R.id.lcl) as ListView
            listView.adapter = arrayAdapter
        }

    }
}
少し何をやっているか解説します。
        var commandList: JSONArray = JSONArray()
        commandList = robot.getJSONArray("launchCommands")
ここでは、IDから選択したロボットの情報を取得し、その中からそのロボット上で実行できるlaunchコマンドの一覧が含まれている「launchCommands」を抜き出し、配列(JSONArray)として定義された「commandList」に格納しています。
        var launchcommandslist: ArrayList<String> = ArrayList();
        if (commandList != null) {
            for (i in 0 until commandList.length()) {
                launchcommandslist.add(commandList.getString(i))
            }
        }
        val robot_cmd: Button = findViewById(R.id.LCL) //LCLはButtonのid
        robot_cmd.setOnClickListener {
        val arrayAdapter: ArrayAdapter<String> = ArrayAdapter(
            applicationContext,
            android.R.layout.simple_list_item_1
            launchcommandslist
        )
        val listView = findViewById(R.id.lcl) as ListView
        listView.adapter = arrayAdapter
        }
    }
}
以降は、
・String型の配列として定義された「launchcommandslist」に「commandList」を格納(JSONArrayからStringへの型変換)
・「launchcommandslist」を画面上にlist表示
の2点を行っています。
launchコマンドを遠隔実行する
次にlaunchコマンドの一覧から選択されたlaunchコマンドを遠隔実行していきます。
class RobotActivity : AppCompatActivity() {
    private var robot: JSONObject = JSONObject()
    val rowma = Rowma("https://rowma.moriokalab.com")

    override fun onCreate(savedInstanceState: Bundle?) {
        super.onCreate(savedInstanceState)
        setContentView(R.layout.activity_robot)

        rowma.connect()

        //選択されたロボットのUUIDを表示
        val robotString = intent.getStringExtra("ROBOT")
        robot = JSONObject(robotString)
        val robotUuidTextView: TextView = findViewById(R.id.robotUuid)
        robotUuidTextView.append(robot.getString("uuid"))

        //ROS launchで実行できるコマンドの一覧を取得
        var commandList: JSONArray = JSONArray()
        var launchcommandslist: ArrayList<String> = ArrayList();
        commandList = robot.getJSONArray("launchCommands")
        println(commandList)
        if (commandList != null) {
            for (i in 0 until commandList.length()) {
                launchcommandslist.add(commandList.getString(i))
            }
        }
        val robot_cmd: Button = findViewById(R.id.LCL)
        robot_cmd.setOnClickListener {
            val arrayAdapter: ArrayAdapter<String> = ArrayAdapter(
                applicationContext,
                android.R.layout.simple_list_item_1,
                launchcommandslist
            )
            println(launchcommandslist)
            val listView = findViewById(R.id.lcl) as ListView
            listView.adapter = arrayAdapter
        }

        //追加
        //選択したコマンドを実行。実行結果は、ロボットのRowma接続画面に表示される。
        val listViewlist = findViewById(R.id.lcl) as ListView
        listViewlist.setOnItemClickListener { parent, view, position, id ->
            println(launchcommandslist[position])
            AlertDialog.Builder(this) // FragmentではActivityを取得して生成
                .setTitle("ROSプログラムの実行")
                .setMessage(launchcommandslist[position])
                .setPositiveButton("上のlaunchコマンドを実行", { dialog, which ->
                    // TODO:Yesが押された時の挙動
                    rowma.runLaunch(robot.getString("uuid"), launchcommandslist[position])
                })
                .setNegativeButton("中止", { dialog, which ->
                    // TODO:Noが押された時の挙動
                })
                .show()
        }
    }
}
追加した内容の解説を少し.........
まず、setOnItemClickListenerを用いてリストが押された際の処理を書きます。今回は、AlertDialog.Builderというものを使ってアラートダイアログを表示しています。
listViewlist.setOnItemClickListener { parent, view, position, id ->
          //リストが押された際の処理
        }
ここでは、launchコマンドのリストから任意のlaunchコマンドが選択された際にアラートダイアログを表示し、「上のlaunchコマンドを実行」が選択されると、
rowma.runLaunch(robot.getString("uuid"), launchcommandslist[position])
が実行され、「中止」が選択された場合には何も処理が行われず、アラートダイアログが消えるという仕組みになっています。
では、
rowma.runLaunch(robot.getString("uuid"), launchcommandslist[position])
では何をしているのでしょうか?
こちらはRowmaーKotlinの遠隔実行のためのクラスを使用しています。使い方はこのような感じです。
rowma.runLaunch( 送信先のロボットのID , 実行したいlaunchコマンド)
つまり今回は、”robot.getString("uuid")”:アプリの最初の画面のロボットのID一覧から選択したロボットのID
に対して、 ”launchcommandslist[position]”:launchコマンド一覧から選択したlaunchコマンド
を実行するように命令しています。
もう一度完成形を
以上でスマホアプリからの遠隔実行は完了です。
すべてのコードを正しく書き換え、Android Studioでビルドが通れば、スマホアプリの完成です。
