7
4

Delete article

Deleted articles cannot be recovered.

Draft of this article would be also deleted.

Are you sure you want to delete this article?

More than 5 years have passed since last update.

Azure Monitor, Azure Automation(Runbooks)を利用して、App Service(PaaS)の監視通知先(Webhook)をChatworkにする

Last updated at Posted at 2018-09-12

PaaSの監視通知先をChatworkにしたい!!

  • PaaSってZabbix Agentといった監視エージェントがインストールできないので監視大変。
  • でもIaaSでDBとか作ると監視はエージェントでできるけど、メンテナンスが大変。
  • Azure Monitorだとメール通知が簡単だけどメールなんて気が付かない!
  • できればPaaSの障害をChatworkに通知したい!

ということで

Azure Monitor + Azure Automation(Runbooks)を利用してChatworkに通知します

  • Azure Monitorでは通知先に「メールアドレス」と「Webhook」を指定できます。
  • Webhookってなんぞや??と思いつついろいろ調べてやってみたら出来たので設定内容をまとめます。

やること

  • AppServiceのHttp Server ErrorをChatworkに通知する。
    • Azure MonitorでAppServiceを監視する。
    • Chatworkへの通知はAutomation(Runbooks)を利用する。
      • Powershellを実行してChatworkに通知する。

必要だけど今回の手順としては書かないこと

  • Chatworkにおける作業
    • 通知用ユーザの作成
    • 通知先Chatworkグループの作成
    • Chatwork API Tokenの取得

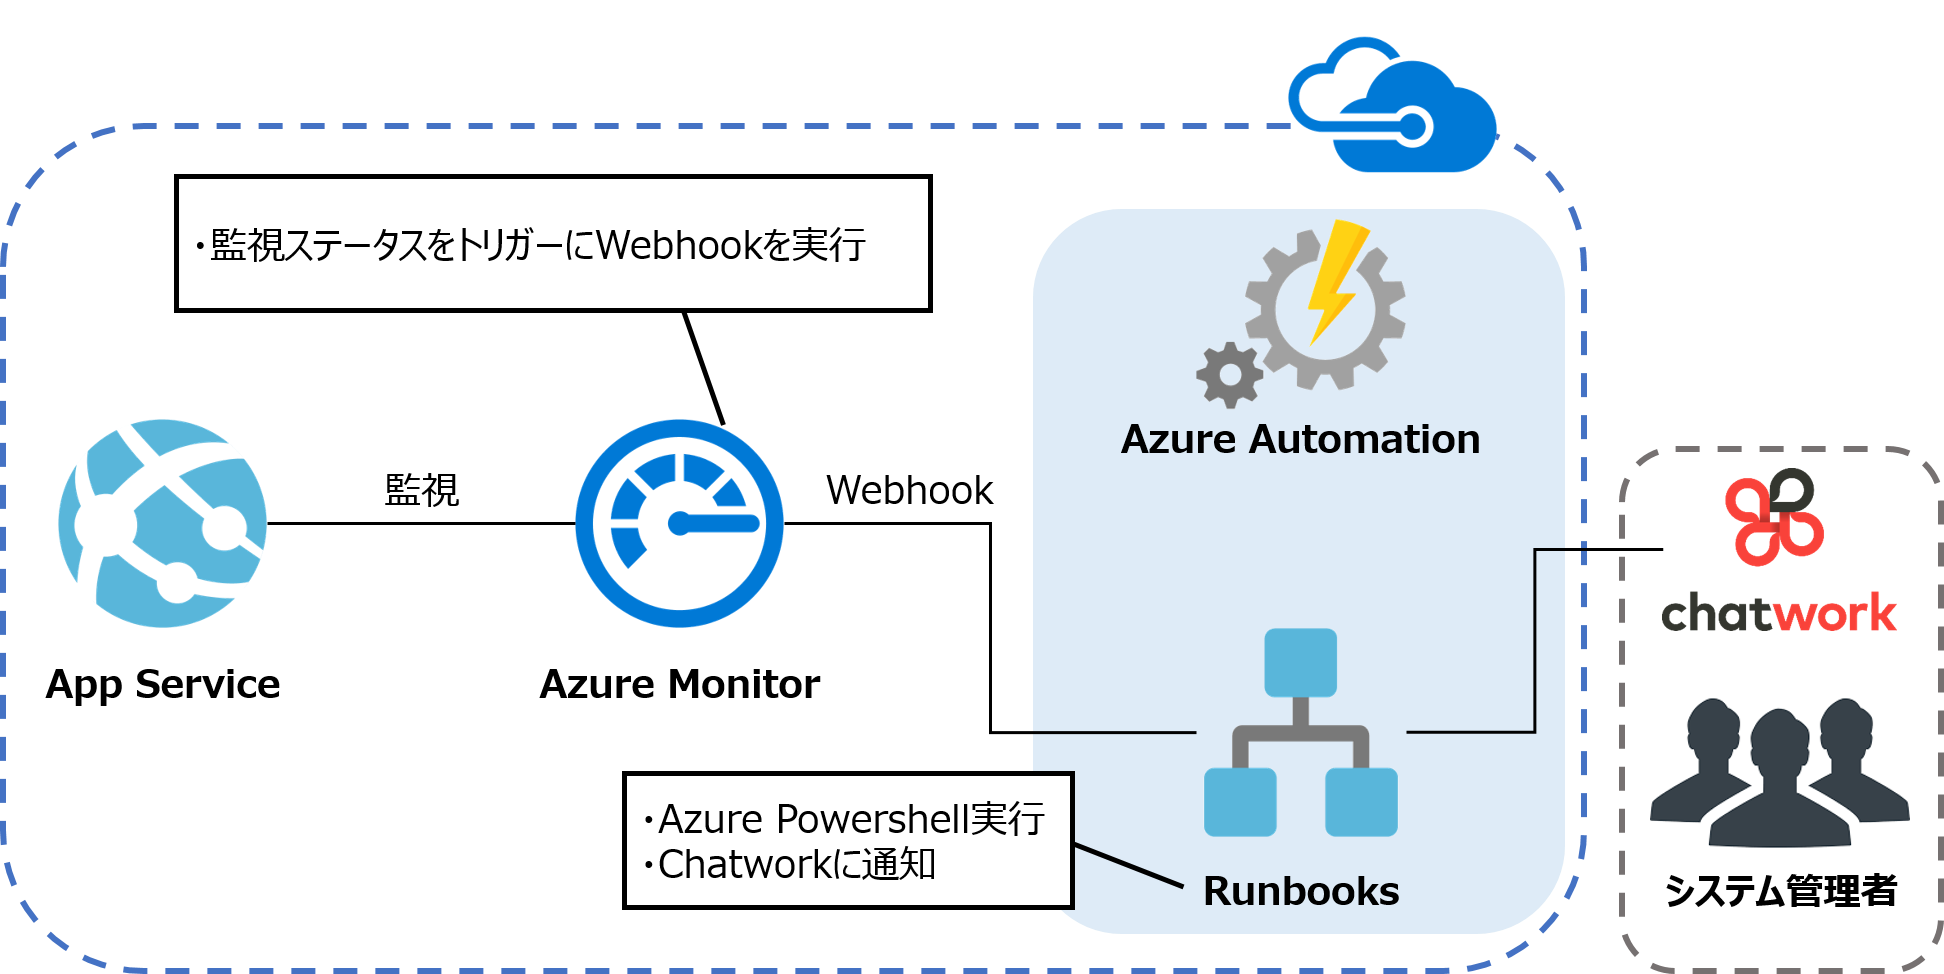
やることのイメージ図

PaaS監視.png

手順概要

  • 1.Automationアカウント作成
  • 2.Runbooks作成
  • 3.Webhook設定
  • 4.Azure Monitor設定

手順

1.Automationアカウント作成

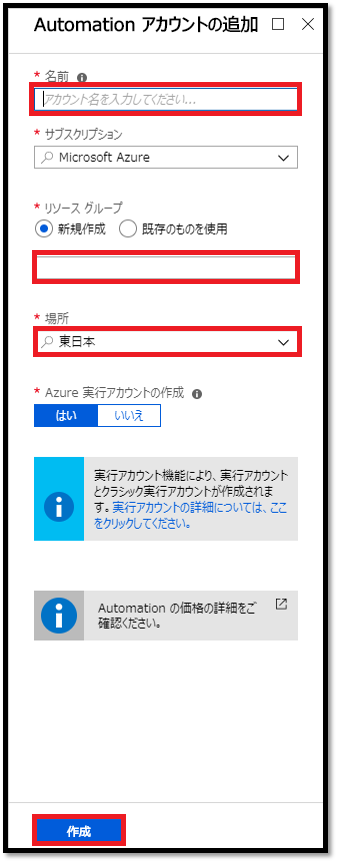
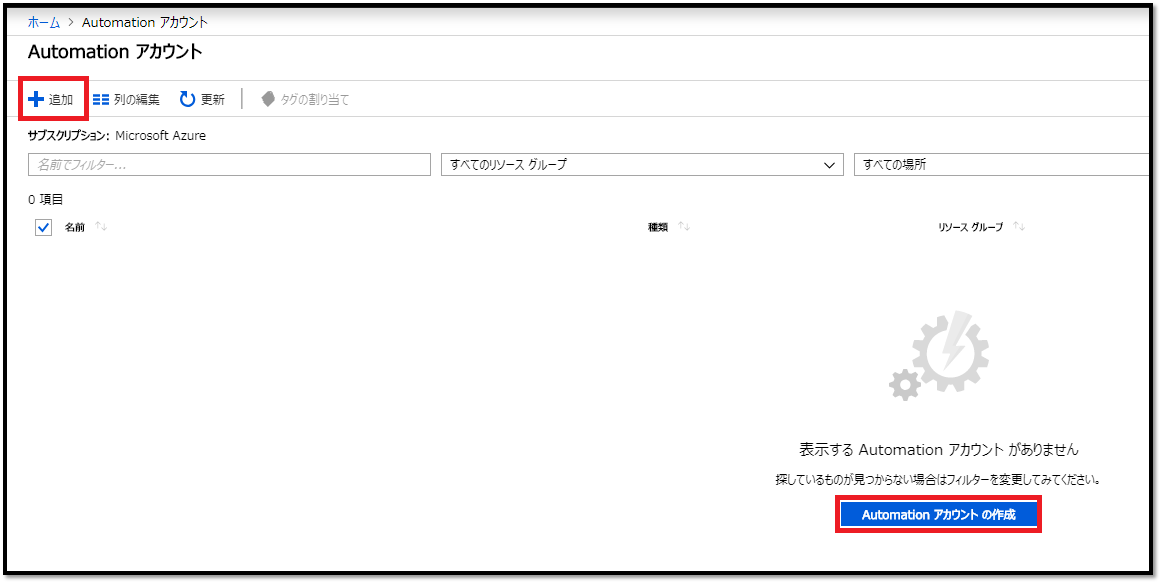
Azure Portalログイン後にAutomation画面で[追加]もしくは[Automationアカウントの作成]を押下します。
01.png


>各項目を入力し[作成]します。 ![02.png](https://qiita-image-store.s3.amazonaws.com/0/168635/f8fc6964-a795-2a4e-71df-8d9a59a63400.png)
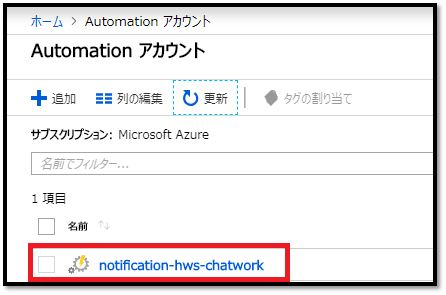
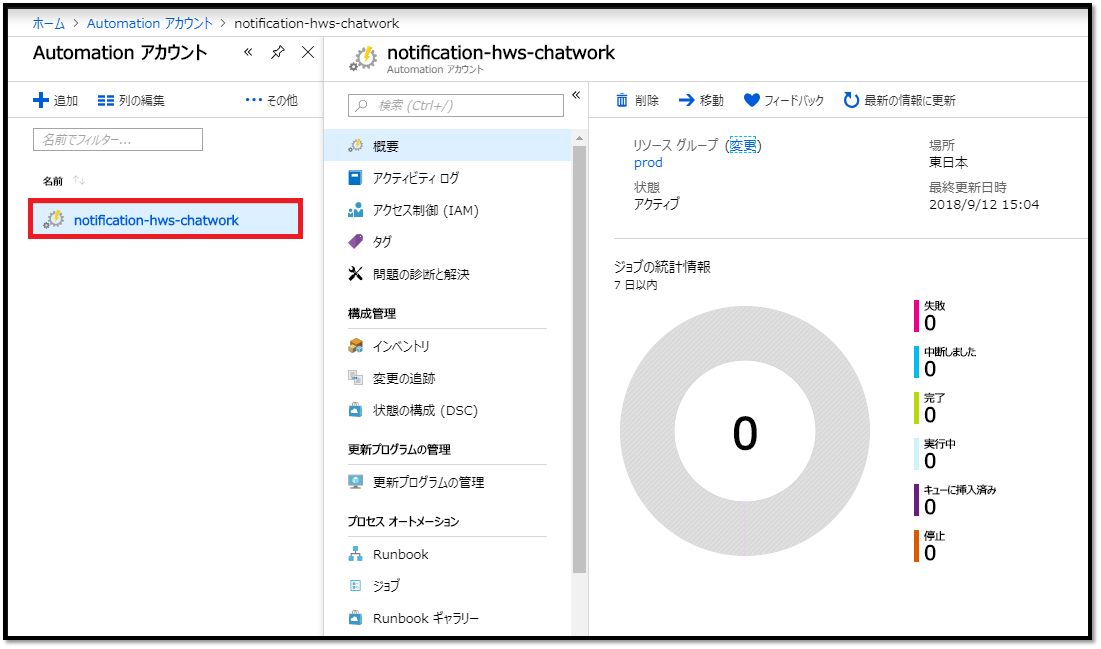
>Automationアカウントが出来ました。 ![03.png](https://qiita-image-store.s3.amazonaws.com/0/168635/d6376d9a-a783-2578-04b6-574fd603242f.png)

2.Runbooks作成

Automationアカウント画面へ移動します。
04.png


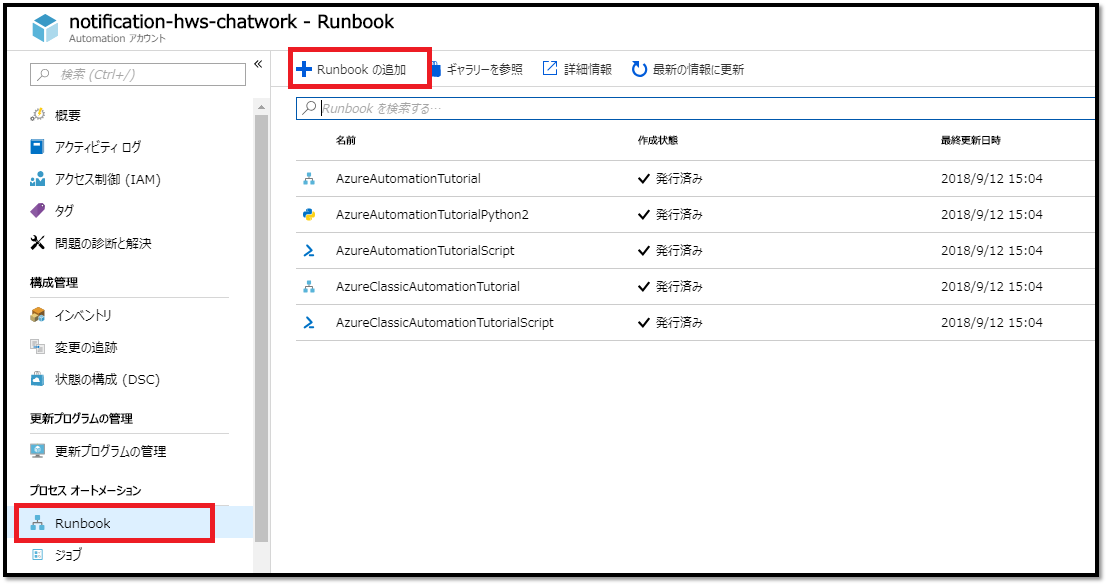
>[Runbookの追加]を押下します。 ![05.png](https://qiita-image-store.s3.amazonaws.com/0/168635/6af15140-810d-c2cf-4267-af5c0be86dc9.png) >Runbookの[名前]と[種類]を入力し[作成]します。 ※種類は[PowerShell Runbook]にしました。 ![06.png](https://qiita-image-store.s3.amazonaws.com/0/168635/dcd825ee-3842-3e64-f88e-61fdd8b180fd.png)
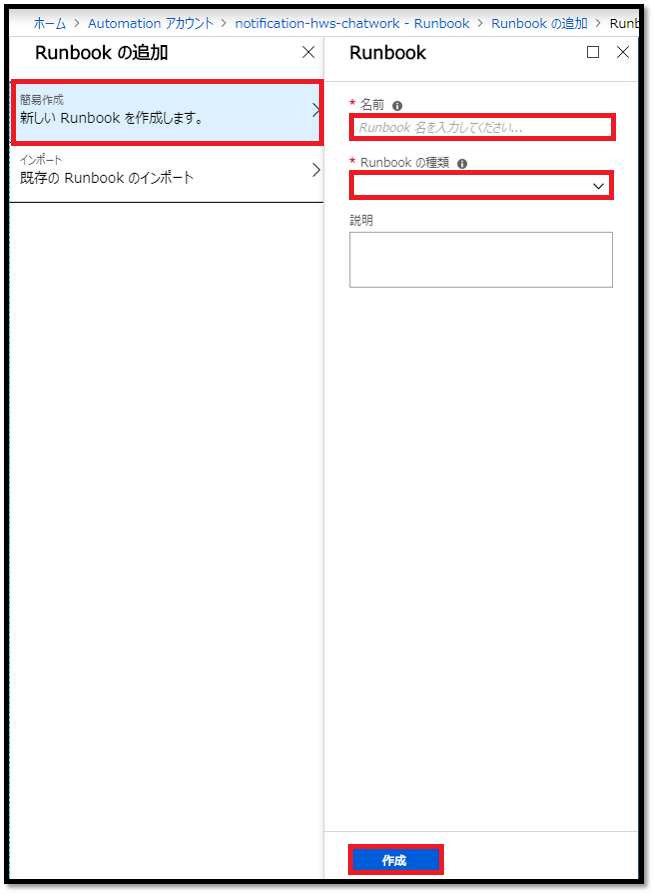
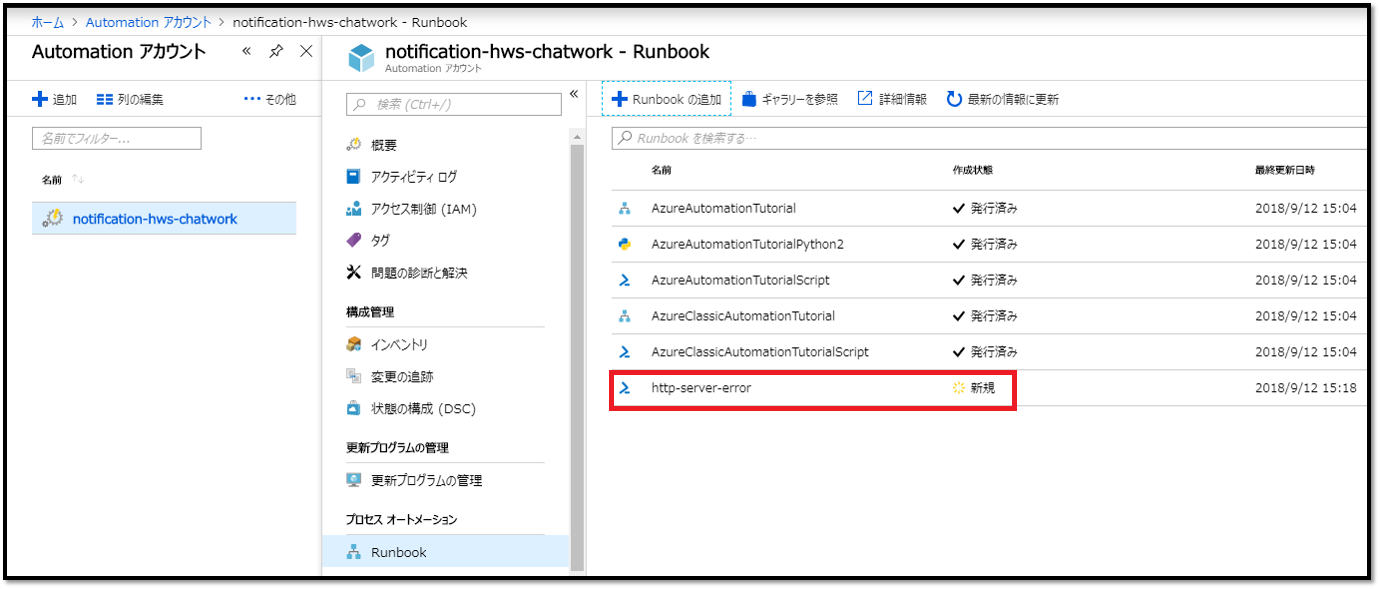
>Runbookが出来ました。作成したRunbookを選択します。 ![07.png](https://qiita-image-store.s3.amazonaws.com/0/168635/aef08e9f-34c4-27b2-6c61-a2f1bcecd56d.png)
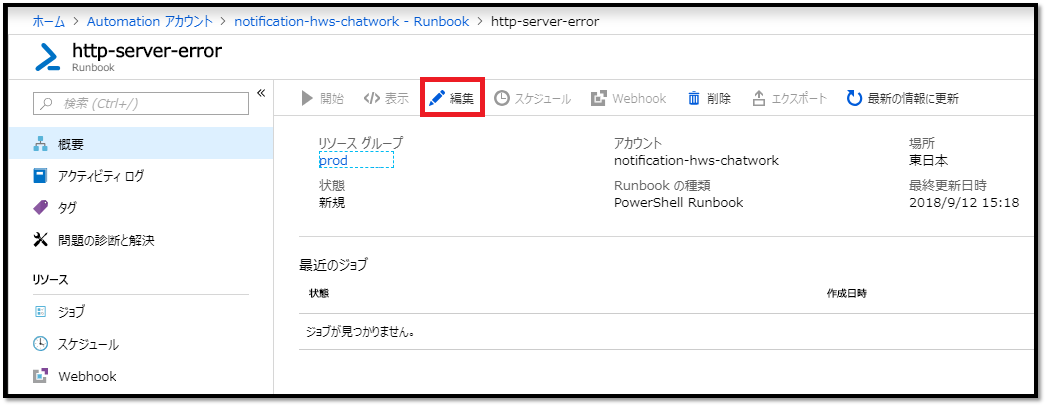
[編集]をします。 ![08.png](https://qiita-image-store.s3.amazonaws.com/0/168635/2fa14cee-e174-840a-2a80-b44e9aa93730.png)
>Chatworkに通知するためのPowershellを記載して[保存]します。 ![09.png](https://qiita-image-store.s3.amazonaws.com/0/168635/7a88190c-8f7b-154e-c020-00cdb88b2a7a.png)
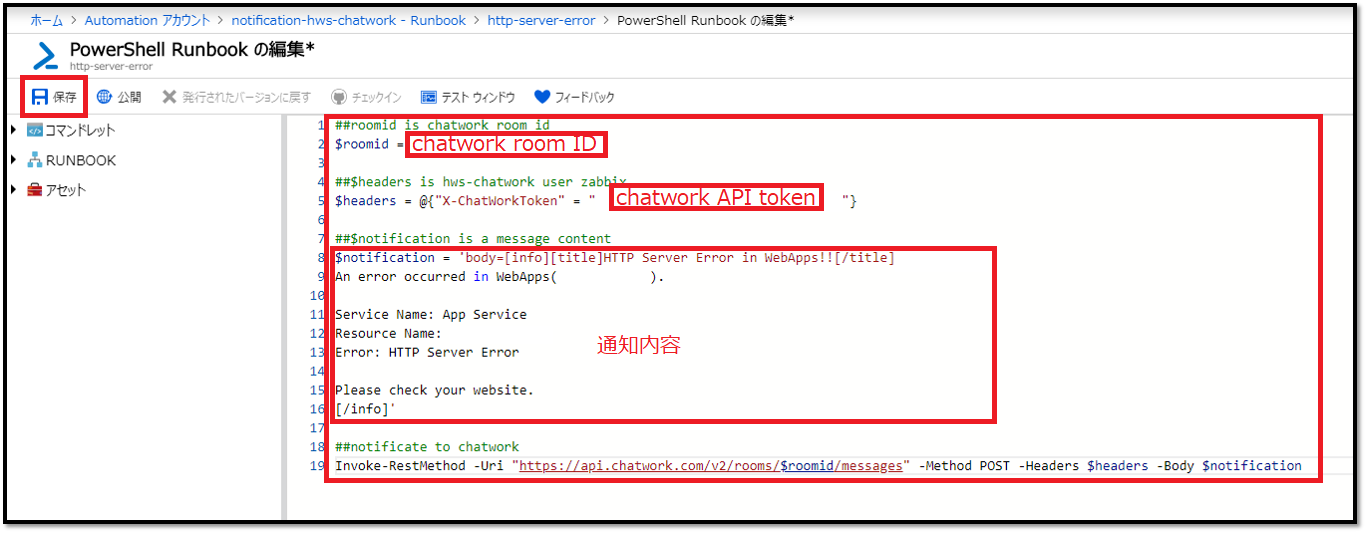
## roomid is chatwork room id
$roomid = chatwork room ID

## $headers is hws-chatwork user zabbix
$headers = @{"X-ChatWorkToken" = "chatwork API token"}

## $notification is a message content
$notification = 'body=[info][title]HTTP Server Error in WebApps!![/title][toall]
An error occurred in WebApps.

Service Name: App Service
Resource Name: 
Error: HTTP Server Error

Please check your website.
[/info]'

## notificate to chatwork
Invoke-RestMethod -Uri "https://api.chatwork.com/v2/rooms/$roomid/messages" -Method POST -Headers $headers -Body $notification

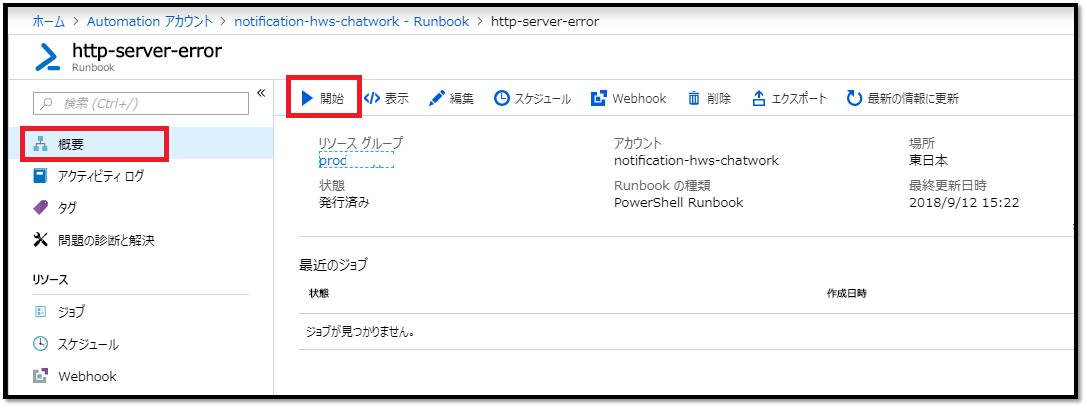
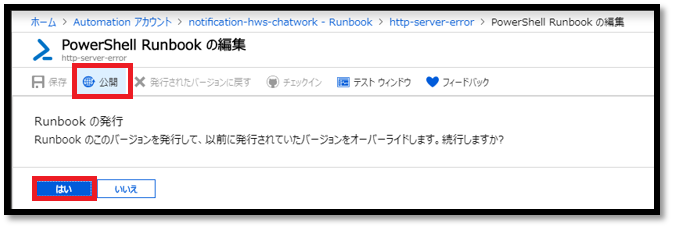
保存したRunbookを[公開]します。
10.png


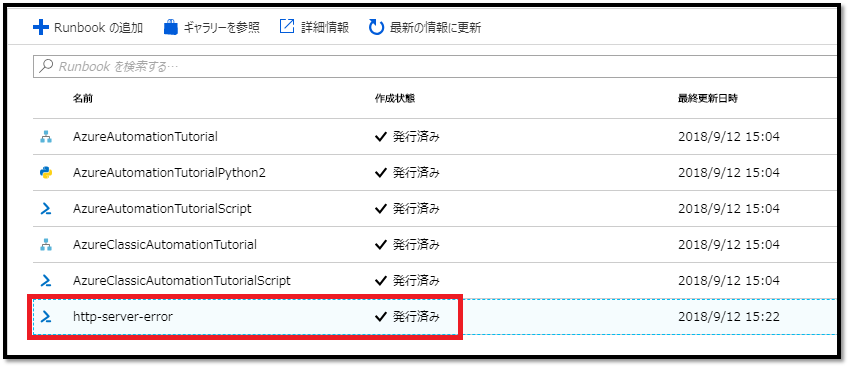
>Runbookのステータスが[新規]から[発行済み]に変わりました。 ※公開をしないとWebhookの設定ができませんでした。 ![11.png](https://qiita-image-store.s3.amazonaws.com/0/168635/b588fead-0f01-8335-cc39-c86f82c0087f.png)
3.Webhook設定

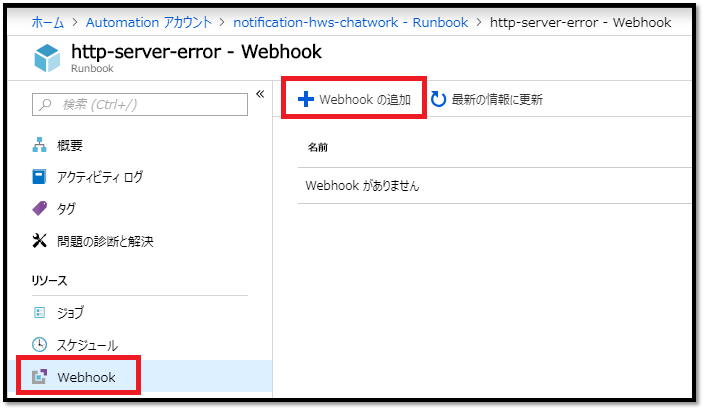
作成したRunbookの画面から[Webhookの追加]を行います。
12.png


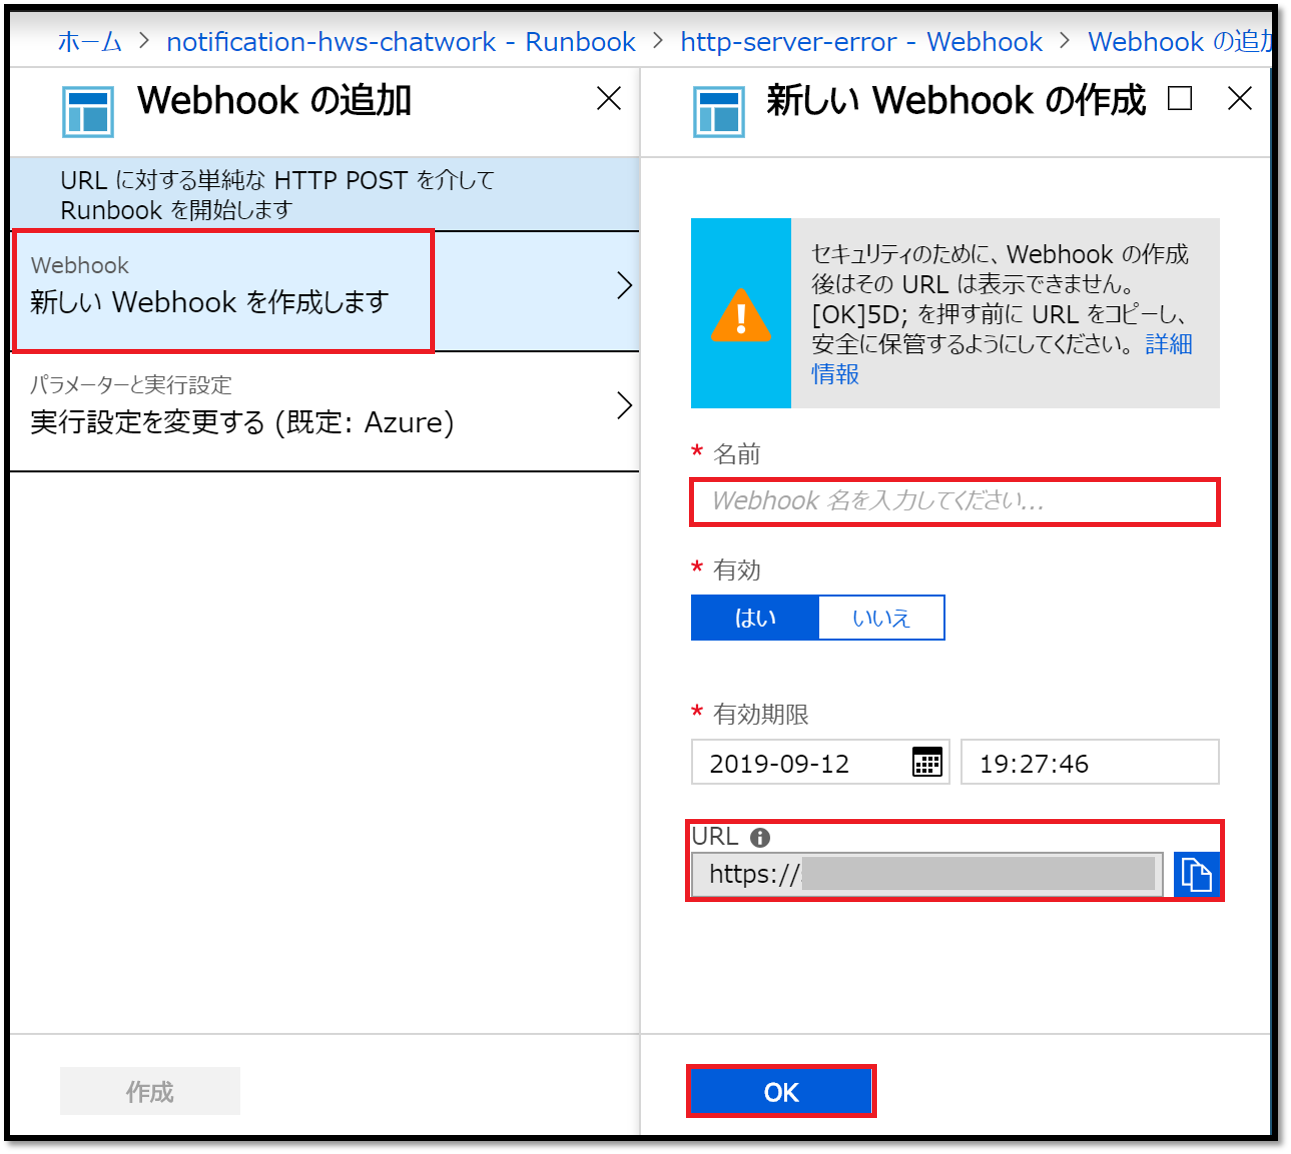
>Webhookの[名前]を入力、**[URL]をコピー&メモした後**に[OK]を押します。 **※ここでURLをメモしないとURLをもう一度確認することが出来ないためAzure Monitorで設定することが出来なくなってしまいます!!** ![14.png](https://qiita-image-store.s3.amazonaws.com/0/168635/72bab601-e697-7d7e-2cbf-f75725e59323.png)
>Chatworkに通知できるか確認するため[開始]を押下します。 ![15.png](https://qiita-image-store.s3.amazonaws.com/0/168635/cd24dda7-a146-f241-9c68-66873c791937.png) [はい]を押下します。 ![16.png](https://qiita-image-store.s3.amazonaws.com/0/168635/8e89c471-8a66-18b9-3f94-8d51a730d8dc.png)
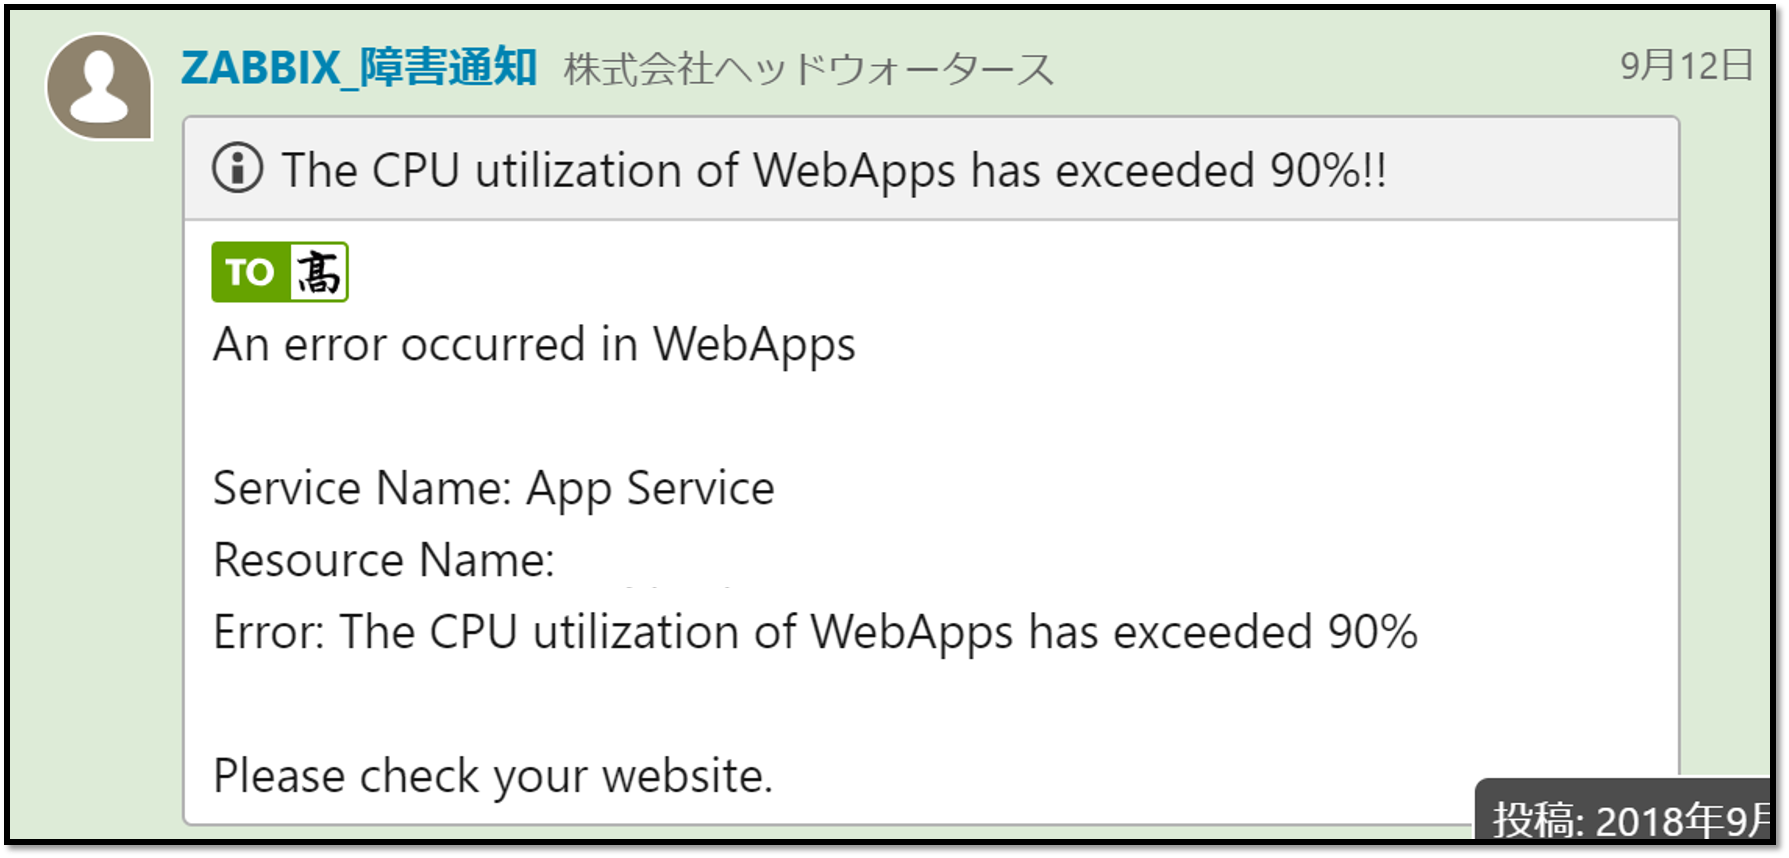
>これで以下のように、Runbookに設定したルームIDを持つチャットワークに通知されるはずです! ![17.png](https://qiita-image-store.s3.amazonaws.com/0/168635/ac772aa8-c420-6458-cbdb-7ebdbfce282e.png)
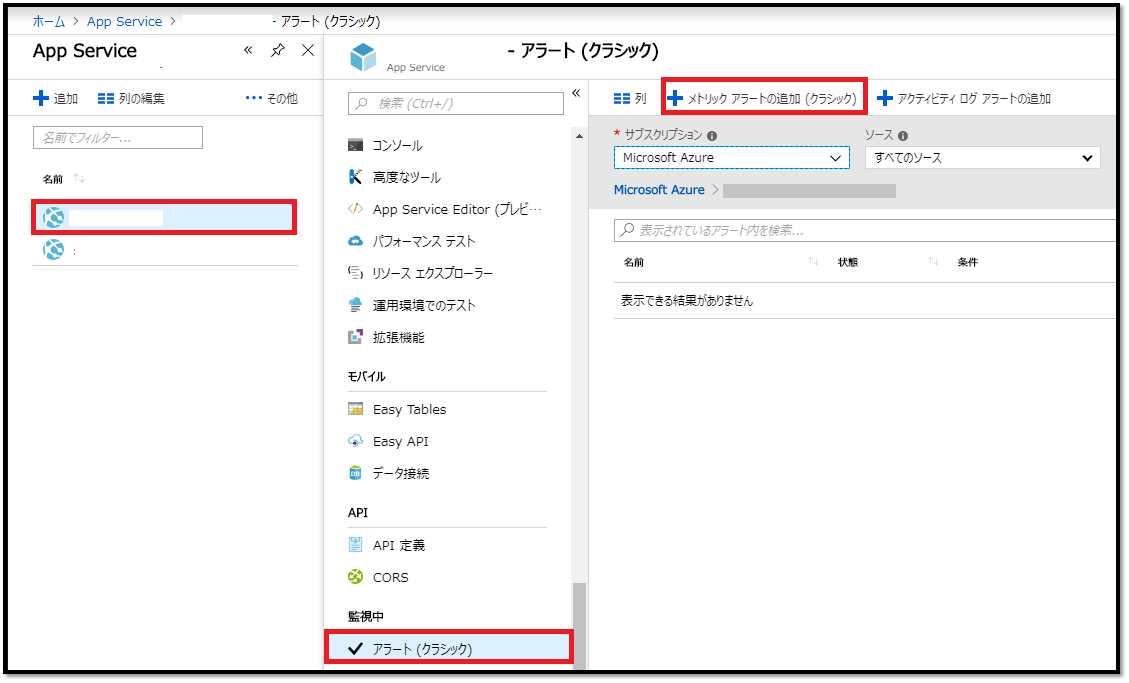
## 4.Azure Monitor設定 >AppServiceの画面から[メトリックアラートの追加(クラシック)]を行います。 ![20.png](https://qiita-image-store.s3.amazonaws.com/0/168635/e0024b5e-4368-4efb-aff5-caeabd845a08.png)
>[通知手段]の[Webhook]に手順3でメモしたURLを張り付けて[OK]を押します。 ![21.png](https://qiita-image-store.s3.amazonaws.com/0/168635/06a0265e-b39c-23ee-a2fc-5c7edf10e6e2.png)
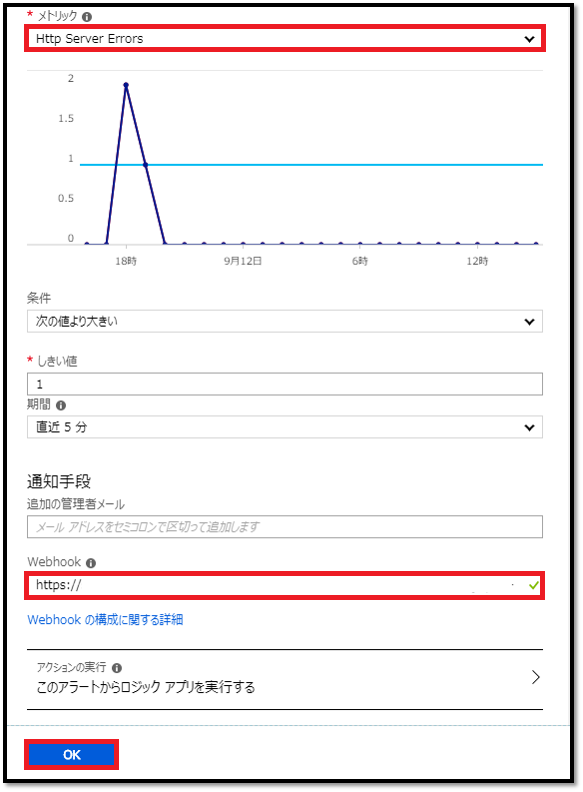
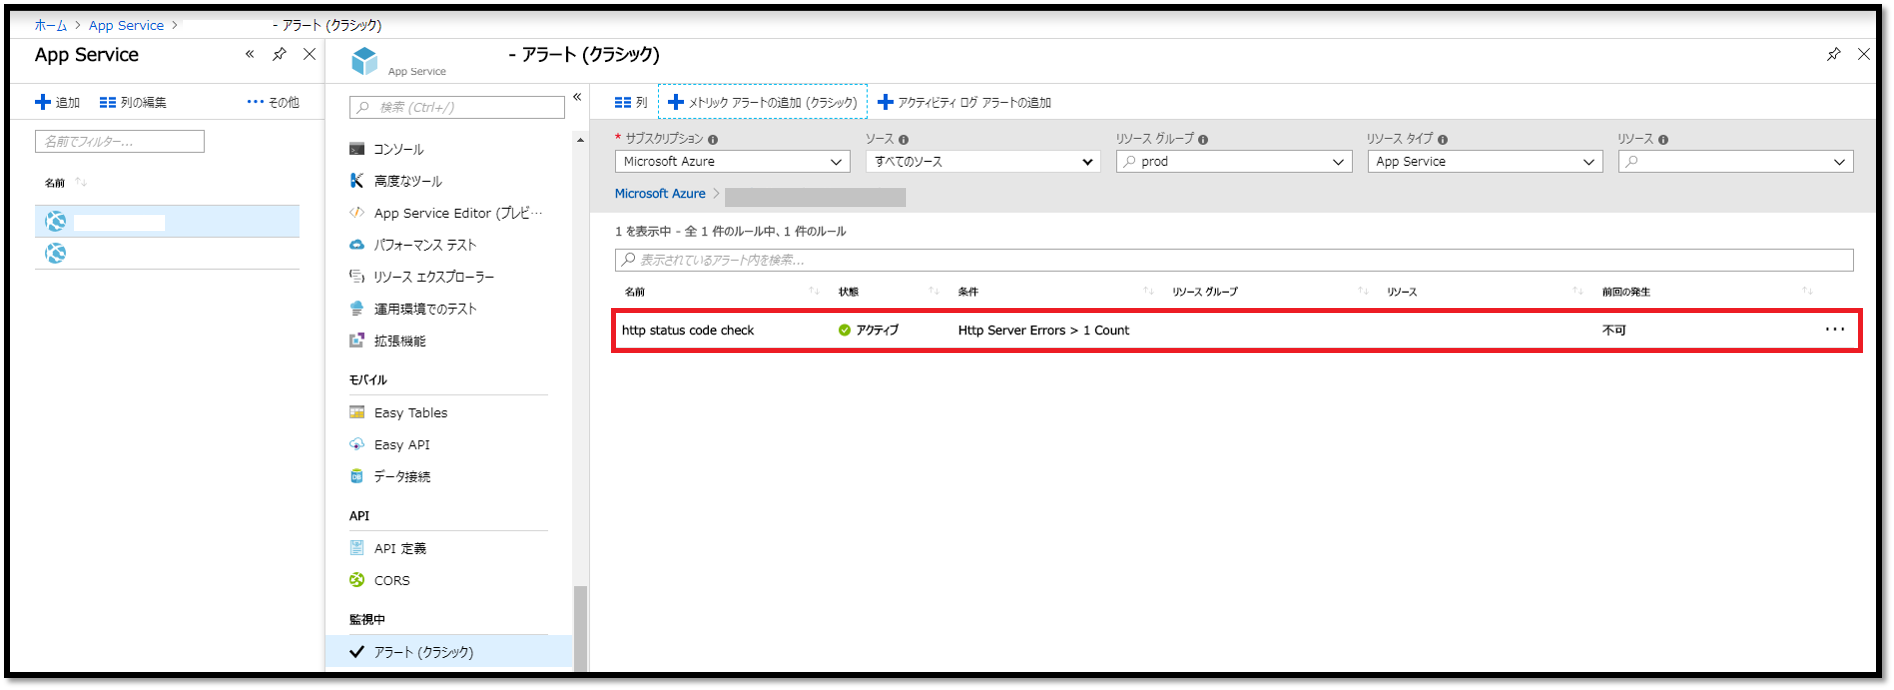
>こんな感じになればOKです! ![22.png](https://qiita-image-store.s3.amazonaws.com/0/168635/cb5e6c8d-2c1b-c083-dd80-9e84837e04d2.png)
7
4
0

Register as a new user and use Qiita more conveniently

  1. You get articles that match your needs
  2. You can efficiently read back useful information
  3. You can use dark theme
What you can do with signing up
7
4

Delete article

Deleted articles cannot be recovered.

Draft of this article would be also deleted.

Are you sure you want to delete this article?